History teacher at New Richmond Middle School. Tennis coach at SUA, Beechmont Racquet and Fitness, Lunken Playfield, and KCC. Striving to learn, create, and innovate one day at a time.
The last two years, I have thought too much. Maybe some of that came from being at two new schools in two years. New students, new content, new expectations. There’s a lot to figure out when you’re starting over, and apparently my response was to give myself even more to figure out.
I constantly felt like I needed to upgrade. Move the needle. Do something outside the box. Take a lesson that worked and find a way to make it better, bigger, or different.
I stressed myself out.
Somewhere along the way, “What do my students need to learn?” started sharing too much space with “What else could I do with this?” And I can spend a ridiculous amount of time answering that second question.
So this year, I’m back to basics.
Good, solid instruction. Good, solid EduProtocols that I know work. The EduProtocol Rack and Stacks that got me here in the first place. I’m paying more attention to why one activity follows another and giving students time to do something meaningful with each one.
I’m no longer trying to get through five, six, or seven protocols. There is no prize for fitting the most into 45 minutes. Although, knowing me, I probably would have tried to win it.
So far this year, I’ve introduced Fast & Curious, Thin Slides, Cyber Sandwich, Parafly, Frayer, Sketch & Tell-O, Thick Slides, and Hexagonal Thinking.
Do I need more? Probably not.
Will I introduce more? Yes. A few. I know myself.
But I want a reason for introducing them beyond having something new to try. There’s plenty of thinking students can do with the routines they already know. They can read something more challenging, make a stronger comparison, explain a connection, or go back and improve an answer. I don’t have to change the format every time I want to push their thinking.
That’s been my focus: teaching content through skills.
The content gives us something to think about. The protocols give students a familiar way to work with it. We’re practicing how to read, paraphrase, compare, explain, and support an idea while learning social studies. That’s plenty to work on.
I’m also letting go of the pressure to entertain. I’m done trying to smash EduProtocols together just because the combination might look cool. I still enjoy a creative lesson. I just don’t need every lesson to become a whole production.
And honestly? I’m more relaxed.
I’m grading about 90% of the work on the fly as students do it. I can see what they understand, ask a question, give feedback, and have them make an adjustment right there. That has felt manageable, and it keeps my attention on the work happening in front of me.
It’s been a good year so far. I’m enjoying teaching, and I’m finding that I can trust the routines I already know work.
I still think too much. But I’m getting better at looking at a solid lesson and letting it be enough.
This week in 103, we built on our work with Greek geography, city-states, and governments by taking a closer look at Athens and Sparta. Monday and Tuesday focused on how life differed between the two, with students moving from maps and partner readings to scenarios and writing about a day in the life of an Athenian, a Spartan, and themselves.
From there, exploring Athenian democracy felt like the natural next step. On Wednesday and Thursday, we worked through what democratic means, sketched the parts of Athens’s government, and began examining primary sources. Those activities gave students a foundation for considering the question that would guide our next few lessons: Was Ancient Athens truly democratic?
Monday: How Different Were Athens and Sparta?
After exploring Greek city-states and their governments, we turned our attention to Athens and Sparta. Both were Greek city-states, but daily life looked different depending on which one you called home.
Fast & Curious and Map & Tell
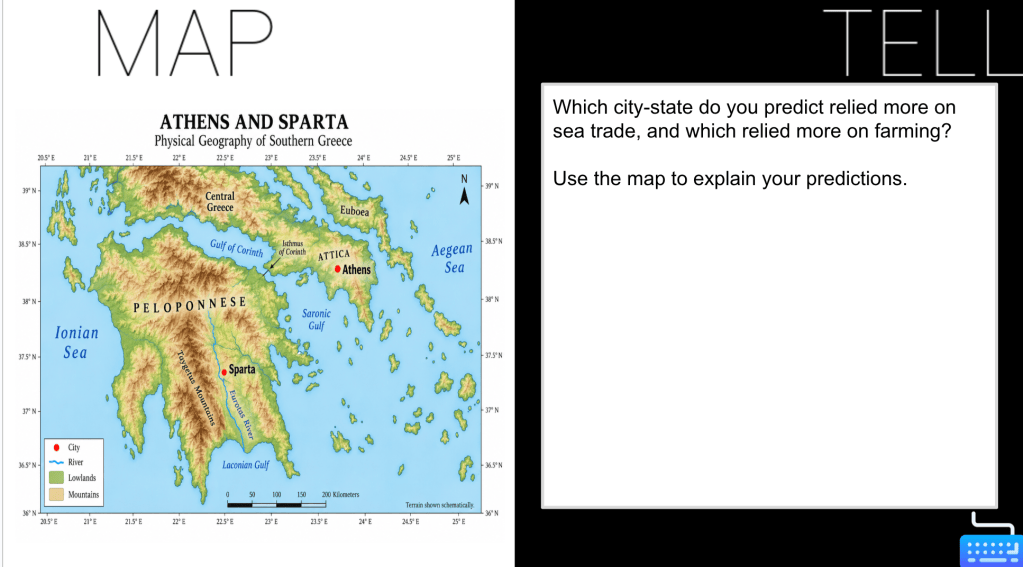
We started with Fast & Curious on Gimkit, followed by a Map & Tell to locate Athens and Sparta. Students used the map to predict which city-state relied more on sea trade and which relied more on farming. This brought us back to our earlier work with geography and how location could shape the way people lived.
CyberSandwich: Two Readings, One Comparison
Then we moved into CyberSandwich. I handed out two different readings, with one partner reading about Athens and the other reading about Sparta. Students read and took notes on their assigned city-state, looking at geography, government, education, and social life.
Partners then compared their notes. Each student brought different information to the conversation, so they needed to share what they had learned while gathering information about the other city-state. The categories helped organize that discussion and gave them specific points to compare.
Writing About Both City-States
From there, students wrote a summary using a compare-and-contrast text structure. Their notes and partner conversations gave them information about both places. Now they needed to organize those details into an explanation of how Athens and Sparta were alike and different.
I like giving the partner discussion a clear purpose. Students needed information from each other to complete the writing, and the comparison gave them a reason to look closely at both readings.
Tuesday: Putting the Details to Work
Monday gave students a foundation for comparing Athens and Sparta. On Tuesday, we returned to that information and asked students to apply it, first through scenarios and then through writing from different perspectives.
Fast & Curious and City-State Scenarios
We started with another round of Fast & Curious on Gimkit. Then, I used ChatGPT to create scenarios about life in each city-state. Students had to decide whether each scenario applied to Athens or Sparta and explain their reasoning.
The explanation mattered here. Students needed to connect details in the scenario to something they had learned about the city-state. That gave us another opportunity to revisit the differences in education, government, geography, and daily life.
3xPOV: A Day in the Life
We finished with a 3xPOV: a day in the life of an Athenian, a Spartan, and themselves. Students used details from their learning to describe life from each perspective.
Including themselves gave students a familiar point of comparison. They could consider their own schooling and daily routines alongside what they had learned about Athens and Sparta.
Across the two days, students kept working with the same information in different ways. They located the city-states, read about one, learned about the other from a partner, and wrote a comparison. The scenarios and 3xPOV then asked them to use those details to explain where a situation belonged and how someone’s daily life could change depending on where they lived.
Wednesday: Was Ancient Athens Truly Democratic?
After comparing Athens and Sparta, exploring Athenian democracy felt like the natural next step. I found a lesson from the Digital Inquiry Group (DIG) and drew some inspiration from Drew Skeeler. The question that would guide our next few days was: Was Ancient Athens truly democratic?
Before students could answer that, we needed to spend some time with the word democratic and learn more about how Athens’s government worked.
Fast & Curious and a Frayer
We started with Fast & Curious on Gimkit to build background knowledge about Athens and introduce vocabulary. Then, we “Frayered” the word democratic.
Students read a brief passage and used it to create a definition, identify examples and non-examples, and predict what a true democracy would look like. That last part gave us something to return to as we examined Athens. What would students expect to see in a democratic government, and how would Athens compare?
Building a Visual
Next, I showed a TED-Ed video about Athenian democracy. I wanted students to begin building a picture of the Assembly, the Council of 500, and the courts before we took a closer look at each one.
The Frayer gave us a starting point for thinking about democracy, and the video introduced the structures we would work with on Thursday.
Thursday: How Did Athenian Democracy Work?
On Thursday, we picked up with the parts of Athenian government students had seen in the video. Now they would read about each one and make decisions about how to represent it.
Sketch & Tell-O: What They Did and How They Were Chosen
We started with a Sketch & Tell-O focused on the Assembly. Students read about it, sketched what it did, and added a caption. Underneath that, they sketched how citizens became part of the Assembly and captioned that drawing, too. I put three minutes on the timer for the round.
Then we repeated the process with the Council of 500 and the courts. Each round asked students to consider the same two things: what that part of government did and how citizens became involved.
I like separating those questions because knowing a group’s job only tells us part of how a government works. Looking at how people become part of that group brings us back to who has access to power.
Two Documents, Two Views of Democracy
We finished class by reading two documents: one from Pericles and one from Aristotle’s Athenian Constitution. Students highlighted details that stood out to them and used the documents to create a Thick Slide.
The slide asked for two facts from each document related to democracy, a quote that stood out, and a comparison of how the two documents portrayed Athenian democracy. Students had to choose details from both sources and consider how those details fit together.
Our question carried through both days. We started by considering what democratic means, looked at how Athens’s government operated, and then began examining documents. Each step gave students more information to work with as they considered whether Ancient Athens was truly democratic.
This week in 103, we built on our work with Greek geography to explore city-states and the governments that shaped them. Students moved from reading and discussing to whiteboards, writing, and gummy bear governments. MAP testing made the schedule a little unusual, but we kept connecting our learning around who held power and what it meant to be part of a Greek city-state.
Tuesday: What Makes a City-State More Than Just a City?
Tuesday picked up where we left off with Greek geography. Mountains and seas separated communities and helped lead to the growth of independent city-states. Now we needed to build on that with a question: What makes a city-state more than just a city?
Fast & Curious and a Frayer
We started with Fast & Curious on Gimkit to revisit previous learning, followed by a Frayer on citizen. This gave us a chance to look at both rights and responsibilities. Being a citizen meant belonging to a community, having a role in it, and being expected to contribute. We also looked at who had those political rights in Ancient Greece and who was left out.
CyberSandwich: Read and Take Notes
Then we moved into CyberSandwich. Students had 10 minutes to read and take notes, choosing five important facts that could help them answer our question. The reading went beyond the buildings and places within a polis to explore its government, laws, citizen-soldiers, and shared identity.
To the Boards: Choose the Top Three
For the partner discussion, students found whiteboard space, compared their notes, and ranked their top three facts before writing them on the board. I like giving that conversation a specific job. Partners had to decide which facts mattered most for answering the question and agree on what deserved a spot on their board.
Writing and a Battle Royale
From there, students used Scriblit to write their responses, and we ran a Battle Royale with their writing. The same question carried us through the lesson, from reading to partner discussion to writing. Each step gave students another opportunity to explain how a city-state functioned as an independent community and what held that community together.
Wednesday: Who Holds the Power?
Tuesday’s work on city-states gave us a place to start on Wednesday. Each polis had its own government, but those governments did not all operate the same way. We began with Fast & Curious on the four types we would be working with: democracy, oligarchy, tyranny, and monarchy.
Iron Chef on the Whiteboards
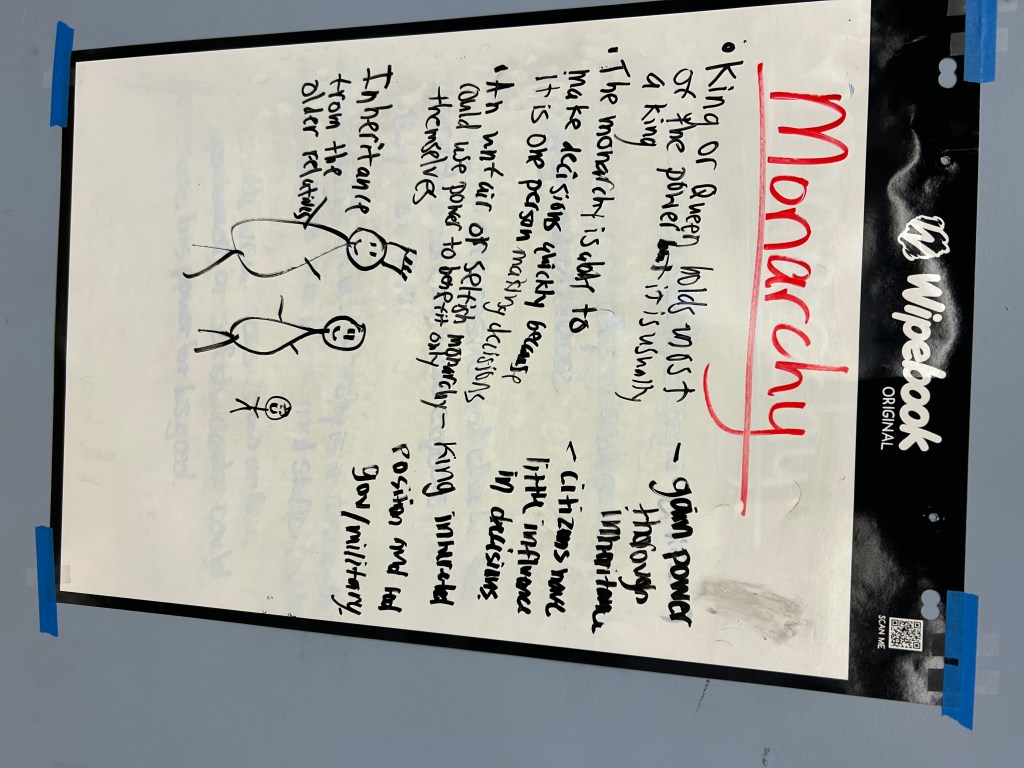
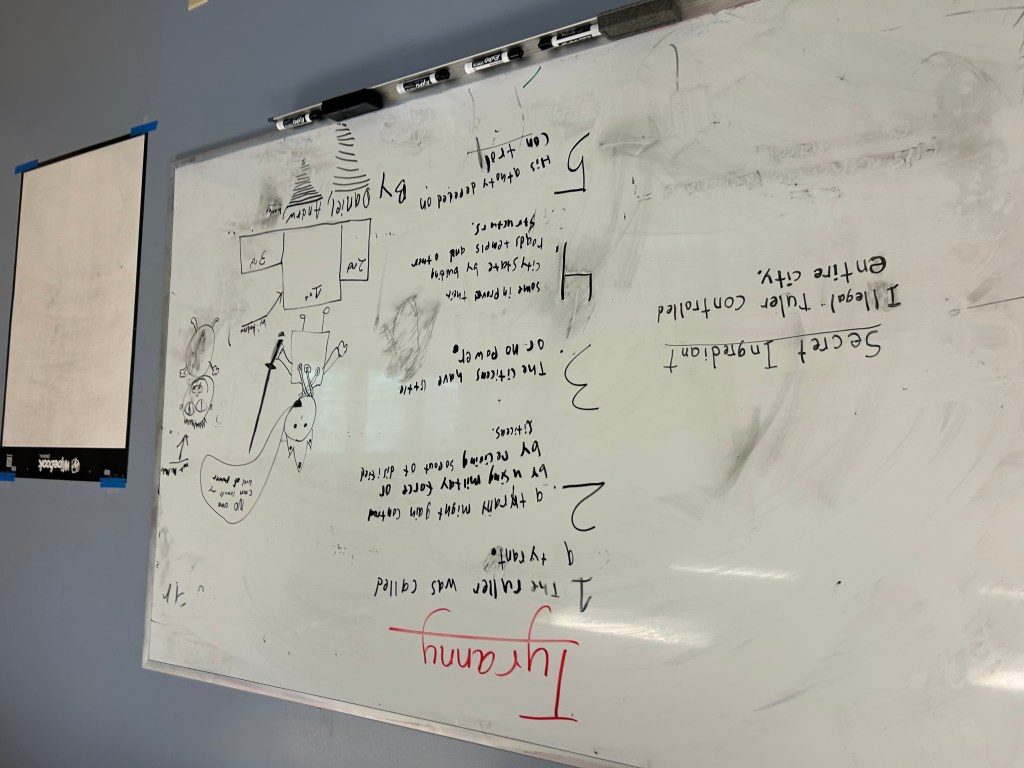
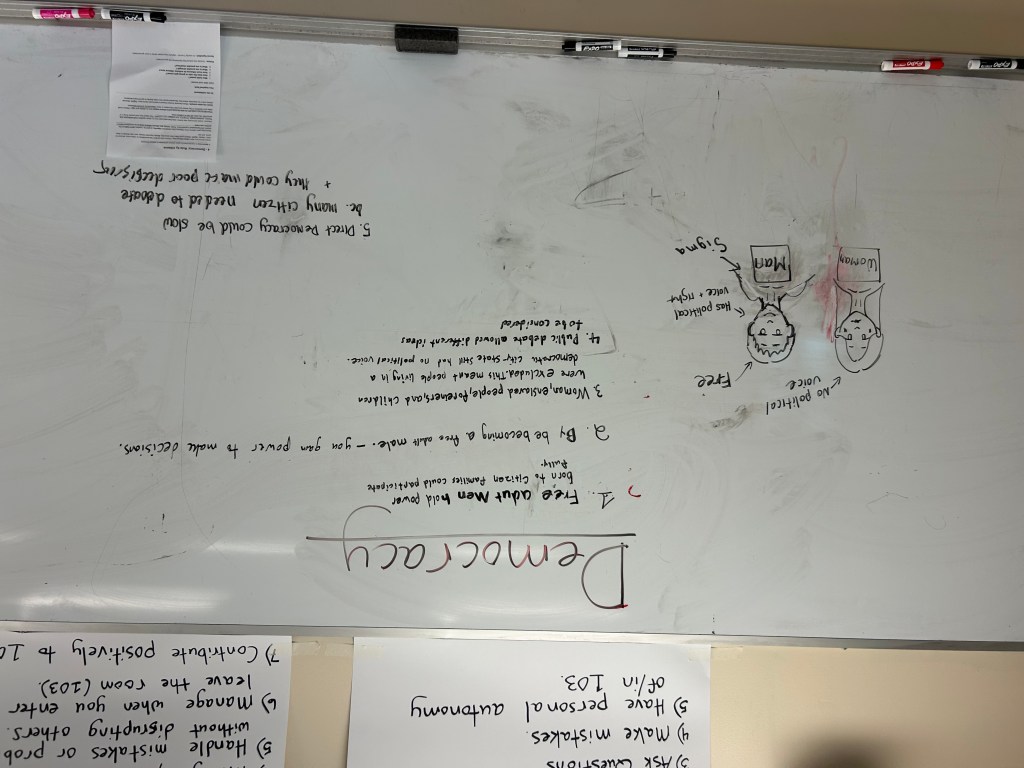
I handed out one of the four government readings to students, and they partnered up to create an Iron Chef whiteboard. Each pair had to explain who held power, how they gained it, how much influence ordinary citizens had, and one possible strength and weakness of that government. They also included a picture to represent it.
The secret ingredient was to explain how power worked in their government in exactly five words. That little constraint gave partners another decision to make. They had to choose words that captured the idea while staying within the limit.
Read the Room
Once the boards were ready, students received a Frayer divided into the four government types. They walked around the room, read each other’s boards, and recorded three important facts about each one. Partners had focused on one government for their Iron Chef, and the walk gave them a chance to learn about the other three.
The same ideas carried across all four: who gets to make decisions, how they get that power, and how much say everyone else has. Those questions would follow us into the next activity.
Thursday and Friday: Gummy Bear Governments
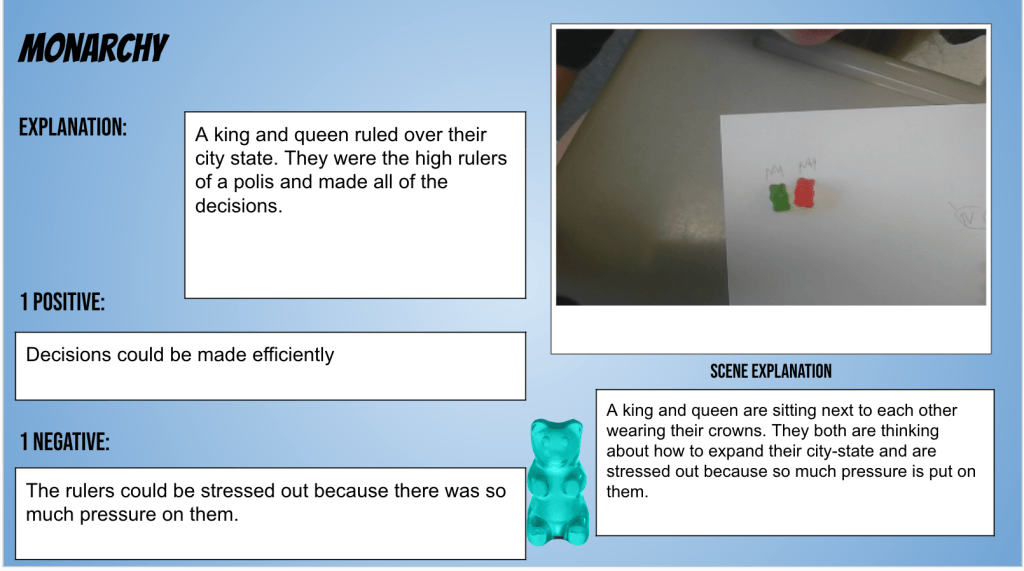
MAP testing made Thursday and Friday’s schedule a little weird, so we spread our next activity across both days. Students had read about the governments, created their boards, and gathered notes. Now I handed out gummy bears and asked them to show how each government worked.
Making Power Visible
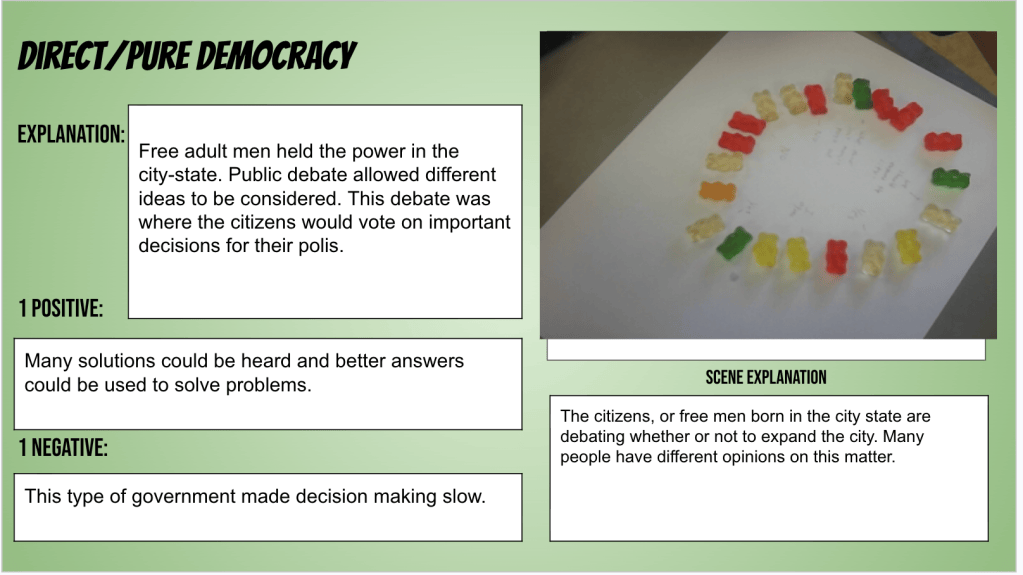
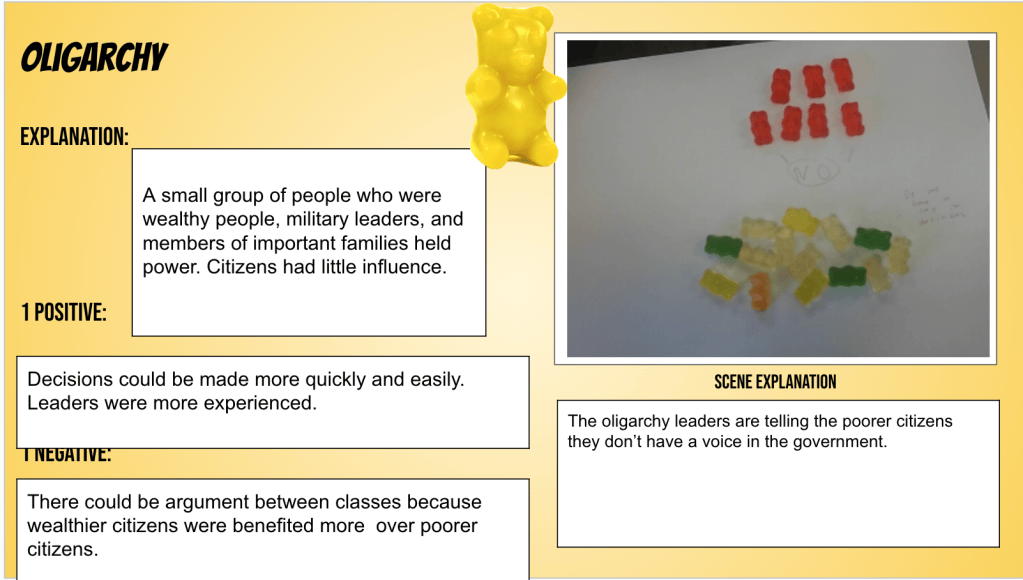
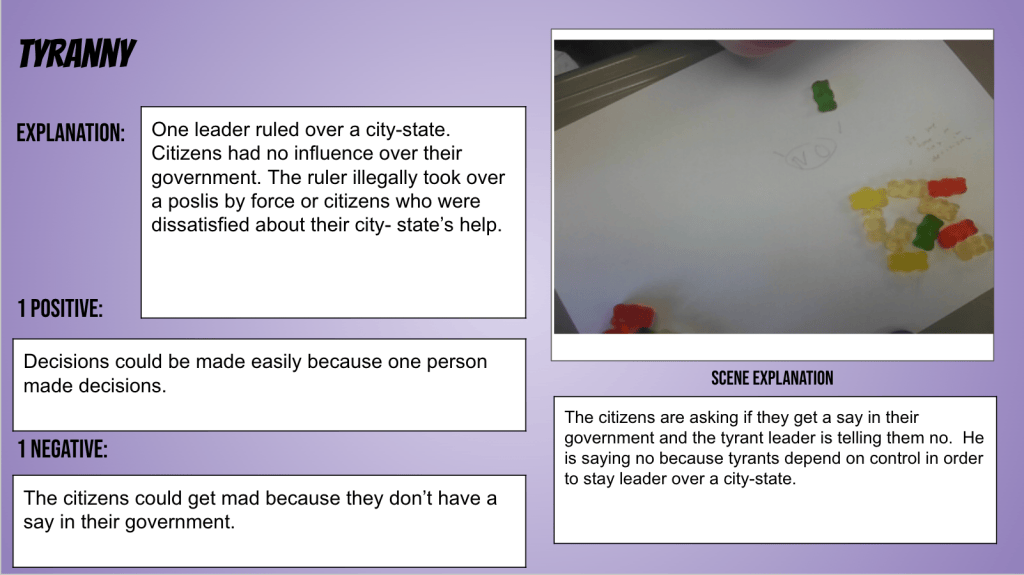
Students arranged their gummy bears into scenes representing democracy, oligarchy, tyranny, and monarchy. They could use construction paper and props to help show who held power and how the other bears fit into the system.
This is where the differences mattered. Monarchy and tyranny both involve one ruler, so showing one bear in charge only tells part of the story. The scene and explanation needed to communicate how that ruler gained power. Democracy and oligarchy also needed to show a clear difference in who had a voice.
Explain the Scene
For each government, students were asked to include a photo, explain how the government worked, and identify one positive and one negative. They also explained what was happening in their gummy bear scene so the arrangement connected to the content.
I like this progression because students keep working with the same information in different ways. They read it, choose what matters, learn from each other’s boards, and then make decisions about how to represent it. The gummy bears give them something to build with, but the explanation is where they have to connect that construction to their understanding of government.
I like a protocol I can run again without spending half the class explaining the directions. CyberSandwich is one of those. Students read and take notes, compare with a partner, and then write. Simple structure. Plenty of room for thinking. But I wanted to change up the middle.
How I Run CyberSandwich
Here’s how I typically run it. Students get about 10 minutes to read and take notes. I keep the reading to about a page or a page and a half. Enough to give them something to work with, but manageable for the time they have.
The notes can look different depending on the reading and the students. Sometimes I ask for five important facts that will help them answer our question. Sometimes I scaffold the notes with questions. Sometimes a graphic organizer makes sense because it matches the structure of the text. Make the note-taking fit your students and your class. They need something useful to bring to the conversation and eventually use in their writing.
The second part is comparing notes with a partner. What did you write down? What did I catch that you missed? What do we have in common? This is such an important part of the process because students get to talk through what they read before responding on their own.
Then they spend about 10 minutes writing a response to the prompt or question. Mine might write in Scriblit, on paper, or in a Google Doc or Slide. Again, whatever works. The platform can change. They still need to answer the question and support their thinking.
Changing the Middle
Here’s where I switched things up. I’ve always valued the partner discussion, but having students rewrite facts they had just written down felt a little repetitive. I wanted to give them a reason to talk through their choices. So I borrowed a piece from Building Thinking Classrooms.
Students partner up, stand up, and head to a whiteboard with their notes. Their job is to discuss what they collected and create a Top 3 or Top 5 list of facts that best help answer our question. That last part matters. A fact might be interesting, but does it help answer what we’re asking?
Now they have a decision to make together. If both students bring five facts, everything might not make the board. They have to compare, explain their choices, and decide what belongs. Which facts overlap? Which ones give them the strongest evidence? Is there something their partner found that they should include? It gives the discussion a purpose and something to produce.
I also like that it gets students up and moving during the lesson. They’ve spent time reading and taking notes independently. Now they’re standing beside a partner, talking through the reading, and making their thinking visible.
A Room Full of Evidence
And when it’s time to write, the facts stay up. Students are surrounded by everyone’s Top 3 or Top 5. They can look around the room and pull from what other pairs thought was important. Maybe another group noticed something they missed. Maybe seeing a fact on the board reminds them of a detail they can use. They still write their own response, but now they have their notes, their partner conversation, and a room full of evidence to help them.
It’s a small change, and that’s part of why I like it. CyberSandwich still follows the same sequence: read and take notes, compare and discuss, then write. I’ve just given that middle piece a little more movement and a clearer job. Get up. Talk it through. Decide what matters. Then use it.
Most weeks, this space leans heavily into what is happening in 8th-grade American History. This week, I’m heading down a grade level to share what has been happening in 7th-grade World History.
In Ohio, 7th grade covers a lot of ground—from Ancient Greece to the First Global Age. Before jumping into all of that history, though, I wanted students to spend some time thinking about the kind of classroom we want to build together. Instead of handing them a list of expectations, we built our own.
Monday: From Sketches to Statements
We started with a Sketch and Tell-O. I asked students to visualize what they felt was most important in a classroom environment. They had four minutes to sketch their ideas, followed by a quick explanation. Then, each student narrowed everything they had drawn down to a single word.
They shared their words with a partner and began looking for common threads. What ideas kept showing up? What did people seem to value? What kind of classroom were they describing?
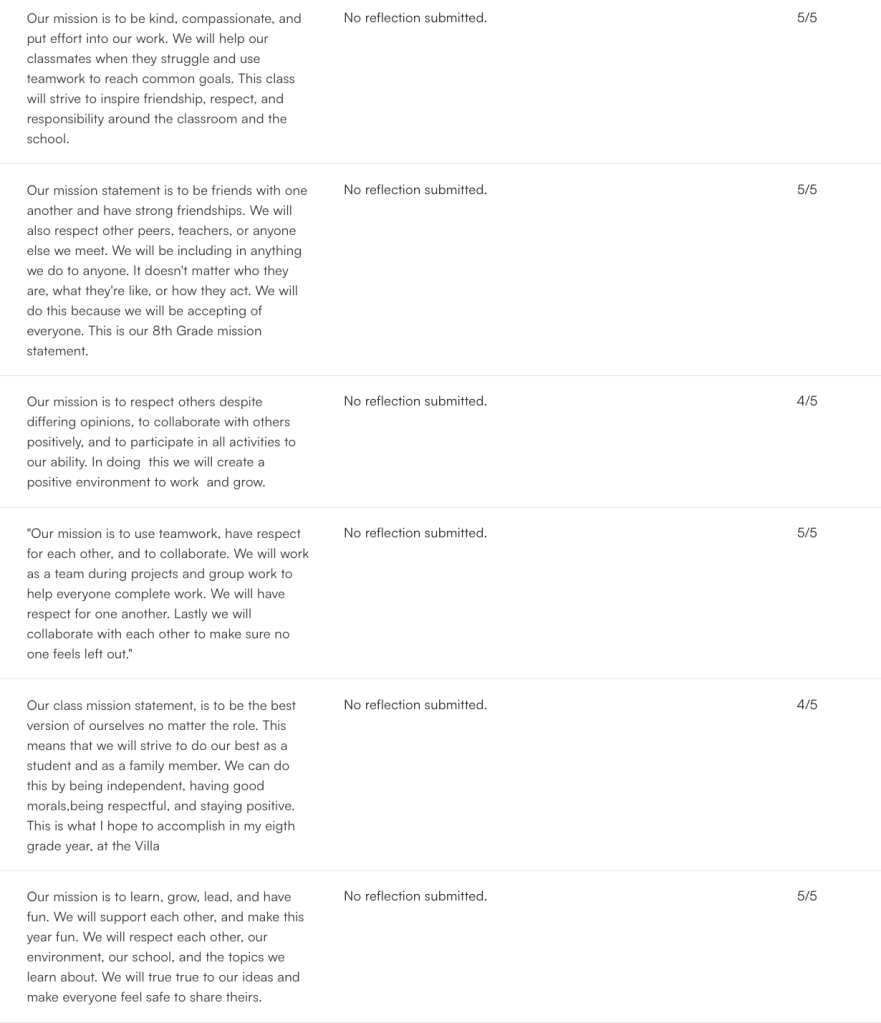
Next came an index-card version of a Thin Slide. On one side, students wrote three or four words they believed were essential to a successful classroom. On the back, they used those words to draft a personal classroom mission statement. I modeled one first, but many students had already written personal mission statements before, so the transition to a classroom mission came naturally.
Then came my favorite part.
Students entered their mission statements into Scriblit, and we held a battle royale. They read the statements, discussed them, and narrowed the field round by round until one remained at the top. I could have written a classroom mission statement myself and put it on the wall, but that would have missed the point. The discussion, debate, and collective ownership were what mattered.
We closed with a Frayer Model of the winning mission statement. Students considered what the mission should look like in four different relationships:
Student to student
Teacher to student
Student to teacher
Student to classroom
By the end of class, the words were theirs. The mission was theirs. Most importantly, the expectations were theirs.
Tuesday and Wednesday: Building Better Paraphrasers
Tuesday and Wednesday were connected by one goal. I wanted students to practice taking information, putting it into their own words, and recognizing what makes a strong summary.
Cyber Sandwich: Ancient Greek Olympians
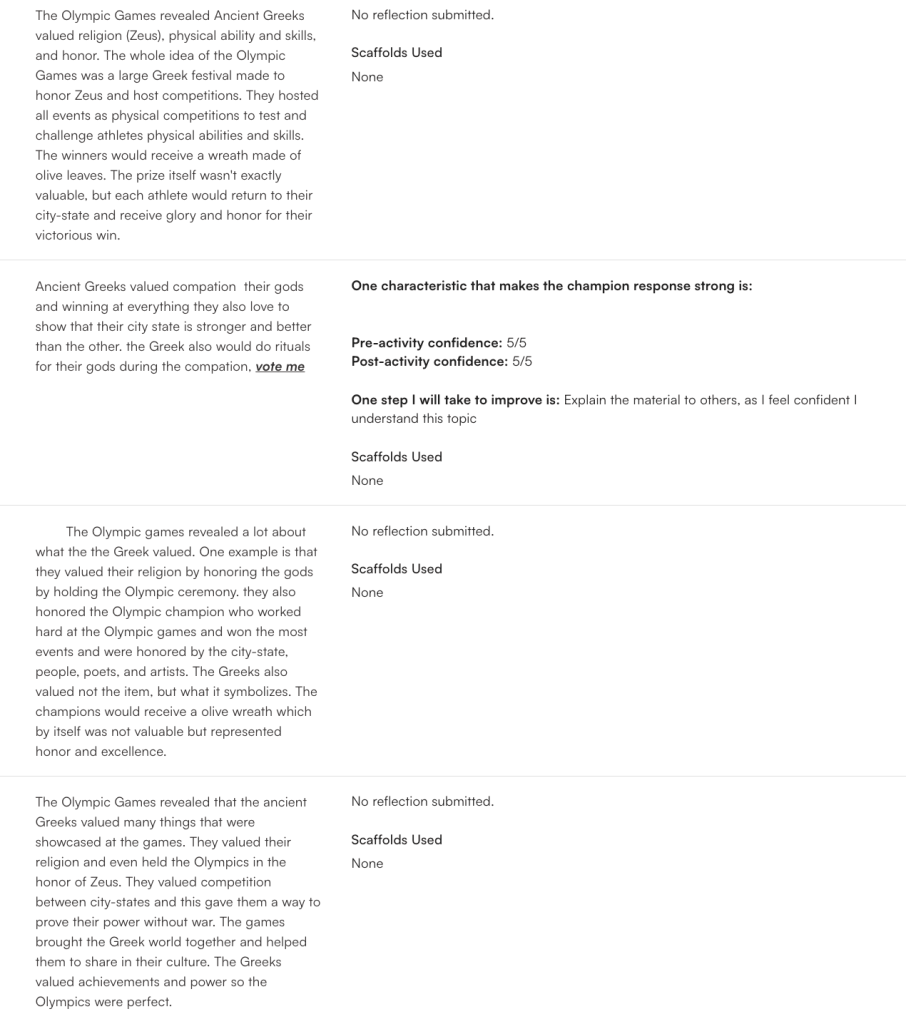
On Tuesday, I introduced students to the process of a Cyber Sandwich. We used a half-page article about athletes in the ancient Greek Olympics. It explained how hard the athletes trained, how winners were celebrated, and how their prize was a wreath made from leaves.
Since this was our first Cyber Sandwich, the focus was more on learning the process than mastering the content. Students had 10 minutes to read and take notes. Then, they had five minutes to compare and discuss their notes with a partner. Finally, they used their notes and conversation to write a summary.
Battle Royale: The Strongest Summary
Students entered their summaries into Scriblit, and we finished with a battle royale. They read the different summaries and voted round by round until one was left. This gave students a chance to see what other people wrote and think about what made one summary stronger than another.
Parafly: Weird Facts Edition
On Wednesday, we focused entirely on practicing Parafly, but I added a small twist. I used ChatGPT to generate weird facts that were one, two, or three sentences long. I copied the facts into Socrative, and students had one or two minutes to paraphrase each one.
ChatGPT Feedback
After each round, I copied all the anonymous student responses into ChatGPT along with the original fact. I asked ChatGPT to choose the strongest paraphrase and explain why it was effective. Students immediately saw a strong example and heard feedback they could use during the next round. Then, we tried it again with a new fact.
Hi-Chews and Cheesy Bracelets
Of course, we needed prizes. Each winner could choose a Hi-Chew or a cheesy bracelet. The prizes were small and a little ridiculous, but the practice was real. Students paraphrased, looked at a strong example, received immediate feedback, and tried again. Each round gave them another chance to improve.
Thursday: How Did Geography Shape Ancient Greece?
On Thursday, we officially started our Ancient Greece unit. Our compelling question for the unit is: How does Ancient Greece still impact our world today? Before students can answer that question, they need to understand the land where Greek civilization developed. Our supporting question for the day was: How did geography shape life in Ancient Greece?
Fast and Curious: Greek Geography
We started with a Fast and Curious using Gimkit. Students had four to five minutes to answer 30 questions correctly. This gave students an early introduction to the vocabulary and ideas they would encounter throughout the lesson. They did not need to know everything yet. This was simply their first exposure.
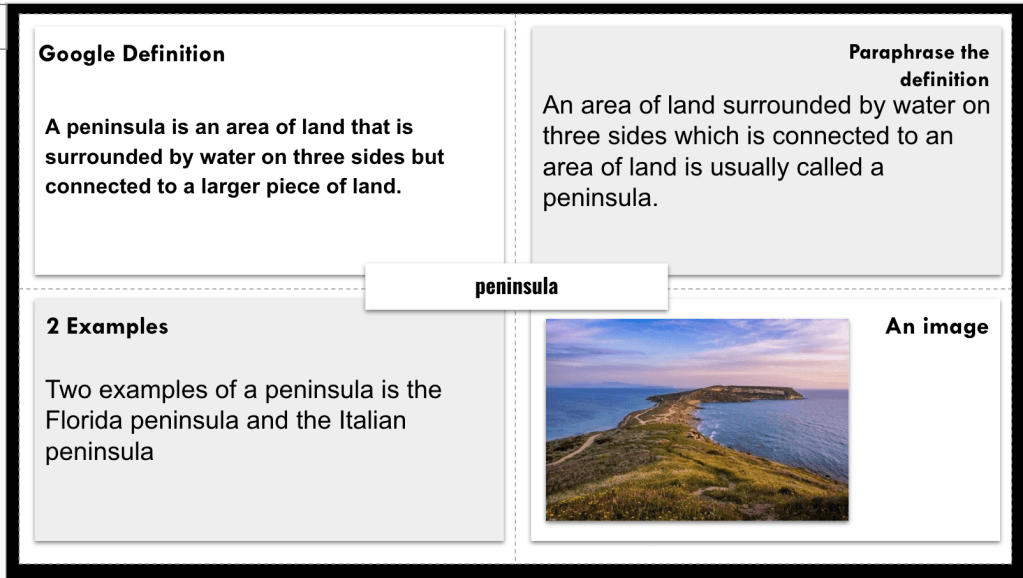
Frayer: Peninsula and City-State
Next, students completed Frayer Models for peninsula and city-state. For peninsula, students paraphrased the definition, identified two examples, and created an image. For city-state, they created their own definition, paraphrased the provided definition, identified two examples, and added an image. This took about 10 minutes and gave students the vocabulary they needed to understand the reading that came next.
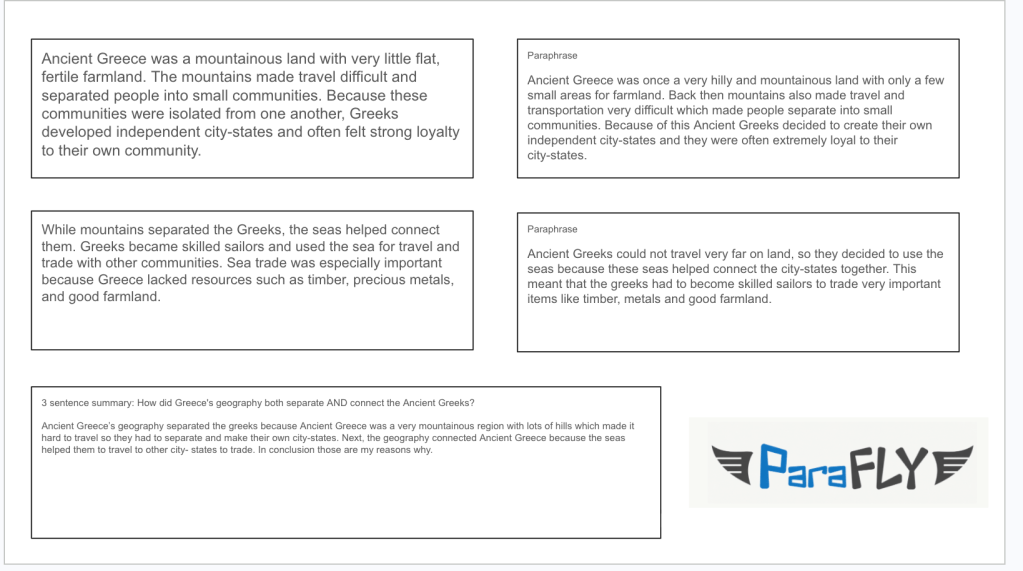
Parafly: Mountains and Seas
Students then completed a six-minute Parafly about the geography of Ancient Greece. The first paragraph explained how mountains made travel difficult, separated communities, and contributed to the development of independent city-states.
The second paragraph explained how the seas connected the Greeks through travel and trade. Sea trade was especially important because Greece lacked resources such as timber, precious metals, and good farmland.
Students paraphrased each paragraph and then wrote a three-sentence summary answering this question: How did Greece’s geography both separate and connect the ancient Greeks?
Map and Tell: Finding the Evidence
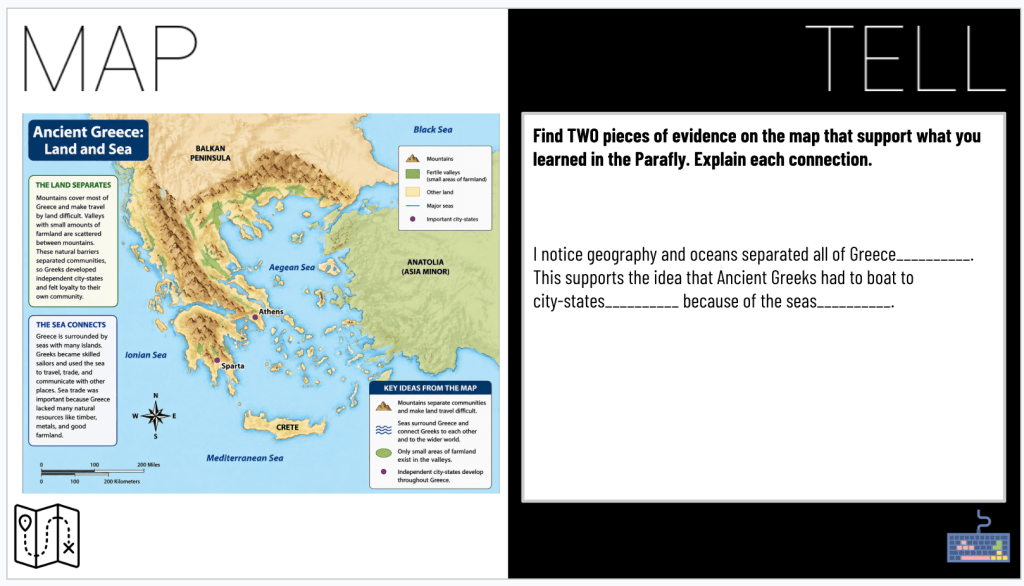
We finished with a Map and Tell. Students studied a map of Ancient Greece and found two pieces of evidence that supported what they had learned during the Parafly.
For each piece of evidence, they completed this statement:
I notice __________. This supports the idea that __________ because __________.
This final step pushed students beyond simply identifying mountains, islands, or bodies of water on a map. They had to connect what they could see on the map to what they had just read and paraphrased.
The lesson moved from vocabulary, to reading, to paraphrasing, and finally to applying the information to a map. Each activity prepared students for the next one while keeping the focus on a single question: How did geography shape life in Ancient Greece?
Friday: Seeing Geography Through Different Perspectives
Friday was about taking what students learned on Thursday and doing something with it. We stayed with the same supporting question: How did geography shape life in Ancient Greece?
Fast and Curious: One More Round
We started with another round of the Greek geography Gimkit. Students had already seen the vocabulary and basic ideas on Thursday, so this gave them another chance to build their background knowledge and improve their scores.
Reading: Geography Shapes Greek Life
Next, students read Geography Shapes Greek Life. The reading added more detail about how the mountains, seas, islands, and limited farmland affected where Greeks lived, how they traveled, and how they made a living.
Sketch and Tell-O: Four Effects of Geography
After reading, students completed a Sketch and Tell-O on paper. For the sketch, they showed four ways geography shaped life in Ancient Greece. For the tell, they wrote at least four sentences explaining how those parts of Greece’s geography affected the ancient Greeks. This gave students a chance to process the same information in two ways. First, they had to visualize it. Then, they had to explain it in writing.
3xPOV: Life in Ancient Greece
We finished with a 3xPOV. Students used what they learned from the reading to imagine how three different people might have experienced life in Ancient Greece. First, they wrote from the perspective of a Greek farmer. They considered what the farmer could grow, the challenges the land created, and the choices a farming family might have to make. Next, they became a Greek merchant. They thought about where the merchant would travel, how they would get there, and which resources they might need to trade for. Finally, they wrote from the perspective of someone who was extremely loyal to their city-state. They explained how Greece’s geography might have shaped that person’s community, daily life, and connection to other Greeks.
The 3xPOV moved students beyond listing geographic features. They had to think about how the same mountains, seas, and limited farmland could affect people differently depending on how they lived. Students turned in both their Sketch and Tell-O and their 3xPOV at the end of class. It was a solid way to close our first look at Ancient Greece and move from simply learning the geography to understanding how people experienced it.
A new year begins. This week was a lot of reflecting on some new practices I wanted to implement in my classroom. One of those practices was a new approach to classroom rules and procedures. Oftentimes, teachers talk about preparing students for the “real world.” We say things like we are teaching students a life lesson by not giving them a pencil or helping them when they forget something. I don’t know. That rarely works. Sorry.
Instead, I started thinking about my own life and what the “real world” actually looks like. I have a lot of different roles in my life. I’m a dad, husband, teacher, coach, and a bunch of other things. I have routines that help me get through my day. I have rights and I have responsibilities. The more I thought about these things, the more I realized they naturally belong in a classroom too. The result was four things: roles, routines, rights, and responsibilities.
I literally wrote each word on a piece of paper and taped them up in my classroom. Under roles, students are learners, leaders, teachers, writers, thinkers, listeners, mistake makers, and more. We also have our learning routines. For us, those routines are EduProtocols. The content will constantly change throughout the year, but students will become familiar with how we learn.
Students also have rights in my classroom. They have the right to learn, the right to feel safe, the right to make mistakes, and the right to ask questions. With those rights come responsibilities. Students have a responsibility to manage themselves and their space, manage their Chromebook, show up on time, listen while others are speaking, and contribute to the learning of others. None of these things are groundbreaking, but I like how they naturally connect back to how I structure my classroom with EduProtocols and learning.
Wednesday
The Marker Game
For the first day of school, I stole a Dominic Helmstetter classic. I wanted to begin class with a Fast and Curious, but we didn’t have working Chromebooks yet. Instead, Fast and Curious became the Marker Game. The Marker Game is pretty simple. Students partner up, face their desks toward each other, and stand a dry erase marker between them. I read a statement about myself or the classroom that is either true or false. If students think the statement is true, they try to grab the marker before their partner. If they think it’s false, they don’t touch it.
It’s fun, active, loud, and there were a lot of laughs. It was also an easy way for students to learn some things about me and the classroom.
The 90s Thin Slide
Next, we moved into a Thin Slide, except we didn’t use a slide. Students used an index card. I used AI to create some pictures of myself in the 90s doing things that either don’t really exist anymore or might seem completely strange to kids today. I showed students the pictures and gave them three minutes to synthesize what they thought life was like in the 90s. Just like a Thin Slide, they could use one picture and one word.
I got words like “weird,” “slow,” “colorful,” and a bunch of others.
Sketch and Tell-O: Your Generation
From there, we went into a Sketch and Tell-O. I gave students a scenario: The year is 2056 and a historian is studying your generation. What four things would they think were weird? Students had to draw and label four things that they thought would stand out to someone studying their lives 30 years from now.
When they finished drawing, they discussed their ideas with a partner for one minute and then spent three minutes writing about their choices.
Overall, it was a solid first day. The students got to know a little about me, I got to see a little of their personalities, and we were able to get some early reps with learning routines we will use throughout the year. We didn’t spend the entire class going through a syllabus or talking about rules. Instead, the students were doing some of the things I want them doing all year. They looked at information, made some decisions, created something, talked to each other, and wrote.
Thursday
What Should Learning Look and Sound Like?
On Thursday, we began class with a Frayer. Instead of using the Frayer for content, I wanted students to think about what learning should actually look and sound like in our classroom. I divided the Frayer into four different situations: independent work, partner work, group work, and whole class work. Students had to describe what each should look like and sound like.
This was a good way to get students to see that there is more than just content to learn in class. There is also more than just me, the teacher, that makes a classroom work. We all have to work together to learn.
This also gave me a chance to connect back to the roles, routines, rights, and responsibilities I introduced earlier. Students have a role in their own learning, but they also have a role in helping others learn. There are going to be times this year when we work independently, with a partner, in a group, or as an entire class. Each of those situations looks and sounds a little different. If we understand our roles and responsibilities, I shouldn’t have to constantly tell students what they should be doing.
Hexagonal Thinking
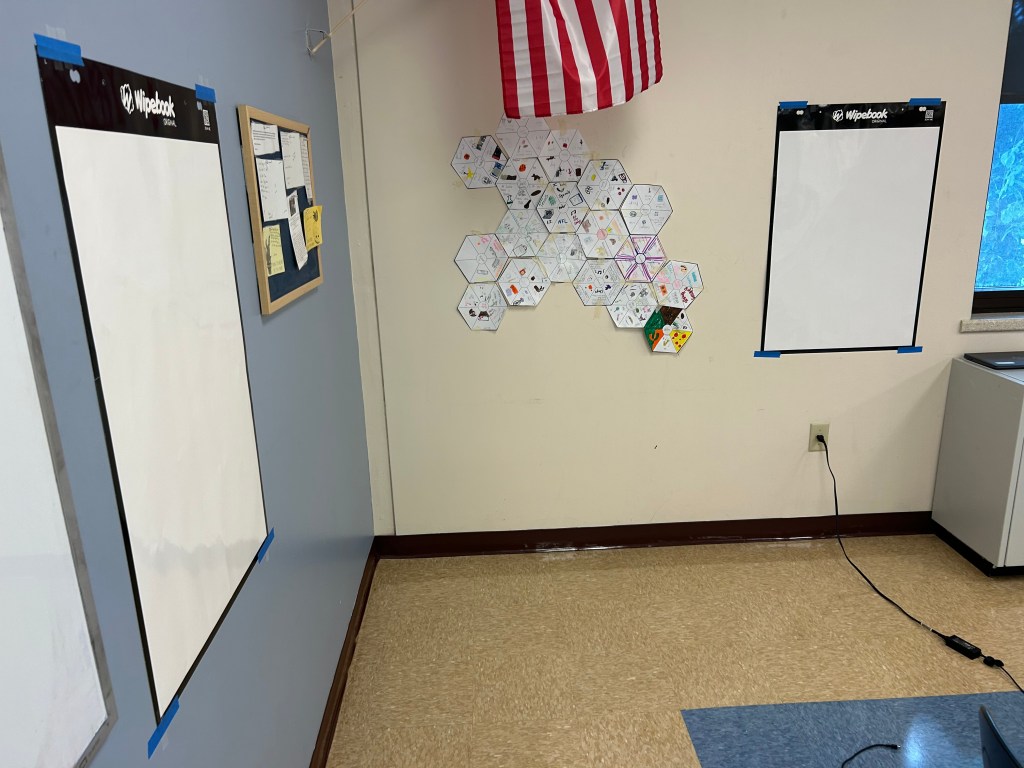
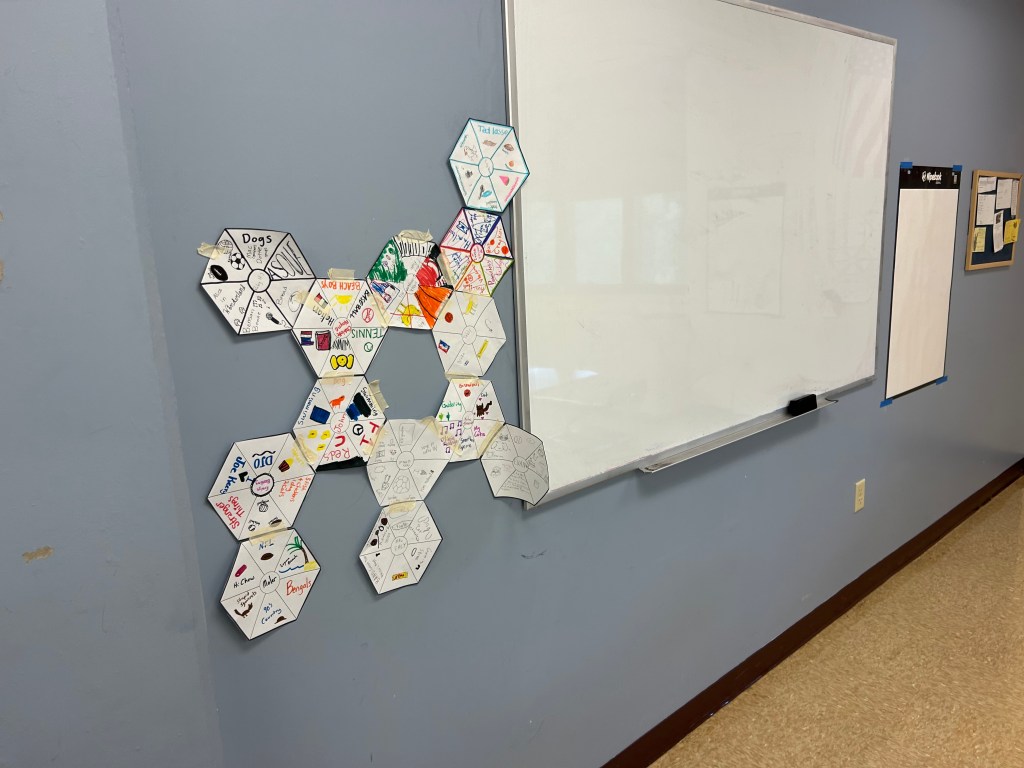
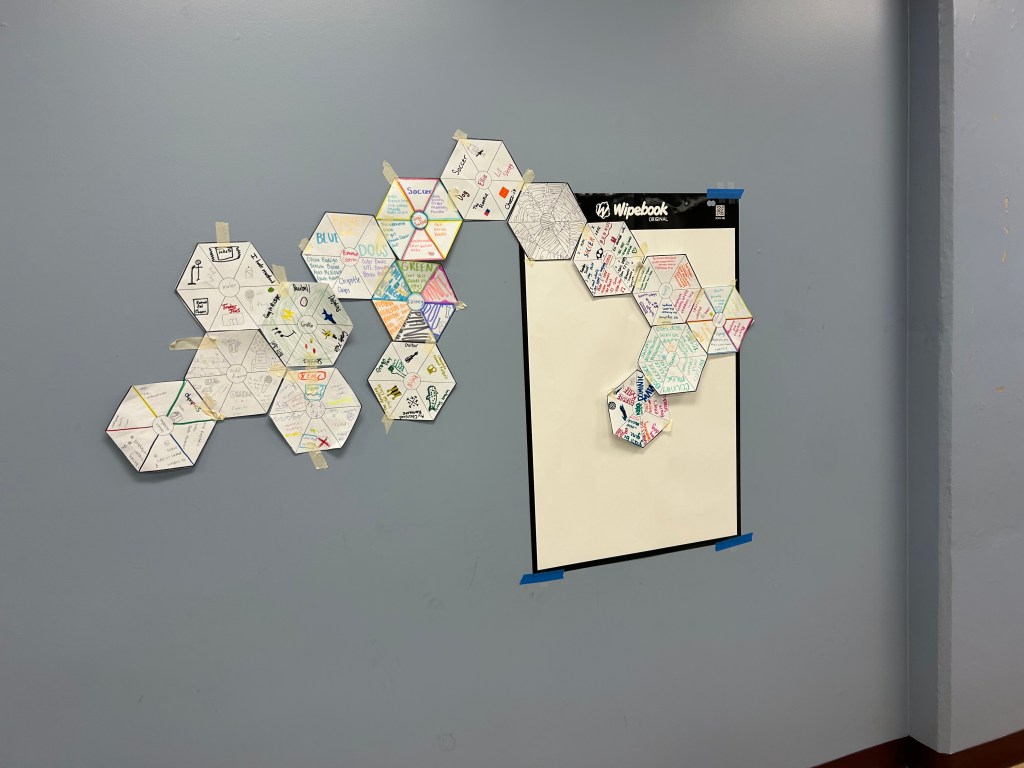
Next, we transitioned into Hexagonal Thinking. I gave every student a hexagon divided into six sections and had them fill it with information about themselves. Once everyone finished their individual hexagon, the challenge became figuring out how everyone in the class connected.
Students had to find connections between their hexagons and tape them together within a confined space. The confined space added a little design thinking element because they couldn’t just spread the hexagons all over the floor. They had to think about where things went, make connections, move things around, and most importantly, talk to each other.
For this part, I sat back and watched. The students ran it. They had until the end of class to figure out how to connect everyone and fit all of the hexagons into the space. There were discussions, disagreements, moving hexagons around, finding new connections, and students trying to figure out where everyone belonged. I didn’t need to jump in and solve it for them.
They did awesome.
What I liked most about the lesson was that it went right back to what we had discussed earlier in the Frayer. The classroom doesn’t work because the teacher tells everyone what to do. Students have roles and responsibilities too. They had to listen to each other, communicate, solve a problem, and help the class accomplish something together. We weren’t really learning social studies content yet, but we were learning how our classroom is going to work.
Friday
Friday Check-In
On Friday, I started class by sharing a Google Form with a Friday check-in. The form had a combination of questions about engagement, including things like what types of lessons have engaged you in the past, along with some other questions that will hopefully help me become a better teacher for these students. I have never taught most of these kids before, so instead of assuming I know what works for them, I figured I should probably ask.
I also added one question that confused a lot of the students:
“Write about a snowman.”
That’s it. Write about a snowman.
Students thought it was a weird question, and I got all kinds of responses. Here are two examples:
They are made of snow, tall, have a carrot nose, sticks as arms, buttons, and are cold.
A snowman was lost in the woods. He had been lost for years and years and couldn’t find his way out of the thick forest, until he met another snowman. The other snowman led him out of the forest so he wouldn’t be so lost anymore.
Same directions. Two completely different ways of thinking.
You will have sensing students who tend to be more concrete and to the point. Then you have intuitive students whose minds may immediately go somewhere more creative. Neither student ignored the directions. Neither response was wrong. They just approached the exact same prompt differently.
I think that’s important to remember. The next time you start to feel like students aren’t listening to directions, or you find yourself saying, “I told them three times,” remember that perhaps they are listening. Their mind may just go somewhere different first. We all think differently. That’s why I asked students to write about a snowman.
Sketch and Tell-O the Syllabus
After the check-in, I finally handed out my syllabus. Instead of reading through the entire thing to the students, I paired it with a Sketch and Tell-O. Students read the syllabus and had to sketch and label four things that stood out to them or they thought were the most important.
When they finished, they discussed their choices with a partner for two minutes and then spent another two minutes writing about why they chose those things.
Once they finished, I spent around 5-10 minutes going over a few of the things from the syllabus that I actually needed to explain, including the grading system and a few other important pieces. I didn’t need to read every word to them. They had already read it, decided what they thought was important, discussed it, and wrote about it. I could fill in the gaps.
FlipSwitch
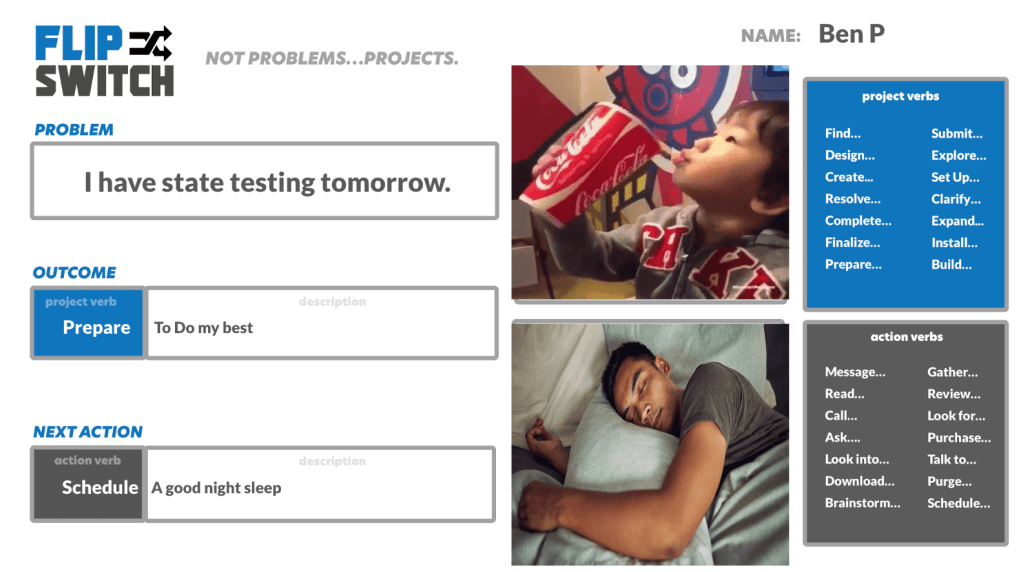
Time permitting, we finished class with a Mark Wallace special, FlipSwitch. FlipSwitch starts with a problem. From there, students identify the desired outcome using an action verb. I like this because oftentimes we know what we want the outcome to be, but we don’t think about what we actually need to do to get there. If we don’t figure out that first action, the problem usually doesn’t get solved.
The next part of FlipSwitch is identifying a next step, again using an action verb. Students can then sketch, write, or even add a GIF showing what solving and not solving the problem would look like.
For our first rep, I gave students a pretty common classroom problem: My Chromebook is dead.
Now what?
The students had to determine the desired outcome and, more importantly, what action they could actually take to begin solving the problem. We had some great conversations and some funny conversations, but underneath all of it students were practicing how to actually respond when a problem comes up instead of just sitting there with the problem.
I really like FlipSwitch for executive functioning skills, and I think there are a lot of places I could take it this year. It could be something we use when common classroom problems come up, but I could also see using it within social studies content. Problems happen. We usually know what we want to happen instead. The hard part is figuring out what we are actually going to do next.
Another year is in the books, and I found myself reflecting back on this school year and thinking about the patterns that kept showing up throughout Room 103. Some lessons fade immediately, while others still stick in your head because you remember the conversations students had, the moments where they struggled through an idea, or the days where the room just felt different.
The classroom slowly became more collaborative, more discussion-driven, and more focused on students making sense of ideas instead of just collecting information. Students spent more time talking through evidence, defending claims, revising thinking, and trying to organize complicated ideas together.
At the same time, reflecting on the year also made me realize there are still some things I need to improve moving forward. Some parts of this year worked really well. Other parts showed me where I still need to grow.
Building Thinking Classrooms Changed the Culture of the Room
If there was one thing that probably shaped Room 103 more than anything else this year, it was Building Thinking Classrooms.
The whiteboards completely changed the feel of the classroom. Students were constantly moving, discussing, comparing ideas, revising answers, and building thinking together. The room stopped feeling like a place where students waited for me to confirm whether something was right or wrong. Instead, students started looking at each other’s ideas and trying to figure things out collaboratively.
That shift showed up all year long. It happened during abolitionist comparisons when students debated who had the greatest impact and defended their reasoning with evidence. It happened during Number Mania activities where students used data and statistics to support bigger historical claims. It happened during hexagonal thinking when students argued over which events or ideas represented the biggest tests of the Constitution.
The biggest thing BTC did was make thinking public. Students could physically see ideas developing around the room. They could compare their reasoning with other groups, borrow evidence, challenge each other’s thinking, and refine their own ideas in real time. The conversations became better because students were surrounded by thinking instead of isolated from it.
I also think BTC naturally changed assessment. The classroom became less about quietly completing work and more about defending ideas publicly. Students had to explain themselves. They had to justify connections. They had to support arguments. Those are the kinds of skills that feel more important now than simply memorizing information for a test.
Ignite Talks and Snorkl Changed How I Think About Assessment
One of the biggest instructional shifts for me this year was thinking differently about assessment, especially in a world where AI can generate answers instantly.
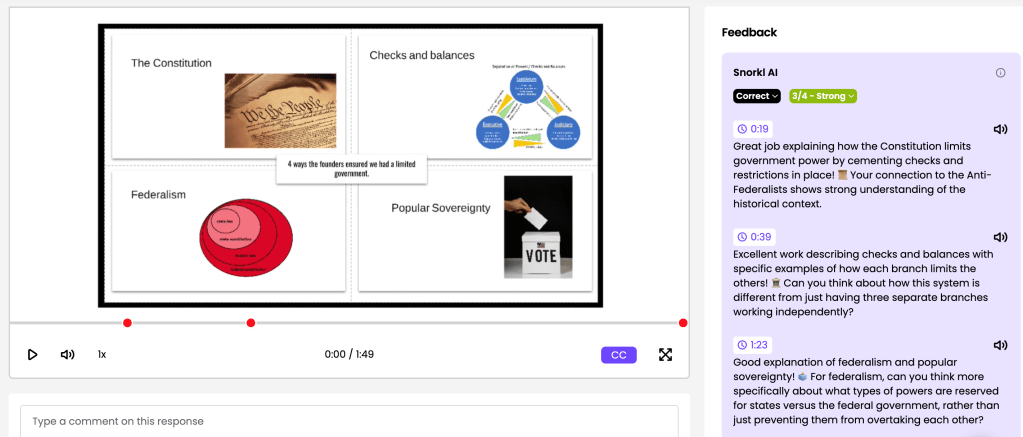
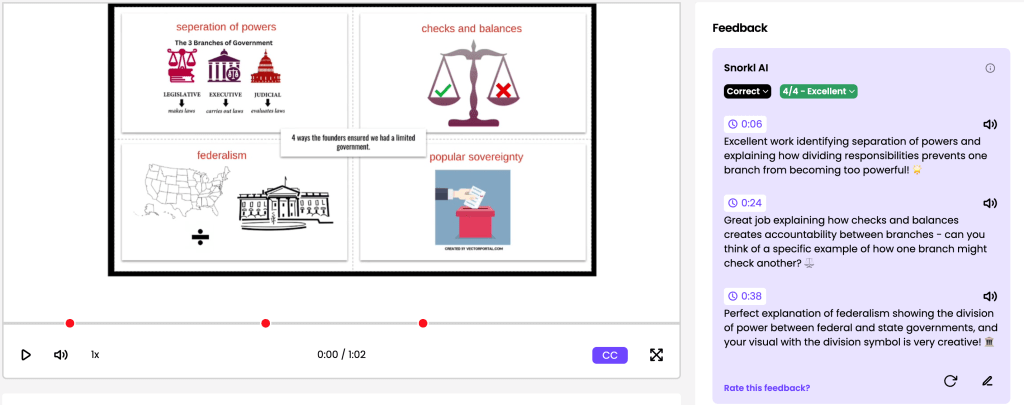
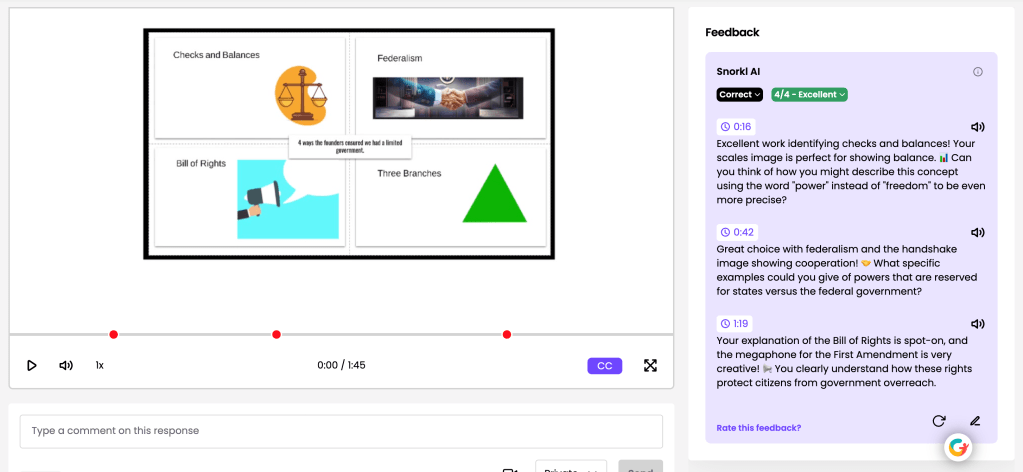
The Ignite Talk over the Constitution and early republic unit really reinforced this for me. Students had to organize ideas, explain historical concepts verbally, connect evidence to claims, and communicate their understanding out loud. AI could support preparation and revision, but it could not do the actual thinking for them.
What I liked about using Snorkl alongside writing and discussion activities was how immediate the feedback became. Students no longer had to wait days to find out whether their reasoning made sense. They could revise while the learning was still fresh.
The goal was never to make work easier with AI. The goal was to make feedback faster and revision more meaningful. Students still had to defend ideas, explain evidence, and make sense of historical concepts themselves.
One of my favorite moments all year came during the Cincinnati inquiry when several students asked me to open a Snorkl because they wanted additional feedback on their writing and analysis. That stuck with me because students usually do not ask for more feedback unless they actually care about improving the work.
This year reinforced something I keep thinking about more and more. Assessment cannot just be about recall anymore. Students need opportunities to explain ideas, revise reasoning, communicate verbally, collaborate, and build arguments using evidence. Those skills are much harder to fake, and they also happen to matter far more outside of school.
The Cincinnati Inquiry Unit Became the Strongest Unit of the Year
Out of everything we did this year, the Cincinnati inquiry unit probably became the most meaningful.
Part of that was because it was local history. Students recognized roads, places, and landmarks they had actually seen before. History stopped feeling like something that only happened somewhere else. But the bigger reason the unit worked was because students had to wrestle with contradiction the entire time.
The compelling question asked: “How was Cincinnati a city caught between two worlds before the Civil War?”
That question carried the entire unit because there was never a clean or simple answer. Students explored how Cincinnati represented freedom for some people while still being deeply tied to racism, violence, and systems connected to slavery. They examined the Ohio River as both a symbol of hope and a very real dividing line between free and slave states. They studied Porkopolis, economic growth, abolitionists, anti-abolitionists, and the Cincinnati riots while constantly revisiting the idea that free did not automatically mean equal.
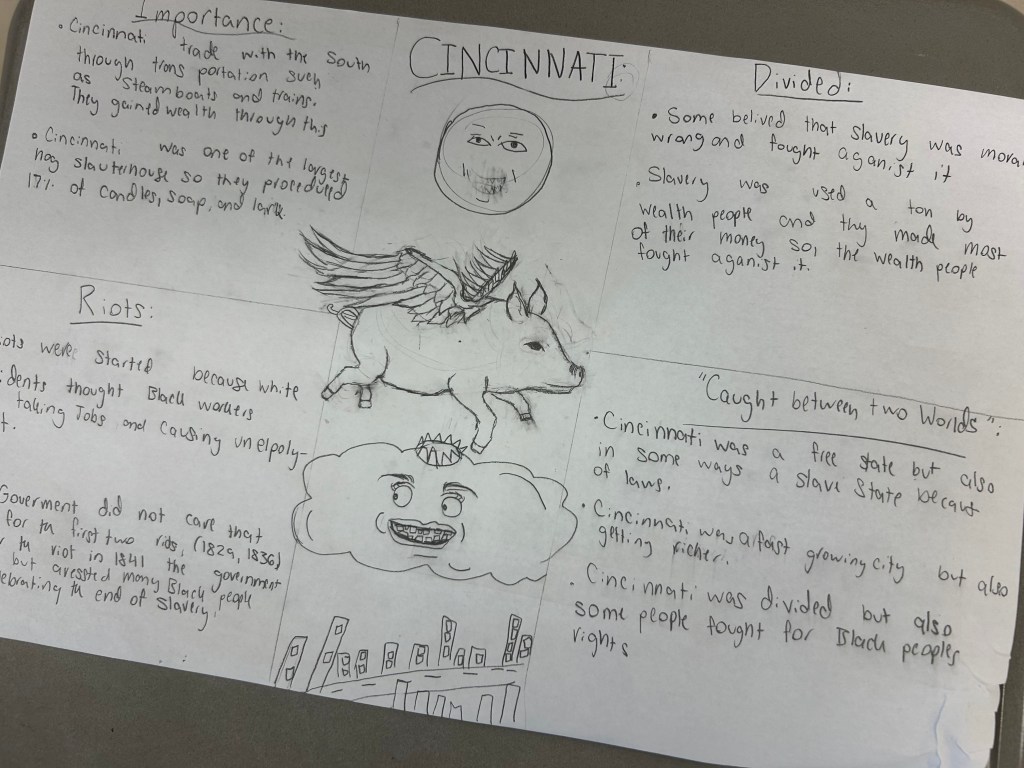
The unit also slowed students down intellectually in a way I really liked. Instead of racing through content, students spent time analyzing evidence, comparing perspectives, discussing tensions, revising ideas, and building understanding piece by piece. The one-pager summative assessments ended up being some of the best work students produced all year because students were not simply repeating information back to me. They were organizing meaning visually and verbally while trying to explain the contradictions within the city itself.
That unit reminded me that inquiry works best when students are trying to make sense of something complicated instead of hunting for a single correct answer.
What I Need to Improve Next Year
As much as I liked many parts of this year, reflecting back also made several things stand out that I need to improve moving forward.
The first is pacing.
Throughout the year, I constantly found myself fighting against time. Shortened classes. Assemblies. Constant schedule changes. Chromebook sign-ins taking forever. Transitions getting interrupted. Some days it felt like half the battle was simply getting everybody logged in and ready to go before losing another chunk of class time.
At the same time, if I am being real about it, I also wish I could have stacked even more EduProtocols together throughout the year. I like tempo in the classroom. I like momentum. I like students constantly shifting between reading, discussing, writing, analyzing, creating, and reflecting while staying connected to the same larger idea or question. Some of my favorite lessons this year were the ones where students moved through multiple structures within the same class period because the energy stayed high and the thinking kept evolving.
That balance is something I am still trying to figure out.
I do not think the answer is slowing everything down completely. I think the answer is being more intentional with where students need time to process and where the lesson benefits from keeping the pace moving. Some moments need discussion and reflection. Other moments benefit from quick transitions, fast reps, and momentum.
Next year, I want to get better at finding that balance between tempo and processing time. I still want the classroom to feel active and layered, but I also want students having enough time to wrestle with ideas instead of feeling like we always have to move to the next thing.
The second thing I need to improve is being more intentional with how I introduce EduProtocols throughout the year.
This year, students eventually became very comfortable with structures like Thick Slides, Thin Slides, Number Mania, CyberSandwich, Frayer Models, Hexagonal Thinking, and 2xCER. By the second half of the year, students understood the expectations, transitions became smoother, and the protocols started disappearing into the thinking itself instead of becoming the focus of the lesson.
But looking back, I think I could do a much better job intentionally sequencing and introducing those structures from the very beginning of the year.
At times, I introduced protocols because they fit the lesson instead of thinking long term about how they connected together across the entire school year. Next year, I want a clearer progression. I want students building confidence with certain structures early so more complicated thinking routines later in the year feel natural instead of brand new.
I also want students understanding why we are using the structures, not just how to complete them. The goal has never been to do EduProtocols just to say we used an EduProtocol. The goal is helping students organize thinking, communicate ideas, collaborate effectively, and reduce cognitive overload so they can focus on the actual learning.
When I look back at Room 103 this year, the best moments were almost never the moments where students were simply getting the right answer. The best moments were when students argued, revised, questioned, connected ideas, defended claims, and struggled through complicated thinking together.
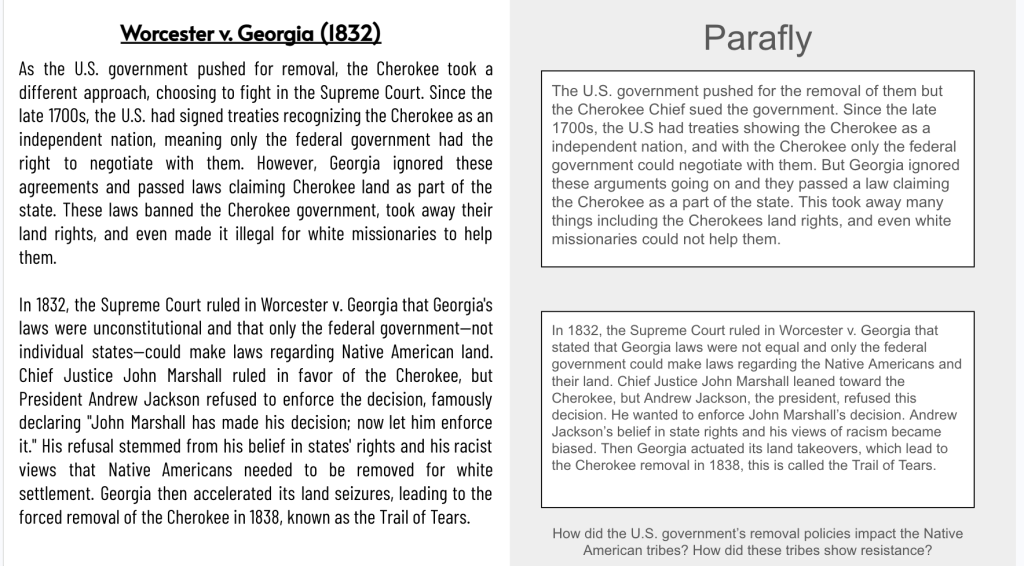
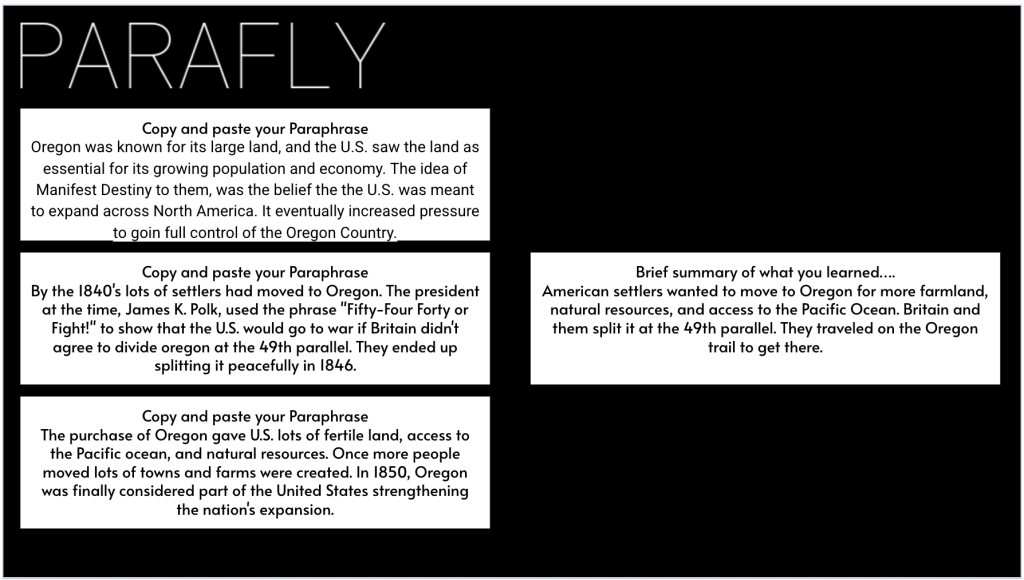
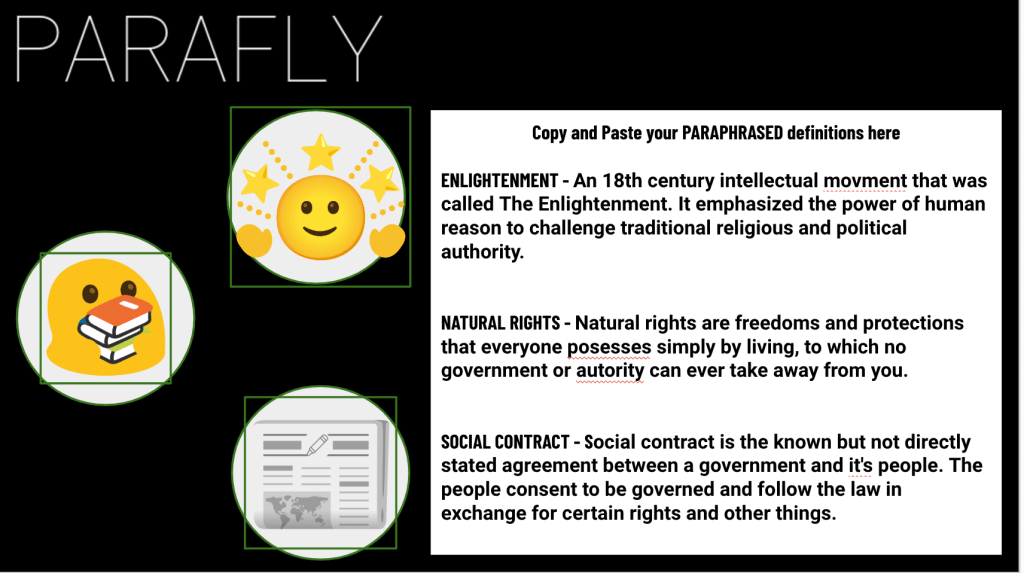
One lesson that has become completely locked in for me over the years is Parafly. It can work with any grade level, any subject, and honestly almost any type of content. The reason is simple. Students struggle with paraphrasing far more than we think they do.
I have now been at three different schools, and every single year I ask students about paraphrasing. Every year I get the same response:
“What’s paraphrasing?”
Not “I’m bad at it.” Not “I don’t like it.” Just flat out confusion about what the skill even is. That should probably tell us something about education right now. We assume students know how to paraphrase because they have heard teachers say “put it in your own words” for years. But hearing directions and actually knowing how to do something are two very different things.
I have made the same mistake over and over again myself.
Last school year in 2024, I did not really start using Parafly until November. This past school year in 2025, I somehow waited even longer and did not really start until January. I assumed students already knew how to paraphrase. We all know what happens when you assume.
The reality is students need direct practice with this skill. Especially now. Copying and pasting has become second nature for students. AI has made it even easier. Will Parafly completely solve copying and pasting? No. But it absolutely helps when students feel confident enough to take information and process it in their own words instead of feeling stuck staring at a blank screen.
A lot of students copy because they genuinely do not know what else to do. They panic when they see text. They think writing means changing two random words and hoping nobody notices. Parafly helps students realize they are capable of processing information themselves.
Starting Small and Building Confidence
When I introduce Parafly, I usually do not even start with class content. In years past, I have used ChatGPT and Socrative together to build the routine first before moving into actual social studies content.
I will use ChatGPT to generate one, two, or three sentence animal facts, random funny facts, weird facts, or anything lighthearted enough to lower the pressure. Then I copy and paste those facts directly into Socrative. Students join the room, read the fact, and paraphrase it in their own words. They get one minute. Then I lock it in.
We immediately look at responses together and talk through what students did well. We discuss what stayed too close to the original, what wording changed, how students reorganized information, and what paraphrasing actually looks like. Then we move onto another one. And then another one. Reps. Reps. Reps.
That repetition is the entire point. Students need repeated exposure to the process in a low-stakes environment before they ever apply it to actual class content. What always surprises me is how quickly middle school students start buying into it. Every single year, without fail, a student eventually says: “This is actually fun.”
Paraphrasing. Fun.
Middle school students saying paraphrasing is fun probably sounds ridiculous, but I really think the structure is why it works. The pressure is low. The tasks are short. Students receive immediate feedback. They are not buried under a giant assignment or a massive writing task. They are simply practicing one skill over and over until they start building confidence.
Why the Structure Works
Parafly works because it isolates one important skill and gives students repeated low-stakes practice with immediate feedback. Students are not trying to analyze content, organize an essay, write a paragraph, and cite evidence all at once. They are simply focused on learning how to process information and restate it clearly.
That matters because a lot of students become overwhelmed when too many skills are stacked together immediately. Parafly reduces cognitive overload by narrowing the focus to one manageable task. Students can fully focus on sentence structure, synonyms, shortening ideas, reorganizing information, and understanding meaning without feeling buried by everything else.
Over time, students naturally begin experimenting with writing. They start noticing patterns. They try different sentence structures. They begin combining ideas together or simplifying information more efficiently. Most importantly, they start understanding that paraphrasing is not simply replacing random words with synonyms. It becomes processing meaning.
From a science of learning standpoint, Parafly naturally supports several important areas:
Retrieval practice
Immediate feedback cycles
Low-stakes repetition
Cognitive rehearsal
Elaboration through sentence restructuring
Building automaticity with writing
Reducing cognitive overload by isolating one skill
Active processing instead of passive copying
Students are actively doing something with information instead of simply transferring words from one place to another. That processing helps students remember information better because they are interacting with meaning instead of memorizing surface-level wording.
Moving Into Actual Content
After students build confidence with the random facts, we transition into actual class content. I will have students paraphrase lines from the United States Declaration of Independence, simplify sections of primary sources, or paraphrase chunks from the textbook.
One pairing that works especially well is combining Parafly with Sketch and Tell. Students paraphrase a section, then sketch an image that represents their paraphrase. The sketch forces students to actually process the meaning instead of just swapping words around. Students have to visualize the content and think about what the text is really saying.
I also like having students paraphrase three or four sections from a reading and then use those paraphrases to build a final summary. Suddenly a difficult textbook section feels much more manageable because students are chunking information into smaller pieces instead of trying to summarize everything all at once.
The lesson can honestly be done in ten to fifteen minutes, which is another reason I like it so much. It does not require complicated preparation. It does not require some giant project. It is simple, structured, and repeatable. And the reps add up quickly.
Connecting Parafly to Other EduProtocols
What I also like about Parafly is how naturally it fits into other EduProtocols. It rarely feels like a standalone activity. Instead, it becomes part of the larger learning process throughout the unit.
Students might Parafly information before transferring it into Number Mania. They might use paraphrased notes while building Thick Slides. They might directly paraphrase during Iron Chef. Students can use paraphrases to prepare for summaries, discussions, or even larger writing assignments later in the week.
One strategy I especially like is pairing Parafly with concise writing challenges. Sometimes I will have students paraphrase information and then limit them to a certain number of words. That structure forces students to think carefully about word choice and clarity while removing unnecessary details.
The options really are endless because paraphrasing is not just an English skill or a writing skill. It is a thinking skill. Once students become more comfortable putting ideas into their own words, almost every other classroom activity becomes stronger too.
Final Thoughts
At the end of the day, Parafly is locked in for me because it solves a real problem students have. Students need confidence with writing. Students need opportunities to process information in their own way. Students need structured practice with summarizing and rewording ideas. And honestly, students need to realize they are more capable writers than they think they are.
Parafly helps build that confidence one repetition at a time. Sometimes the best lessons are not the flashy ones. Sometimes the lessons that stay locked in are the ones that quietly build foundational skills students desperately need.
This week looked a little different. Between interruptions, schedule changes, and all the end-of-year randomness that comes with May, this was not a clean “day-by-day” kind of week. Instead of forcing content forward, we slowed down and focused on a few things that deserved more time. One of the biggest was wrapping up our Cincinnati inquiry unit.
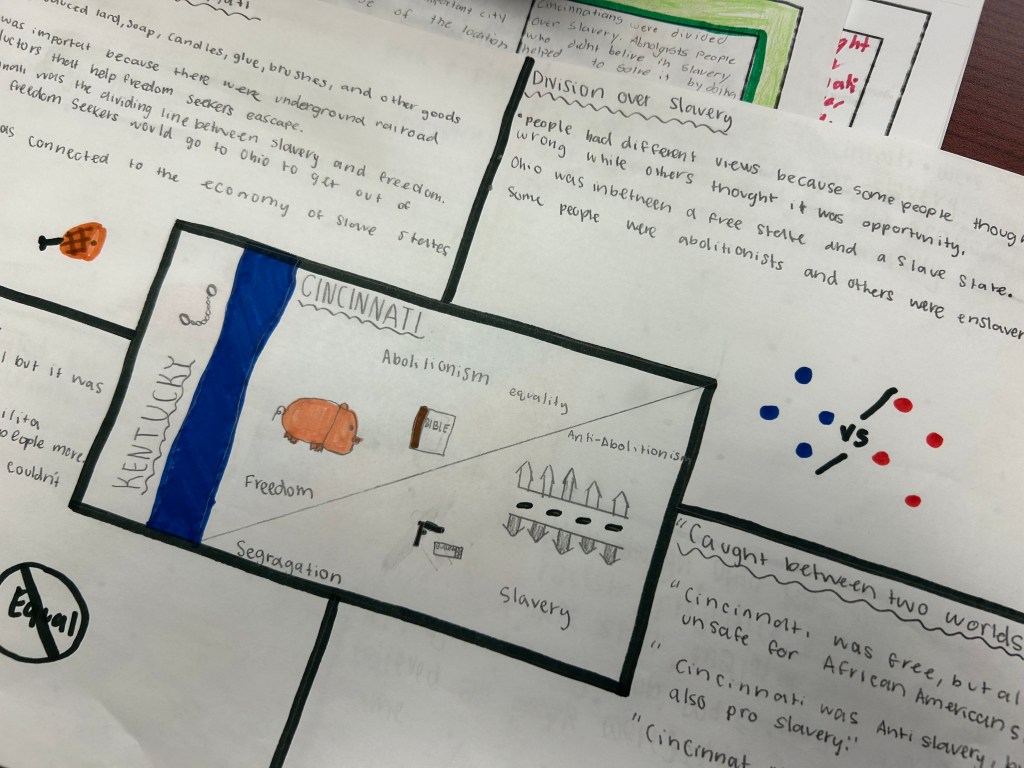
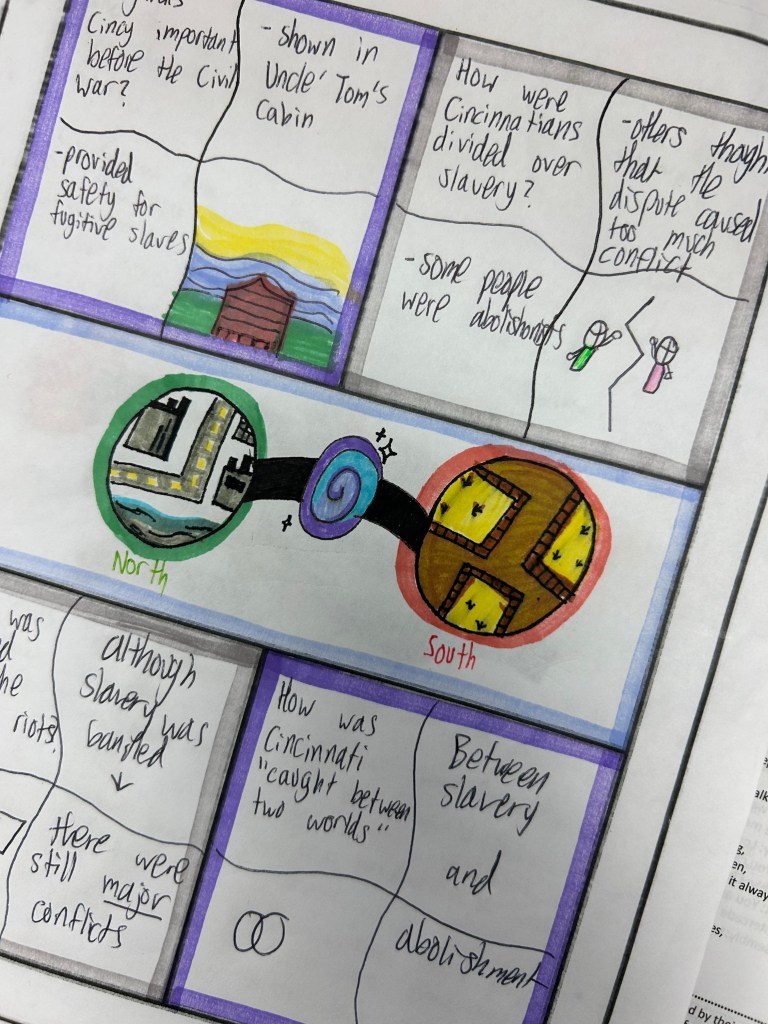
Cincinnati: Caught Between Two Worlds
Our essential question throughout the unit was: “How was Cincinnati a city caught between two worlds before the Civil War?”
Students learned about the Ohio River and how it symbolically divided free and slave states, but we also talked about the reality of the river itself. Before modern dams and river systems, the Ohio River was not always deep or difficult to cross. At certain times of the year, parts of it could be only one to three feet deep or frozen over completely. That small detail changed how many students viewed escape, movement, and the idea of freedom itself.
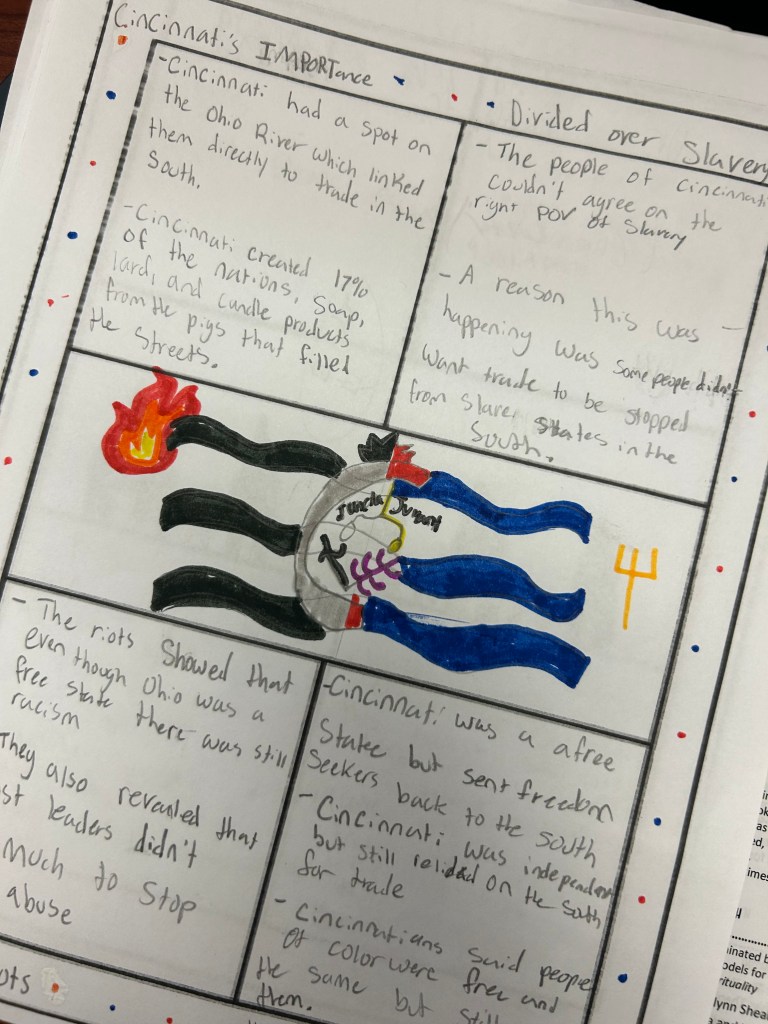
We also explored why pigs are everywhere in Cincinnati and why the city became known as Porkopolis. Students connected the river to trade, transportation, and economic growth. Cincinnati was booming because of its location, but students also began to realize how connected the city still was to the South economically and culturally.
That contradiction became the center of the inquiry. A free state did not mean free from racism, discrimination, or violence. Students examined the Cincinnati riots of 1829, 1836, and 1841 and discussed what those events revealed about the city. Many students walked into the unit assuming “North = good” and “South = bad.” Local history complicated that thinking in important ways.
Ending the Unit with One-Pagers
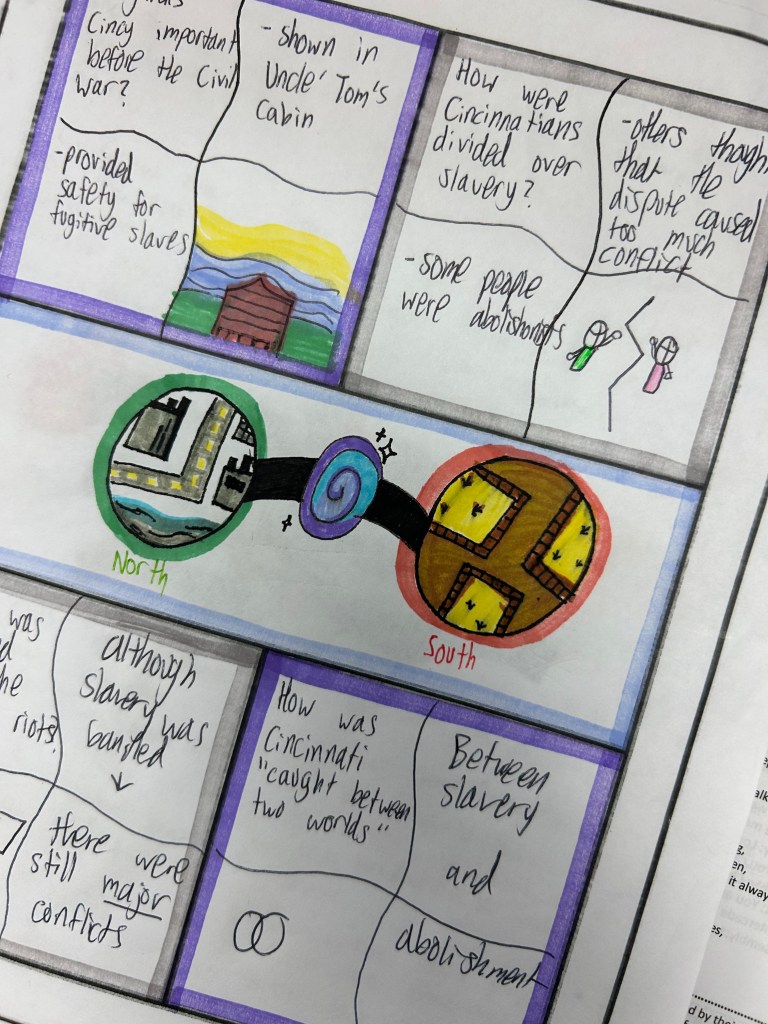
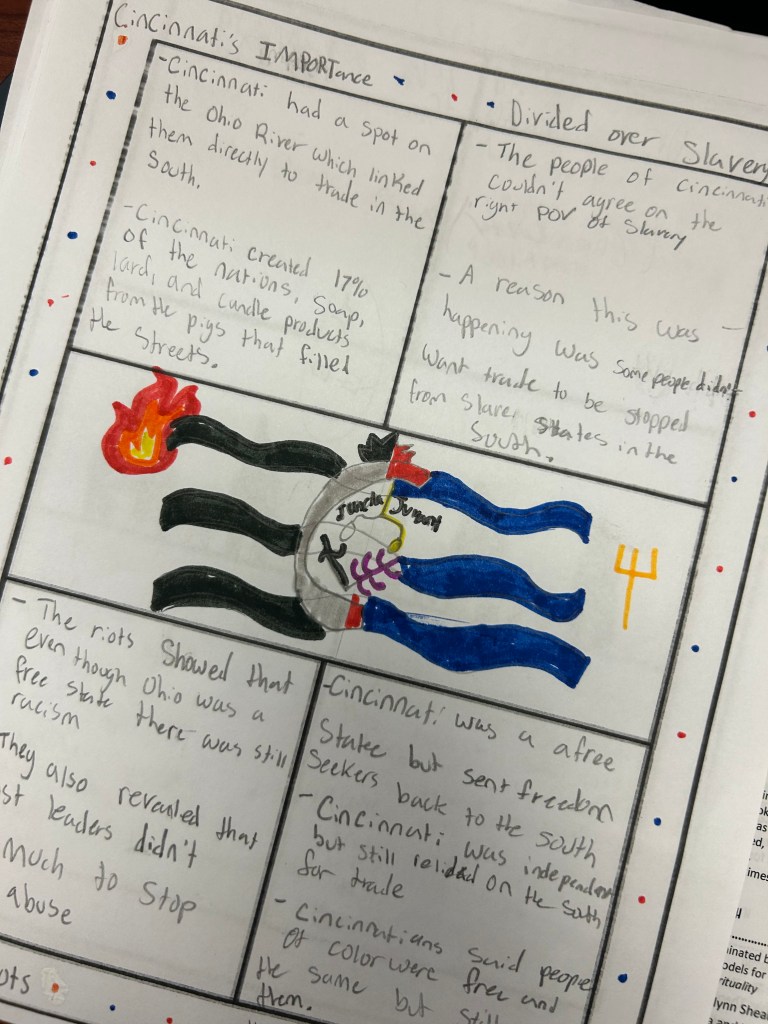
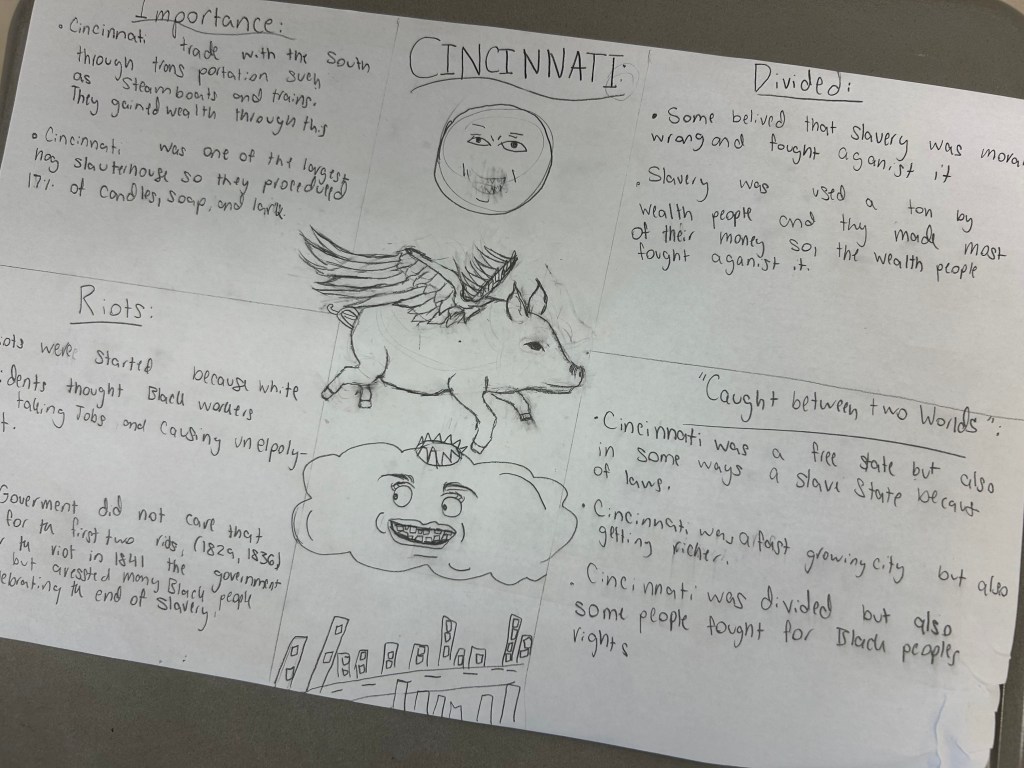
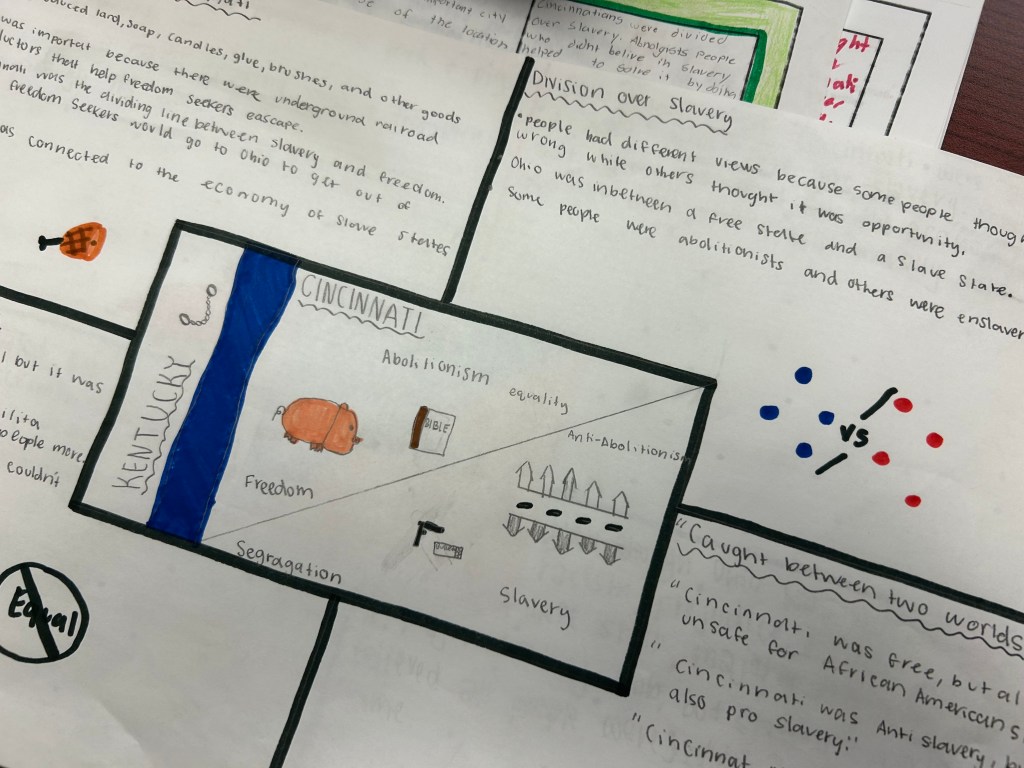
To finish the inquiry, students created one-pagers that visually explained the tensions and contradictions of Cincinnati before the Civil War. The structure of the assignment asked students to break the inquiry into sections:
Why Cincinnati became important before the Civil War
How Cincinnatians were divided over slavery
What the riots revealed about the city
Why Cincinnati was “caught between two worlds”
One of my favorite parts was the contradiction statements: “Cincinnati was ____________, but also ____________.”
Those statements forced students to move beyond simple answers. Cincinnati was a free city, but also deeply discriminatory. It was economically successful, but also divided. It was connected to freedom seekers, but also connected to pro-slavery beliefs and racial violence.
The one-pagers also gave students room to show understanding in different ways. Some students leaned heavily into symbolism with rivers, chains, bridges, and divided maps. Others focused more on evidence and written explanations. A few created visuals that connected Porkopolis, the Ohio River, and the riots all together on the same page.
That is the kind of work I want students doing at the end of a unit. Not just repeating information, but organizing ideas, wrestling with contradictions, and building meaning from evidence.
Turning Coloring Pages Into History
The other thing we did this week was much lighter. My 8th graders are graduating soon. At this point in the year, they still need structure and purpose, but they also need room to breathe a little. I wanted something creative, low stress, and genuinely fun. So I went down a rabbit hole.
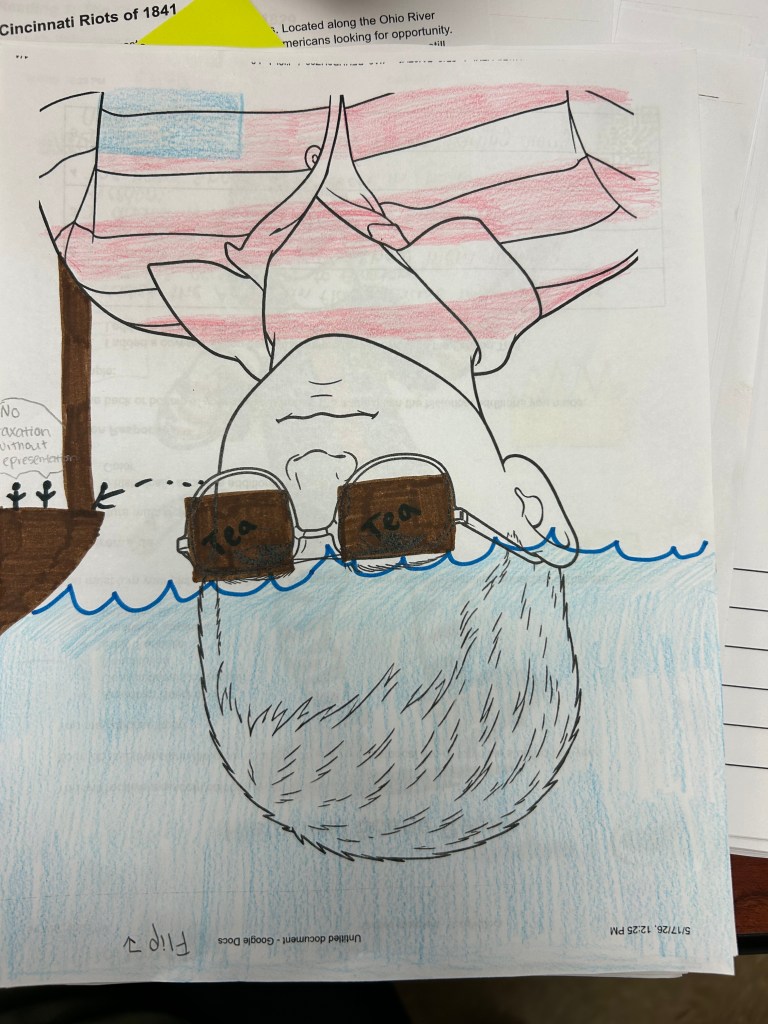
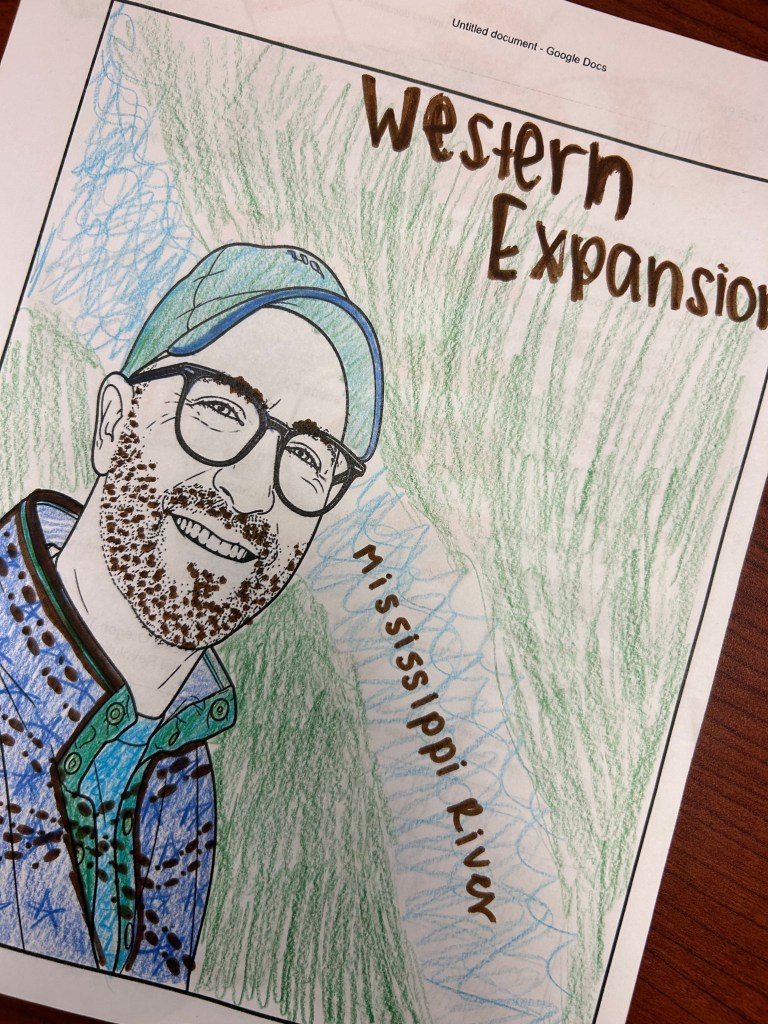
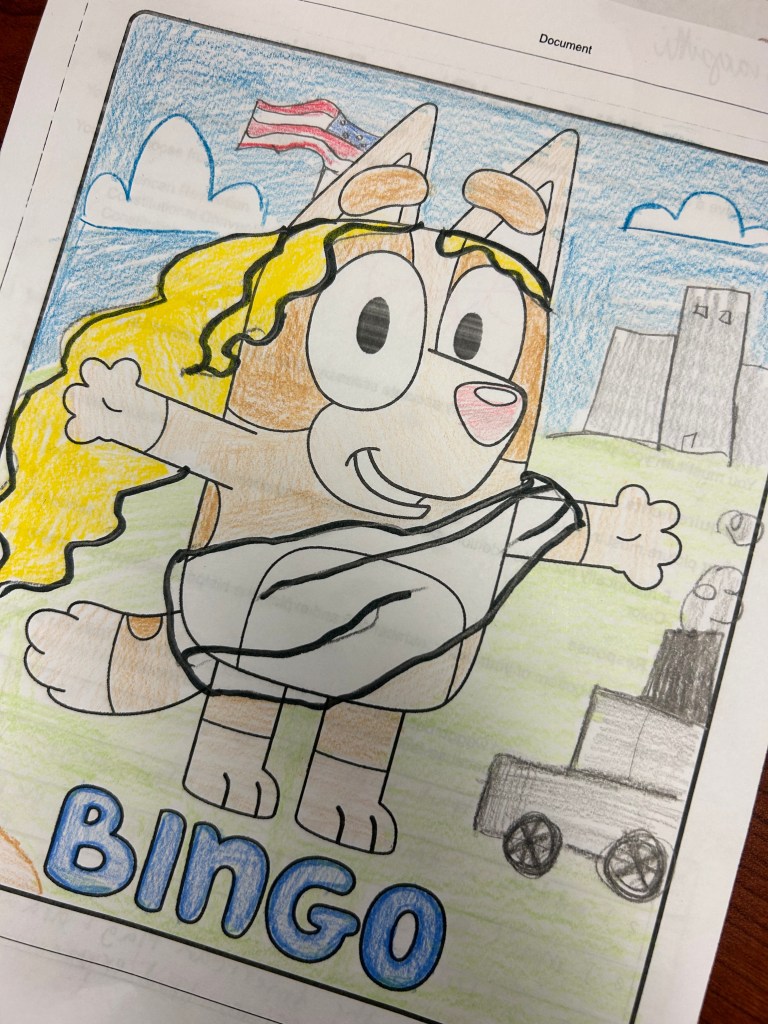
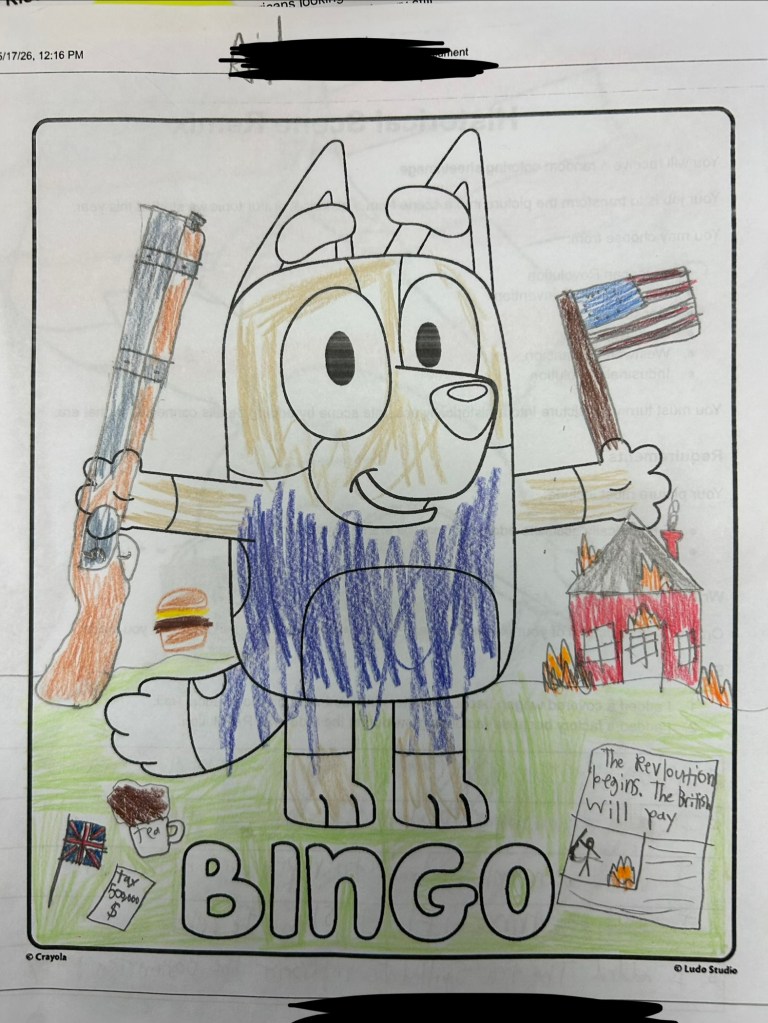
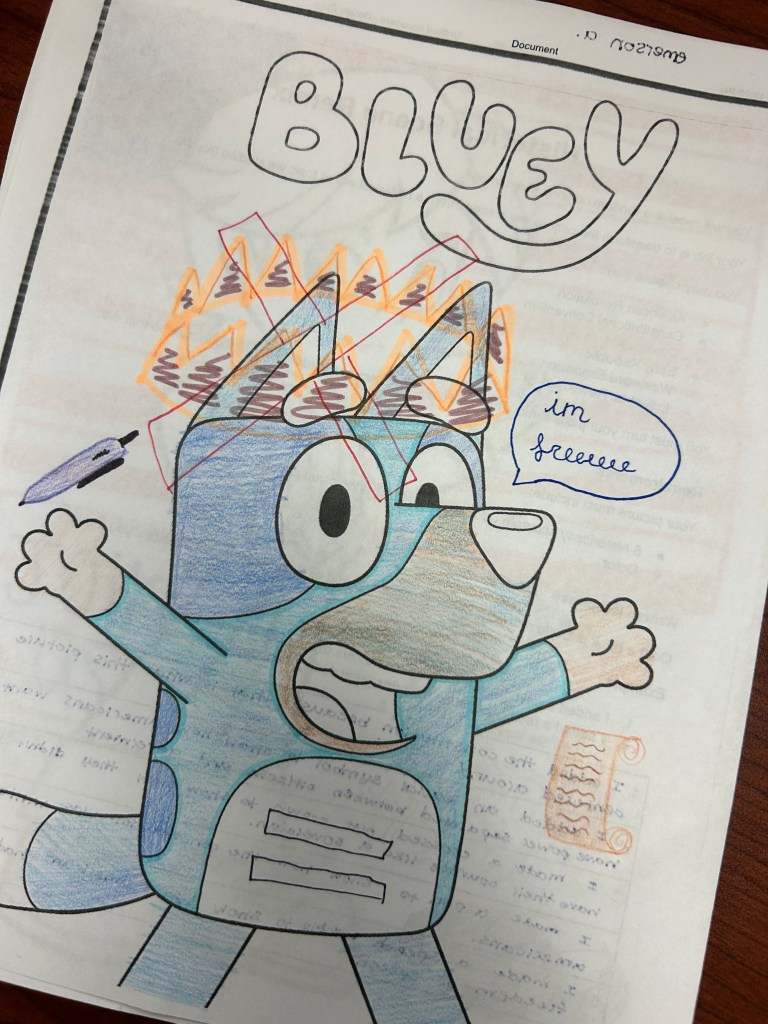
I found coloring pages on Crayola’s website, used ChatGPT along with old pictures of myself, and made a collection of weirdly specific coloring pages connected to our class. Then students had to transform the coloring page into a historical scene or moment. That was it. Add at least five historical details or symbols and explain what you added.
Some students turned Bluey into historical figures. Others added scenes from westward expansion, the American Revolution, or industrialization. One student turned a coloring page into a tea protest scene complete with taxation references and a burning building. Another added a Mississippi River reference into a western expansion design. One student even turned me into a coloring page.
And honestly, it ended up being one of those assignments where students quietly worked longer than expected because they were invested in it.
There was something fun about watching middle schoolers take a simple coloring page and turn it into something historical, creative, and weirdly thoughtful. Some were funny. Some were surprisingly detailed. A few looked like absolute chaos in the best way possible.
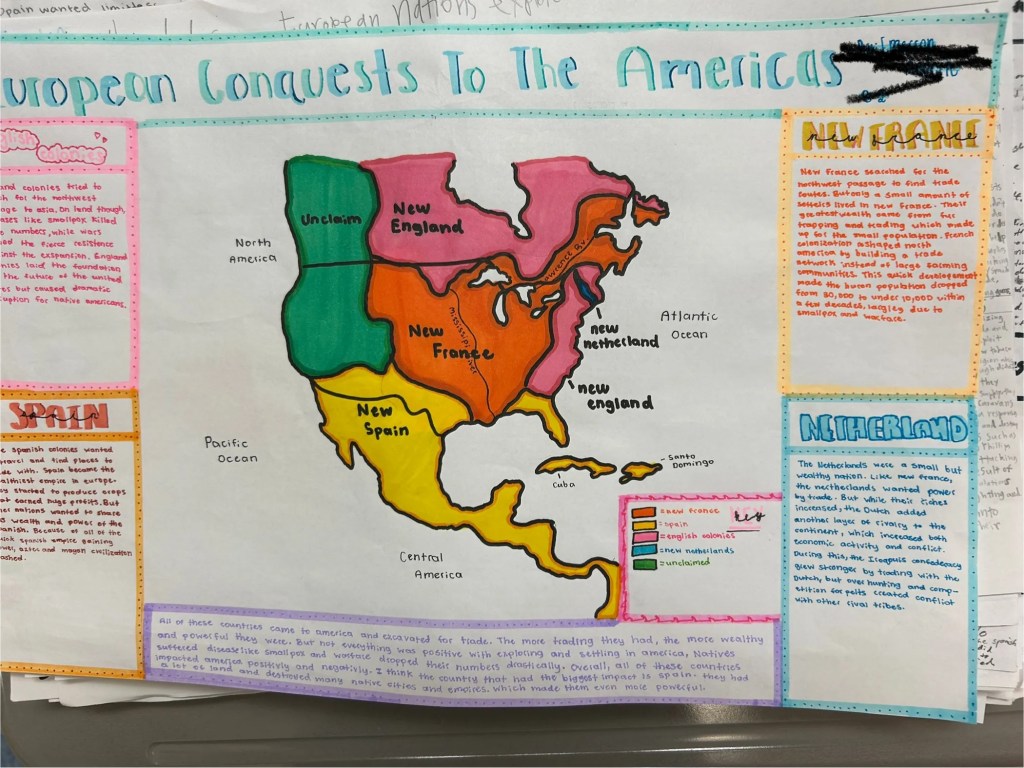
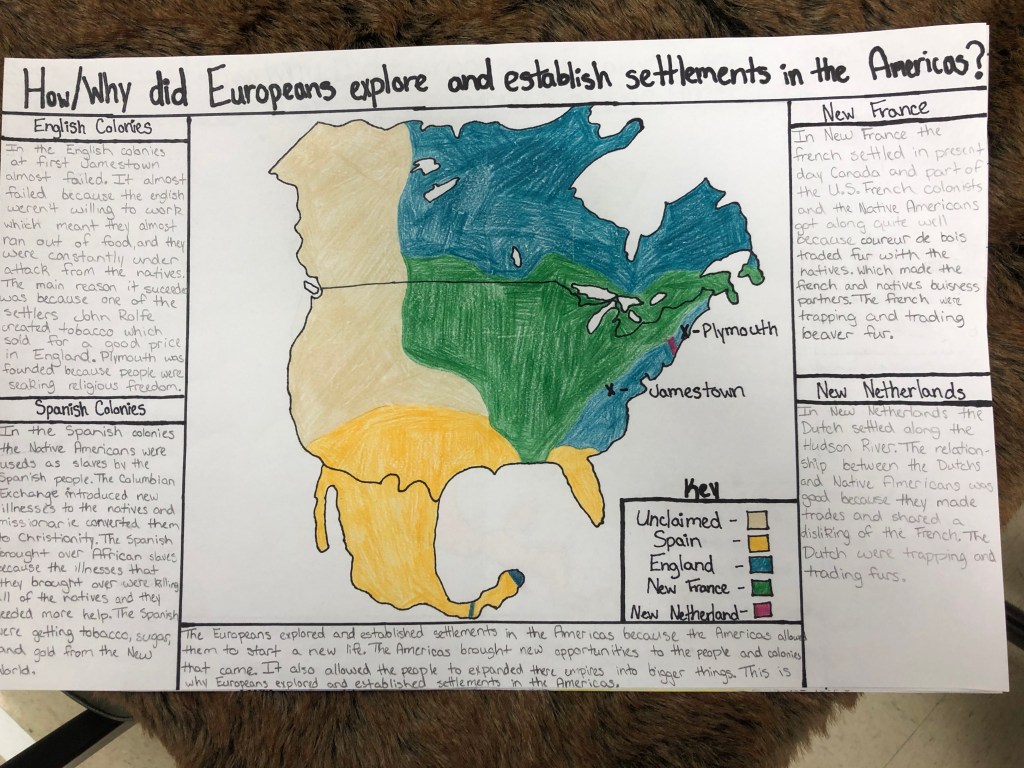
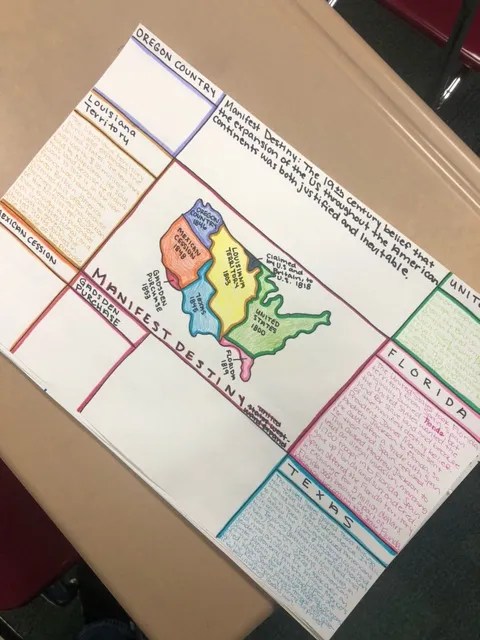
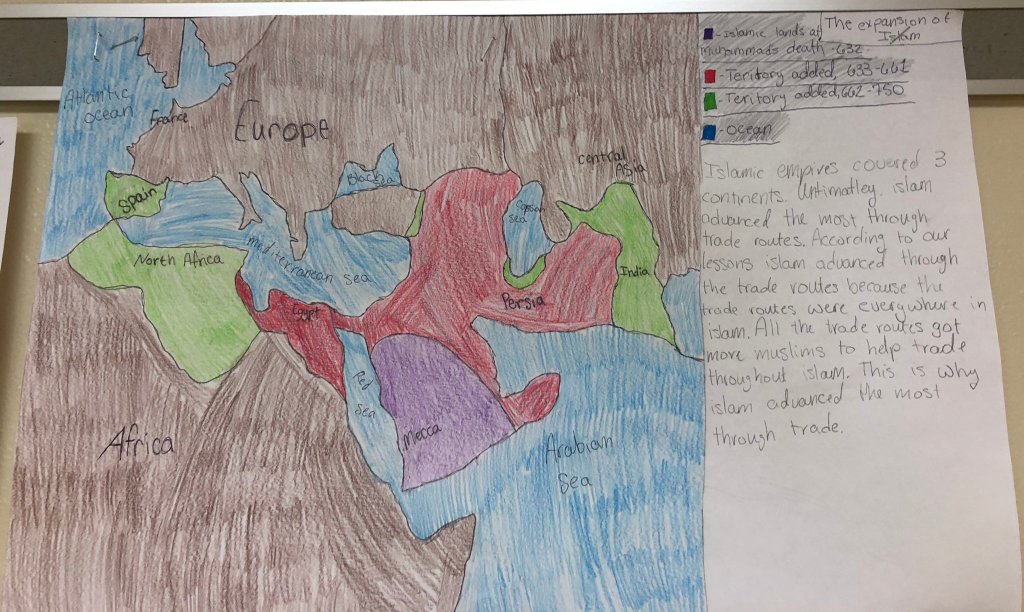
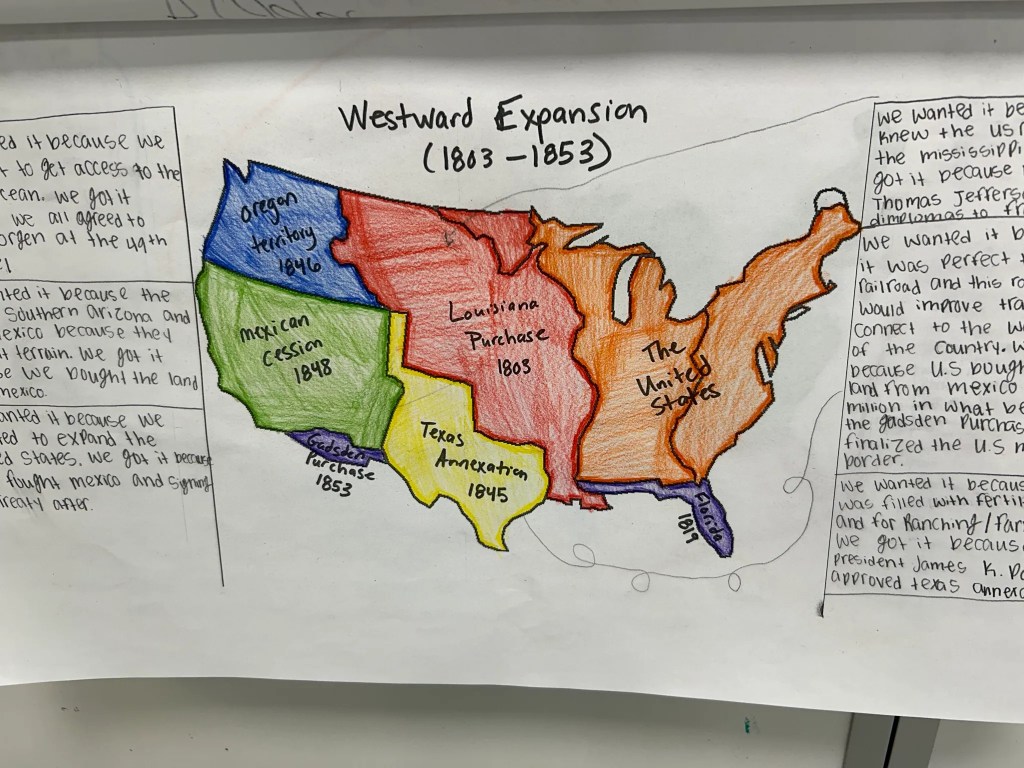
One strategy that has become completely locked in for me over the years is annotated maps. I have used annotated maps with Westward Expansion, the Crusades, the French and Indian War, European Exploration and Colonization, and the Causes of the Civil War. No matter the topic, the goal always stays the same. I want students to see the relationship between geography and history instead of viewing maps as something separate from the actual content.
Too often students look at maps as a quick reference tool instead of historical evidence. They memorize locations for a quiz, but never fully think about why rivers mattered, why cities developed where they did, why territories became contested, or why expansion happened in certain directions. Annotated maps slow students down and force them to think about those relationships while they are building the map itself.
The activity also combines so many important skills together naturally. Students are researching, organizing information, analyzing cause and effect, discussing ideas, creating visuals, and continuously revisiting a larger historical question. The map becomes much more than a geography assignment. It becomes a thinking activity.
Starting With a Driving Question
The entire process starts with a compelling or driving question. Questions like:
How did manifest destiny contribute to Westward Expansion?
How did Europeans explore and colonize North America?
Which led most to the expansion of Islam – innovation, trade, or conflict?
The question gives the map purpose. Students are not simply drawing locations because the teacher told them to. Every label, annotation, and piece of research should connect back to answering the larger historical question.
I think the driving question changes the quality of student thinking immediately. Students stop seeing the map as a worksheet and start seeing it as evidence that helps explain historical events. Instead of memorizing isolated facts, they begin making connections between geography and the decisions people made throughout history.
Hand Drawing the Maps
I also have students hand draw the maps. No tracing and no pre-made outlines. I hear complaints every single time we start, but I continue doing it because students pay far more attention to geography when they physically create the map themselves.
The process of drawing the map forces students to interact with the geography instead of passively looking at it. Students slow down and begin recognizing patterns they normally would not notice if they were simply filling in labels on a printed worksheet. I also think there is value in students physically creating something themselves instead of instantly relying on technology to do the work for them.
The maps are rarely perfect, but perfection is not the goal. The goal is building understanding through the process of creating the map.
Building the Annotations Through EduProtocols
Once the maps are drawn and labeled in the center of the page, students begin building annotations around the outside of the map. Those annotations might include statistics, explanations, cause and effect relationships, evidence from readings, visuals, symbols, or short written responses connected to the driving question. The annotations are what transform the activity from a geography worksheet into a historical thinking activity.
What I really like about annotated maps is how naturally they pair with EduProtocols. The annotations do not need to come from one giant lecture or packet. Instead, students build their annotations from the learning and research they complete throughout the unit using different protocols.
In the past, I have done a series of CyberSandwiches where students read, discussed, and summarized information connected to the driving question. As students built summaries throughout the week, they continuously referred back to those summaries while creating annotations around the map. This worked really well because students already had manageable chunks of information prepared instead of trying to start the entire map from scratch at the very end.
I have also paired annotated maps with Thick Slides. Students completed a series of Thick Slides connected to different parts of the unit, then used those slides as references while building the annotations around their maps. The Thick Slides helped students organize important information, visuals, and evidence before transferring their thinking onto the poster itself.
One pairing that worked especially well was using the ParaFLY EduProtocol before students annotated the maps. Students practiced paraphrasing information from readings, then transferred their paraphrased information directly onto the poster. This helped students avoid simply copying information word for word and forced them to process the content more carefully before adding it to the map.
A strategy I really liked using alongside ParaFLY involved rolling dice to help students practice concise writing. I used a dice with numbers ranging from 10 to 30. After rolling the dice, students had to annotate and explain information using that exact number of words. The structure forced students to think carefully about word choice, summarize information clearly, and avoid adding unnecessary details. It also created a simple challenge that kept students engaged while practicing paraphrasing and summarizing skills.
The combination of annotated maps and EduProtocols works well because students are constantly revisiting information, discussing ideas, summarizing learning, and transferring knowledge into a visual format. Instead of the map becoming a standalone assignment at the end of the unit, it becomes the place where all of the learning throughout the week starts coming together.
Formative or Summative? Both Work.
One reason annotated maps have stayed locked in for me is because they are flexible. Sometimes students build the map over several days as a formative assessment where they continuously add new learning and revise their thinking throughout the unit. Other times the annotated map becomes the final summative assessment where students synthesize everything they learned into one product.
I have paired annotated maps with several EduProtocols where students answer the compelling question directly beside the map using evidence gathered throughout the unit. That combination works really well because students are visually organizing information while also practicing historical writing skills.
The finished products also give me a much clearer picture of student thinking than many traditional assessments. Students are organizing, connecting, explaining, and applying information instead of simply selecting answers on a multiple choice test.
Why the Structure Works
What I like most about annotated maps is that students are constantly doing something with the information. They are researching, organizing, discussing, connecting ideas, revisiting the driving question, and visually showing relationships between geography and history. Students begin recognizing that geography is not just background information. Geography shapes decisions, trade, migration, conflict, expansion, and power.
I also think annotated maps work well because they naturally keep cognitive load manageable. Instead of overwhelming students with a massive project all at once, students build understanding piece by piece while continuously connecting information back to the same central question. The map becomes an organizational structure for their thinking.
The structure also works because students create something meaningful while interacting with content from multiple angles. They are writing, drawing, researching, discussing, and analyzing all within the same activity.
Final Thoughts
At the end of the activity, students have something visual and tangible that represents their learning. More importantly, they begin seeing history differently. Historical events stop feeling random because students can physically see how geography influenced the story.
That connection between geography and history is why annotated maps have stayed completely locked in for me for years.


 Moler's Musings