Last week I gave a Literacy Skills entry assessment. I used AI to analyze the results…
The literacy skills analysis reveals that 8th grade students need to improve in several key areas. Finding the Main Idea remains a challenge, with students struggling to consistently identify central themes across texts. Understanding Vocabulary in Context shows fair performance, but there’s room for improvement in deriving word meanings from context. Students demonstrate moderate ability in Recognizing Important Details, but often miss key information or focus on less relevant points. While Comparing Perspectives is fair to good, students could benefit from more practice in contrasting viewpoints. Making Inferences needs significant improvement, as students struggle to draw conclusions beyond explicitly stated information. Lastly, Making a Claim with Evidence is identified as the weakest area, with students failing to make clear claims or support ideas with specific textual evidence. These findings suggest a need for targeted instruction and practice in these critical literacy skills to enhance students’ overall comprehension and analytical abilities in social studies.
Next, I asked AI to develop some themed days that we could devote to working on these skills. I also had it correlate the skills and themes with EduProtocols. Here is the outcome….
Main Idea Monday (Addressing: Finding the Main Idea)
Thin Slides: Students create one slide with a key image and one word to represent the main idea of a historical event or concept. Present and discuss why each represents the main idea.
Cyber Sandwich: Students read a historical text, discuss with a partner, and write a one-sentence summary focusing on the main idea. Expand to a paragraph summary. Use “What is this passage mostly about?” as a guiding question.
Text Detective Tuesday (Addressing: Understanding Vocabulary in Context & Recognizing Important Details)
Frayer Model: Students complete a Frayer model for key historical terms, focusing on contextual usage and decoding strategies.
ParaFLY: Students paraphrase complex historical quotes or paragraphs, underlining key points and writing margin notes. Use “5 W’s and H” questions to identify important information.
What’s Important Wednesday (Addressing: Recognizing Important Details)
8pARTS: Students analyze a historical image using the 8pARTS protocol, focusing on identifying crucial details and their significance.
Number Mania: Students create infographics highlighting key statistics and facts from a historical period or event. Present and explain why these details are important.
Thinking Thursday (Addressing: Making Inferences)
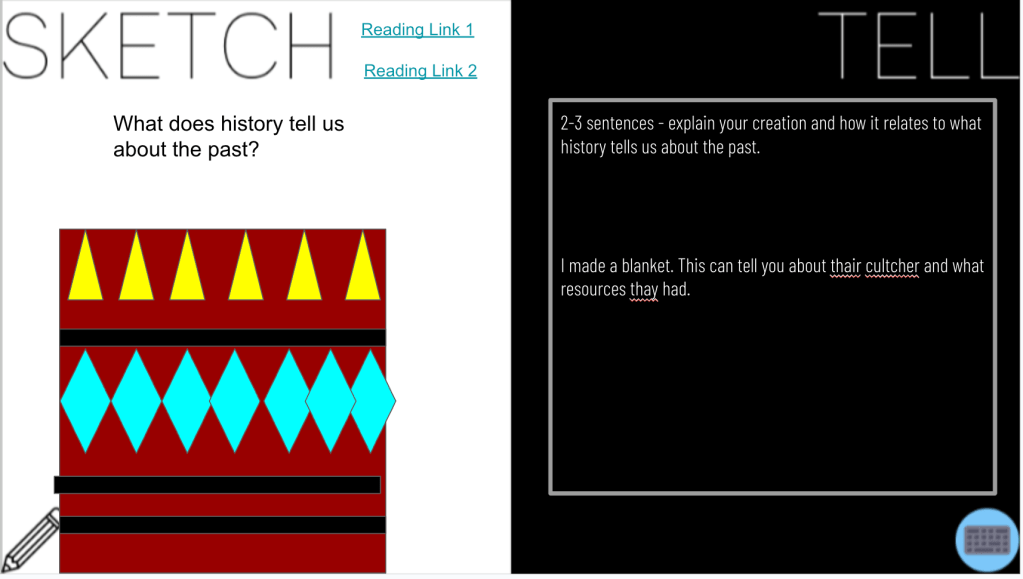
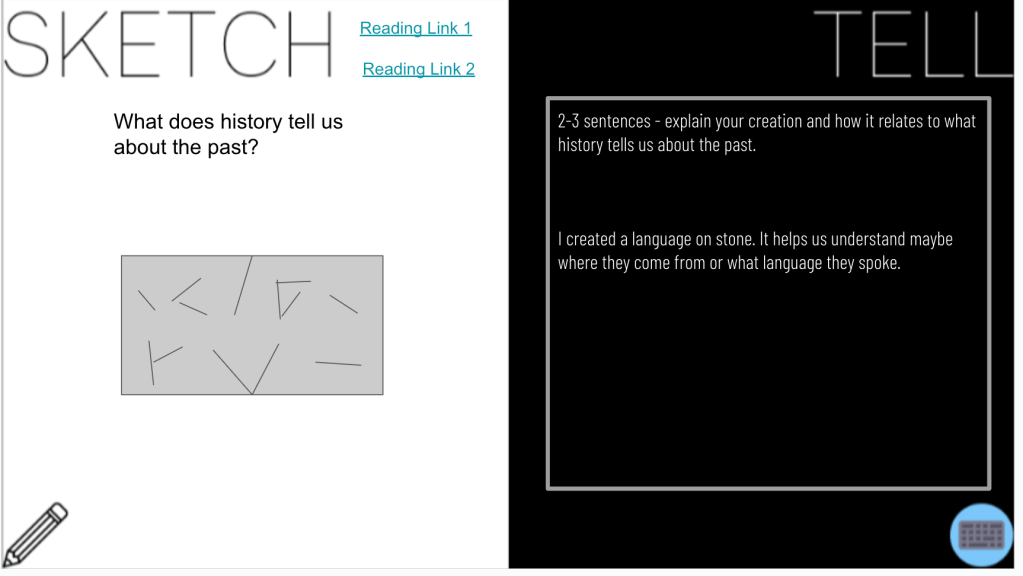
Sketch and Tell: Students create visual representations of historical events or concepts, including inferred information not explicitly stated. Explain their drawings using “Based on… I can infer that…” statements.
Hero’s Journey: Students map a historical figure’s journey, making and explaining inferences about motivations and challenges not explicitly stated in texts.
Multiple Viewpoints Friday (Addressing: Comparing Perspectives & Making a Claim with Evidence)
3xPOV (Three Times Point of View): Students examine a historical event from three different perspectives:
A direct participant in the event
A contemporary observer not directly involved
A modern historian looking back on the event Students use T-charts or Venn diagrams to compare and contrast these viewpoints.
3xCER (Claim, Evidence, Reasoning): Students engage with a historical topic or event using the following structure:
Make three different claims about the topic
Provide specific evidence from historical sources to support each claim
Explain the reasoning that connects the evidence to each claim Students present and discuss their CERs, focusing on the strength of their claims, the relevance of their evidence, and the logic of their reasoning.
So far this school year is flying by. I’m really enjoying my new schedule. My day begins with teaching two 65-minute social studies periods, followed by a plan period, co-teaching a reading workshop with an ELA teacher, and ending the day with two more 65-minute social studies classes. It makes for a nice day, allowing for in-depth lessons and sufficient time to transition between subjects.
At the beginning of the year, the name of the game is teaching the process and procedures of EduProtocols. I like to begin the year smart by starting with the following EduProtocols: Wicked Hydra, Frayers, 3xCER, 8Parts, Thin Slides, and Sketch and Tell. These are pretty basic, and I use them throughout the entire school year. They provide a solid foundation for critical thinking and engagement. I will introduce more in-depth protocols as the year progresses, such as CyberSandwich and Thick Slides, which build upon these basic skills.
We began the day with no Chromebooks, so I needed a new plan. I had to introduce the syllabus. Last year, I used an escape room, but without Chromebooks, I needed something different. Enter the Resource Rumble from EMC2Learning. I used AI to create some puzzles and questions based on my syllabus related to the rules and procedures. I took the questions created by AI and placed them in 8 “treasure chests” around the room. The students had 25 minutes to complete all the treasure chests and have me check their work. This activity not only introduced the syllabus content but also encouraged teamwork and problem-solving.
A true Resource Rumble involves Jenga blocks, but mine were on the Amazon truck. I switched to a new plan and used dice instead. I have several different styles of dice, including one that has numbers one through twelve. After each group brought up their answer, I had them roll the dice to determine how many points the chest was worth. At the end, I had them add up their points. The winning group got to choose from my Unimpressive Prize Box, which contains small, quirky items that surprisingly delight the students.
Following this activity, we did a quick overview of the syllabus, ensuring everyone understood the key points. We then moved on to some Frayer a Friend, to make more connections. By the end of the day, the students finally received their Chromebooks, setting us up for more tech-integrated lessons in the coming days.
Tuesday
Now that we had Chromebooks, it was great to finally introduce the Fast and Curious. I was surprised at the number of students who had never played Gimkit. Since so many students were unfamiliar with it, I found a 4th-grade trivia Gimkit to introduce the game. I set the time limit for 8 minutes to let them explore, but I didn’t tell them anything – I wanted them to figure it out on their own.
Next, I ran another 4th grade trivia Gimkit round with less time, but challenged them to answer more questions and raise the class average. Following this, we did another round where I introduced the states – 50 questions, 50 states. My goal is to have the students know their states with 90% accuracy. It’s a work in progress, but Gimkit’s game-like structure makes this typically dry subject more engaging.
For another round of Gimkit, I had half the class close their Chromebooks and partner up to work together to answer questions. This variation promotes collaboration and peer teaching. If we had any time left, I had students complete another Frayer a Friend continuing to make more connections and learn the process of using a Frayer model.
Wednesday
We began class with a Dominic Helmstetter special – a great Smart Start for the Sketch and Tell-o with gold medals. I had students choose an Olympic event they would gold medal in and one non-Olympic event they would gold medal in. They had to draw a symbol and provide an explanation for why they would win a gold medal. This took about 20-25 minutes and served as a fun warm-up activity that also encouraged creativity and self-reflection. It also agve me a chance to understand the interests of the students.
We followed this up with another Gimkit on states, continuing to build their geography knowledge. I was ready to move into content and the question of “Why do we study history?” However, I realized I had a problem: we hadn’t really practiced much on Chromebooks. We had done Sketch and Tell and Thin Slides on paper, but not much with Chromebooks. This needed to change to ensure students were comfortable with the digital tools we’d be using throughout the year.
I stopped the lesson and created some practice slides using Justin Unruh templates. I put together a Thin Slide utilizing Google Slides, a Thin Slide utilizing Padlet, and two Sketch and Tells. I wanted to show how Padlet could be utilized for the “I can’t draw” feature, as it uses AI to generate images that can be used for Thin Slides. This introduction to various digital tools will prove valuable as we incorporate more tech-based activities.
For the Smart Start question, I asked, “What is a food no one should eat?” I gave students 3 minutes to create their responses. They put their name as the “subject” and wrote their one word or phrase in the body of the post. After 3 minutes, I selected “freeze Padlet” and then hit the play button, which turned it into a slide presentation. By using Padlet, students can’t mess with each other’s slides, ensuring a smooth presentation process.
Following our Thin Slides, we used a regular Sketch and Tell. The prompt was, “What is a food you can eat every day for the rest of your life?” It became apparent that I had to show them where Google Shapes was located on the toolbar and how to change colors and duplicate shapes. We clearly have some Google tech learning that needs to be done! I chose these specific EduProtocols because I would be using them in the near future, and this practice session helped identify areas where students needed more support.
Thursday
I began class with a Literacy Skills Entry exam from our McGraw Hill book. I noticed two exams – Historical Thinking Skills and a Literacy Skills exam. I decided the Literacy Skills entry exam was what I was going to use. I have every student with an IEP this year, and I wanted an idea of our ability to understand main ideas, inferences, context clues, and perspectives. This baseline assessment will help me tailor future lessons to meet the specific needs of this year’s class.
The original exam was 20 questions, which seemed like overkill. I had AI analyze the entire exam and every question for the skills being assessed. From there, I reduced the 20 questions to 8. This exam took 20 minutes. At the end of the day, I had AI create a rubric for the exam, and then I took all the students’ responses and correlated them with the rubric. The data I received provided good baseline information that will inform my teaching strategies moving forward.
For my original lesson on “Why do we study history?” I had a CyberSandwich ready to go. However, after some thought and knowing the students I had in front of me, I realized a new protocol would be too much. Instead, I put together a Thin Slide with the prompt, “What is an event that families would try to record and retell?” I gave them 3 minutes and stuck to my timer. This activity helped students connect historical thinking to their personal experiences.
Next, I included a Frayer with the word “continuity.” Under the “define” heading, I had AI create a sentence that could be used to help students use context clues to create a definition. The sentence was: “The movie series kept the same main character and story from one film to the next, providing continuity that helped viewers follow along easily.” For the other boxes, students had to find examples, non-examples, and a picture. I was hoping the Frayer would take 5 minutes, but it took about 8 to 10 minutes. This extra time was well-spent as students grappled with this important historical concept.
Following the Frayer, I had two Sketch and Tells ready to go. I linked the section from the textbook and asked, “Why do we study history?” The goal was to create a sketch with Google Shapes based on the reading and explain it with 2 to 3 sentences. Students had 10 minutes to complete both Sketch and Tells. That was a bit of a struggle, but I still had them turn it in. I’m learning I have my work cut out for me this year – I’m trying to help the students own their learning through protocols and timers. This process of productive struggle is essential for developing their historical thinking skills.
Friday
On Friday, I continued our historical thinking skills unit. This new book has a lot to it. It’s overwhelming and, like most textbooks, restricting, but I’m trying to analyze the teacher edition and think about which skills they’re trying to get the students to use. This helps direct my use of EduProtocols and ensures that I’m meeting curriculum standards while using engaging teaching methods.
The new topic today was, “How do historians use primary and secondary sources?” I felt like I had overwhelmed the students yesterday with too much, so I decided to simplify it and stick to a Frayer about primary and secondary sources. I provided a sentence created by AI to help them use context clues to create a definition. This approach allowed us to focus deeply on these fundamental concepts in historical research.
We began class with a Gimkit of 10 questions related to why we study history and primary and secondary sources. The class averages were between 72% and 79%, showing a decent grasp of the concepts but room for improvement. We followed this up with a Frayer on primary and secondary sources, reinforcing the ideas through a different learning modality.
Instead of using the textbook section on historians using various sources, I used a Dan Lewer “History for Humans” lesson. It provides a scenario set in the year 3240, where students are historians looking back on the lives of teenagers from 2024. I provided students with a graphic organizer, and they had to select artifacts or sources from their backpacks, write down observations, make inferences, and ask questions. Students used Chromebooks, phones, Stanley water bottles, pencils, and books as their artifacts. They did an excellent job with this activity, really getting into the role of future historians and understanding how everyday objects can become historical sources.
I also reminded them that they had started thinking like historians last week with a Wicked Hydra, asking questions about pictures related to me. They had also begun this process with the 8Parts activity, analyzing a historical photo. We didn’t finish this historical thinking activity and will continue on Monday, allowing for a deeper exploration of these skills.
We finished class with a Gimkit challenge: get above a 90% class average, and everyone receives 3 PBIS points. The class averages ranged from 82% to 92% – every class raised their average. This friendly competition helped reinforce the concepts we’d been learning all week while adding an element of fun to end the week.
Closing
As I reflect on this week, I’m pleased with the progress we’ve made in introducing various EduProtocols and historical thinking skills. The students are gradually adapting to the new technologies and methodologies, even if there’s still a learning curve. It’s clear that flexibility is key – whether it’s dealing with unexpected Chromebook delays or adjusting lesson plans on the fly. I’m particularly encouraged by the students’ engagement with activities like the Resource Rumble, Gimkit challenges, and the futuristic historian exercise. These activities not only make learning more interactive but also help develop critical thinking skills essential for studying history.
Looking ahead, I plan to continue refining my approach, balancing between introducing new concepts and reinforcing the basics. The baseline data from our literacy skills assessment will be invaluable in tailoring future lessons. As we delve deeper into our curriculum, I’m excited to see how the students will grow in their ability to analyze sources, make connections, and think like historians. It’s been a challenging but rewarding start to the year, and I’m looking forward to what the coming weeks will bring. Onward to another week of discovery in 8th grade social studies!
This week marked the start of a new chapter in my teaching career. I’ve transitioned to Batavia Middle School, where I’m now teaching 8th grade social studies in room 234. While the subject remains the same, I’m facing new procedures, new students, and a new textbook.
At my previous school, we used TCI History Alive, but now I’m working with McGraw Hill’s Voices of the Past. This change has presented some challenges. Previously, I could easily transfer TCI sections to a Google Doc and link it to activities (like EduProtocol), or directly link TCI sections to activities. However, with McGraw Hill, I can’t transfer content to Google Docs or create links in the same way.
This limitation is particularly frustrating because I prefer using Google Docs for its accessibility. It allows students to quickly access sources with a simple click, which streamlines the class and maintains a good tempo. I’m currently brainstorming ways to work around this issue.
Another adjustment I’m facing is the longer class periods. We now have 65-minute classes, compared to the 47-minute periods I was accustomed to. While this extended time offers more opportunities for activities (as they say in Step Brothers, “There’s so much room for activities”), it’s challenging from a timing perspective. On the bright side, I now only have four periods of Social Studies and co-teach one period of reading workshop with an ELA teacher.
Despite these changes, the first two days flew by.
Thursday: Building Connections
Thursday marked the first day back for everyone. As always, I began by emphasizing the core values of our classroom: respect, value, support, connection, challenge, and empowerment for everyone in room 234.
Although the students won’t receive their Chromebooks until next week, it wasn’t a problem. EduProtocols are versatile and can easily transfer to paper. To foster a sense of value, respect, and connection among the students, we started with a “Frayer a Friend” activity. This exercise included various prompts such as:
Their name and birthday
Four things they like
Four things they dislike
Three items they’d want on a deserted island
A sketch of their dream vacation
I initially set a six-minute timer for the first round, but many students couldn’t finish in time. That’s perfectly fine – it’s all part of the learning process. On the back of the Frayer, I incorporated an idea from Ariana Hernandez: Sketch, Tell, and Connect. Students sketched something they noticed during their interview, wrote a quick sentence about it, and then explained how it might connect to them personally.
We followed this with another round of Frayer a Friend, this time reducing the time to five minutes. Impressively, 90% of the class finished this round. I used this as an opportunity to reinforce our class goal: improvement with each repetition, doing a bit more each time.
Next, we moved on to a REPP (Random Emoji Power Paragraph) activity with their partners. This is always a hit, bringing great energy and laughter to the classroom. It’s one of my favorite EduProtocols.
To wrap up the day, since we didn’t have Chromebooks, I introduced the Marker Game. Students found a new partner, and each pair received a dry erase marker to stand up between them. I read True/False statements about the syllabus and my class. If they thought the statement was true, they grabbed the marker; if false, they left it alone. This game was a blast and a great way to review important class information.
Overall, it was a successful first day, though I’m eagerly anticipating the arrival of the Chromebooks.
Friday: Deepening Connections and Introducing Myself
On Friday, I wanted to maintain the momentum we’d built. We started with another Frayer a Friend activity, this time partnering students with someone from a different table. I set a four-minute timer, and everyone successfully completed the task.
Next, I introduced the Wicked Hydra activity. I had prepared five images related to me and my life, taping them to poster paper or whiteboards around the room. These images included:
A picture of my family
Me receiving the OCSS MS Social Studies Teacher of the Year award
A photo from my NKU tennis days
A Zach Bryan concert where Bruce Springsteen made a surprise appearance
A picture of Dominic Helmstetter and me presenting at NCSS (interestingly, two classes thought Dominic was Ronaldo and were impressed that I had “met” him!)
The goal of this activity was to introduce myself through questioning strategies while simultaneously developing students’ historical thinking skills of observation and questioning. I rotated all groups through all pictures in 15 minutes.
Following this, I combined a 3xCER (Claim, Evidence, Reasoning) with the Wicked Hydra activity. I emphasized that everything we do in room 234 serves a purpose. In this case, their observations and questions would help them create claims about me. After explaining claims, evidence, and reasoning, I gave the students 10 minutes to come up with claims about me based on the images they had observed.
We concluded the activity by having students share their claims. I answered their questions and shared more about myself, creating a wonderful opportunity for connection and engagement.
This class period was a resounding success, and I’m definitely planning to use this activity again in the future.
In conclusion, despite the challenges of adapting to a new school environment, these first two days have been incredibly rewarding. I’m excited to continue building connections with my students and helping them develop crucial skills through engaging, purposeful activities.
Artificial Intelligence (AI) has rapidly become an invaluable tool in education, transforming how teachers plan, instruct, and assess their students. Here’s an in-depth look at how AI can serve as a personal assistant for educators and the importance of editing and the 80/20 rule in maximizing its effectiveness.
Lesson Planning and Curriculum Development
AI tools, such as ChatGPT, are revolutionizing the way teachers approach lesson planning and curriculum development. These tools can generate lesson plans, create outlines, and provide a wealth of resources tailored to specific subjects and grade levels. Here’s how AI can streamline this critical process:
Generating Ideas: AI can help teachers brainstorm innovative lesson ideas. By inputting a general topic or theme, AI can suggest various activities, discussion points, and multimedia resources that can make the lesson more engaging and comprehensive.
Creating Outlines: Once a lesson idea is generated, AI can assist in organizing the content into a coherent structure. This includes breaking down the lesson into segments such as introduction, main content, activities, and assessments, ensuring a logical flow that enhances student understanding.
Producing Full Lesson Plans: AI can take the outlines and expand them into full-fledged lesson plans. This involves detailing each segment, including step-by-step instructions, necessary materials, and timing. Teachers can then review and tweak these plans to suit their specific classroom dynamics.
Resource Compilation: AI can compile relevant resources such as articles, videos, and interactive activities that align with the lesson objectives. This saves teachers significant time and effort in searching for high-quality materials.
Differentiation and Personalized Learning
Differentiating instruction to meet the diverse needs of students is a critical aspect of effective teaching. AI tools can significantly aid in this by providing customized learning materials and activities. Here’s how:
Tailoring Reading Levels: By inputting specific reading levels, AI can generate texts that are appropriate for students’ comprehension abilities. For example, creating a 500L reading passage ensures that even struggling readers can grasp the content without feeling overwhelmed.
Adapting Learning Styles: AI can create materials that cater to different learning styles, such as visual, auditory, and kinesthetic learners. This includes generating visual aids, audio recordings, and hands-on activities that make the content accessible to all students.
Providing Multiple Formats: AI can produce various formats of the same content, such as summaries, detailed explanations, and interactive quizzes. This allows students to choose the format that best suits their learning preferences and needs.
Creating Adaptive Assessments: AI-driven assessments can adjust their difficulty based on student responses, providing a personalized evaluation experience that accurately reflects each student’s understanding and progress.
Student Engagement
Engaging students is one of the most challenging aspects of teaching. AI can enhance student interaction through innovative and interactive activities. Here are some examples:
Factual Scavenger Hunts: AI can create scavenger hunt activities where students search for facts within provided materials. This not only makes learning fun but also encourages active participation and critical thinking.
Argumentative Writing Prompts: AI can generate prompts for argumentative essays, helping students develop their writing and reasoning skills. By providing diverse and thought-provoking topics, AI can stimulate deeper engagement and discussion.
Q&A with Historical Figures: Tools like storyfile enable students to interact with virtual representations of historical figures. Students can ask questions and receive answers based on historical data, making history lessons more immersive and engaging.
Interactive Simulations: AI can develop simulations and role-playing scenarios that allow students to experience historical events, scientific processes, or mathematical concepts in a hands-on manner, fostering a deeper understanding of the material.
Assessment and Feedback
AI can transform how teachers assess student performance and provide feedback. Here’s how:
Automated Quiz Generation: AI can quickly generate quizzes and tests that align with lesson objectives. These assessments can include various question types, such as multiple-choice, short answer, and essay questions.
Instant Feedback: AI tools can provide immediate feedback to students on their assessments. This helps students understand their mistakes and learn from them in real time, enhancing the learning process.
Data-Driven Insights: AI can analyze assessment results to identify patterns and trends. This enables teachers to pinpoint areas where students are excelling or struggling, allowing for targeted interventions and support.
Formative and Summative Assessments: AI can assist in creating both formative assessments, which monitor student learning during the instructional process, and summative assessments, which evaluate student learning at the end of an instructional unit.
Organizing and Analyzing Data
Managing and analyzing educational data is crucial for informed decision-making. AI can assist teachers in this area by:
Organizing Student Performance Metrics: AI can compile and organize data on student performance, making it easier for teachers to track progress over time. This includes grades, attendance, and behavioral records.
Curriculum Alignment: AI can ensure that lesson plans and assessments align with curriculum standards and learning objectives. This helps teachers stay on track and meet educational requirements.
Identifying Learning Trends: By analyzing data, AI can identify trends in student learning, such as common misconceptions or frequently missed questions. This information is valuable for adjusting instructional strategies.
Generating Reports: AI can create detailed reports that summarize student performance, highlight areas for improvement, and suggest next steps. These reports can be shared with students, parents, and administrators to support collaborative efforts in improving education.
The Importance of Editing
While AI is a powerful tool, it is not infallible. It is crucial for teachers to edit and review the output generated by AI. Here are key reasons why:
Accuracy: AI may produce content that includes factual errors or outdated information. Teachers must verify the accuracy of this content before using it in their classrooms.
Relevance: The content generated by AI should be relevant to the specific context and needs of the students. Editing ensures that the materials are appropriate and tailored to the class’s current learning objectives.
Quality: AI-generated content might lack the nuanced understanding and creativity that human teachers bring to their work. Editing helps to polish the material, making it more engaging and effective.
The 80/20 Rule
The 80/20 rule, also known as the Pareto Principle, is particularly relevant when using AI in education. It suggests that 80% of results come from 20% of efforts. In the context of AI as a personal assistant:
Focus on High-Impact Tasks: Teachers should leverage AI for routine and time-consuming tasks, such as grading and lesson planning, which frees up more time for them to focus on the 20% of activities that have the most significant impact on student learning and engagement.
Maximize Efficiency: By allowing AI to handle the bulk of administrative tasks, teachers can dedicate more energy to innovative teaching methods and personal interactions with students, which are crucial for fostering a positive learning environment.
Conclusion
AI is not a replacement for teachers but a tool that, when used effectively, can enhance their capabilities and improve educational outcomes. By understanding the importance of editing AI-generated content and applying the 80/20 rule, teachers can make the most of these technological advancements. Embracing AI with intentionality and purpose will ensure that it serves as a valuable assistant in the modern classroom, empowering educators to focus on what they do best: inspiring and educating the next generation.
As educators, time is precious, and maximizing productivity is crucial. Whether you’re using a Mac or a Windows computer, keyboard shortcuts can save you time and streamline your workflow. These shortcuts are particularly helpful when integrating EduProtocols into your classroom activities. Here’s a handy guide to some essential keyboard shortcuts and how they can enhance your use of EduProtocols.
Copy and Paste with Command+C and Command+V or Ctrl+C and Ctrl+V
The basic shortcuts for copying and pasting are Command + C and Command + V for Mac users, and Ctrl + C and Ctrl + V for Windows users. These are fundamental for a variety of tasks:
Copying Text and Images: Quickly transfer text and images between documents and slides.
Organizing Information: Easily move elements within your EduProtocols templates.
Duplicating Shapes and Text with Command+D or Ctrl+D
One of the frequent tasks in activities like Sketch and Tell or Thick Slides is duplicating shapes and text. On a Mac, you can use Command + D, and on Windows, you can use Ctrl + D. This shortcut makes it easy to create multiple copies of an image, shape, or text box, speeding up the design process. For example:
Sketch and Tell: Quickly duplicate images to create multiple illustrations.
Thick Slides: Duplicate word art fonts to maintain consistent styles across slides.
Iron Chef: Clone elements to create uniform layouts for collaborative work.
Selecting All Text with Command+A or Ctrl+A
When you need to select all the text on a page for copying and pasting, Command + A (Mac) or Ctrl + A (Windows) is your go-to shortcut. This is particularly useful for:
Copying Text for AI Integration: Select all text on a webpage or document to easily copy and paste it into AI platforms for processing.
Organizing Information: Gather all text from a source to ensure no details are missed when transferring information to your EduProtocols templates.
Finding Specific Items with Command+F or Ctrl+F
Searching for specific terms or phrases within a document or webpage is made simple with Command + F (Mac) or Ctrl + F (Windows). This shortcut is indispensable for:
Research and References: Quickly locate key terms or facts on a webpage or document.
Text Analysis: Help students find and highlight important information during reading activities.
Inserting Hyperlinks with Command+K or Ctrl+K
Hyperlinks are essential for connecting resources and references. Use Command + K (Mac) or Ctrl + K (Windows) to insert hyperlinks efficiently. This can enhance:
Thick Slides and CyberSandwiches: Link directly to sources, ensuring students have access to relevant information.
Resource Compilation: Create interconnected documents and slides for comprehensive study materials.
Commenting on Google Docs and Slides
Adding comments in Google Docs or Slides is crucial for collaborative work and feedback. Use Command + Option + M on a Mac and Ctrl + Alt + M on Windows to quickly add comments. This is especially useful for:
Feedback and Collaboration: Easily provide feedback on student work.
Peer Review: Facilitate peer review processes by enabling students to comment on each other’s work.
Other Essential Keyboard Shortcuts
Here are a few more shortcuts that can further streamline your tasks:
Reopen Closed Tabs with Ctrl+Shift+T: Accidentally closed a tab? No problem. Ctrl + Shift + T (Windows) or Command + Shift + T (Mac) will reopen it.
Paste Without Formatting with Ctrl+Shift+V: Need to paste text without bringing over unwanted formatting? Ctrl + Shift + V (Windows) or Command + Shift + V (Mac) will do just that.
Undo with Command+Z or Ctrl+Z: Made a mistake? Quickly undo it with Command + Z (Mac) or Ctrl + Z (Windows).
Redo with Command+Shift+Z or Ctrl+Shift+Z: Redo an action with Command + Shift + Z (Mac) or Ctrl + Shift + Z (Windows).
Teaching Students Keyboard Shortcuts
Teaching students these shortcuts can significantly boost their productivity and digital literacy. By mastering these tools, students can:
Work More Efficiently: Complete assignments and projects faster.
Enhance Learning: Spend less time on technical tasks and more time on critical thinking and learning.
Develop Digital Skills: Build essential skills for future academic and professional success.
Conclusion
Integrating these keyboard shortcuts into your daily routine can significantly enhance your productivity and effectiveness, especially when using EduProtocols. By mastering these simple yet powerful tools, you can focus more on teaching and less on navigating through software. Happy shortcutting!
As educators, we’re always on the lookout for ways to make our lessons more engaging and effective. One strategy that stands out is using the Iron Chef EduProtocol along with thick slides. But how can we enhance these tools to maximize student engagement and learning? Let’s dive in!
Top 10 Ways to use the Secret Ingredient in the Iron Chef
Adding a secret ingredient to the Iron Chef EduProtocol can spice things up and get students thinking creatively. Here are my top ten ways to change up the secret ingredient and why they work so well:
Analogy or Metaphor: Create a one-sentence analogy or metaphor that explains the topic. This encourages students to think abstractly and make connections to other concepts.
News Headline: Write a news headline that captures the essence of the topic. Headlines are catchy and force students to distill information to its most important elements.
Interview Question: Come up with one interview question you would ask an expert on the topic. This gets students thinking about the topic from an investigative perspective.
Tweet: Compose a tweet (280 characters) summarizing the main point or an interesting fact about the topic. Tweets are concise and make students focus on clarity and brevity.
Visual Representation: Draw a quick doodle or icon that illustrates the topic. Visuals help students remember and understand concepts better.
Personal Connection: Write a one-sentence connection to your own life or experience. Personal connections make the learning more relevant and memorable.
Concept Map: Sketch a simple concept map showing how the topic connects to one other idea. Concept maps encourage students to see the bigger picture and how ideas interrelate.
Soundtrack: Choose a song that represents the topic and explain in one sentence why you chose it. This taps into students’ emotions and helps them connect with the material on a deeper level.
Advertisement: Create a short slogan promoting the topic. Slogans are fun and make students think about the topic in a persuasive way.
Historical Context: Write a sentence that places the topic in a historical context. This helps students understand the importance and relevance of the topic over time.
These secret ingredients can be tailored to any subject or grade level, sparking creativity and encouraging students to delve deeper into the material.
Top 10 Ways to Change Up Thick Slides
Thick slides are a fantastic tool for organizing and presenting information. To make them even more effective for note-taking, consider these top ten ideas and why they’re so effective:
Cause and Effect: List the causes and effects related to the topic in a simple diagram or table. This framework helps students understand relationships and consequences.
Pros and Cons: Create a table listing the pros and cons of a particular event, decision, or idea related to the topic. This encourages critical thinking and balanced analysis.
Timeline: Create a mini-timeline with 4-5 key events related to the topic. Timelines help students visualize sequences and historical context.
PEEL Paragraph: Have students write a paragraph using the PEEL structure: Point, Evidence, Explanation, and Link. This method strengthens their argumentative writing and analytical skills.
Problem and Solution: Describe a problem related to the topic and propose possible solutions. This approach encourages problem-solving and creative thinking.
Fact vs. Myth: Create a table or list that distinguishes facts from common myths about the topic. This helps students develop critical thinking and discernment.
Hero’s Journey: Smash thick slides with the Hero’s Journey and include the call to action, threshold, helper, abyss, transformation, and return. This narrative framework deepens students’ understanding of storytelling and personal growth.
Mind Map: Create a mind map that shows the connections between different aspects of the topic. Mind maps foster holistic understanding and recall.
RACES Paragraph: Write a paragraph using the RACES strategy: Restate the question, Answer the question, Cite evidence, Explain the evidence, and Summarize. This method ensures thorough and structured responses.
SWBST (Somebody, Wanted, But, So, Then): Use the SWBST framework to summarize a story or historical event. This helps students identify key elements and understand the narrative structure.
By integrating these frameworks into thick slides, educators can enhance students’ note-taking skills and ensure a deeper understanding of the material. The combination of creative secret ingredients and structured note-taking strategies makes learning more engaging, interactive, and effective.
Give these ideas a try in your classroom and watch your students thrive with the Iron Chef EduProtocol and Thick Slides!
As educators, we’re always looking for ways to make our lessons more engaging and effective. One powerful strategy I’ve found is “racking and stacking” EduProtocols. But what exactly does this mean, and why is it so beneficial? Let’s dive in!
What is Racking and Stacking?
“Racking and stacking” refers to the practice of sequencing multiple EduProtocols within a single lesson or unit. It’s like creating a playlist of engaging activities, each building upon the last to deepen understanding and reinforce key concepts.
Why Rack and Stack?
Maintains high engagement: By varying activities, you keep students interested and focused.
Addresses multiple learning styles: Different protocols cater to visual, auditory, and kinesthetic learners.
Scaffolds learning: Each activity builds on the previous one, reinforcing and expanding knowledge.
Encourages deeper thinking: Students revisit content in different ways, promoting higher-order thinking skills.
A Racked and Stacked Lesson Example: Manifest Destiny
Let me walk you through a recent lesson I taught on Manifest Destiny, where I racked and stacked several EduProtocols. This particular rack and stack was designed to span two days, allowing for deeper engagement with each protocol and the content.
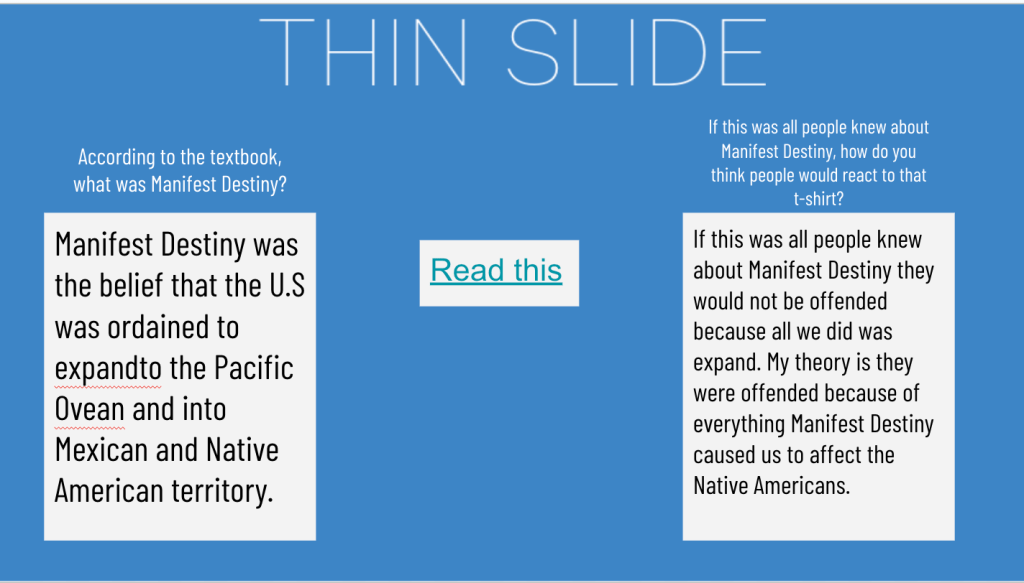
Wicked Hydra Why I started here: This protocol activates prior knowledge and curiosity. I displayed a headline about a controversial “Manifest Destiny” t-shirt, prompting students to generate questions. It immediately created interest and set the stage for deeper exploration.
Thin Slide Why it came next: After piquing their curiosity, I wanted to provide some basic background. The Thin Slide allowed students to quickly process a short textbook excerpt on Manifest Destiny, giving them a foundation for further analysis.
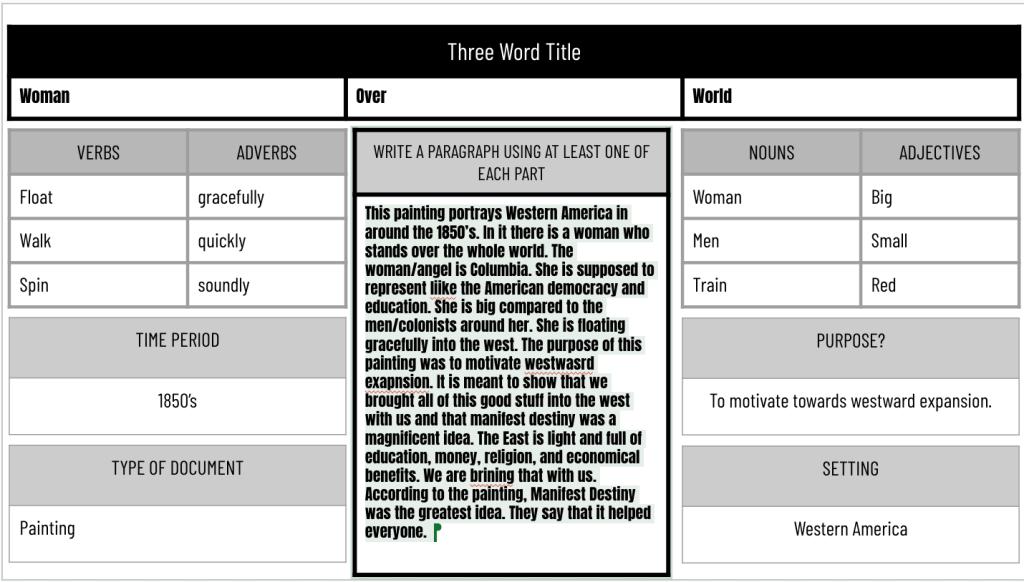
8 Parts of Speech (8pArts) Why I used this third: Now that students had some context, I had them analyze the famous “American Progress” painting. The 8pArts protocol encouraged close observation and descriptive language, deepening their understanding of Manifest Destiny’s visual representation.
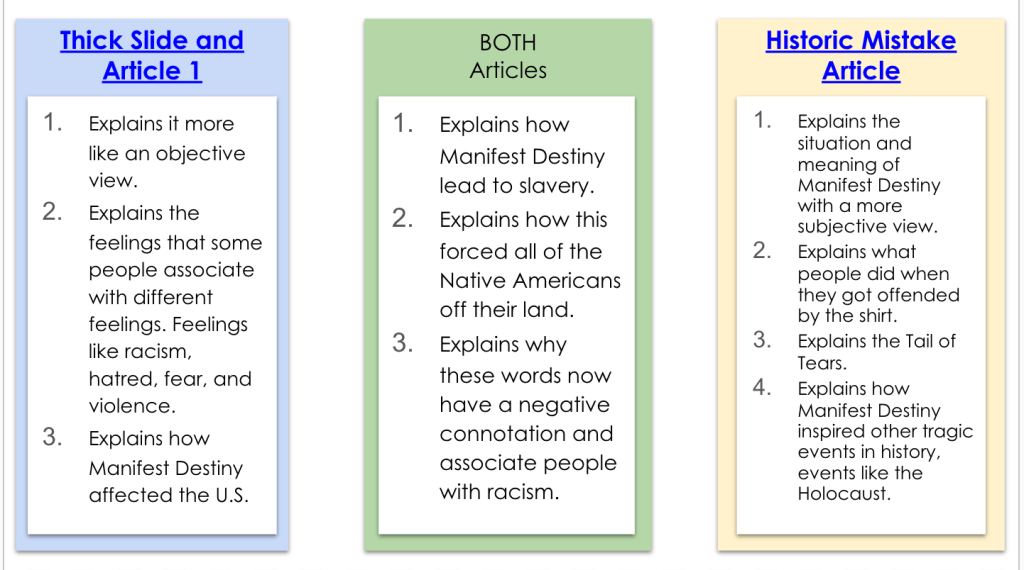
Thick Slide Why it followed: Building on their growing knowledge, the Thick Slide pushed students to engage with a more complex article. They had to extract key ideas, find relevant quotes, and make connections – all higher-order thinking skills.
CyberSandwich (Compare) Why I placed it here: At this point, students had multiple sources of information. The compare component of CyberSandwich allowed them to synthesize their learning, contrasting the news article with their Thick Slide findings.
Sketch and Tell Why I ended with this: As a final reflection, students revisited the original textbook excerpt, adding new information they’d learned throughout the lesson. This protocol encouraged metacognition and allowed students to visually represent their expanded understanding.
By racking and stacking these EduProtocols over two days, I created a dynamic learning experience that allowed for both breadth and depth. Students had time to fully engage with each protocol, building their understanding step by step. This extended approach also allowed for more meaningful discussions and reflections between activities.
Racking and stacking EduProtocols isn’t just about using multiple activities – it’s about thoughtfully sequencing them to maximize learning. When done well, it creates a lesson that’s greater than the sum of its parts, leading to deeper understanding and more engaged students.
Learning from the Masters
When it comes to racking and stacking EduProtocols, one educator stands out as a true master of the craft: Justin Unruh. His innovative approaches to combining protocols have inspired countless teachers, including myself. If you’re looking to dive deeper into the world of racked and stacked EduProtocols, I highly recommend checking out Justin’s templates. They offer excellent “grab and go” options for easy implementation in your classroom, perfect for both newcomers to EduProtocols and experienced users looking for fresh ideas.
So next time you’re planning a lesson or unit, consider how you might rack and stack EduProtocols to create a truly powerful learning experience. Whether you’re spreading it across multiple days like my Manifest Destiny lesson or creating a single power-packed session, the possibilities are endless!
As social studies teachers, we’re always looking for ways to make history more engaging and relevant for our students. One powerful approach is incorporating local history into our lessons. However, finding and using primary sources from our communities can be challenging, especially when dealing with old documents that are difficult to read. This is where AI can be a game-changer.
Recently, I experimented with using AI to help extract and modernize text from a local historical newspaper, making it more accessible for my students. Here’s how I did it:
Step 1: Find a Relevant Primary Source
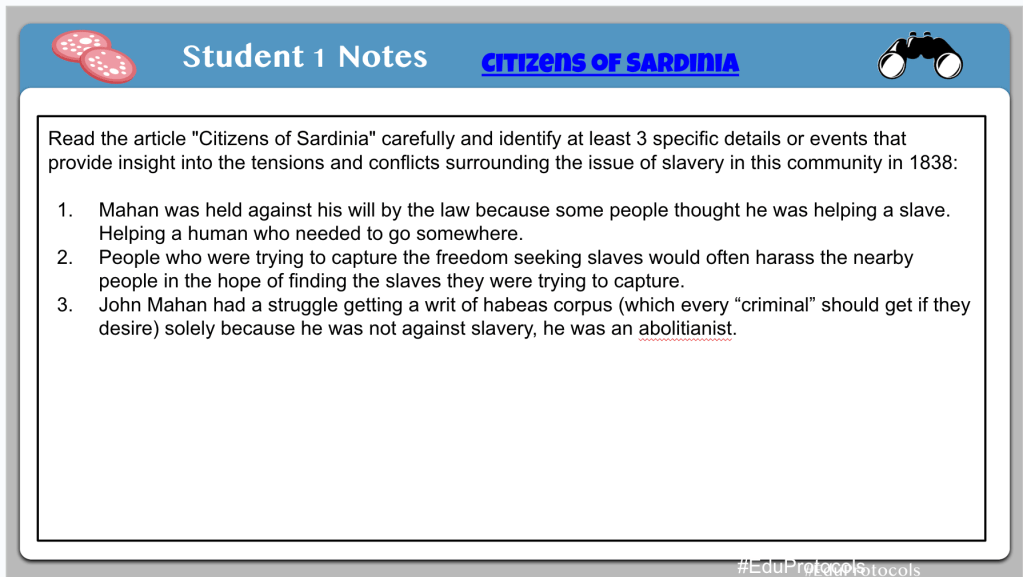
I discovered an 1838 issue of “The Philanthropist,” an anti-slavery newspaper published in our town by local abolitionist James G. Birney. The front page contained an article about citizens in nearby Sardinia, Ohio protesting the arrest of a reverend who had helped enslaved people escape.
Step 2: Capture an Image of the Text
I took a screenshot of the newspaper article. The text was faded and in an old-fashioned typeface, making it difficult for students to read.
Step 3: Use AI to Extract and Modernize the Text
I uploaded the image to Claude, an AI assistant capable of analyzing images. I asked Claude to transcribe the text into modern English while preserving the original meaning and tone. Within seconds, I had a clear, readable version of the article. ChatGPT or Gemini can also be used as well.
Step 4: Verify and Edit the AI Output
I quickly scanned the AI-generated text to check for any obvious errors or misinterpretations. In this case, the output looked accurate, but it’s always important to review AI-generated content.
Step 5: Create an Engaging Lesson
With the modernized text, I developed a Cybersandwich lesson asking students to identify specific details about the tensions surrounding slavery in our community in 1838. This brought a powerful piece of local history to life in a way that was accessible and engaging for my students.
Benefits of This Approach:
Makes difficult-to-read primary sources accessible to students
Saves time compared to manual transcription
Allows incorporation of more local history into lessons
Engages students with relatable, place-based historical content
By leveraging AI in this way, we can open up a wealth of local historical resources that might otherwise remain unused in our classrooms. This approach not only makes history more relevant to our students but also helps them develop a deeper connection to their community’s past.
Have you tried using AI to bring local history into your classroom? I’d love to hear about your experiences and ideas in the comments below!
This is the last The Week That Was In 505. It will be changing to The Week That Was in 234 as I have changed schools and classrooms.
The New Richmond community has been a part of my life since 2nd grade. It is my alma mater. I’m in their athletic hall of fame for tennis. My parents still live in the community. It is where I have taught the last 12 years. But, it was time for a change. I’m moving onto Batavia Middle School and teaching 8th grade social studies.
What does this mean for all the template links on this site? I don’t know….it depends on how long they keep my account open. I have too many template links, and a messy drive, and it’s next to impossible for me to track down all these links. We will just start fresh with the new school year.
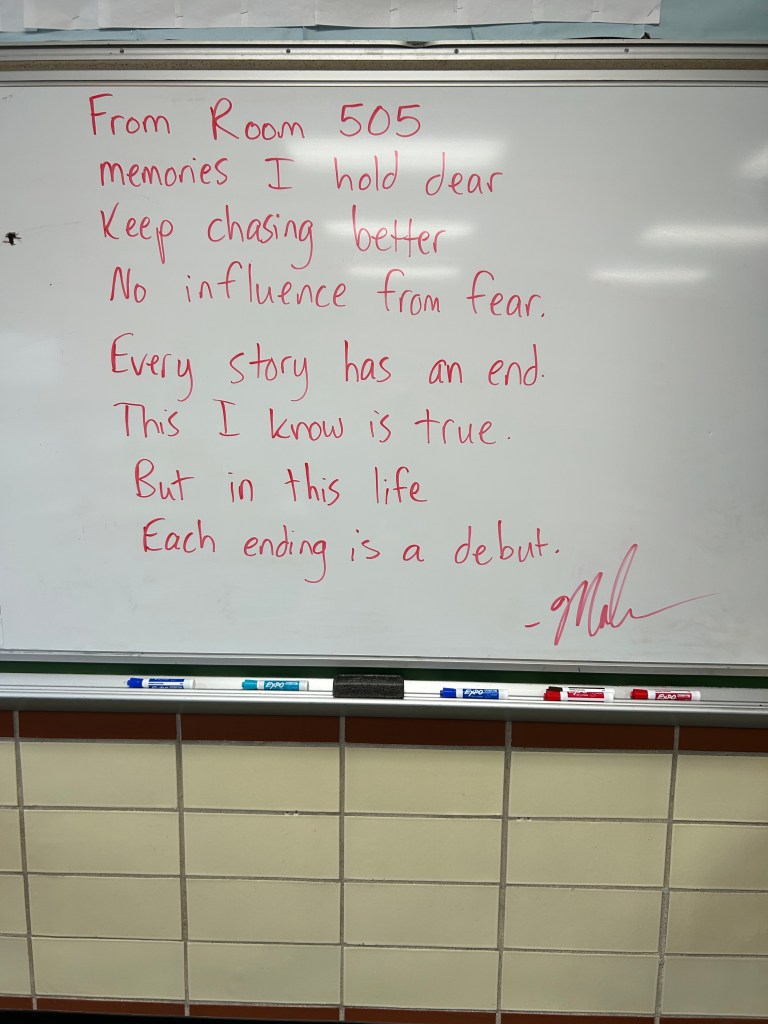
Every year I write a note on my board and walk out. Here is my last note:
Monday was really the only day of teaching this week. Knowing how middler schoolers can be, I needed something engaging. I used my good buddy Claude AI to help me design an escape room. Claude came up with a series of puzzles and games to help students figure out a clue to unlock the Google Form.
The escape room we designed was related to the content students learned all year – causes of the American Revolution, the Constitution, Westward Expansion, and causes of the Civil War.
Claude did an excellent job coming up with some basic puzzles. For example:
Students had to put westward expansion events in chronological order for a number lock.
There was a series of multiple choice questions where the correct answers spelled out the cause of the Civil War that students had to unscramble.
The Cryptogram was fun, but it wasn’t perfect. Some of the words and letter clues were off.
One of the clues specific letters from the answers were unscrambl;es and spelled out FEDERALISM.
Overall, Claude did an excellent job coming up with ideas. I put this escape room together in 30 minutes. Claude also helped me come up with rhymes to help students find the next puzzle thgat I hid somehwere ion my classroom.
Ultimately, the escape room built up to a 3 digit lock box where the students had to do some math:
Clue 1: Start with the total number of representatives in the U.S. House of Representatives. Clue 2: Subtract the total number of senators in the U.S. Senate. Clue 3: Subtract the number of the amendments that abolished slavery and involuntary servitude, except as punishment for a crime. Clue 4: Subtract the number of the amendment that granted citizenship rights and equal protection under the law to all persons born or naturalized in the United States. Clue 5: Subtract the number of the amendment that reserves powers not delegated to the federal government to the states or the people.
It was an engaging, and awesome, last Monday of school.
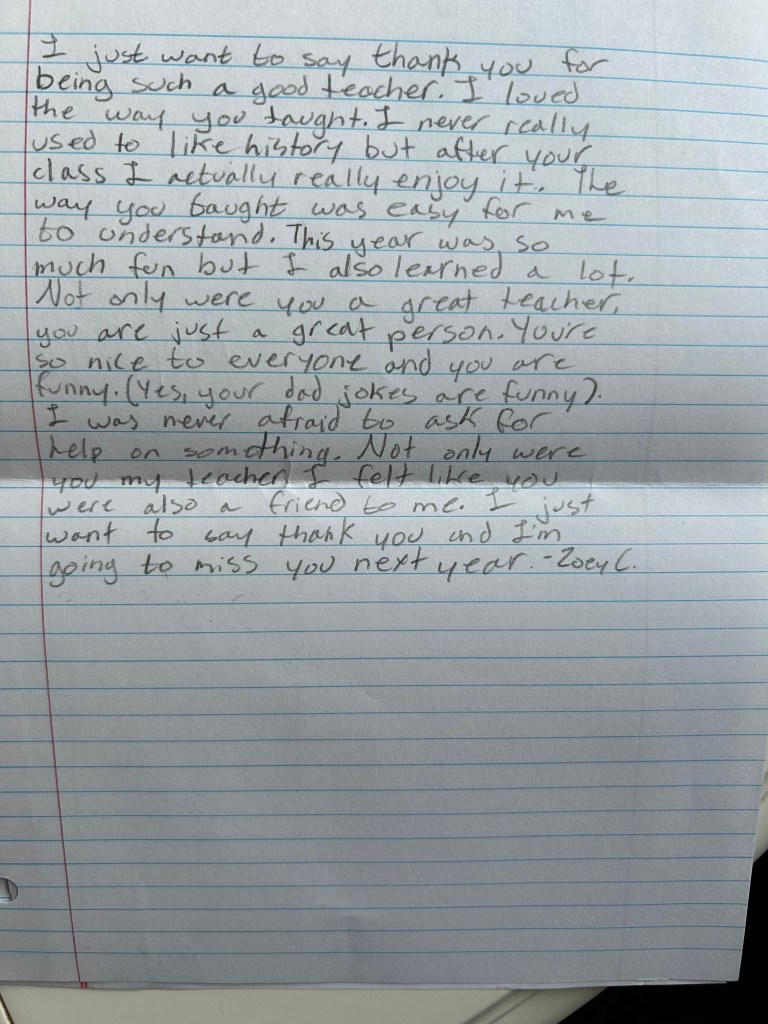
I don’t often share any notes I get, but I keep everything in a basket, and I thought I would share some…
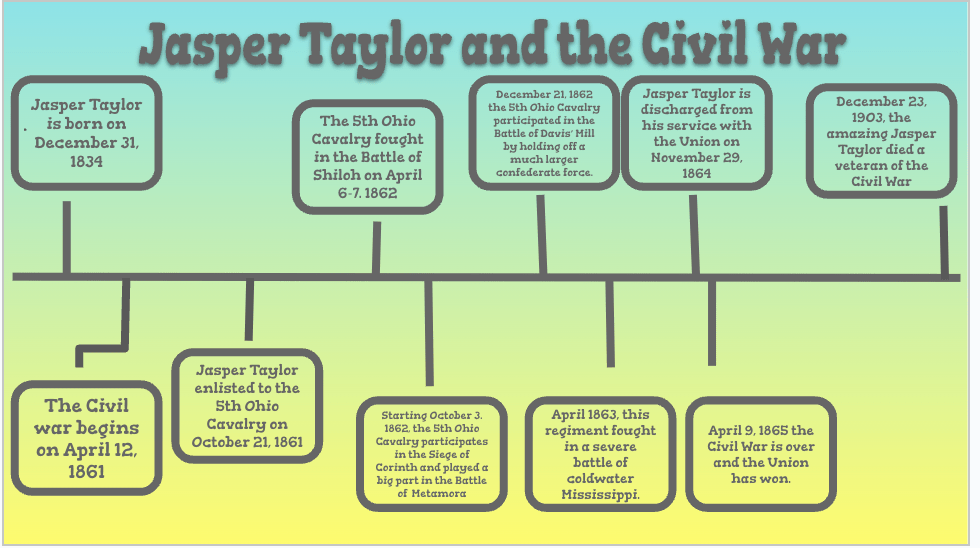
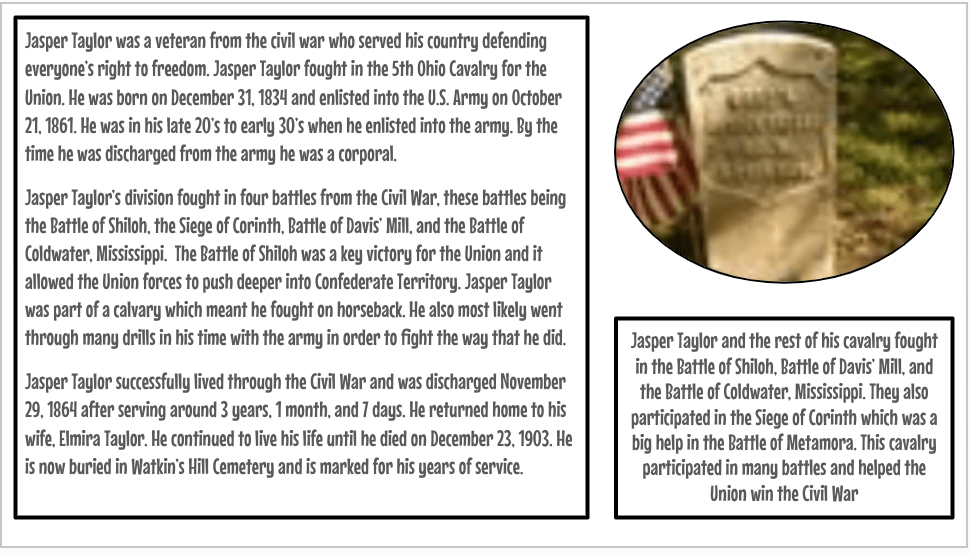
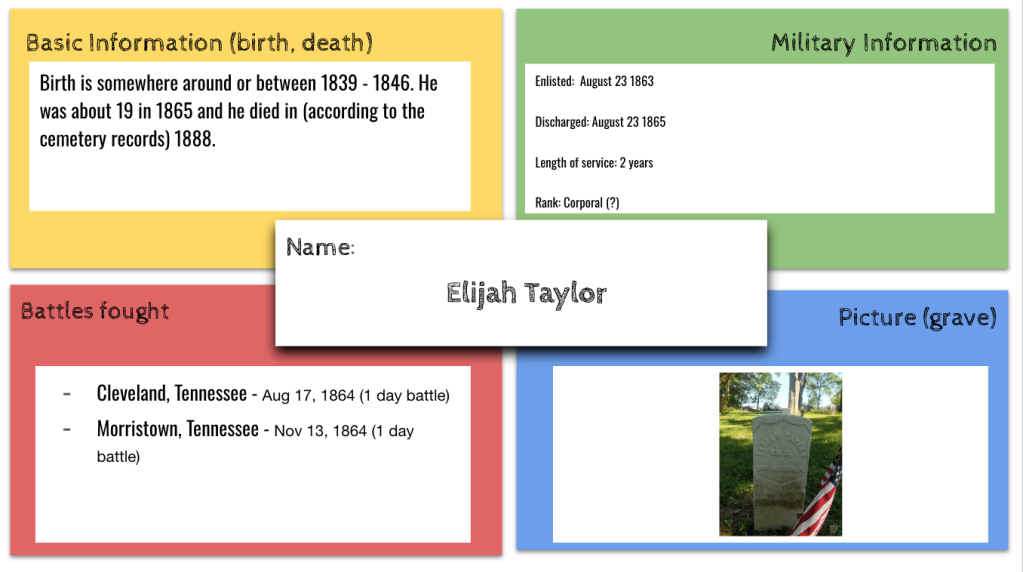
This week, my students embarked on a fascinating research project to uncover the stories of Civil War veterans buried in Watkins Hill Cemetery, located right behind our school. By combining a series of EduProtocols, the students were able to organize their findings and piece together the contributions these brave soldiers made to the Union victory.
To kick off the project, students utilized the Fold3 database, a rich resource for military records, as well as information from the cemetery itself and the American Battlefield Trust website. Armed with these tools, they took on the role of historical detectives, digging deep to unearth details about each veteran’s life and service.
The EduProtocols provided a structured framework for the students to present their discoveries. They began by creating a Frayer model to capture basic information about their chosen veteran, such as their birth and enlistment details, regiment, and company. Next, they constructed a timeline to place the veteran’s service within the broader context of the Civil War, marking key milestones like enlistment, discharge, and the battles they fought in.
One of the most engaging aspects of the project was the “Thick Slide,” where students delved into a specific battle their veteran participated in. They researched the date, location, and significant events of the battle, bringing the veteran’s experience to life. By watching videos about the daily life of Civil War soldiers and the food they ate, the students gained a more intimate understanding of the challenges these men faced.
As a culminating activity, the students wove together all the threads of their research to craft a compelling biography of their veteran. They reflected on how each individual contributed to the Union’s ultimate victory, whether through bravery on the battlefield or vital support roles behind the lines.
I asked students what they learned from this project. Here was an interesting comment from a student on the reflection form…”That even though we mainly focus on the big events in history, all the people involved are very important to the overall event.”
Watching my students engage so deeply with local history was truly rewarding. They not only honed their research and critical thinking skills but also developed a profound appreciation for the sacrifices made by these long-ago soldiers. By connecting with the past on such a personal level, they gained a new perspective on the impact of the Civil War on our community and the nation as a whole.
Projects like this one remind us of the power of place-based learning and the importance of preserving local history. I’m incredibly proud of my students’ dedication and the insights they uncovered, and I look forward to exploring more ways to bring the past to life in our classroom.