Boosting Productivity with Keyboard Shortcuts on Mac and Windows

As educators, time is precious, and maximizing productivity is crucial. Whether you’re using a Mac or a Windows computer, keyboard shortcuts can save you time and streamline your workflow. These shortcuts are particularly helpful when integrating EduProtocols into your classroom activities. Here’s a handy guide to some essential keyboard shortcuts and how they can enhance your use of EduProtocols.

Copy and Paste with Command+C and Command+V or Ctrl+C and Ctrl+V

The basic shortcuts for copying and pasting are Command + C and Command + V for Mac users, and Ctrl + C and Ctrl + V for Windows users. These are fundamental for a variety of tasks:

  • Copying Text and Images: Quickly transfer text and images between documents and slides.
  • Organizing Information: Easily move elements within your EduProtocols templates.

Duplicating Shapes and Text with Command+D or Ctrl+D

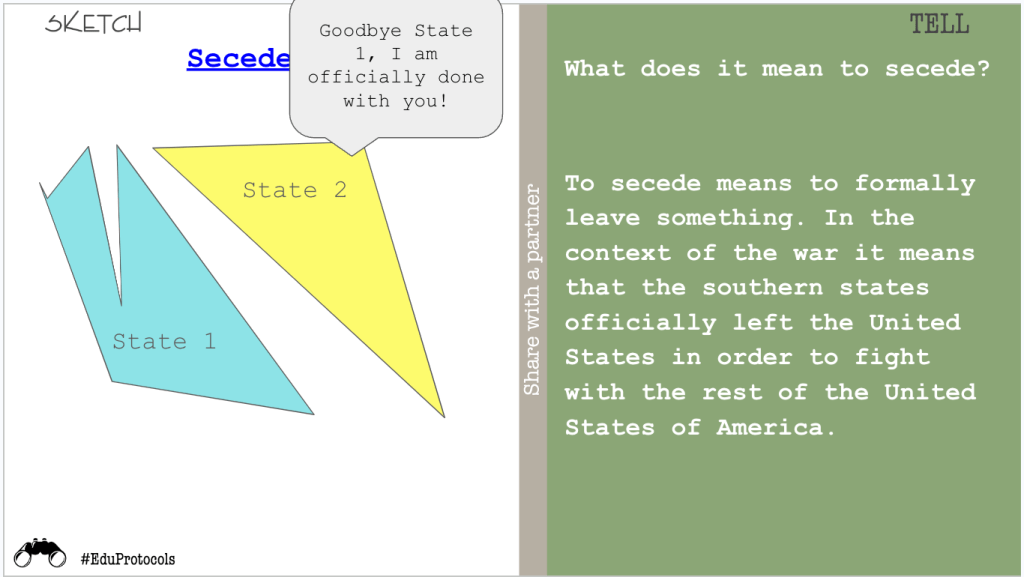
One of the frequent tasks in activities like Sketch and Tell or Thick Slides is duplicating shapes and text. On a Mac, you can use Command + D, and on Windows, you can use Ctrl + D. This shortcut makes it easy to create multiple copies of an image, shape, or text box, speeding up the design process. For example:

  • Sketch and Tell: Quickly duplicate images to create multiple illustrations.
  • Thick Slides: Duplicate word art fonts to maintain consistent styles across slides.
  • Iron Chef: Clone elements to create uniform layouts for collaborative work.

Selecting All Text with Command+A or Ctrl+A

When you need to select all the text on a page for copying and pasting, Command + A (Mac) or Ctrl + A (Windows) is your go-to shortcut. This is particularly useful for:

  • Copying Text for AI Integration: Select all text on a webpage or document to easily copy and paste it into AI platforms for processing.
  • Organizing Information: Gather all text from a source to ensure no details are missed when transferring information to your EduProtocols templates.

Finding Specific Items with Command+F or Ctrl+F

Searching for specific terms or phrases within a document or webpage is made simple with Command + F (Mac) or Ctrl + F (Windows). This shortcut is indispensable for:

  • Research and References: Quickly locate key terms or facts on a webpage or document.
  • Text Analysis: Help students find and highlight important information during reading activities.

Inserting Hyperlinks with Command+K or Ctrl+K

Hyperlinks are essential for connecting resources and references. Use Command + K (Mac) or Ctrl + K (Windows) to insert hyperlinks efficiently. This can enhance:

  • Thick Slides and CyberSandwiches: Link directly to sources, ensuring students have access to relevant information.
  • Resource Compilation: Create interconnected documents and slides for comprehensive study materials.

Commenting on Google Docs and Slides

Adding comments in Google Docs or Slides is crucial for collaborative work and feedback. Use Command + Option + M on a Mac and Ctrl + Alt + M on Windows to quickly add comments. This is especially useful for:

  • Feedback and Collaboration: Easily provide feedback on student work.
  • Peer Review: Facilitate peer review processes by enabling students to comment on each other’s work.

Other Essential Keyboard Shortcuts

Here are a few more shortcuts that can further streamline your tasks:

  • Reopen Closed Tabs with Ctrl+Shift+T: Accidentally closed a tab? No problem. Ctrl + Shift + T (Windows) or Command + Shift + T (Mac) will reopen it.
  • Paste Without Formatting with Ctrl+Shift+V: Need to paste text without bringing over unwanted formatting? Ctrl + Shift + V (Windows) or Command + Shift + V (Mac) will do just that.
  • Undo with Command+Z or Ctrl+Z: Made a mistake? Quickly undo it with Command + Z (Mac) or Ctrl + Z (Windows).
  • Redo with Command+Shift+Z or Ctrl+Shift+Z: Redo an action with Command + Shift + Z (Mac) or Ctrl + Shift + Z (Windows).

Teaching Students Keyboard Shortcuts

Teaching students these shortcuts can significantly boost their productivity and digital literacy. By mastering these tools, students can:

  • Work More Efficiently: Complete assignments and projects faster.
  • Enhance Learning: Spend less time on technical tasks and more time on critical thinking and learning.
  • Develop Digital Skills: Build essential skills for future academic and professional success.

Conclusion

Integrating these keyboard shortcuts into your daily routine can significantly enhance your productivity and effectiveness, especially when using EduProtocols. By mastering these simple yet powerful tools, you can focus more on teaching and less on navigating through software. Happy shortcutting!

Creative Enhancements for Iron Chef and Thick Slides

As educators, we’re always on the lookout for ways to make our lessons more engaging and effective. One strategy that stands out is using the Iron Chef EduProtocol along with thick slides. But how can we enhance these tools to maximize student engagement and learning? Let’s dive in!

Top 10 Ways to use the Secret Ingredient in the Iron Chef

Adding a secret ingredient to the Iron Chef EduProtocol can spice things up and get students thinking creatively. Here are my top ten ways to change up the secret ingredient and why they work so well:

  1. Analogy or Metaphor: Create a one-sentence analogy or metaphor that explains the topic. This encourages students to think abstractly and make connections to other concepts.
  2. News Headline: Write a news headline that captures the essence of the topic. Headlines are catchy and force students to distill information to its most important elements.
  3. Interview Question: Come up with one interview question you would ask an expert on the topic. This gets students thinking about the topic from an investigative perspective.
  4. Tweet: Compose a tweet (280 characters) summarizing the main point or an interesting fact about the topic. Tweets are concise and make students focus on clarity and brevity.
  5. Visual Representation: Draw a quick doodle or icon that illustrates the topic. Visuals help students remember and understand concepts better.
  6. Personal Connection: Write a one-sentence connection to your own life or experience. Personal connections make the learning more relevant and memorable.
  7. Concept Map: Sketch a simple concept map showing how the topic connects to one other idea. Concept maps encourage students to see the bigger picture and how ideas interrelate.
  8. Soundtrack: Choose a song that represents the topic and explain in one sentence why you chose it. This taps into students’ emotions and helps them connect with the material on a deeper level.
  9. Advertisement: Create a short slogan promoting the topic. Slogans are fun and make students think about the topic in a persuasive way.
  10. Historical Context: Write a sentence that places the topic in a historical context. This helps students understand the importance and relevance of the topic over time.

These secret ingredients can be tailored to any subject or grade level, sparking creativity and encouraging students to delve deeper into the material.

Top 10 Ways to Change Up Thick Slides

Thick slides are a fantastic tool for organizing and presenting information. To make them even more effective for note-taking, consider these top ten ideas and why they’re so effective:

  1. Cause and Effect: List the causes and effects related to the topic in a simple diagram or table. This framework helps students understand relationships and consequences.
  2. Pros and Cons: Create a table listing the pros and cons of a particular event, decision, or idea related to the topic. This encourages critical thinking and balanced analysis.
  3. Timeline: Create a mini-timeline with 4-5 key events related to the topic. Timelines help students visualize sequences and historical context.
  4. PEEL Paragraph: Have students write a paragraph using the PEEL structure: Point, Evidence, Explanation, and Link. This method strengthens their argumentative writing and analytical skills.
  5. Problem and Solution: Describe a problem related to the topic and propose possible solutions. This approach encourages problem-solving and creative thinking.
  6. Fact vs. Myth: Create a table or list that distinguishes facts from common myths about the topic. This helps students develop critical thinking and discernment.
  7. Hero’s Journey: Smash thick slides with the Hero’s Journey and include the call to action, threshold, helper, abyss, transformation, and return. This narrative framework deepens students’ understanding of storytelling and personal growth.
  8. Mind Map: Create a mind map that shows the connections between different aspects of the topic. Mind maps foster holistic understanding and recall.
  9. RACES Paragraph: Write a paragraph using the RACES strategy: Restate the question, Answer the question, Cite evidence, Explain the evidence, and Summarize. This method ensures thorough and structured responses.
  10. SWBST (Somebody, Wanted, But, So, Then): Use the SWBST framework to summarize a story or historical event. This helps students identify key elements and understand the narrative structure.

By integrating these frameworks into thick slides, educators can enhance students’ note-taking skills and ensure a deeper understanding of the material. The combination of creative secret ingredients and structured note-taking strategies makes learning more engaging, interactive, and effective.

Give these ideas a try in your classroom and watch your students thrive with the Iron Chef EduProtocol and Thick Slides!

Racking and Stacking EduProtocols: Maximizing Student Engagement and Learning

As educators, we’re always looking for ways to make our lessons more engaging and effective. One powerful strategy I’ve found is “racking and stacking” EduProtocols. But what exactly does this mean, and why is it so beneficial? Let’s dive in!

What is Racking and Stacking?

“Racking and stacking” refers to the practice of sequencing multiple EduProtocols within a single lesson or unit. It’s like creating a playlist of engaging activities, each building upon the last to deepen understanding and reinforce key concepts.

Why Rack and Stack?
  1. Maintains high engagement: By varying activities, you keep students interested and focused.
  2. Addresses multiple learning styles: Different protocols cater to visual, auditory, and kinesthetic learners.
  3. Scaffolds learning: Each activity builds on the previous one, reinforcing and expanding knowledge.
  4. Encourages deeper thinking: Students revisit content in different ways, promoting higher-order thinking skills.
A Racked and Stacked Lesson Example: Manifest Destiny

Let me walk you through a recent lesson I taught on Manifest Destiny, where I racked and stacked several EduProtocols. This particular rack and stack was designed to span two days, allowing for deeper engagement with each protocol and the content.

  1. Wicked Hydra
    Why I started here: This protocol activates prior knowledge and curiosity. I displayed a headline about a controversial “Manifest Destiny” t-shirt, prompting students to generate questions. It immediately created interest and set the stage for deeper exploration.
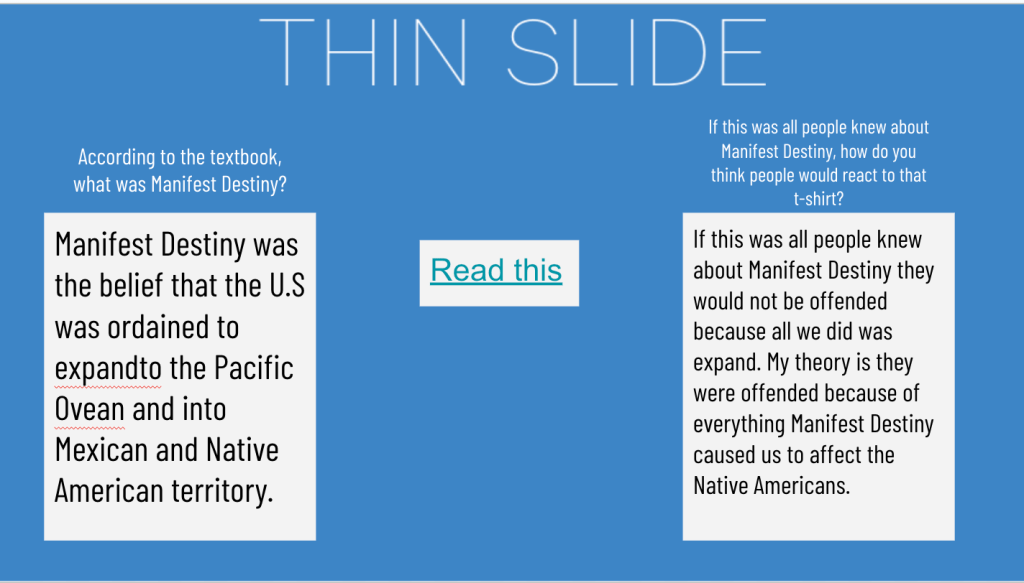
  2. Thin Slide
    Why it came next: After piquing their curiosity, I wanted to provide some basic background. The Thin Slide allowed students to quickly process a short textbook excerpt on Manifest Destiny, giving them a foundation for further analysis.
  3. 8 Parts of Speech (8pArts)
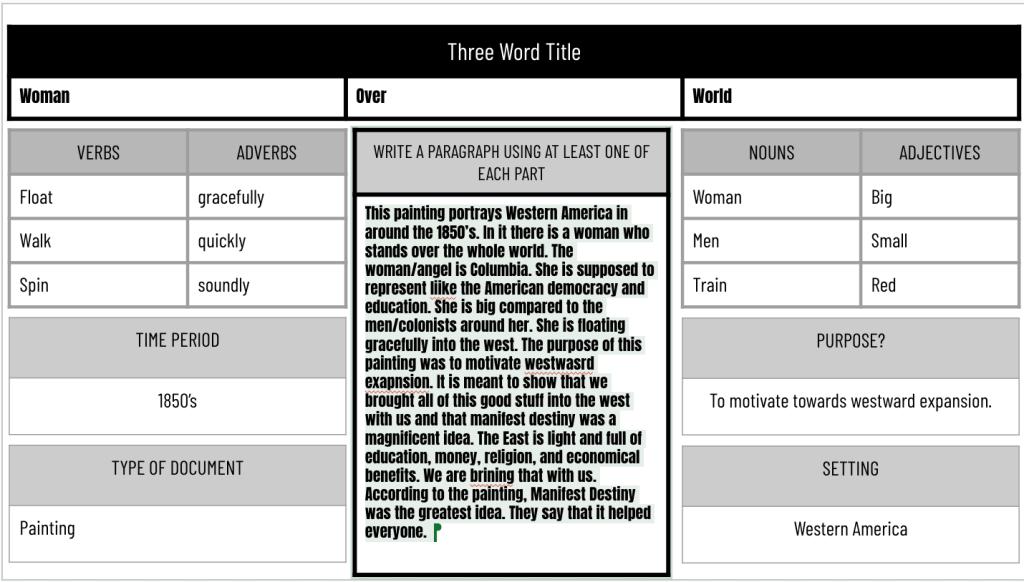
    Why I used this third: Now that students had some context, I had them analyze the famous “American Progress” painting. The 8pArts protocol encouraged close observation and descriptive language, deepening their understanding of Manifest Destiny’s visual representation.
  4. Thick Slide
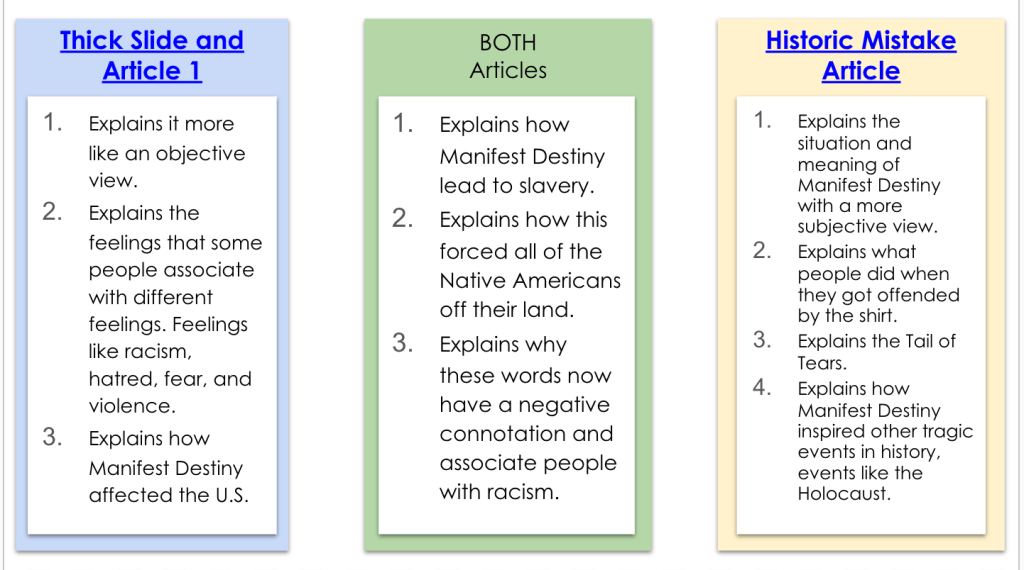
    Why it followed: Building on their growing knowledge, the Thick Slide pushed students to engage with a more complex article. They had to extract key ideas, find relevant quotes, and make connections – all higher-order thinking skills.
  5. CyberSandwich (Compare)
    Why I placed it here: At this point, students had multiple sources of information. The compare component of CyberSandwich allowed them to synthesize their learning, contrasting the news article with their Thick Slide findings.
  6. Sketch and Tell
    Why I ended with this: As a final reflection, students revisited the original textbook excerpt, adding new information they’d learned throughout the lesson. This protocol encouraged metacognition and allowed students to visually represent their expanded understanding.

This Rack and Stack can be found here.

The Power of the Stack

By racking and stacking these EduProtocols over two days, I created a dynamic learning experience that allowed for both breadth and depth. Students had time to fully engage with each protocol, building their understanding step by step. This extended approach also allowed for more meaningful discussions and reflections between activities.

Racking and stacking EduProtocols isn’t just about using multiple activities – it’s about thoughtfully sequencing them to maximize learning. When done well, it creates a lesson that’s greater than the sum of its parts, leading to deeper understanding and more engaged students.

Learning from the Masters

When it comes to racking and stacking EduProtocols, one educator stands out as a true master of the craft: Justin Unruh. His innovative approaches to combining protocols have inspired countless teachers, including myself. If you’re looking to dive deeper into the world of racked and stacked EduProtocols, I highly recommend checking out Justin’s templates. They offer excellent “grab and go” options for easy implementation in your classroom, perfect for both newcomers to EduProtocols and experienced users looking for fresh ideas.

So next time you’re planning a lesson or unit, consider how you might rack and stack EduProtocols to create a truly powerful learning experience. Whether you’re spreading it across multiple days like my Manifest Destiny lesson or creating a single power-packed session, the possibilities are endless!

Using AI to Bring Local History to Life in the Classroom

As social studies teachers, we’re always looking for ways to make history more engaging and relevant for our students. One powerful approach is incorporating local history into our lessons. However, finding and using primary sources from our communities can be challenging, especially when dealing with old documents that are difficult to read. This is where AI can be a game-changer.

Recently, I experimented with using AI to help extract and modernize text from a local historical newspaper, making it more accessible for my students. Here’s how I did it:

Step 1: Find a Relevant Primary Source

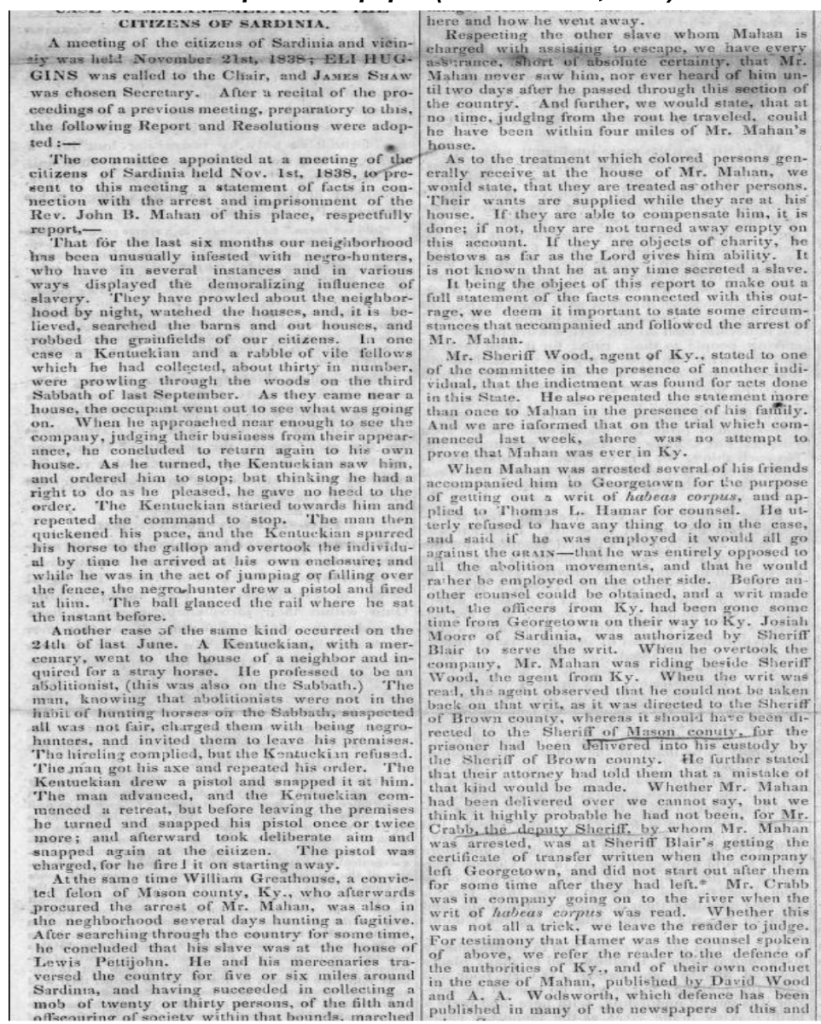
I discovered an 1838 issue of “The Philanthropist,” an anti-slavery newspaper published in our town by local abolitionist James G. Birney. The front page contained an article about citizens in nearby Sardinia, Ohio protesting the arrest of a reverend who had helped enslaved people escape.

Step 2: Capture an Image of the Text

I took a screenshot of the newspaper article. The text was faded and in an old-fashioned typeface, making it difficult for students to read.

Step 3: Use AI to Extract and Modernize the Text

I uploaded the image to Claude, an AI assistant capable of analyzing images. I asked Claude to transcribe the text into modern English while preserving the original meaning and tone. Within seconds, I had a clear, readable version of the article. ChatGPT or Gemini can also be used as well.

Step 4: Verify and Edit the AI Output

I quickly scanned the AI-generated text to check for any obvious errors or misinterpretations. In this case, the output looked accurate, but it’s always important to review AI-generated content.

Step 5: Create an Engaging Lesson

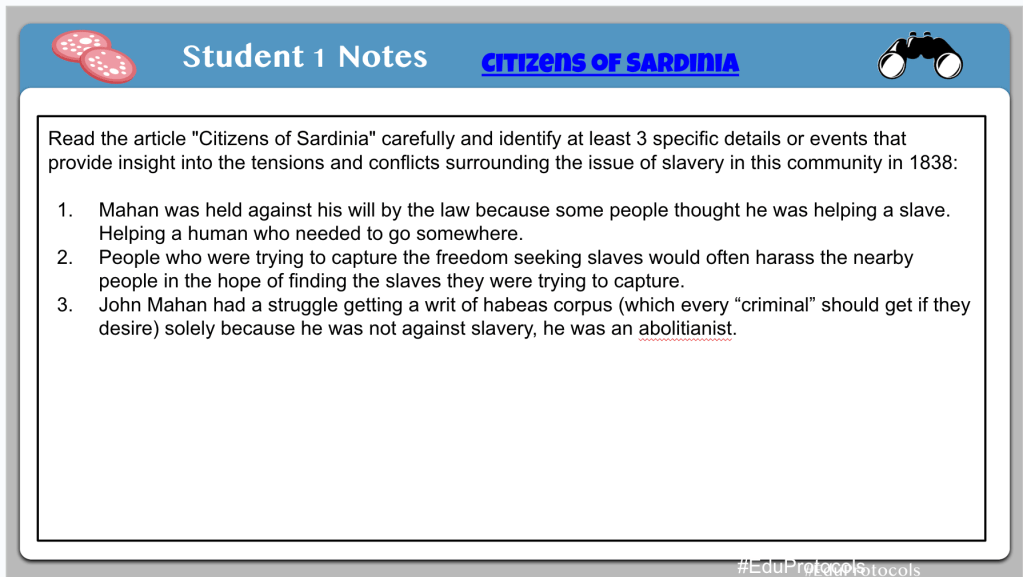
With the modernized text, I developed a Cybersandwich lesson asking students to identify specific details about the tensions surrounding slavery in our community in 1838. This brought a powerful piece of local history to life in a way that was accessible and engaging for my students.

Benefits of This Approach:

  1. Makes difficult-to-read primary sources accessible to students
  2. Saves time compared to manual transcription
  3. Allows incorporation of more local history into lessons
  4. Engages students with relatable, place-based historical content

By leveraging AI in this way, we can open up a wealth of local historical resources that might otherwise remain unused in our classrooms. This approach not only makes history more relevant to our students but also helps them develop a deeper connection to their community’s past.

Have you tried using AI to bring local history into your classroom? I’d love to hear about your experiences and ideas in the comments below!

Citizens of Sardinia CyberSandwich Lesson Link

The Week That Was In 505

This is the last The Week That Was In 505. It will be changing to The Week That Was in 234 as I have changed schools and classrooms.

The New Richmond community has been a part of my life since 2nd grade. It is my alma mater. I’m in their athletic hall of fame for tennis. My parents still live in the community. It is where I have taught the last 12 years. But, it was time for a change. I’m moving onto Batavia Middle School and teaching 8th grade social studies.

What does this mean for all the template links on this site? I don’t know….it depends on how long they keep my account open. I have too many template links, and a messy drive, and it’s next to impossible for me to track down all these links. We will just start fresh with the new school year.

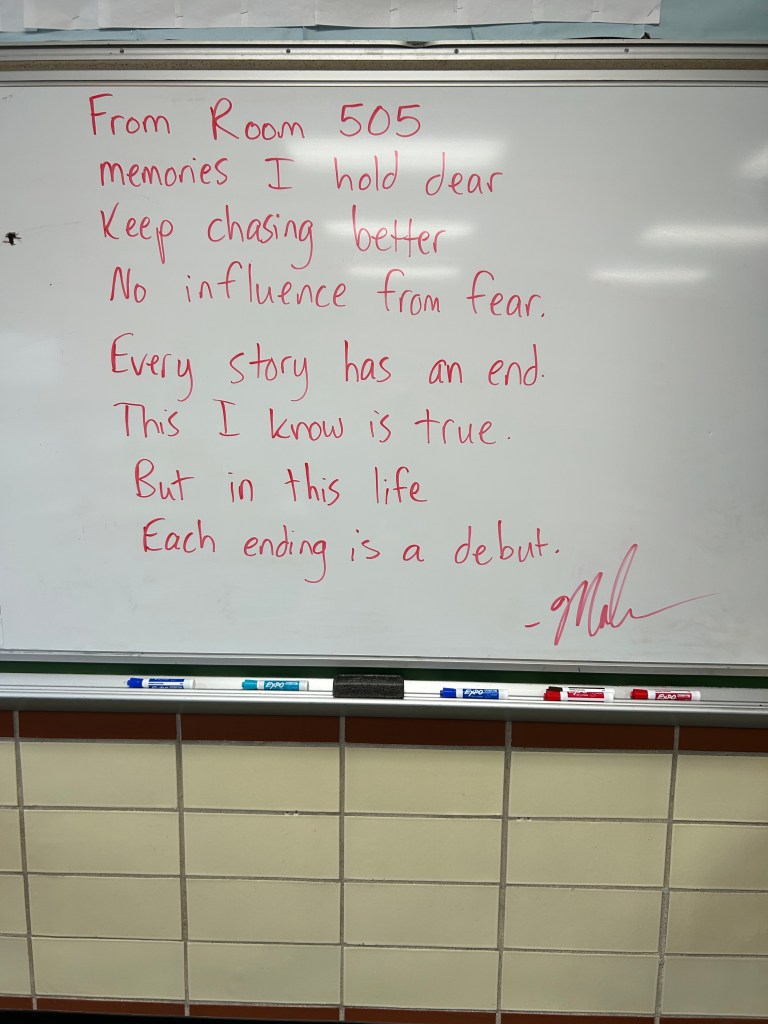
Every year I write a note on my board and walk out. Here is my last note:

Monday – Escape Room, Google Form

Monday

Monday was really the only day of teaching this week. Knowing how middler schoolers can be, I needed something engaging. I used my good buddy Claude AI to help me design an escape room. Claude came up with a series of puzzles and games to help students figure out a clue to unlock the Google Form.

The escape room we designed was related to the content students learned all year – causes of the American Revolution, the Constitution, Westward Expansion, and causes of the Civil War.

Claude did an excellent job coming up with some basic puzzles. For example:

  1. Students had to put westward expansion events in chronological order for a number lock.
  2. There was a series of multiple choice questions where the correct answers spelled out the cause of the Civil War that students had to unscramble.
  3. The Cryptogram was fun, but it wasn’t perfect. Some of the words and letter clues were off.
  4. One of the clues specific letters from the answers were unscrambl;es and spelled out FEDERALISM.

Overall, Claude did an excellent job coming up with ideas. I put this escape room together in 30 minutes. Claude also helped me come up with rhymes to help students find the next puzzle thgat I hid somehwere ion my classroom.

Ultimately, the escape room built up to a 3 digit lock box where the students had to do some math:

Clue 1: Start with the total number of representatives in the U.S. House of Representatives.
Clue 2: Subtract the total number of senators in the U.S. Senate.
Clue 3: Subtract the number of the amendments that abolished slavery and involuntary servitude, except as punishment for a crime.
Clue 4: Subtract the number of the amendment that granted citizenship rights and equal protection under the law to all persons born or naturalized in the United States.
Clue 5: Subtract the number of the amendment that reserves powers not delegated to the federal government to the states or the people.

It was an engaging, and awesome, last Monday of school.

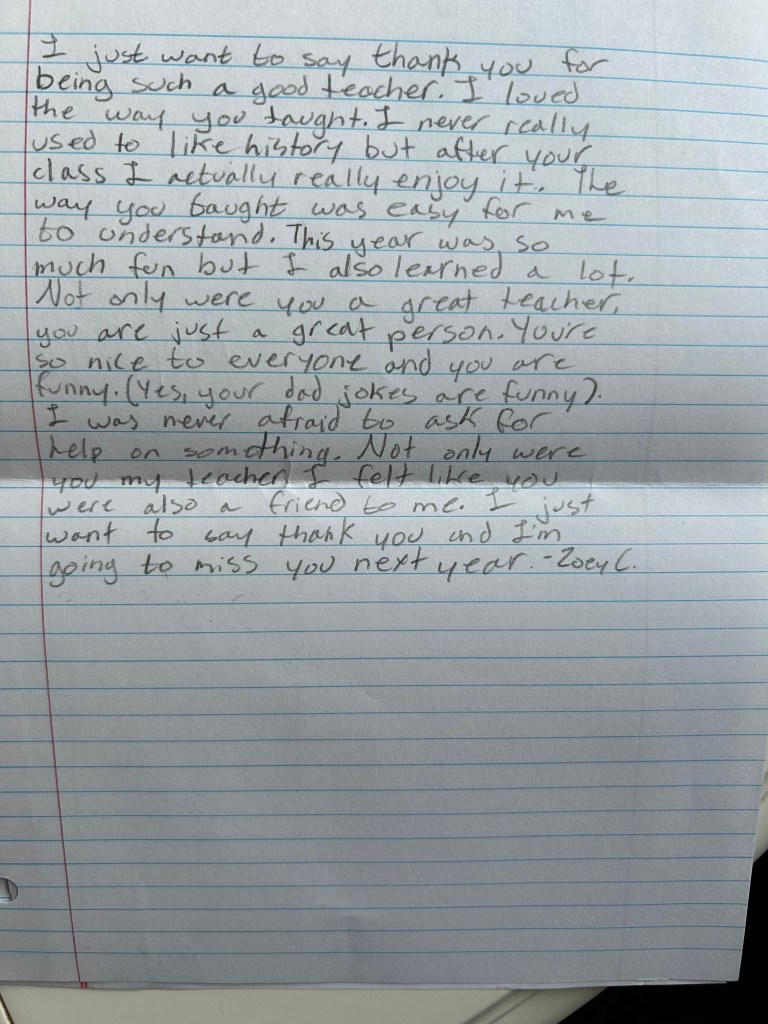
I don’t often share any notes I get, but I keep everything in a basket, and I thought I would share some…

The Week That Was In 505

Monday through Friday:

  1. Civil War Veteran EduProtocols
  2. Success Criteria

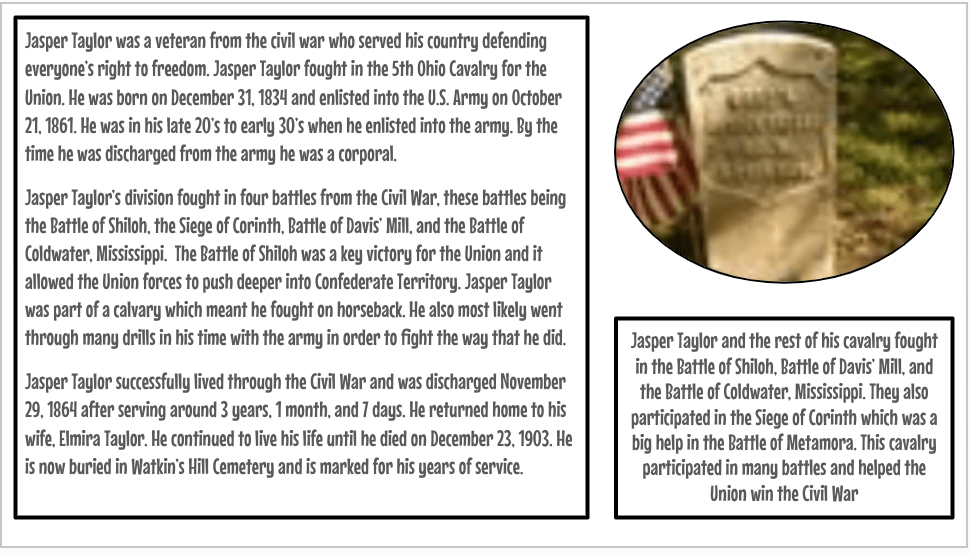
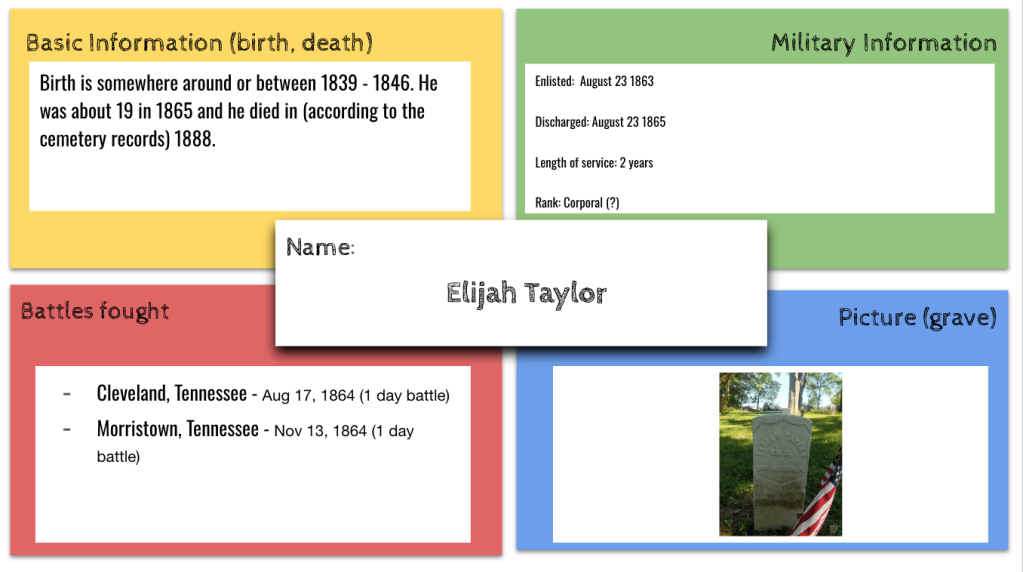
This week, my students embarked on a fascinating research project to uncover the stories of Civil War veterans buried in Watkins Hill Cemetery, located right behind our school. By combining a series of EduProtocols, the students were able to organize their findings and piece together the contributions these brave soldiers made to the Union victory.

To kick off the project, students utilized the Fold3 database, a rich resource for military records, as well as information from the cemetery itself and the American Battlefield Trust website. Armed with these tools, they took on the role of historical detectives, digging deep to unearth details about each veteran’s life and service.

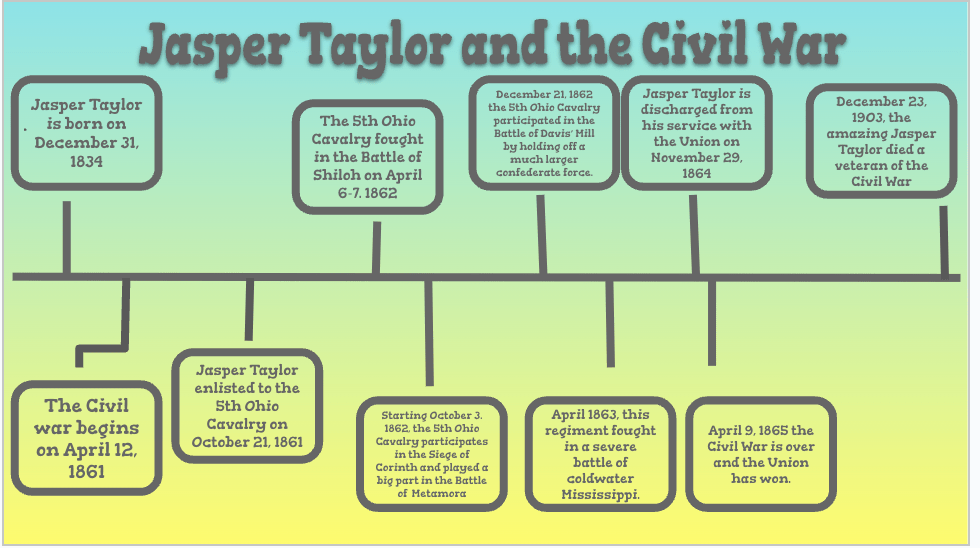
The EduProtocols provided a structured framework for the students to present their discoveries. They began by creating a Frayer model to capture basic information about their chosen veteran, such as their birth and enlistment details, regiment, and company. Next, they constructed a timeline to place the veteran’s service within the broader context of the Civil War, marking key milestones like enlistment, discharge, and the battles they fought in.

One of the most engaging aspects of the project was the “Thick Slide,” where students delved into a specific battle their veteran participated in. They researched the date, location, and significant events of the battle, bringing the veteran’s experience to life. By watching videos about the daily life of Civil War soldiers and the food they ate, the students gained a more intimate understanding of the challenges these men faced.

As a culminating activity, the students wove together all the threads of their research to craft a compelling biography of their veteran. They reflected on how each individual contributed to the Union’s ultimate victory, whether through bravery on the battlefield or vital support roles behind the lines.

I asked students what they learned from this project. Here was an interesting comment from a student on the reflection form…”That even though we mainly focus on the big events in history, all the people involved are very important to the overall event.”

Watching my students engage so deeply with local history was truly rewarding. They not only honed their research and critical thinking skills but also developed a profound appreciation for the sacrifices made by these long-ago soldiers. By connecting with the past on such a personal level, they gained a new perspective on the impact of the Civil War on our community and the nation as a whole.

Projects like this one remind us of the power of place-based learning and the importance of preserving local history. I’m incredibly proud of my students’ dedication and the insights they uncovered, and I look forward to exploring more ways to bring the past to life in our classroom.

The Week That Was In 505

As educators, it is our responsibility to make history come alive for our students. By employing a variety of teaching strategies and resources, we can help them develop a deep understanding and appreciation for the past. In this blog post, I will share my experience teaching the Civil War to my students, highlighting the activities and projects that proved most effective in engaging them and fostering their learning.

Monday – Assessment (I can’t share the EMC2Learning templates – sorry)

Tuesday – Start of the Civil War

Monday

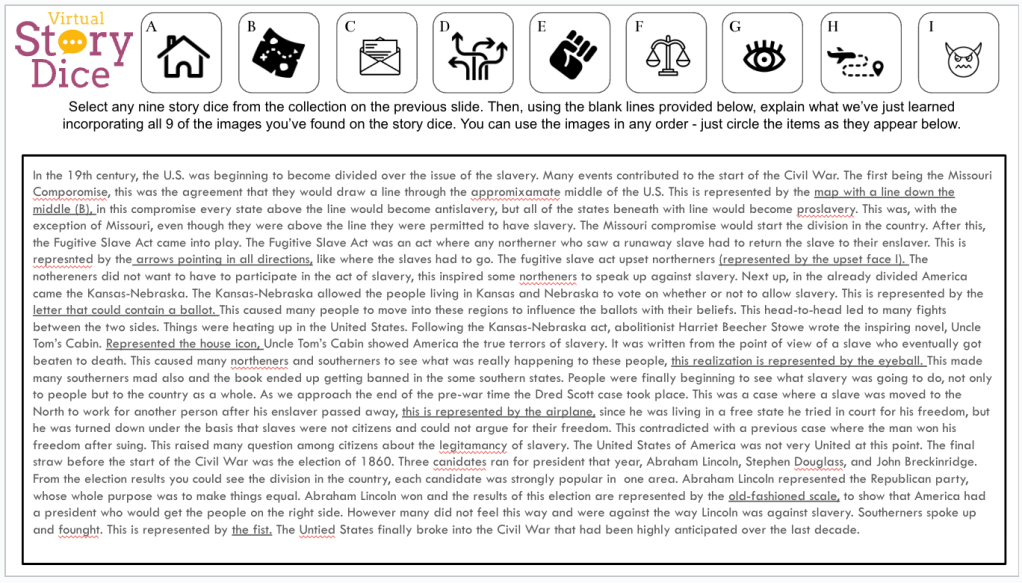
To assess my students’ understanding of the Civil War and the events leading up to it, I provided them with three assessment options on Monday: a Story Dice template, a Video Game template, and a Sketch and Tell-o Connect activity. These diverse assessment methods allowed students to demonstrate their knowledge in creative and engaging ways, catering to different learning styles and preferences.

The Story Dice template required students to select nine images that represented or symbolized the events and factors contributing to the growing tensions over slavery. They then wrote a paragraph explaining how these events and factors led to the Civil War, incorporating the selected images.

The Video Game template challenged students to create a game proposal that included at least four of the events or factors studied. They had to explain how each event or factor was represented in the game and discuss the educational value of their proposed game.

Lastly, the Sketch and Tell-o Connect activity asked students to create six sketches representing the events leading up to the Civil War. They then made connections by creating a claim, evidence, and reasoning for the question, “What series of disagreements and deals made between the Northern and Southern states finally caused the Civil War?”

Tuesday

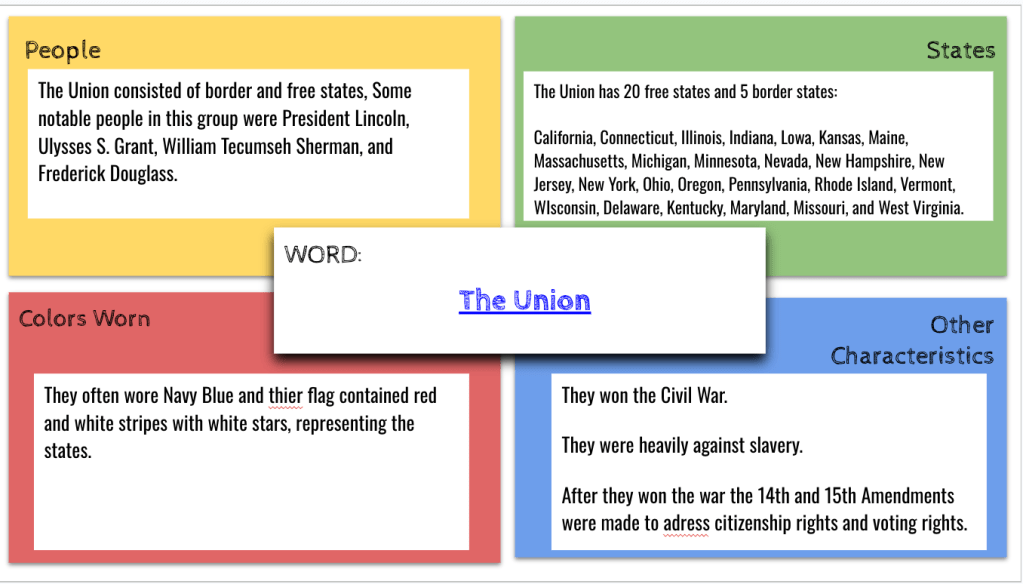
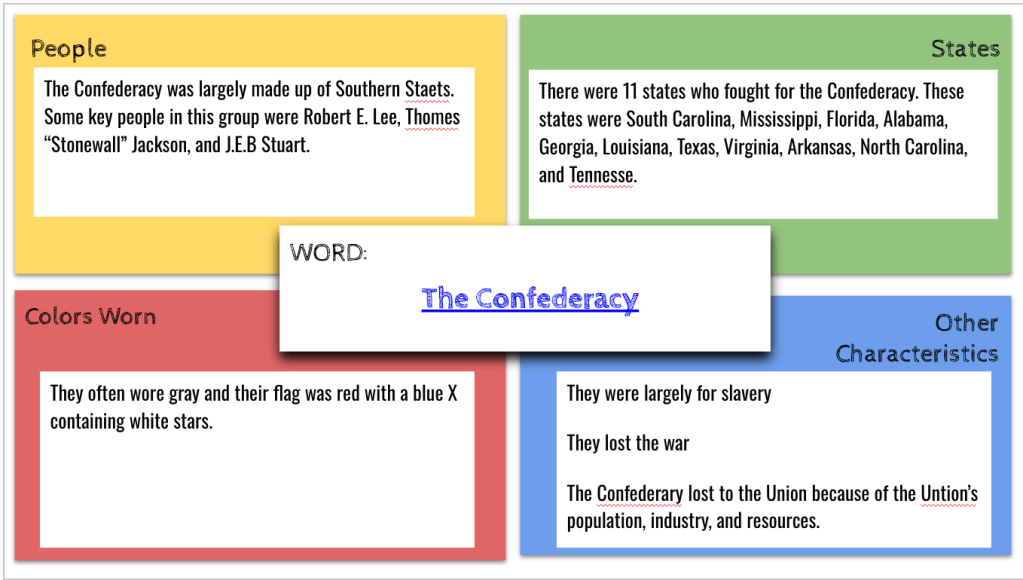
Following the summative assessment, I utilized a combination of resources and activities to introduce the Civil War. On Tuesday, I had my students complete a Frayer Model activity, where they collected information about the Union and Confederate armies, including the states involved, colors worn, and other characteristics. This activity helped them organize their knowledge and understand the opposing forces.

I also had my students watch an EdPuzzle video on the start of the Civil War. The video provided a concise yet informative overview of the key events, battles, and leaders, allowing students to visualize the important aspects of the war. The EdPuzzle platform enabled me to embed questions throughout the video, ensuring active engagement and comprehension.

Thursday

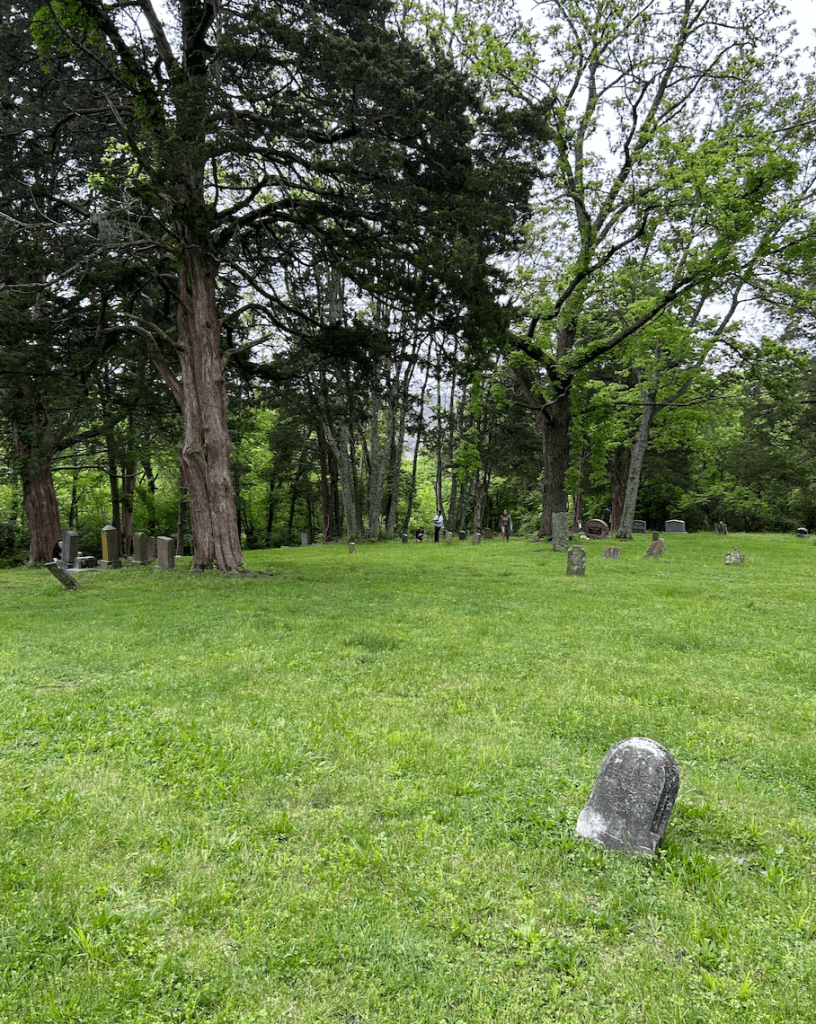
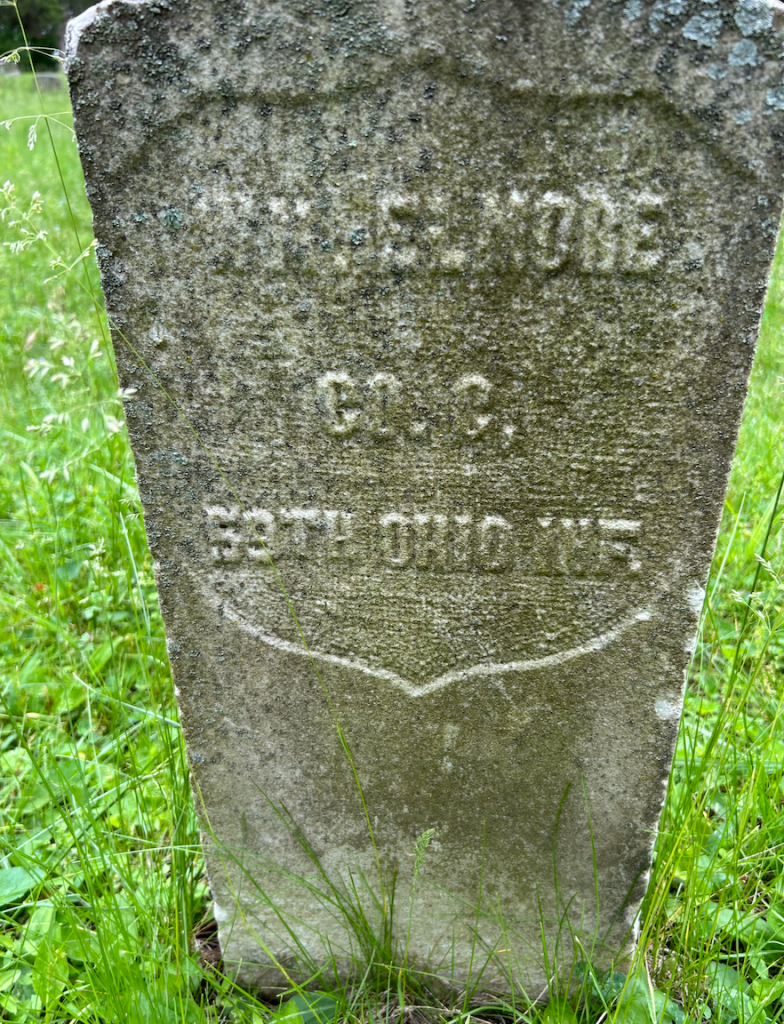
On Thursday, I embarked on an exciting project that connected our classroom learning with local history. Near our school grounds lies the Watkins Hill Cemetery, which houses the graves of several Civil War veterans. I instructed my students to research and document the names of these veterans, along with the companies and regiments in which they served.

To make the most of this opportunity, I took my students on a field trip to the cemetery. They had the chance to explore, locate the graves, and gain firsthand knowledge about the individuals who played a significant role in our nation’s history. This hands-on experience brought history to life and fostered a deep connection with the past.

Building upon this experience, I introduced my students to Fold3, a comprehensive military veteran database. Using a Google Slidedeck containing EduProtocols, students organized their research findings and delved deeper into the stories of the Civil War veterans. They analyzed numerical data points, researched specific battles, and pieced together the historical context in which their chosen veterans lived.

Conclusion

By employing a multifaceted approach to teaching the Civil War, I was able to engage my students and help them develop a profound understanding of this pivotal moment in history. The combination of creative summative assessments, introductory activities, and hands-on exploration of local history created a comprehensive and meaningful learning experience.

I encourage fellow educators to explore opportunities within their communities to connect history with local landmarks. By immersing students in the stories of the past, we can ignite their curiosity, foster a love for learning, and help them appreciate the sacrifices made by those who came before us.

The Week That Was In 505

This week was our last testing week, so we had two shortened class periods. I was continuing the causes of the Civil War and my essential question, “Which conflicts over slavery led to the Civil War?”

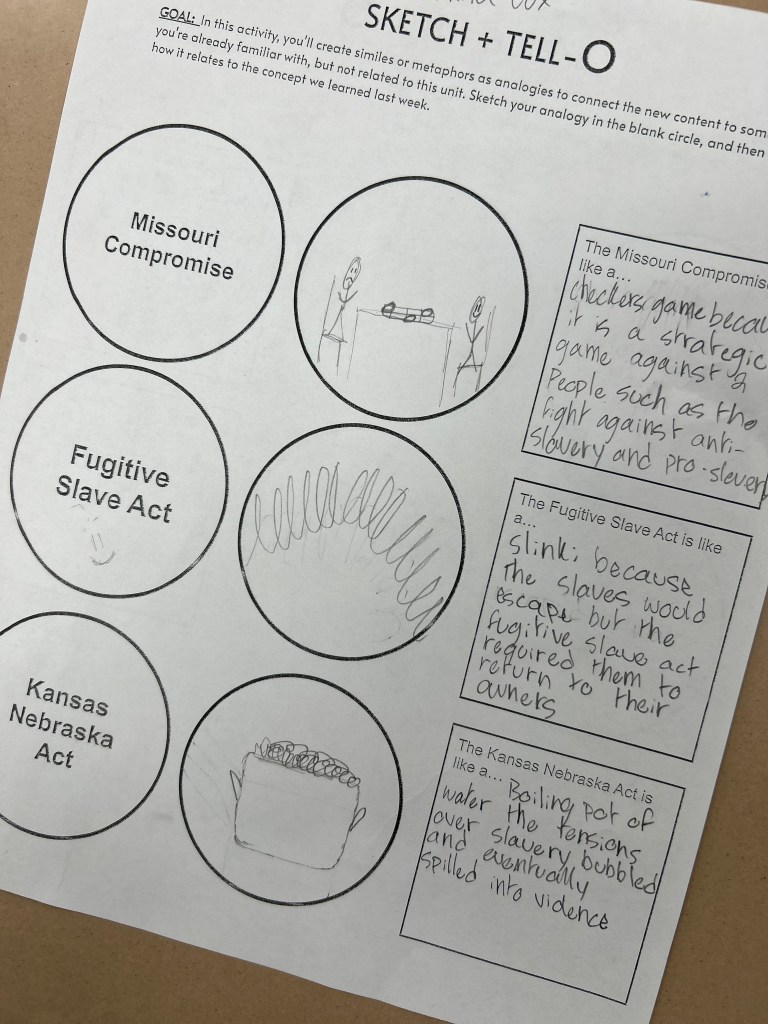
Last week, our focus was on compromises such as the Missouri Compromise, Compromise of 1850, and the Fugitive Slave Act. This week we focused on finishing up the Kansas Nebraska Act, learning about Uncle Tom’s Cabin, Dred Scott, and the Election of 1860. I have never really focused on the Election of 1860, so I wrapped some EduProtocols around a lesson from the Retro Report.

Monday – Sketch and Tell-o Analogies

Tuesday – Uncle Tom’s Cabin

Wednesday – Dred Scott, Amendments Sketch and Tell

Friday – Election of 1860

Monday

On Monday, I began class with a Sketch and Tell-o that had students thinking about analogies. I wanted them to review what they learned last week (Missouri Compromise, Fugitive Slave Act, Kansas Nebraska Act) by creating similes. For example, they would sketch and object for the simile connection and then write how the Missouri Compromise is like that object. We did this for 25 minutes and then moved onto the start of a new lesson.

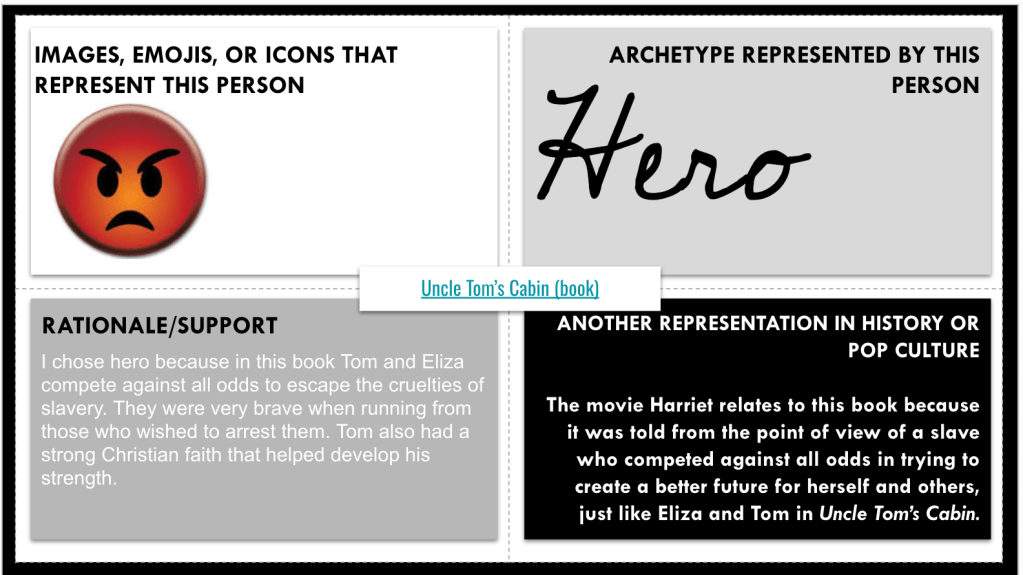
To introduce Uncle Tom’s Cabin, I used an Archetype Foursquare. In the middle of the archetype template, I linked an article about the background, plot, and impact of the novel. Students read through the information and decided which archetype they would apply to the novel and use supporting evidence. At the conclusion, I had students discuss why they chose a certain archetype to describe Uncle Tom’s Cabin.

We ended class with a Fast and Curious EduProtocol. I added some questions to the Gimkit about Uncle Tom’s Cabin. The class averages were down a bit because I added three new questions.

Tuesday

On Tuesday, we dove into a lesson on Uncle Tom’s Cabin. I adapted this lesson from from a textbook that my co-author, Dr. Scott Petri, contributed to – a resource written for schools in Texas that incorporates background information and primary sources to help students learn history.

Monday we had explored the background and significance of Uncle Tom’s Cabin. Tuesday, we focused on three chapters: Chapter 7 – A Mother’s Struggle, Chapter 30 – A Slave Warehouse, and Chapter 33 – Cassy. Students selected a chapter and designed a slide that featured a quote that would anger abolitionists. We then analyzed the quote together and considered how it reflected the harsh realities of slavery.

I was pleased with how engaged and motivated the students were throughout the lesson. By focusing on storytelling techniques and emotional language, Harriet Beecher Stowe created empathy and awareness about the devastating impact of slavery. I added an Annotate and Tell to the lesson with three excerpts from the ending of the book. On the slide, I had students focus on the arguments Stowe put forth against slavery, the audience she was appealing to, and why she would appeal to mothers.

Wednesday and Thursday

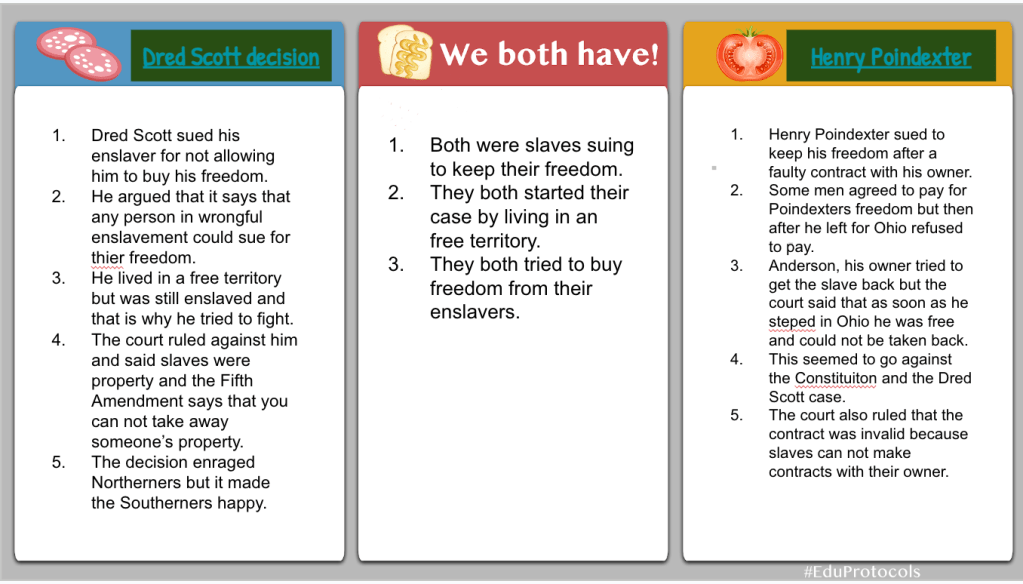
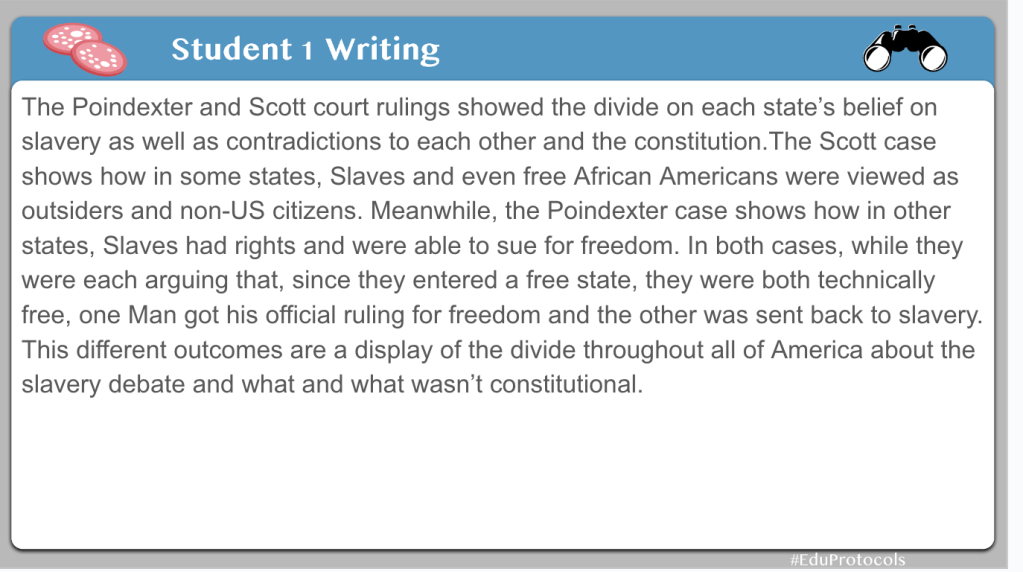
On Wednesday, we began learning about the Dred Scott case. I also use this as an opportunity to tie in some local history about Henry Poindexter who had a similar case in Ohio. As an educator, I always strive to connect historical events to the local context, making them more relatable and meaningful for my students. In this particular lesson, we discovered a remarkable similarity between the Dred Scott case of 1857 and a case involving Henry Poindexter in 1856.

Henry Poindexter signed a promissory note committing to pay $1,000 for his freedom. When his enslaver allowed him to cross the river into Ohio, specifically in New Richmond and Cincinnati, Henry decided not to honor the agreement, arguing that he was now in the free state of Ohio. Subsequently, his enslaver sued him, leading to a legal battle that reached the Ohio Supreme Court. Ultimately, the court ruled in Henry’s favor, declaring him free. This local connection offered a unique opportunity to understand the complexities of the time through a relatable lens.

To deepen our understanding, we engaged in a Cybersandwich activity, comparing the Dred Scott case with Henry Poindexter’s legal battle. Students filled out a Venn diagram, identifying similarities and differences between the two cases. This exercise encouraged critical thinking, analysis, and reflection on the legal implications and consequences of each situation.

Following the Venn diagram, students composed a compare/contrast text structure to summarize their findings. This exercise not only reinforced their understanding of the cases but also developed their writing skills and ability to articulate complex ideas effectively.

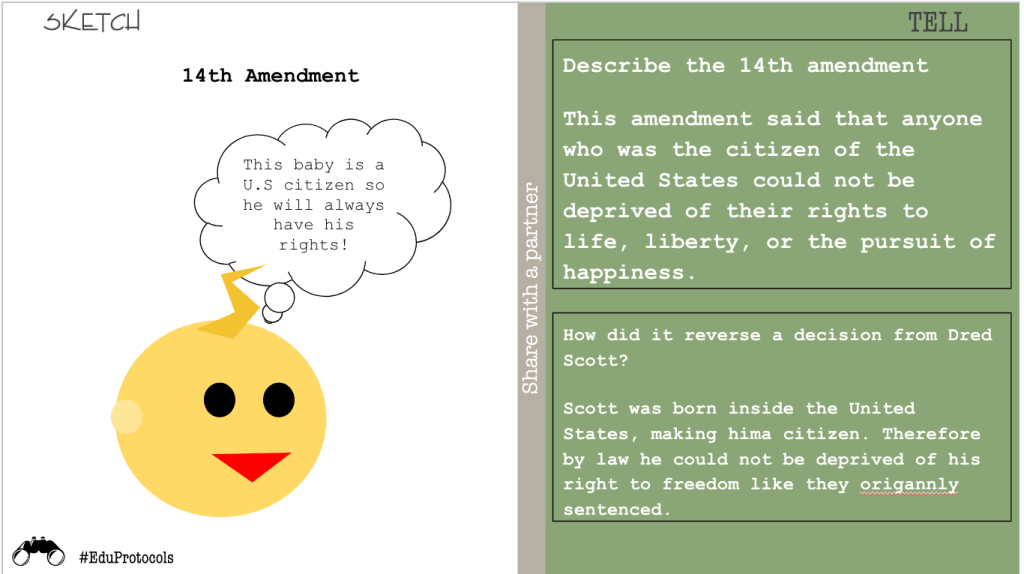
To further our exploration, we connected the Dred Scott case to the 13th and 14th Amendments, which had profound implications for civil rights and the overturning of the infamous decision. Employing a Sketch and Tell activity, students utilized Google Shapes to create visual representations of the 13th and 14th Amendments.

Accompanied by their sketches, students “told” the story of the amendments in their own words, explaining how each amendment played a significant role in nullifying the Dred Scott case decision. This exercise fostered creativity, critical thinking, and a deeper comprehension of the amendments’ impact on the course of history.

Thursday’s lesson was a cool exploration of local history intertwined with national events. By connecting the Dred Scott case to the story of Henry Poindexter, we provided students with a personal connection to a pivotal moment in our nation’s past. Moreover, examining the 13th and 14th Amendments enabled students to comprehend how the legal landscape evolved and how these amendments transformed the rights of individuals.

Friday

Friday I wasn’t at school and had a decision to make – do I post a summative assessment for my unit on the causes of the Civil War? Or, do I add one more lesson on the Election of 1860? The Election of 1860 lesson would be easy to put together and cause less problems – I went with this idea.

For this lesson, I adapted it from Retro Report. I started with this question, “How did the results of the 1860 presidential election show that the United States was becoming more and more divided?”

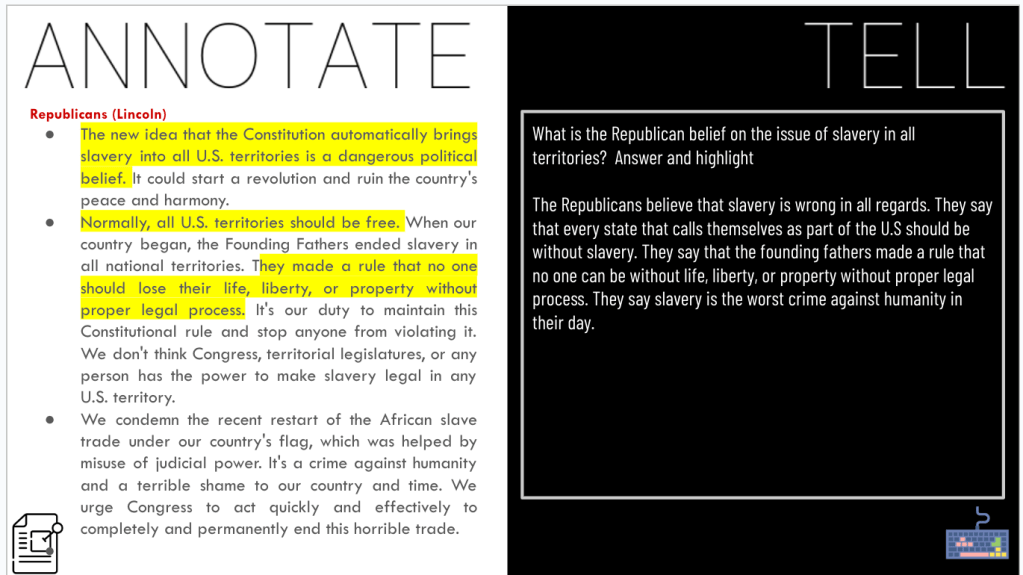
At the end of the lesson, I wanted students to write from the POV of 3 candidates from the Election of 1860. So, I created a 3xPOV template for this lesson. At the beginning of the lesson, I put together a Map and Tell and jhad students analyze a ,ap from the Election of 1860. Next, they watched a video from Retro Report on the election. The they analyzed the platforms of the Northern Democrats, Southern Democrats, and Republicans regarding their stance on slavery. Finally, students ended with the 3xPOV. This was meant to be a one day and they did an awesome job considering I wasn’t present.

The Week That Was In 505

This week was another testing week with the Ohio AIR math test. At the end of the week, our assistant principal sent out a weekly updated and asked the question, “What does AIR stand for in Ohio AIR Test?” I responded with, “AIR – Academically Inconvenient Requirement.” I don’t think I won the trivia contest.

This week we continued our unit on the causes of the Civil War. I asked the question, “What conflicts over slavery led to the Civil War?” This week we focused on the Missouri Compromise, Compromise of 1850, and the Kansas and Nebraska Act.

This semester I”ve been trying to build in more opportunities to have students empathize from multiple perspectives. I have been using some 2xPOV, empathy maps, and perspective summary writing at the end of different lessons.

Monday – Missouri Compromise

Tuesday – Compromise 1850/Fugitive Slave Act

Thursday – Kansas and Nebraska Act

Monday

On Monday, we began with the Missouri Compromise. I asked the question, “How did the Missouri Compromise attempt to balance free states and slave states between North and South?” I began the lesson with a Gimkit with 3 or 4 questions about the Missouri Compromise. I ran the Gimkit for 3 minutes, and then ran it again for 2 minutes.

Next in line, we switched Frayer model with the word, Compromise, in the center. Around the word Compromise, I had students create definition, use it in a sentence, share examples, and nonexamples. For the examples of Compromise, I urged everyone to think of examples we have learned about in class. They came up with, “3/5ths Compromise, the Treaty of Ghent, the Treaty of Paris 1783.” I thought these were great connections.

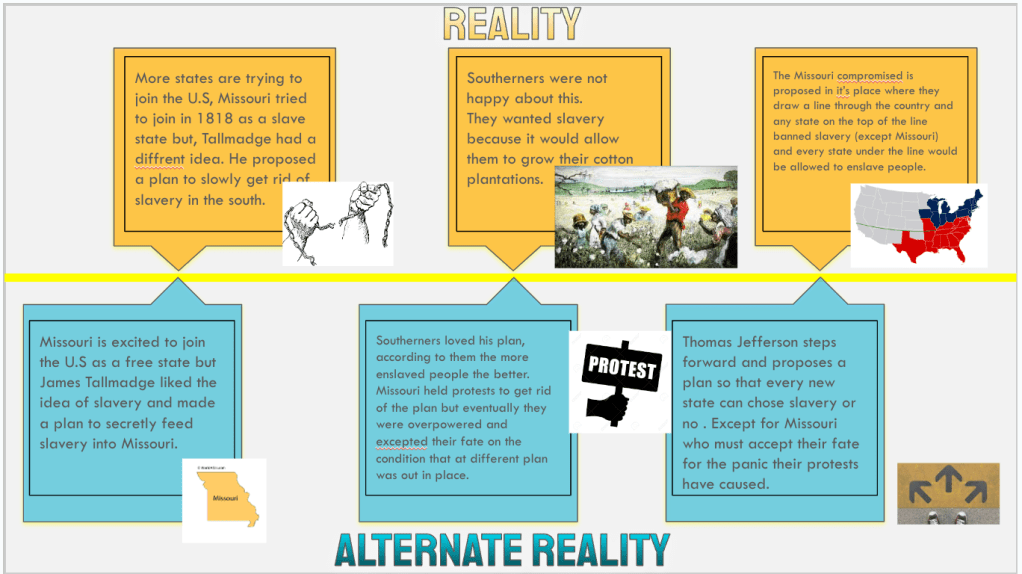
Following the Frayer, we switched to an EMC2learning penny pedagogy called Upside Down Learning. Students read a textbook section about the Missouri Compromise. On the top of the line with Upside Down Learning, students tell the true story of the Missouri Compromise. I had them think about the compromise, and retelling of the compromise in sequential order. Underneath of the true story, the students come up with alternate reality. They keep some of the details, but they twist them a bit.

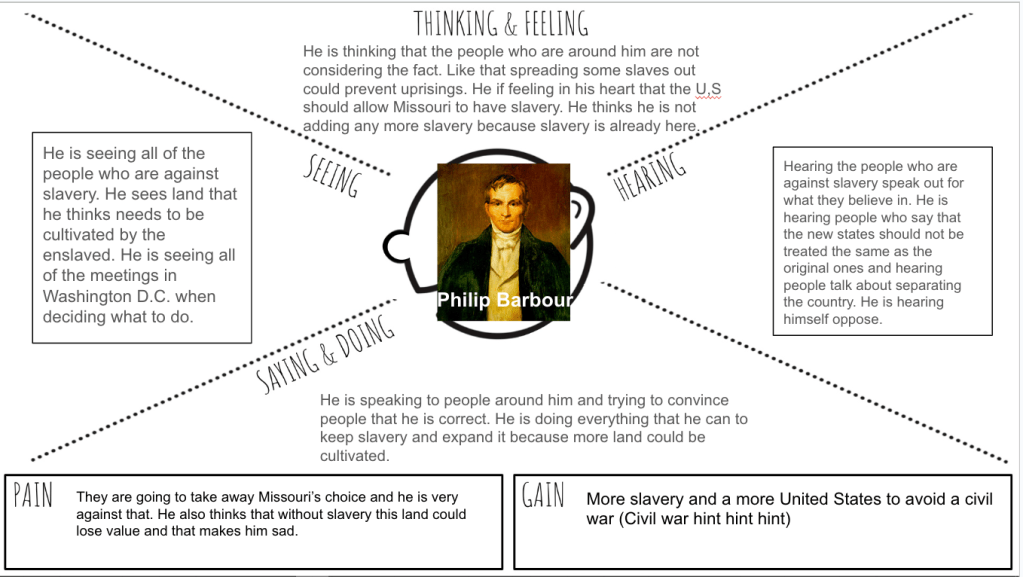
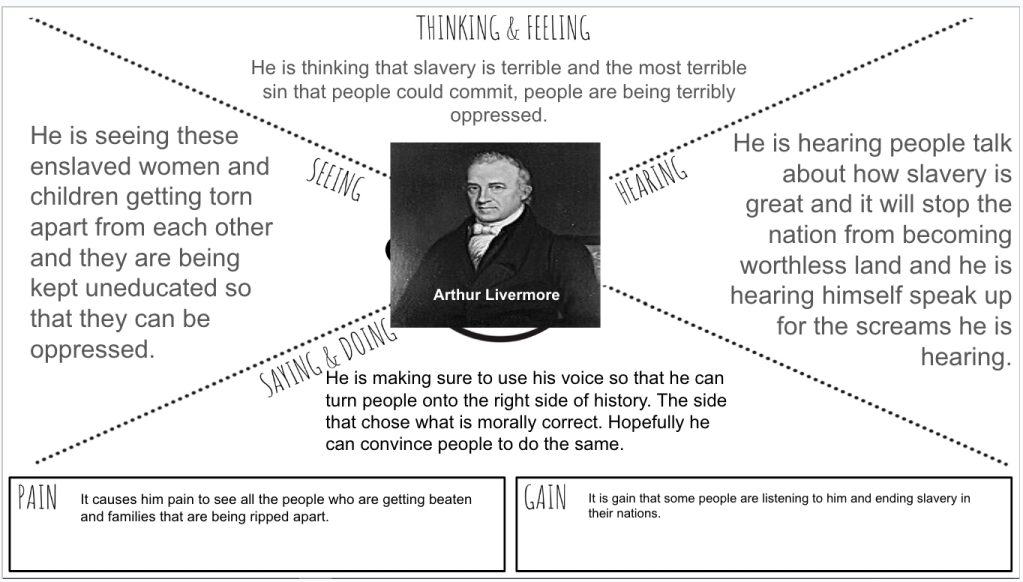
Next, I had students complete an empathy map with two primary sources. Students read a debate between two congressmen named Arthur Livermore and Philip Barbour over the Tallmadge Amendment and Missouri Compromise. Upon reading, students completed an empathy map. To end class, we ran one more Gimkit for 2 to 3 minutes and increased our class averages to over 90% across all classes.

Tuesday

On Tuesday, we switched over to the Compromise of 1850 and I asked the question, “What was the Compromise of 1850 and why did it make northerners angry?” I asked this question kowing we would focus on the Fugitive Slave Act. Before the lesson began, I wrote on the board, “Fugitive Slave – Freedom Seeker, Slave – Enslaved Person/People, Master – Enslaver.”

This lesson we began with a Number Mania and here were my instructions: “The Fugitive Slave Act of 1850 was a harsh and ineffective law that deepened the divide between the North and the South, ultimately contributing to the outbreak of the Civil War in 1861.”

  • Prove this quote true with 4 numbers and facts from the reading.
  • If you use my secret number, I’ve got a Jolly Rancher for you.
  • Add icons/images for all facts
  • Add a title.
  • In the speaker notes, explain why you selected these numbers.

I added the Secret Number to create some intrigue – it’s the end of the year! My secret number ended up being 11 – the Civil War began 11 years after the Compromise of 1850. I had these dates underlined and said to everyone, “I gave you a subtle hint.” Only a handful of student solved the secret number throughout the day.

The reading I paired with the Number Mania had a ton of numbers. I wanted to see if students could pick out the important numbers related to the quote.

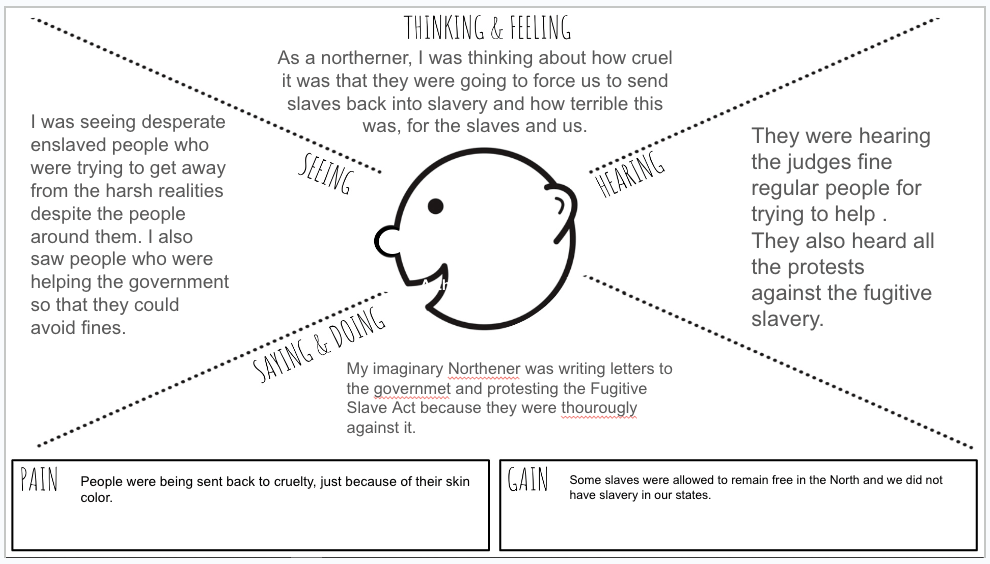
Following the Number Mania, students filled out an empathy map from a northerners perspective about the Fugitive Slave Act. I also related the Fugitive Slave Act to our community because Enslaved Person Trackers terrorized the abolitionists of New Richmond due to the Fugitive Slave Act. Students filled out an Empathy Map showing what a northerner might think, say, hear, and do about the Fugitive Slave Act. I encouraged them to use details from the Number Mania, which is essentially details from their reading.

At the end of class, I added a few more questions to the Gimkit about the Compromise of 1850. I ran the Gimkit for 3 to 4 minutes.

Wednesday

Wednesday was a shortened class period (30 minutes) due to math testing. I wanted students to reflect on their Number Mania from Tuesday. I put together a Google Form with success criteria at the top. The success criteria contained the numbers students could have used on their infographics. I asked the students these reflection questions:

  1. How many numbers from the provided list did you include in your infographic to support the quote “The Fugitive Slave Act of 1850 was a harsh and ineffective law that deepened the divide between the North and the South, ultimately contributing to the outbreak of the Civil War in 1861”?
  2. How well do you think the numbers you included in your infographic support the given quote?
  3. What did you learn about the Fugitive Slave Act of 1850 and its impact on the United States while creating your infographic?
  4. If you could improve one aspect of your infographic, what would it be and why? 
  5. If you graded yourself on the infographic, what score would you give yourself out of 4 points?

This was a day to finish the Number Mania and empathy maps. A pretty easy, light day.

Thursday

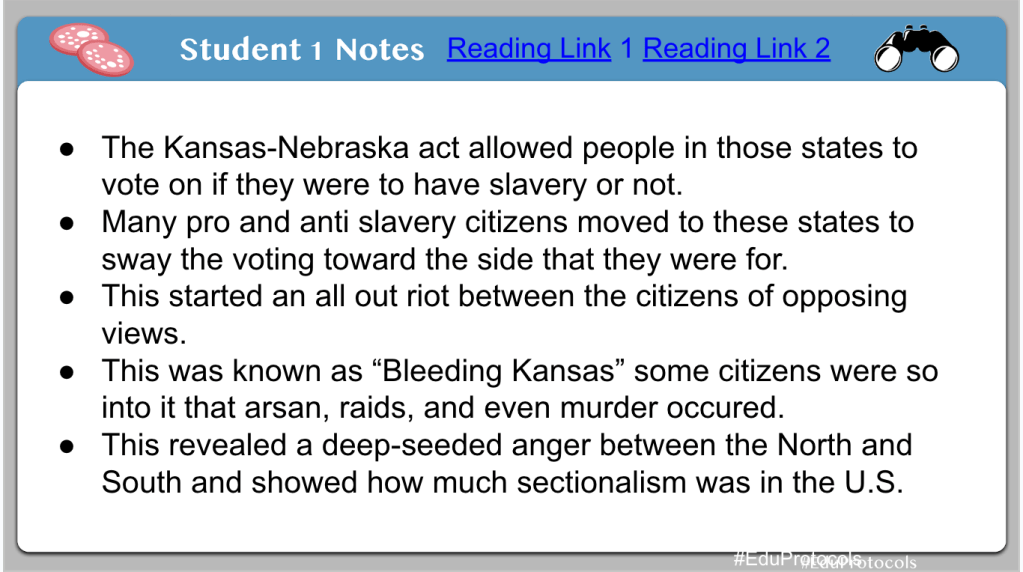
On Thursday we switched to the Kansas and Nebraska Act. I asked the question, “What did voting on slavery and the Kansas and nebraska act reveal about Sectionalism in the United States?” I knew the students would have trouble with the parts of this question – Kansas Nebraska Act and Sectionalism. I didn’t want to throw too much at the students, so we focused on sectionalism for the shortened class period.

One thing I’ve been trying to do more often is using a relevant preview Activity before learning something new. I took this idea from Gene Tavernetti’s book, Teach FAST. This book focuses on how to optimize learning through designing lessons around how students learn best.

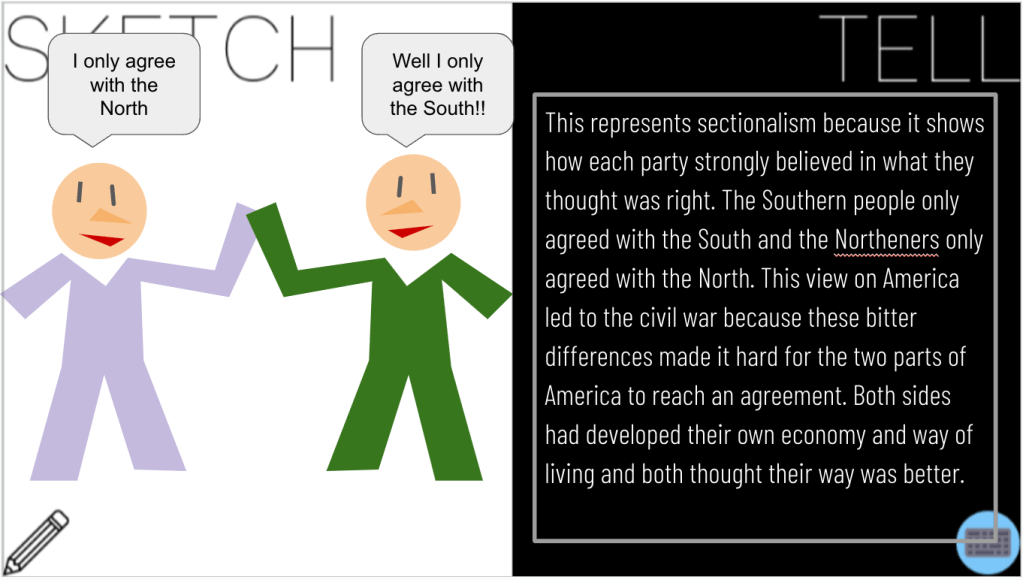
A preview activity is a quick activity where students reflect, discuss, or write out something they have experienced and eventually relate it the new content they will learn. In this case, I had students reflect, and create a Sketch and Tell, on a conflict they had with someone – a parent, sibling, teacher, or friend. They sketched about the two differing beliefs, or interests. Then they discussed the conflict with a partner. Finally, they wrote about it on the tell side.

Following the preview activity, I had students complete another Sketch and Tell. This one was about sectionalism. I had AI generate a 2 paragraph explanation of sectionalism. In my prompt, I asked AI to include Civil War and slavery context. Students created an image to represent sectionalism, they discussed their creation with a partner, and then they wrote about sectionalism. To end class, we ran another rep of the Gimmit. I added some more questions to the Gimkit about the Kansas Nebraska Act.

Friday

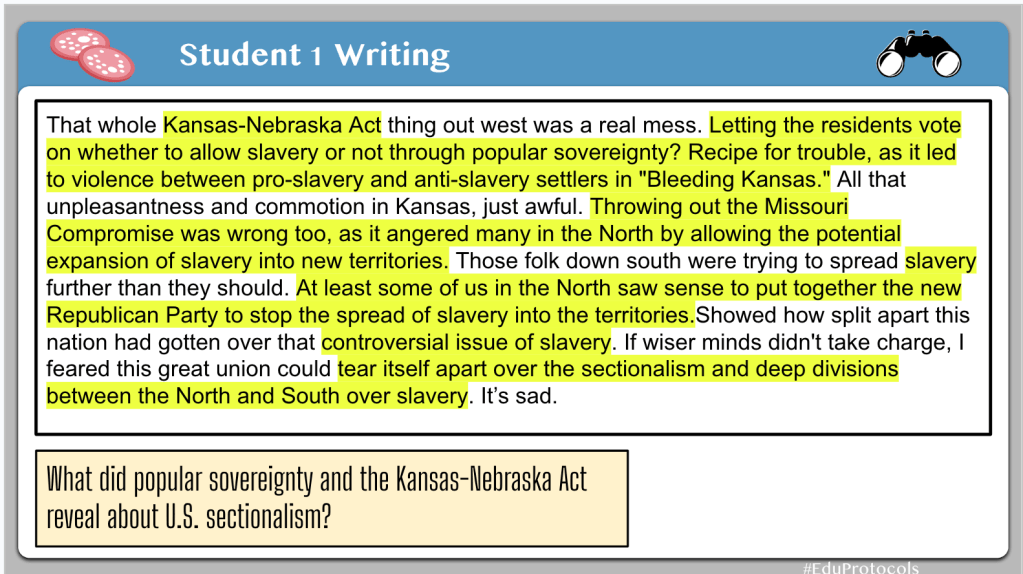
On Friday we addressed the second part to my question – the Kansas and Nebraska Act. I ran a CyberSandwich with this lesson. I had students read for 10 minutes about the Kansas and Nebraska Act. Their goal was to pull out 5 or more important facts that would help them answer the question, “What did voting on slavery and the Kansas and nebraska act reveal about Sectionalism in the United States?”

After 10 minutes, students discussed and compared their notes with a partner. Following this, students fixed a very vague northerner perspective on the Kansas Nebraska act.

I created another Google Form with reflection questions. I added success criteria at the top:

  1. Explain what “popular sovereignty” means and how it applied to the Kansas-Nebraska Act.
  2. Describe the violence that took place in Kansas between pro-slavery and anti-slavery settlers, known as “Bleeding Kansas”.
  3. Mention how the Kansas-Nebraska Act angered many in the North because it allowed the potential spread of slavery into new territories.
  4. Explain that the Act’s repeal of the Missouri Compromise was seen as wrong by those in the North.
  5. Note that the Republican Party was formed in response to the Kansas-Nebraska Act, with the goal of preventing the expansion of slavery.
  6. Conclude that the events surrounding Kansas revealed the deep divisions (sectionalism) between the North and South over the issue of slavery.

I also added these reflection questions:

  1. How many of the these details do you have?
  2. What score would you give yourself?
  3. Why would you give yourself that score?

To end class, I ran the Gimkit one more time – every class, except for one, got a 90% or higher class average.

The Week That Was In 505

This week we started state testing. We always begin with the ELA test. As a result, our schedule was a bit weird. Also, I don’t really do anything on class on ELA testing days. Staring at screen, reading, and writing for 2 1/2 hours is daunting. I’m not going to have students come into social studies only to do it all again.

This week we focused on social studies for Monday, Tuesday, and Friday. We began the week by finishing our lesson on abolitionists. Students could choose between 3 options to show their learning about abolitionists – Dinner Party (Amanda Sandoval template), Sketch and Tell, or an Instastory (Amanda Sandoval template).

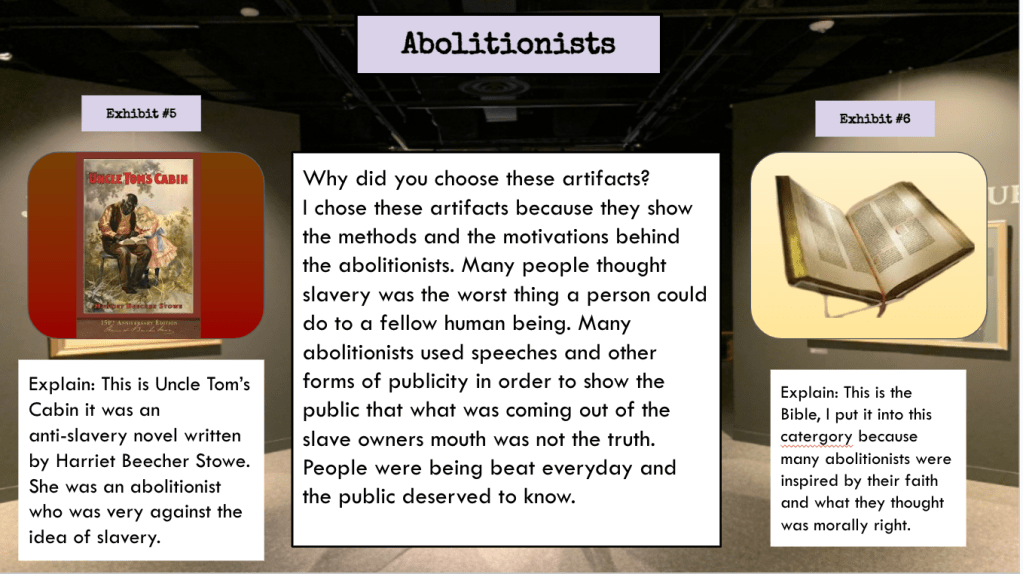
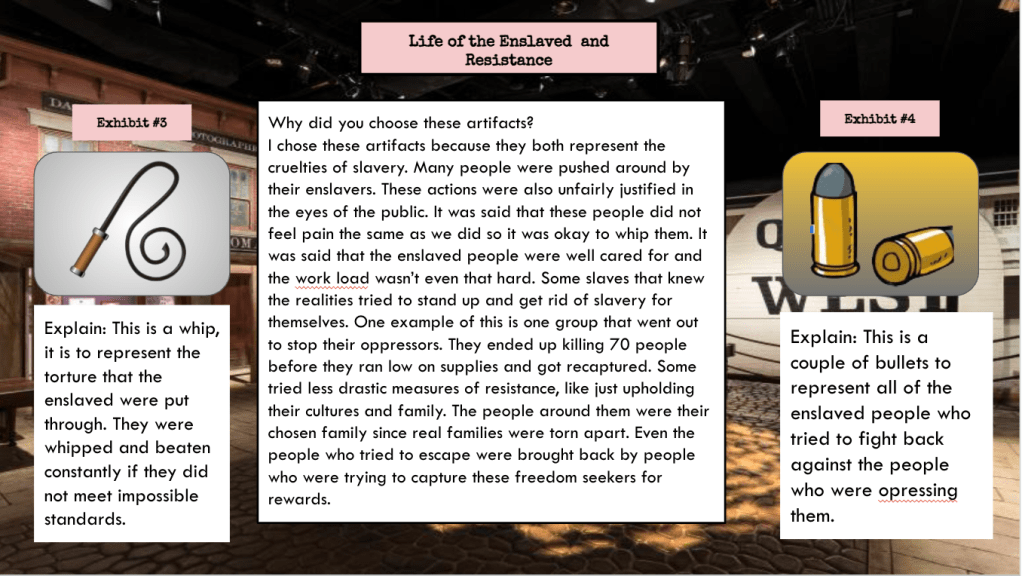
Then we wrapped up our unit on Revolution and Reform with a Summative Assessment of creating a virtual museum exhibit sharing the things they learned. I gave students one class period to complete this museum exhibit.

To end the week, we began a new unit on the Civil War. I began with a Geography Challenge from TCI. WE have spent the last two weeks learning about slavery and abolitionism and this served as a nice transition to the cause of the Civil War – slavery. The geography challenge served as a nice transitioning piece from abolitionism to showing how the Union struggled over the issues of slavery and statehood.

Monday – Abolitionist Lesson, Assessment

Tuesday – Virtual Museum Exhibit

Friday – Geography Challenge, Class Companion

Monday

Last Thursday we began a lesson on abolitionism. I like this lesson because I can incorporate lots of local history with abolitionists like: James G. Birney, John Rankin, and Harriet Beecher Stowe. It helps students see how their community played an important role in the ending of slavery. Here is the layout of the lesson:

  1. Students choose an abolitionist and create a Thick Slide about their methods and motivations.
  2. Students share their Thick Slide through a Google Form. The Google Form collects the slide links into a Google Sheet. I share the sheet.
  3. Students choose 4 other abolitionists, read through the slides, and collect notes about them using a Frayer Model.
  4. Students use their information to create something – Dinner Party, Sketch and Tell, or Instastory.

Students like having the choice of to show what they know about abolitionism. I tried to pick choices that varied in complexity. To me the Dinner Party was the most complex because students had to think about where toplace the abolitionists at a dinner party and think about their conversations. It’s very outside of the box thinking.

The sketch and tell is an option that students are familiar with. I selected this because I wanted students to apply a visual to the methods and motivations for abolitionists.

The Instastory template is familiar to students because it looks like an Instagram posting. Even though I haven’t used this template all year, I wanted to throw it out there and see what would happen. Here are some student samples:

Tuesday

On Tuesday, I wanted to wrap up my unit on Revolution and Reform. I wanted students to be able to answer two questions:

  1. How was life different in the North from life in the South?
  2. What motivated abolitionists to risk their lives to end slavery?

I needed an assessment to tie those things together. Te perfect option was a virtual museum exhibit. A few years ago, I created a template for a virtual museum, but I have never used it……until now.

When I put together the assessment, I wanted students to create an exhibits showing differences between North and South, an exhibit on slavery and resistance, and an exhibit on abolitionism. Because this is a summative assessment, I gave students the entire class period to get it done. It had to be turned in by the end of class. No working on it at home. A one shot deal.

I was pretty impressed with the exhibits:

Friday

On Friday, I introduced a new unit question, “What were the conflicts over slavery that led to the Civil War?” I began with a Geography Challenge from TCI because it was a simple way to begin the lesson. Plus, it wasn’t a daunting task that involved much reading or writing considering students spent the last 2 days doing that with testing.

I introduced the lesson by reminding students we have been learning about slavery and abolitionists. Now it was time to see how al, of these ideas played into arguments over statehood and sectionalism between North and South. We were building on previous knowledge to set up new knowledge.

We began the lesson by reading some background knowledge paired with the maps. Next, I had the students go through the steps to complete the Geography Challenge map.

During this lesson, I tried Class Companion – an self-contained AI tool that offers immediate feedback with student writing responses. Here is a brief summary about it:

Class Companion is an innovative educational app that integrates artificial intelligence to provide personalized feedback on writing assignments for students. In subjects like AP World History, teachers can assign writing prompts for students to practice answering repeatedly until they achieve an acceptable response.

The AI acts as a virtual teacher, offering instant critiques on what students did well and areas for improvement, allowing them to learn from mistakes at their own pace outside the classroom. Teachers can customize assignments, rubrics, and the type of feedback given, making it versatile across subjects requiring written responses like social studies, English, science, and languages.

The app includes anti-cheating features like detecting pasted text, tracking response times, and enabling teachers to override the AI’s grading if disputed. Students appreciate the rigorous practice and autonomy Class Companion provides in mastering structured essay writing for classes like AP History.

In summary, Class Companion harnesses AI to deliver tailored writing guidance, practice opportunities, and engagement for students while giving teachers powerful customization and oversight capabilities. Its unique blend of technology and pedagogy enhances the learning experience.