The Week That Was In 234

This week in Room 234 was packed with a mix of EduProtocols, hands-on activities, and a focus on understanding colonial tensions. From Sketch and Tell-O for visualizing British taxes on Monday to analyzing historic protests with 8 Parts and Cyber Sandwich later in the week, each day brought something new. We tackled the Boston Tea Party with Number Mania to dig into key details and wrapped up with an inquiry lesson on “having a voice in government.” I even worked in guided notes—a rare move for me—to support their understanding of the British Acts. Each protocol helped keep the energy high while pushing students to think critically about the events leading up to the American Revolution.

Monday

Lesson Link

Monday didn’t start out the way I’d planned. I wasn’t feeling well, but I managed to make it to school—until that weird feeling just took over and I had to head home. I can’t believe I’m saying this, but I ended up leaving…guided notes. 😳 Yep, the thing I swear I’m anti- guided notes. But sometimes, you’ve got to roll with what works for the kids you have this year, even if it’s not your ideal plan.

Guided Notes

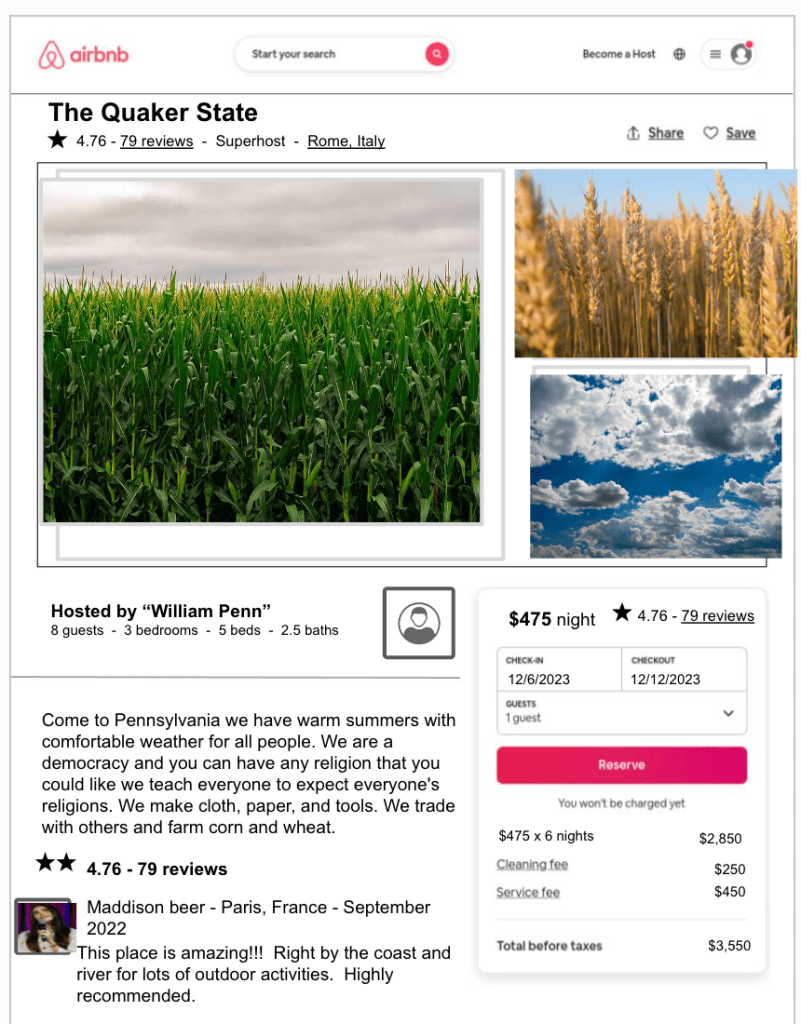
I’m working with a student population that’s still getting used to taking ownership of their learning. So, while guided notes aren’t my go-to strategy (and honestly, something I’d like to phase out), they’re a starting point. I figured that leaving the notes would help the students review what we’ve already learned about British acts and taxes while introducing some new information like the Townshend Acts, Tea Act, and Intolerable Acts. I could’ve covered all the British acts and taxes at once, but knowing the group I have this year, I wanted to avoid overload. Small doses, steady progress—that’s the plan.

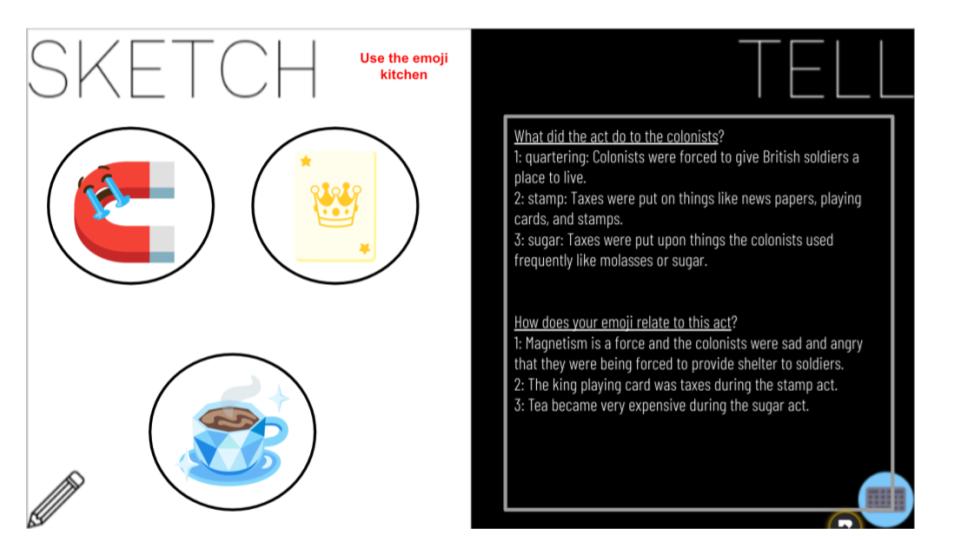
Sketch and Tell-o: Emoji Kitchen Edition

To follow up the guided notes, I left a Sketch and Tell-o activity. I had the students use the Emoji Kitchen to create visual representations of the British acts. The goal was for them to combine two emojis into one new emoji that represented each act, like using a tea cup and an angry face to illustrate the Tea Act. It’s a fun and creative way to get them thinking beyond the text, and I was hoping it would engage their imaginations a bit more than traditional worksheets.

Gimkit

I set up a Gimkit as an assignment and left it for them to complete. It was meant to reinforce the acts we covered, testing their recall and giving them that competitive, game-based edge they enjoy. I figured it was the perfect way to end the lesson independently—keeping it interactive even while I was out.

The Results: Progress, but We’ve Got Work to Do

Here’s what happened:

  • About 80% of students completed the guided notes, which isn’t bad considering it’s what they’re used to.
  • 50% made it through the Sketch and Tell-o, which shows me they’re still warming up to that format.
  • Only 30% completed the Gimkit—but of that 30%, the overall average score was 82%, so they’re retaining the info, which is a positive takeaway.

Not the most productive day, but it’s progress. The plan is to ease them out of guided notes and into more interactive and student-led learning activities as the year goes on. We’re building stamina and confidence, one small step at a time. This class is growing—slowly but surely—and I’m adapting my approach to meet them where they’re at while pushing them forward. It’s all part of the journey.

Tuesday

Mr. Roughton’s Site

Tuesday, I was back in action and ready to keep building on the momentum (even after a rough Monday). To really drive home the idea of British acts and taxes, I used a classic Mr. Roughton lesson called “Of Parents and Children.” It’s a gem that uses a humorous, relatable approach to connect the build-up of the American Revolutionary War with the students’ own experiences.

“Of Parents and Children”: Bringing the Revolution Home

In this lesson, the premise is simple but effective—compare historical events to everyday situations that students can relate to. I read scenarios that mimicked the British acts and taxes but presented them as if they were happening between parents and children. For example, one scenario had the “parents” making their child pay the family Netflix bill (which, of course, got a lot of groans and eye rolls). The students wrote down how they would feel if that happened to them—most of the responses ranged from “unfair” to “totally unreasonable.”

After each scenario, we flipped the script and connected it to the actual historical event, like the Stamp Act or Townshend Acts. The students then made connections between the two, understanding how colonists might have felt and why they were so angry. It’s always great to see the lightbulbs go off when they realize how similar these feelings of unfairness are to the colonists’ experiences.

Taking Longer Than Expected

The activity ended up taking longer than I anticipated—students were really into it, and we had some great discussions about fairness and control. We didn’t have time for all the follow-up activities I had planned, but the engagement and dialogue made it worth it. It was one of those moments when slowing down felt right, even if it meant changing the pace of the day.

Fast and Curious Wrap-Up

To wrap things up, we did a quick Gimkit Fast and Curious. It was a great way to reinforce what we’d discussed in a fun and interactive format. The class averages ranged from 90% to 76%, showing that even with a more hands-on, discussion-based approach, they were retaining the key information.

It was a solid day of learning that tied the content to something personal and familiar for the students, making the history feel less distant and more relevant. Onward to the next lesson! 💥🔥

Wednesday

Lesson Link

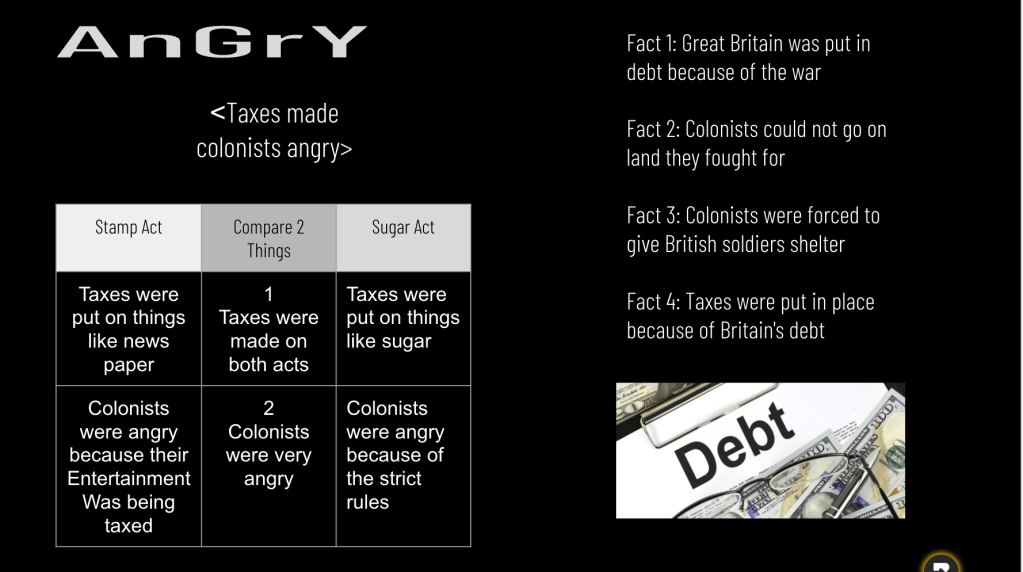
Wednesday, I could tell the energy in the room was running low after all the talk about British acts and taxes. It was time to pivot and move on. I decided to shift the focus to how the colonists protested these taxes and why they chose to take action. And, to really hook them, I wanted to start with something dramatic—violence.

Kicking Off with a Hook: “The Bostonians Paying the Excise-Man”

To grab their attention right off the bat, I used the famous cartoon, The Bostonians Paying the Excise-Man. This picture tells a pretty wild story—perfect for keeping 8th graders interested while diving into the deeper meaning of protest and rebellion. I knew the image’s intensity would catch their eye and drive home the point that sometimes people resort to violence when they feel unheard.

I started the lesson with a quote on the board:
“He picked off his charred skin, kept it in a box, and showed it to King George III to prove his loyalty.”

It was just the hook I needed. Eyes went wide, and hands shot up. The curiosity was sparked, and we were off to a solid start. This lesson was done entirely on paper because I’ve noticed that my students engage more with physical materials than with digital ones—so we’re rolling with what works.

8Parts: Analyzing the Cartoon

We kicked off with an 8Parts activity. The goal? Analyze the cartoon with no background information—just raw observation. I asked them to list nouns, verbs, adjectives, and adverbs they saw. This helped them start thinking critically without immediately jumping to conclusions. After they’d had some time to work through their observations, I filled them in on the historical context behind the cartoon and had them consider: Why would someone create this?

To wrap up the 8Parts, they crafted a summary using all the parts they had identified. It was cool to see them start piecing together how protest could turn violent and why.

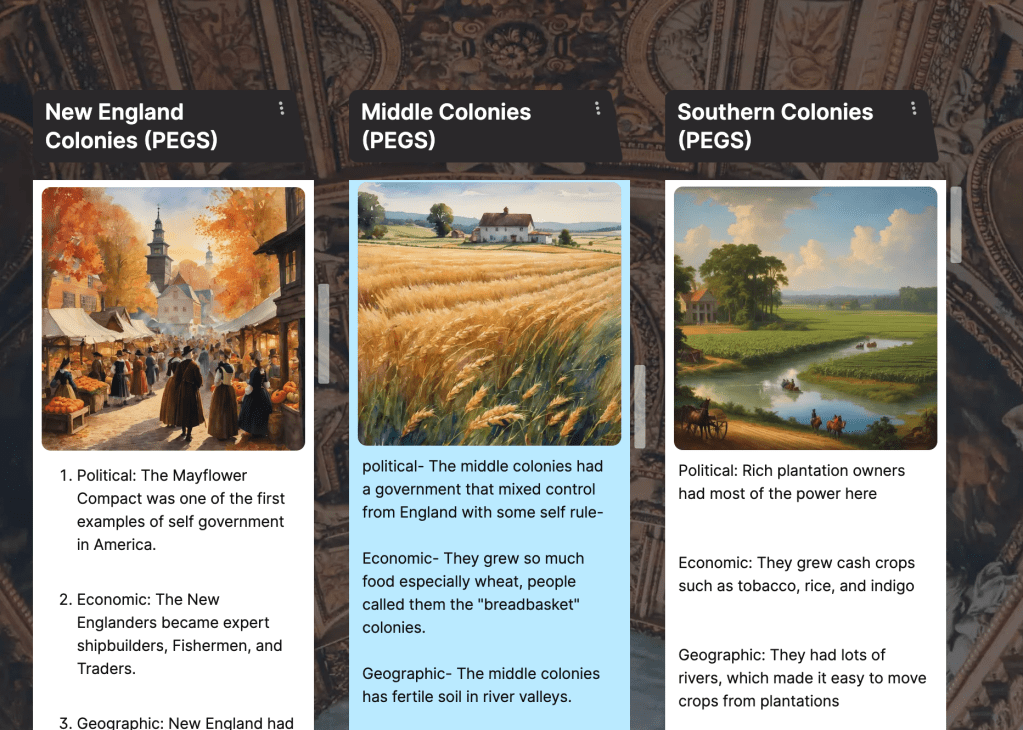
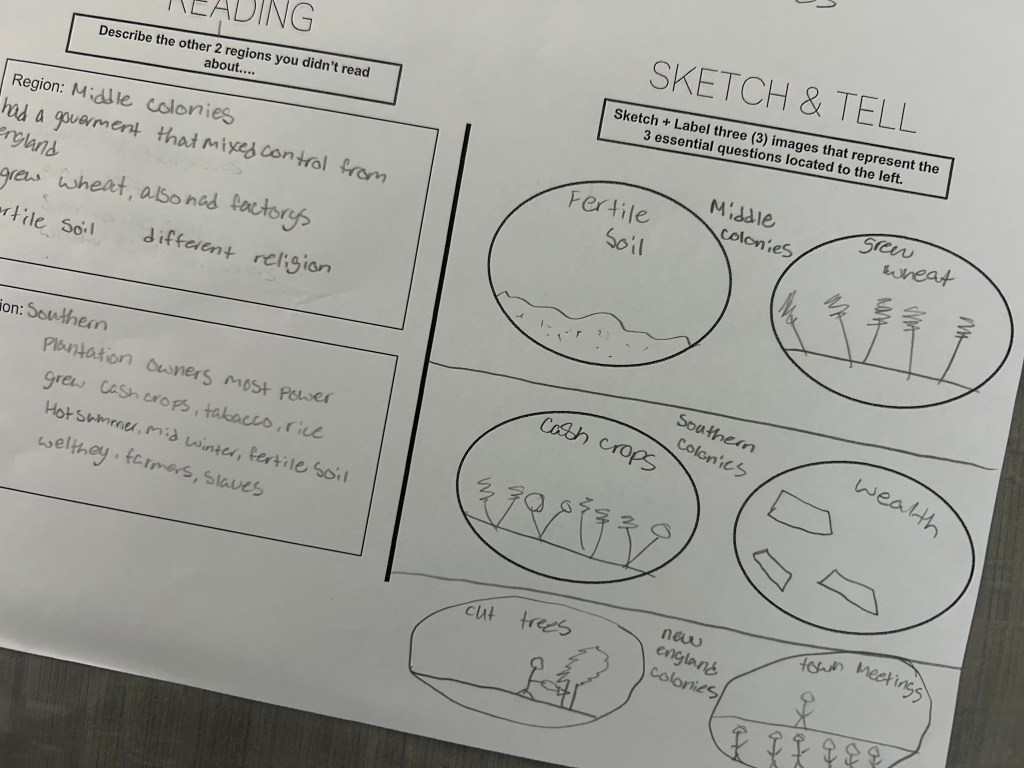
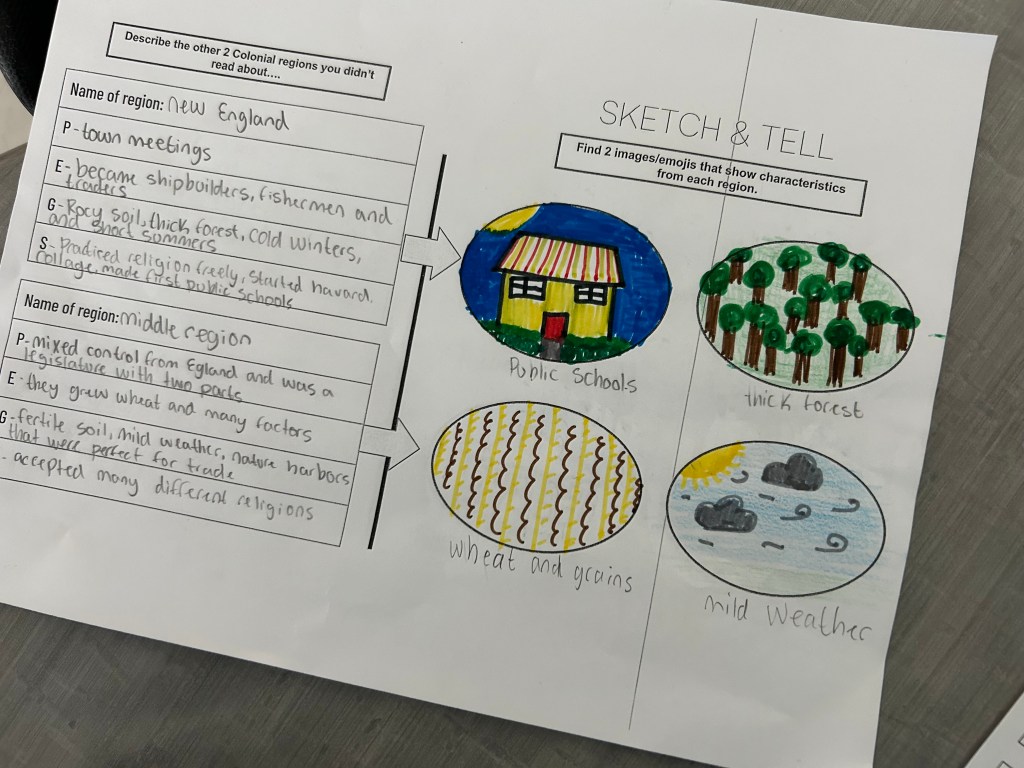
Frayer Models: Sons of Liberty & First Continental Congress

Next up, we switched gears and worked on two Frayer Models—one for the Sons of Liberty and one for the First Continental Congress. I provided the Google definition for each term, but I wanted them to make it their own. They had to create their own definitions, jot down two examples of people they might have heard of who were part of each group, and sketch a picture to represent each one. It was a solid way to build context and give them some hands-on work that helped reinforce the key players in these protests.

CyberSandwich: The Story of John Malcolm

For the main event, we dove into a CyberSandwich about the cartoon The Bostonians Paying the Excise-Man. The story focused on John Malcolm, who was tarred and feathered by the Sons of Liberty. This narrative always grabs attention—it’s intense and dramatic, exactly the kind of thing that gets 8th graders engaged. They took notes using the who, what, when, where, why structure. They were all in, and you could see the gears turning as they made connections between the story and the broader context of colonial protests.

To wrap up the CyberSandwich, I tried something different. I had AI create a really bad summary paragraph for the students to fix. They nailed it—picking it apart, rephrasing, and turning it into something meaningful. It was awesome to see them take ownership of their corrections and really focus on improving the content.

The last task was to write a caption for the cartoon, but from the perspective of a British loyalist. This was a challenge for them. They struggled to switch perspectives, and it was clear that empathy mapping is still something we need to work on. But it’s all part of the process, and I’m confident that with more practice, they’ll get there.

Reflection

Wednesday was an active day that pushed the students to connect personally with history while developing key skills like analysis, summarization, and empathy. The energy in the room was definitely better, and I felt like the shift in focus was just what we needed to keep the momentum going. On to the next! 💥🔥

Thursday

Lesson Link

Thursday was all about continuing the theme of protest, shifting from violent and intimidation protests to destructive protests when people felt their voices weren’t being heard. Our focus? The Boston Tea Party—a classic example of colonists taking drastic measures to make their point.

Intro to Number Mania

I love using Number Mania for events like the Boston Tea Party, but I realized I hadn’t introduced this activity to my students yet. So, before diving into the history, I set up a practice round to get them comfortable with the concept.

To start, I had each student create a slide with 3 numbers that were significant to them. It could be anything—like their birthday, favorite sports jersey number, or the number of pets they have. Then, I taught them how to use Word Art, change colors and fonts, and add drop shadows to make everything pop on their slides. This creation time took about 12-15 minutes, but it was worth it. They got into the groove of designing and making their numbers stand out.

This step was crucial; it got them familiar with the process and built confidence so when we moved into the actual content, they’d feel ready.

The Real Deal: Boston Tea Party By the Numbers

With the practice under their belts, it was time for the real Number Mania experience. I had Claude (AI) create a “Boston Tea Party By The Numbers” reading. Of course, I fact-checked everything before handing it over to the students—got to keep things accurate!

To set the stage, I gave them a quote:
“The Boston Tea Party was a massive and well-organized protest that required careful planning, involved many people, and had huge consequences.”

Their goal? Find 4 numbers and facts in the text that supported this quote. We read the text together, and they highlighted the numbers that stood out. Then, they created a slide with their findings, just like we practiced.

Success with Number Mania

Thanks to the practice run, they nailed it. I was hearing a lot of “This is easy!” as they worked, which is exactly what I want—confidence and engagement. They connected the numbers back to the larger idea of the Boston Tea Party being a well-planned protest, and it was great to see them make those connections independently.

This approach worked wonders. It wasn’t just about understanding the history; it was about reinforcing the process, building confidence, and making it feel achievable. We’re definitely keeping Number Mania in the rotation!

Onward to the next chapter in our revolutionary journey! 💥🔥

Friday

Primary Sources Lesson Link, Thick Slide Summary

Friday was a day off for me, so I set up an inquiry lesson for my students—a deep dive into the question, “Why is it important to have a voice in government?” This inquiry question felt like the perfect way to wrap up everything we’d covered throughout the week about colonial protests, representation, and rebellion.

Tackling Inquiry with a Little Help from AI

Now, I actually like some of the inquiry lessons from the textbook, but the problem is they’re often a bit much. These lessons can be overly complicated, and many of the primary sources aren’t exactly written at an 8th-grade-friendly level. Sure, I want students to stretch their thinking and be challenged, but there’s a fine line. Most students don’t have the stamina for hours of “critical thinking” with material that feels too complex or abstract.

So, I decided to give this inquiry lesson a boost to make it more accessible. Here’s what I did:

  1. Streamlining the Primary Sources: The lesson had five primary sources, so I took screenshots and ran each one through Claude AI. I asked it to rewrite the sources at a 7th-grade reading level, but still maintain the original tone and style. This way, the students could understand the essence without getting bogged down by archaic language.
  2. Adding Context & Guiding Questions: For each source, I had the AI add context to set the stage—who wrote it, why, and how it fits into our big question. I also had it extract any guiding questions from the textbook and even create one additional question for each source to push the students’ thinking just a bit further.
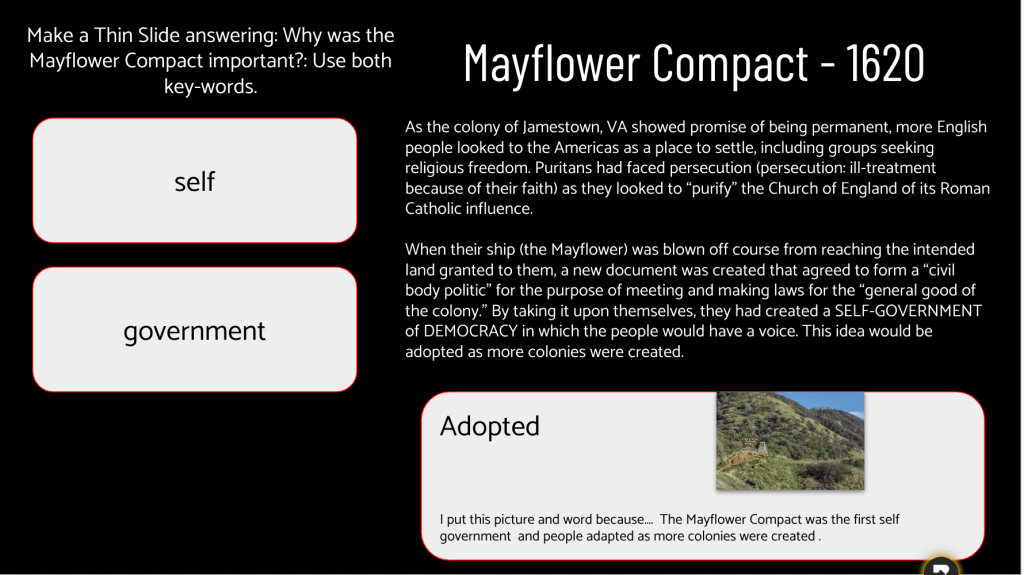
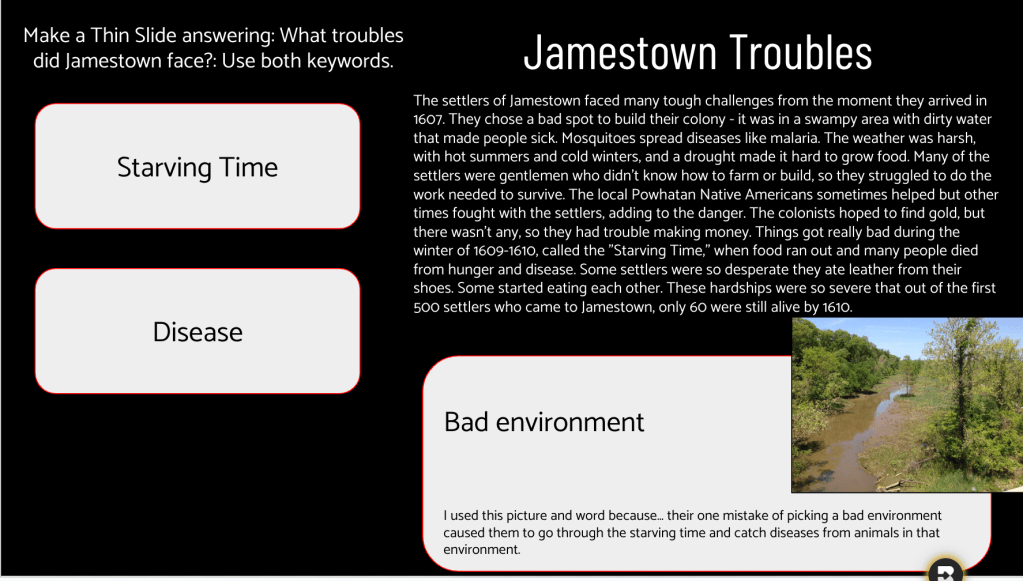
  3. Final Synthesis Question: The ultimate goal was for students to answer the question, “Why is it important to have a voice in government?” After they’d worked through the sources and guiding questions, they were meant to summarize their findings on a Thick Slide.
The Real-Life Results

Did most students finish the work on paper? Honestly, I’m not sure. I saw that about 30 out of 90 students got to the Thick Slide summary. My guess is that the majority were working through the sources at their own pace, which is totally fine. The focus was less on “getting to the end” and more on engaging with each source meaningfully.

This setup was a bit of an experiment, but I’d say it was worth it. Having simplified sources and targeted questions helped make the inquiry more manageable. Even if they didn’t all finish, I’m hopeful that they took away some understanding of why representation matters—a key theme we’ll keep building on as we move forward in our revolutionary timeline.

The Week That Was In 234

Sometimes, the demands of teaching and life outside the classroom can be overwhelming. This week, I felt the weight of it all. Trying to balance lesson planning, teaching, and taking care of my own well-being hasn’t been easy, but I’m doing my best to carve out moments for myself to stay sane. Still, Tuesday’s lesson reminded me that, despite all the challenges, we’re making progress—one step at a time.

Tuesday

Lesson Link

Our focus for the day was colonial government, diving into how the colonies were left to create their own systems under England’s “salutary neglect.” It was a great opportunity to make connections between historical events and the structures the colonies built, giving students a look at the roots of American government.

We kicked things off with a Gimkit review to get the students’ minds engaged. The scores were rough—class averages came in at 49%, 60%, 65%, and 68%. Not exactly the strong start I was hoping for, but it set the tone for what we needed to work on. It’s all about growth, and sometimes seeing those lower numbers is the push we need to make improvements.

Map and Tell: Visualizing Space and Context

Next, we did a Map and Tell activity. I wanted students to make the observation that England was far away from the colonies. This helped us place the lesson in the context of distance and the impact of England’s hands-off approach, leading to salutary neglect. It’s one thing to tell them the colonies were left to manage themselves; it’s another to show them the physical distance on a map and let them connect the dots themselves.

Pyramid of Power: Visualizing Colonial Structure

To reinforce the concepts, we filled out a pyramid showing the power structure in England versus the colonies. The top half of the pyramid was England, with the king and Parliament. The bottom half showed the 13 colonies with their elected assemblies and town meetings. This was my attempt to help them visualize how the government was structured differently on either side of the Atlantic. We also tied this back to mercantilism, which we covered last week, emphasizing how England’s focus on economic gain allowed the colonies to develop their own political systems.

Thin Slides: Chunking Colonial Government

After the pyramid, I had the students use a Justin Unruh Thin Slide to work through chunked readings about the different foundations of colonial government, like the Magna Carta, Mayflower Compact, House of Burgesses, English Bill of Rights, and Fundamental Orders. The goal was to have them engage with keywords and summarize these concepts visually.

But this is where things got tricky. The kids seemed overwhelmed by the task. I chunked the material into five slides, thinking it would make the information manageable, but even this proved daunting for them. I timed each slide at 5-6 minutes, but it felt like I was pushing a boulder uphill—students were struggling to keep up, and engagement was low. I tried to step in, reading the content aloud and shifting to an “I do, we do, you do” model, hoping to guide them through it.

By the time I got to the second half of the day, I realized I needed to adjust. I switched the Thin Slide activity to paper. It was a simple move, but it made a huge difference. With the material in front of them and fewer distractions, the kids seemed more settled, and the pace was smoother. It’s a reminder that sometimes we have to adjust and find what works best for our students, even if it means veering from the plan.

Wrapping Up: Finishing with Gimkit

To close out the lesson, we went back to Gimkit for a final review. This time, the class averages were better—70%, 80%, 74%, and 72%. It wasn’t a dramatic jump, but it showed progress, and that’s what I’ll take away from this day.

Reflections: Learning and Adjusting

It wasn’t the most productive day, and that’s okay. Some lessons flow smoothly, and others remind us that teaching is a constant process of trial, error, and adjustment. Switching from digital to paper was the right call, and it’s something I’ll keep in mind moving forward. If a strategy isn’t working, I have to be flexible enough to try something new in the moment.

It’s all about finding the balance—both for my students and for myself. Whether it’s adjusting lessons on the fly or taking a deep breath to center myself before the next class, I’ll keep moving forward. Sometimes, it’s about embracing the small wins—like those incremental Gimkit score improvements—and using them as building blocks for the next day.

Here’s to figuring it all out, one lesson (and one adjustment) at a time.

Wednesday

Lesson Link

We started the lesson with the “Brain” phase—classic retrieval practice. Students closed their Chromebooks and used their memories to answer a series of questions about the English Colonies. I set the timer for 10 minutes and challenged them to pull as much as they could from their own knowledge. The purpose was to emphasize thinking without relying on tech. As they worked, I could see some were really digging deep, and the effort was there. It was a great warm-up and laid the groundwork for the rest of the lesson.

Next, I had students highlight the questions they couldn’t fully answer, and that’s when we moved into the “Book” phase. Chromebooks came back out, but I was strict—no Googling! Instead, they had to rely on their notes and materials from previous lessons. I made sure to walk around, keeping everyone focused on using their resources the right way. This was all about reinforcing the importance of their own notes as tools and encouraging them to build solid study habits. The class was quiet but engaged, as students dove into their resources.

Once they had gathered their answers, it was time for “Buddy.” Students paired up and compared their responses, filling in any gaps or clarifying details they missed. This was the most interactive part of the lesson, and it was great to see them teach and learn from each other. I could tell that some students found confidence in what they knew, while others appreciated the chance to ask questions and catch up.

Finally, we wrapped up with “Boss” mode—that’s where I stepped in. Students brought their remaining questions or uncertainties to me. I loved this part because it gave me insight into areas where they needed more support and gave them the opportunity to check their understanding. I made it a point to answer their questions directly, clearing up any misconceptions they had about the material. It was a great way to wrap up the review while ensuring that everyone walked away with a clearer understanding.

The Results: A Big Improvement

I didn’t reveal the Brain-Book-Buddy-Boss framework upfront—I introduced each step as we went along, keeping the students curious and engaged. By the time we got through all four phases, they were fully on board and energized. We ended the lesson with another Gimkit assessment. This time, the class averages jumped significantly: 92%, 88%, 87%, and 86%. It was a major improvement from the 60%-70% range we had last week.

And the best part? I had them put away their notes and Chromebooks for the Gimkit—just their brains, again. The progress showed me that the strategy worked, reinforcing not only content knowledge but the value of retrieving information from memory.

Final Takeaway: Why I’ll Be Using This Again

The Brain-Book-Buddy-Boss approach hits all the right notes for an effective review session. It builds on retrieval practice, collaboration, and direct feedback—all while keeping students actively engaged. The step-by-step method allows them to build confidence, reflect on what they know, and fill in gaps—all in one lesson.

I’ll definitely be using this strategy again. It’s a win for the students and a win for the teacher, and it’s exactly the kind of structure we need to keep moving forward in our learning journey.

Thursday

Lesson Link

Thursday was a turning point in the classroom as we launched into a new unit: the Causes of the American Revolution. The focus was all about understanding the shifting relationship between the colonists and England, and how things went from cooperation under Salutary Neglect to conflict. I knew I needed a hook that would be engaging, relevant, and just disruptive enough to get their attention—so I turned to PBIS.

Hooking Them with the PBIS Bathroom Trick

Let’s be honest—classic hooks like pretending to tax pencils or papers just don’t cut it anymore. Kids see right through it. So, I pulled out a move that was a little more realistic. I went into our PBIS rewards system and created a store item—a bathroom pass—for a steep price: 150 PBIS points. When I announced this to the class, they were outraged, and that’s exactly what I was going for.

We launched into a discussion about why they were so mad. The students had a lot to say, calling out the fairness of it all and pointing out that I had never cared about bathroom usage before—so why was I making it a big deal now? That’s when I pulled out my “Aha!” moment. I explained that this frustration they felt was exactly what the colonists experienced. England had ignored them for years under Salutary Neglect, and then suddenly, it started enforcing policies and making them pay their “fair share.” The students connected instantly—it wasn’t just a random history lesson; it was a situation they could feel.

This hook worked because it was something they genuinely cared about, and it was believable. It’s way better than the cheesy, outdated “tax” tricks. When you tap into something realistic like PBIS rewards, they buy in because it’s their world.

Retrieval Practice and Review: WordWall and Gimkit

After we had our discussion, I wanted to keep the momentum going with some retrieval practice. I’ve been making a conscious effort to build retrieval practice into the routine so it becomes second nature. We started with a WordWall activity where I posted a 13 Colonies map and had students, from memory, drag and drop to match the colonies. They got one shot to do it. Most students nailed 13 to 14 colonies correctly, which was awesome to see—proof that the practice is starting to pay off.

Next, we switched gears to a Gimkit focused on the French and Indian War. I prompted them with the question: “Think about what changed the relationship between the colonists and England?” This helped frame the conversation about how England’s policies started shifting after the war, leading to the tensions we’d see later.

Thin Slides and Sourcing Parts: Making Connections

To dig a little deeper, we did a quick Thin Slide on Padlet. I asked the students to find the European country that controlled Clermont County, Ohio, in 1754. Their task was simple: one word (the country) and one picture (a map) to support their answer. It took about 5 minutes, which was longer than I usually like for Thin Slides, but they needed that time to explore and find the info. I’m okay with a little extra time if it means they’re engaging with the material.

We moved on to Sourcing Parts using the famous Join or Die cartoon. The goal was to pick apart the cartoon and write a summary of its message. This activity took about 10 minutes, but I was impressed. The students noticed details like the letters and abbreviations representing the colonies, which was exactly why I had started with the WordWall retrieval practice earlier. It set the foundation for them to make the connection to the colonies depicted in the cartoon.

Experiment Time: Guided Notes vs. Sketch and Tell-o

Here’s where the day got interesting. I tried an experiment with my classes: for the first three, I used guided notes while I talked about the French and Indian War. For the last class, I switched it up and used a Sketch and Tell-o, letting them read about the French and Indian War on their own and create their own notes. I wanted to see if one approach would yield better engagement or retention.

We ended with another round of Gimkit. The scores were all over the place:

  • First class: 45% to 69%
  • Second class: 39% to 76%
  • Third class: 31% to 66%
  • Fourth class: 43% to 74%

So, what did I learn? Well, honestly, it’s hard to draw any clear conclusions. There were so many variables at play—behaviors, levels of engagement, and just plain old classroom dynamics. In the last bell, where I tried the Sketch and Tell-o, I had a couple of my usual top scorers out of the room during the second Gimkit round. They usually rank in the top 5, so there’s no doubt their absence impacted the final percentage. That 74% could’ve easily pushed up closer to 80% if they’d been there.

Final Thoughts

Was it the guided notes or the Sketch and Tell-o that made the difference? I don’t have a definitive answer yet. What I do know is that mixing things up and testing out different methods helps me see where my students are at and what they respond to. Sometimes, it’s not about the perfect strategy; it’s about being willing to pivot and try new things, even if the results aren’t crystal clear. At the end of the day, any progress—whether it’s small jumps in Gimkit scores or students making connections to content—means we’re moving in the right direction.

The PBIS bathroom hook will definitely make a return in future lessons—it’s the kind of realistic hook that gets them thinking and feeling like they’re in the colonists’ shoes. And I’ll keep experimenting with different approaches to see what sticks and what doesn’t. It’s all part of the process, and every day, we’re building something better.

Friday

Lesson Link

Taxes and “No Taxation Without Representation”

I kicked off the class with a quick overview of why we have taxes in the first place—what they pay for and why they’re necessary. This laid the groundwork for our discussion about taxation without representation, so the students could start seeing things from the colonists’ perspective. I used a map to show the distance between England and the colonies, highlighting how disconnected the colonists felt from the laws being imposed on them.

I didn’t want to overwhelm the kids with too much information at once, so I decided to focus on just three key acts: the Stamp Act, the Sugar Act, and the Quartering Act. Breaking it down into manageable chunks felt like the right move, especially for a Friday when everyone’s attention span is hanging by a thread!

Iron Chef on Padlet: Act by Act

Once I set the stage, I gave each student a half-page of reading about one of the acts. They had 10 minutes to read and then jump into an Iron Chef activity on Padlet. The goal was to share key facts from their reading and use Padlet’s “I Can’t Draw” feature to create an AI-generated image that visually represented the act they were assigned. It was fun watching them explore the AI tool, and it definitely kept the energy up in the room.

Sketch and Tell with Emoji Kitchen

After we built out the Padlet, students reviewed each other’s work. Their task was to choose an act they didn’t study initially and create a Sketch and Tell using the Emoji Kitchen. They had 10 minutes to pair an emoji with a visual representation of the act and explain its significance. This approach was all about helping them synthesize information from their peers and think critically about how to represent historical concepts visually. The Emoji Kitchen adds a playful twist that keeps them engaged—some of the creations were spot-on and hilarious!

Wrapping Up with a Thick Slide

To pull everything together, we moved into a Thick Slide activity. I asked the students to create a slide that included the following:

  • A title and subtitle for context
  • Four key facts about the acts they learned
  • A comparison between the Stamp Act and the Sugar Act
  • An image that tied their points together

The Thick Slide gave them a chance to consolidate their knowledge and show what they’d absorbed in a structured way. It also allowed me to assess their understanding at a glance. I love how Thick Slides force students to think critically about what they’ve learned and distill it into a concise, visual summary.

Ending Strong with Gimkit

We wrapped up class with a Gimkit session to reinforce what we covered. The students always get competitive with Gimkit, and it’s the perfect way to review and end the week on a high note. I could see that focusing on just three acts kept things clear and manageable for them, and the structured activities made it easier for them to retain and recall information.

Final Thoughts

Friday felt like a win. By focusing on a few key acts and using a variety of EduProtocols like Iron Chef, Sketch and Tell, and Thick Slides, the lesson flowed smoothly. The balance of reading, visual work, and interactive review hit all the right notes. It’s all about finding ways to keep the students engaged while ensuring they walk away with a solid grasp of the content.

I’m looking forward to building on this foundation next week as we dive into more of the acts and continue exploring the buildup to the Revolution. The goal is to keep it fresh and interactive so that the students stay invested in the story of how these events shaped America.

Brain-Book-Buddy-Boss: A Winning Review Strategy

Brain-Book-Buddy-Boss-Link

If you’re anything like me, you’re always on the lookout for strategies that actually work in the classroom—ones that not only engage students but also lead to real results. On my way to school last week, I tuned into Gene Tavernetti’s podcast, Better Teaching: Only Stuff That Works, where he had Blake Harvard as a guest. Harvard shared an approach that I knew I had to try: Brain-Book-Buddy. I ended up adding a little twist—Boss. It turned out to be the perfect way to review our English Colonies unit.

Here’s how it worked, and why it was such a game-changer for my classroom.

Step 1: Brain—Retrieval Practice That Sets the Tone

I started the review by focusing on retrieval practice. Retrieval is one of the most powerful strategies for learning—it forces students to pull information from memory, strengthening their ability to recall it later. For the “Brain” part, I had students close their Chromebooks and use their brains to answer a set of questions on the English Colonies. I gave them 10 minutes to jot down everything they could remember, emphasizing that this was just about their own recall—no notes, no devices, just their memory.

This approach was a big shift for some students, but it worked wonders. Having them rely on their brains alone set the tone for the rest of the lesson and put the emphasis on thinking instead of searching. They quickly realized that they knew more than they thought—and it was great to see that confidence building.

Step 2: Book—Reviewing and Filling the Gaps

Once the 10 minutes were up, I had the students highlight any questions they couldn’t answer or were unsure about. That’s when we moved to “Book” mode. This time, the Chromebooks came back out, but I made it clear—no Googling! We’re all about using our own resources, so students had to find the information using their class notes and any EduProtocols we had already practiced, like Cyber Sandwich or Thin Slides, to review the material.

I walked around the room to make sure everyone was sticking to the task and using the notes they had created throughout the unit. This was a chance for them to practice good habits—turning to their own resources instead of the internet—and it worked! By using their own notes, they were reinforcing those study skills that will serve them far beyond this unit.

Step 3: Buddy—Collaborating to Deepen Understanding

Next, it was time for the “Buddy” step. Students paired up and discussed the questions they’d highlighted and the answers they’d found. This collaborative element allowed them to fill in any gaps they still had and bounce ideas off one another. It’s amazing how much students learn from each other when given the space to collaborate. They were actively teaching each other and, in turn, solidifying their own understanding.

Step 4: Boss—Clearing Up Misconceptions

The final step was “Boss”—and that’s where I came in. After they had a chance to work through the material with their buddies, it was time for them to bring any remaining questions or misconceptions to me. I stood at the front of the room, and they fired off their questions one by one. I loved this part because it gave me a window into what they were still unsure about. It also gave the students the chance to clarify anything they hadn’t quite nailed down yet.

I didn’t tell them upfront that we were going through a “Brain-Book-Buddy-Boss” structure—I taught it as we went along. This kept them engaged and curious, wondering what step was coming next. By the end of the lesson, they were fully onboard and loving the process.

The Results: A Massive Improvement

The proof was in the pudding—or in this case, in the scores. We wrapped up the review with a Gimkit assessment, and I was thrilled with the results: class averages came in at 92%, 88%, 87%, and 86%. This was a huge improvement from the 60%-70% range we saw last week. And the best part? I had the students put their papers away for the Gimkit, so they had to rely solely on their brains again. This kind of consistency in retrieval practice really paid off.

Why It Works: Blending Engagement and Retrieval Practice

What I love about the Brain-Book-Buddy-Boss strategy is that it hits multiple key elements of effective teaching. It combines retrieval practice, collaboration, and direct instruction all in one lesson. The structured approach makes it easy for students to stay engaged, and the different phases ensure they’re using their knowledge in multiple ways—solo, in pairs, and with teacher support.

Retrieval practice isn’t new, but finding ways to make it engaging can be challenging. This method adds layers that not only make it fun but also deepen understanding. I’ll definitely be using this strategy again, and I’m excited to see how it can be adapted for other units or subjects.

Final Thoughts

Whether it’s for a review or an introduction, Brain-Book-Buddy-Boss is a winner. It’s simple, effective, and most importantly, it helps students learn how to rely on their own knowledge and resources. After seeing the results with my English Colonies unit, I know this will become a staple in my classroom.

If you haven’t tried it yet, give it a go—your students will love the structure, and you’ll love the results.

The Week That Was in 234

This week was all about leveraging EduProtocols to simplify learning, foster creativity, and reinforce key concepts. From using Thin Slides and Cybersandwich to explore complex topics like Bacon’s Rebellion and race-based slavery, to engaging students with retrieval-based activities like Graph and Tell and Thick Slides, the focus was on making learning more accessible and engaging. Whether students were interacting with AI chatbots or diving into historical data, these protocols helped break down challenging content into manageable, meaningful tasks. Here’s a breakdown of how we used EduProtocols to keep the momentum going this week:

Monday

Lesson Link

On Monday, I decided to try out something new and set up a free trial with Magic School. In the past, it seemed like a promising one-stop shop for classroom tools, though my previous experiences were inconsistent. But with a new school email, I created a fresh account and set up a chatbot for the 13 colonies.

My vision was to have a chatbot that would take on the persona of one of the founders of the 13 colonies. All students had to do was type, “Who founded <enter colony name>?” A few people have already asked how I set up the chatbot, so here’s how I did it: Instead of app smashing, I was AI smashing. I went to Claude AI and asked for a set of instructions for a chatbot that would take on the persona of one of the founders of the 13 colonies—geared for 8th graders. It even provided a knowledge base for each founder!

For this lesson, I didn’t think it was important for students to memorize every detail about every colony. Instead, I wanted them to understand the colony’s region, its geography, and its economy.

Starting with Gimkit: Colonial Regions Review
We kicked off with a quick Gimkit on colonial regions, a review of Friday’s lesson. The class averages ranged from 82% to 90%—pretty solid, especially for a Monday.

Frayer Model Activity
Next, I handed out paper Frayer models where students wrote a colony name in the middle and added information about its government, geography, economy, and religion. Looking back, I should’ve just aligned it with the PEGS acronym we used on Friday, but live and learn.

Introducing Magic School
I showed students how to use Magic School, where I had set up a classroom that allowed me to add AI tools. I added both the chatbot and an image generator, then shared the Magic School link with the students—super easy!

I loved this activity because it got kids asking good questions, which is such an important life skill. They could ask the chatbot about their colony and get personalized answers. For example, they could ask the founder to use simpler language or even to relate the colony’s geography to basketball! It was cool, and the students were hooked—many didn’t know AI could do this kind of stuff.

Students wrote down notes from the chatbot on their Frayer models.

Airbnb Advertisement Activity
The next step was to use those notes to create an Airbnb advertisement for their colony. I got this idea from Ditch That Textbook, and it was super easy to adapt. However, the students struggled a bit with this task. Getting them to think creatively and step outside the box is still a work in progress, but I see improvement.

Takeaway
The chatbot was a win—it allowed students to engage in inquiry-based learning and step away from the textbook. The creative thinking piece is still a challenge, but I’m confident that with practice, we’ll get there. The biggest takeaway? Learning how to ask good questions and use AI to personalize that learning was a game changer for my students.

Tuesday

Lesson Link

Tuesday, I needed a bit of an easy day, but still wanted to create a meaningful learning experience. We started the lesson by emphasizing the importance of using person-first language when discussing slavery. Instead of using terms like “slave,” we replaced them with “enslaved person,” and “master” or “owner” with “enslaver.” It’s a small shift but a crucial one, and I’ve learned it requires explicit teaching for students to fully grasp its significance.

Station Rotation Activity: The Triangular Trade and Middle Passage
The core of today’s lesson was a station rotation activity centered on the essential question: “How did Europeans exploring North America for trade, religious reasons, and competition with each other affect the history of the continent and the people who lived there?” This question has been guiding our exploration of European colonization’s impact on North America.

Students rotated through four stations, each engaging with a different aspect of the Triangular Trade and the Middle Passage:

Station 1: EdPuzzle Video
We kicked off with a 5-minute EdPuzzle video—a Ted-Ed lesson on the Middle Passage. The video was followed by questions to ensure comprehension and introduce students to the topic. The video laid the foundation for the rest of the activity.

Station 2: SlaveVoyages.org Interactive Map
At this station, students used the SlaveVoyages.org database, an incredible resource featuring a timelapse map of ships departing West Africa for the New World. The interactive map allowed students to explore individual ships, their cargo, and survival rates. It was a powerful, visual way to understand the horrific journeys endured by enslaved people. The database, built through collaborative efforts, was an invaluable resource for our class.

Station 3: Slavery Statistics
In this station, we focused on statistics related to slavery. Tying back to our previous Number Mania lesson, students saw how statistics have real historical context. They used data from the Slave Voyages database and connected it to the numbers we’ve been exploring.

Station 4: Slavery in the Northern and Southern Colonies
At the final station, students read about slavery’s presence in both the Northern and Southern colonies and how enslaved people managed to build their own culture despite their circumstances. A map illustrating the Triangular Trade routes accompanied the reading, helping students visualize the geographic connections.

Students worked in pairs at each station, discussing and answering questions. The stations ended up taking longer than expected, but seeing the students engaged and actively learning was more important than sticking to a rigid timeline.

Thick Slide Assessment
To wrap up the lesson, I posted a Thick Slide task. Students condensed the information from their station rotations into essential facts, answering the question, “How did the triangular trade and the Middle Passage transform North America?” They also used the Slave Voyages database to find a ship that traveled to North America and gather relevant statistics. As a final touch, they included a quote from Olaudah Equiano and an image with a caption.

Takeaway
This was a more laid-back day, but it was packed with meaningful content and reflection. The stations allowed for deep engagement, and the students rose to the challenge of condensing complex ideas into manageable pieces of information. Even though we didn’t stick to the exact schedule, the engagement and learning made it all worth it.

Wednesday

Lesson Link

On Wednesday, I wanted to introduce how race-based slavery came to be in North America. I started with a picture of Anthony Johnson on the board. Johnson was a Black man and former indentured servant in Jamestown who earned his freedom, owned land, and even enslaved people to work on his tobacco farm. This example illustrated that slavery wasn’t originally race-based in the colonies. But then came Bacon’s Rebellion, and things began to shift.

Graph and Tell: Analyzing Slavery Census Data
We began with a Graph and Tell activity where students analyzed census data about slavery. They made inferences based on the data, which served as a review of the colonial regions and their economies. This exercise helped students make connections between the regions and how slavery impacted their development.

Introducing Bacon’s Rebellion
Next, I introduced Bacon’s Rebellion. The textbook mentioned that the rebellion showed how the Virginia government couldn’t ignore its citizens, but I thought, “Bacon’s Rebellion goes way beyond that!” To help students understand, I used a Somebody, Wanted, But, So, Then activity, giving them more practice with sequencing and comprehension. This scaffolded their understanding of the rebellion’s role in the shift toward race-based slavery.

Cybersandwich: The Start of Race-Based Slavery
After introducing Bacon’s Rebellion, we read about how race-based slavery began in Virginia as a consequence of the rebellion. I had students work through a Cybersandwich activity for this reading. They wrote down five important facts, condensed their notes, and then compared and discussed with a partner. This paired learning helped students process the material more deeply.

Struggling with Summary Writing
To wrap up, I wanted students to write a quick summary of what they had learned about the shift to race-based slavery. Oh boy—the summary writing was a struggle. I’m not sure if it was the content itself or just the act of writing, but many students found it challenging to condense their thoughts into a clear, concise summary.

Takeaway
Wednesday’s lesson introduced some complex ideas, and while the Cybersandwich activity helped students grasp the content, the summary writing showed me that we still have some work to do. I’ll need to continue working on breaking down writing skills and building confidence in expressing complex ideas in shorter formats.

Thursday

Lesson Link

Thursday was a special reward day for the students since it was the end of the quarter. With limited time and a more relaxed atmosphere, I decided to do something simple but beneficial: a Retrieval Practice Grid activity that doubled as an opportunity for extra credit.

The Retrieval Practice Grid
I created a grid of questions that covered topics from 7th grade, Unit 1, Unit 2, and our current unit. Each question on the grid was worth a different amount of points based on its difficulty. Students could work through the questions, and depending on how many points they earned, they could unlock different levels of extra credit.

To ensure this was true retrieval practice, I didn’t allow Chromebooks—it was all about what they could recall from memory. The goal was to reward students for what they’ve learned over time, and it was a great way to wrap up the quarter while still reinforcing key content.

Takeaway
This activity worked perfectly for the day’s time constraints while still keeping students engaged and focused. It also showed me how much they’ve retained from not just this year, but even last year’s content. A win for both students and teacher!

As the week comes to a close, I’m impressed with how the EduProtocols have streamlined our lessons while keeping students engaged and thinking critically. The combination of Thin Slides, Cybersandwich, and Graph and Tell not only made complex topics like race-based slavery more approachable, but also fostered deeper understanding and retention. The students are gradually getting more comfortable with creative tasks, and I can see their confidence growing as they interact with both the content and each other. Moving forward, I’m excited to keep building on this momentum with even more dynamic and student-centered activities.

Motivating Students to Work: How EduProtocols Can Help

Motivating students to engage deeply with their work is one of the most important goals in the classroom. Too often, students view learning as a series of tasks to complete, focusing on getting the “right answer” instead of developing critical thinking, collaboration, and creativity. But motivation doesn’t have to be elusive. With EduProtocols, teachers can foster a classroom culture where students are engaged, confident, and motivated to succeed. By aligning EduProtocols with principles from Self-Determination Theory (SDT), we can tap into students’ intrinsic motivation, giving them the tools to take ownership of their learning.

Autonomy: Letting Students Control Their Learning

Self-Determination Theory emphasizes that students are more motivated when they feel autonomous in their learning. Autonomy is all about giving students the power to make choices in how they approach a task. In the classroom, this translates to offering students control over how they express their understanding.

Protocols like Iron Chef are great for fostering autonomy. In Iron Chef, students are given a set of resources and a limited time to create a collaborative presentation on a topic. They have creative freedom in how they organize and present the information. Whether they choose visuals, bullet points, or videos, students are empowered to decide how they showcase their learning. This autonomy not only makes learning more engaging but also helps students feel more connected to the material.

Similarly, 8pARTS, which asks students to analyze historical images or documents by identifying key elements like people, actions, and objects, encourages them to think critically about what they observe. Students are not just passively receiving information—they are actively interpreting and presenting it in a way that makes sense to them. This fosters a sense of ownership and personal investment in the task.

Competence: Building Confidence with Small Wins

Another crucial element of motivation, according to SDT, is the need for competence. Students are more motivated when they feel capable of achieving success and see measurable growth. This is where protocols like Fast and Curious and Thick Slides excel.

Fast and Curious involves using platforms like Gimkit or Quizizz to give students rapid, repeatable assessments on the material. Students answer questions, receive immediate feedback, and try again. With each round, they see their scores improve, reinforcing their belief that they can succeed through effort. This constant progress fosters a strong sense of competence, which keeps students motivated to continue learning.

Thick Slides, on the other hand, build competence by asking students to summarize and present their understanding of complex topics on a single slide. This might sound simple, but the depth of thought required to condense information into key points, visuals, and captions encourages deeper understanding. Students can see their knowledge grow as they complete these presentations, and that visible improvement reinforces their belief in their own abilities.

Relatedness: Fostering Connections through Collaboration

Motivation thrives when students feel connected to each other and their teacher. SDT points to the importance of relatedness, which is the feeling that we belong to a group and that our contributions matter. EduProtocols are designed to promote collaboration and shared learning, helping students feel connected and engaged.

CyberSandwich is an ideal protocol for promoting relatedness. In this activity, students work in pairs to read a text and take notes independently, then come together to compare their notes and write a joint response. The collaborative nature of CyberSandwich makes it perfect for fostering discussion, teamwork, and connection. Students are not only learning from the content but also from each other. They gain a deeper understanding of the material and develop stronger relationships with their peers in the process.

Likewise, Iron Chef promotes group collaboration as students work together to create a presentation. The shared responsibility of completing the task builds a sense of community and encourages peer learning. When students feel like they’re part of a team and that their contributions matter, they are much more likely to stay engaged and motivated.

Breaking the “Right Answer” Mindset: Encouraging Critical Thinking

One of the most significant hurdles to motivation is the “right answer” mindset, where students believe their role is to find the correct answer and move on. This mindset limits creativity and critical thinking, turning learning into a rote exercise. EduProtocols shift the focus from simply getting the right answer to exploring, analyzing, and creating.

8pARTS and Thick Slides both challenge students to go beyond surface-level answers. In 8pARTS, students examine images or documents and make inferences about their meaning. There’s no single right answer—students must think critically, ask questions, and provide reasoning for their interpretations. This kind of task deepens their engagement with the material because they are actively exploring, rather than passively consuming, content.

With Thick Slides, students synthesize their learning into a single, cohesive slide. This requires them to distill key ideas, add supporting visuals, and explain their thinking. There’s no one right way to do this, which encourages students to think critically about what they’ve learned and how to communicate it effectively.

Repetition and Reflection: Deepening Understanding

One of the key strategies for building long-term motivation is giving students opportunities for repetition and reflection. Research from The Oxford Handbook shows that people are more motivated when they have multiple chances to improve and can reflect on their progress.

Fast and Curious exemplifies this approach by giving students several chances to master content through repeated quiz rounds. Each time they take the quiz, they see their scores improve, and they get immediate feedback that helps them understand where they need to improve. This repetition solidifies their learning and motivates them to keep trying, as they can clearly see their growth.

Reflection is equally important. Thick Slides and CyberSandwich offer students opportunities to reflect on what they’ve learned and articulate their thinking. In Thick Slides, students not only present information but also explain their reasoning, which encourages them to think more deeply about the material. CyberSandwich pushes students to compare their understanding with a peer’s, fostering discussion and reflection that strengthens their grasp of the topic.

Conclusion: Motivating Students with EduProtocols

By tapping into the principles of autonomy, competence, and relatedness, EduProtocols provide a clear path to motivating students. These protocols break down learning into manageable, engaging activities that build confidence, foster collaboration, and encourage critical thinking. With EduProtocols, students move from passive participants to active learners, motivated by their own progress and the support of their peers.

Incorporating EduProtocols like Iron Chef, Fast and Curious, CyberSandwich, and Thick Slides into the classroom creates an environment where students are motivated not just to complete tasks, but to engage deeply with the material. When students feel autonomous, competent, and connected, they aren’t just learning—they’re thriving.

The Week That Was In 234

This week, my focus was all about scaling back and simplifying. I realized I’ve been expecting too much from my students in a short amount of time. Instead of overwhelming them, I shifted to teaching them how to work efficiently, meet deadlines, and build confidence with every task. EduProtocols like Thin Slides, Iron Chef, and Sketch and Tell-O became the foundation for helping students succeed. The goal wasn’t just to cover content, but to teach them how to learn and apply skills independently. Small wins are adding up, and I’m already seeing the results in their engagement and confidence.

Monday

Lesson Link

I came into class on Monday knowing I needed to simplify and keep things engaging. I leaned into some tried-and-true strategies to break down the lesson, making it easier for students to digest.

Starting with Gimkit: Fast and Curious
We began the day with a quick 4-minute Gimkit focusing on 8 questions about Jamestown. This activity—Fast and Curious—is all about rapid retrieval and feedback. The class averages ranged between 57% and 70%, but more importantly, it set the tone for the lesson. Fast and Curious is an excellent way to boost content retention while adding a layer of competition. It was a simple but effective way to kick things off.

Breaking It Down with Thin Slides
Next, we used Justin Unruh’s Thin Slide template to chunk the reading. Jamestown can be dry, and our textbook doesn’t do it any favors. I used AI to extract the key parts of the reading and then chunked it into manageable sections. Each Thin Slide had one word and one picture, and I modeled how to provide an explanation using the keywords provided. Each slide took about 5 minutes, which kept the class moving while giving students time to process the content.

Somebody, Wanted, But, So, Then Sketch and Tell
After completing the Thin Slides, I had the students combine their work into a Somebody, Wanted, But, So, Then Sketch and Tell comic. This is basic reading comprehension but framed in a way that’s simple enough for everyone to grasp. The students created a visual summary of Jamestown, which reinforced the lesson’s main points while keeping it creative and interactive.

Breaking the “Right Answer” Mindset
A lot of students were still raising their hands, hoping for the “right” answer, but I’m working hard to break them out of the mindset that social studies is just about filling in blanks. I want them to engage with the content and think critically—there are no simple answers here!

Wrapping Up with Gimkit
To close out the class, we ran the same Gimkit again, and the improvement was clear. Class averages shot up to 85%-94%. This repeated retrieval practice solidified their learning, and the jump in scores showed they were starting to internalize the material.

By keeping things simple and focusing on strategies that chunked the content, I was able to make this lesson engaging and accessible. The results? The students worked through the material effectively, and I didn’t feel like I was overwhelming them. It’s a win-win.

Tuesday

Lesson Link

Tuesday’s lesson followed the same structure as Monday, and the results continued to impress. Keeping it simple, consistent, and achievable is key to building student confidence and engagement.

Starting with Gimkit: Fast and Curious on Plymouth
We kicked off the day with a custom Wordle. I made the Wordle “Religion” and asked the kids to figure it out because the word related to Plym outh. Next we did a Fast and Curious Gimkit, this time focusing solely on Plymouth. The quiz was 9 questions, and the class averages ranged from 52% to 65%. It was a great way to gauge what the students already knew and give immediate feedback.

Thin Slide: Chunking the Reading
Just like Monday, we used the Thin Slide template. The readings were chunked into smaller sections, with each slide featuring a keyword and a picture. The students had 5 minutes per slide to process the information and build their slides, using the provided keywords as a guide. The familiarity of the Thin Slide made it an achievable task for the students. There was no need to introduce new techniques or overwhelm them with too much at once.

Somebody, Wanted, But, So, Then Sketch and Tell
Once the Thin Slides were complete, we wrapped up the reading with another Somebody, Wanted, But, So, Then Sketch and Tell comic. This is such a simple yet effective way to summarize content. It allows the students to visually capture the key points of the lesson in a creative format, reinforcing comprehension in a way that feels both achievable and rewarding.

Ending with Gimkit: Building Confidence
We ended the class with the same Gimkit as the beginning. This time, the class averages soared to 86%-94%. The consistency in approach, combined with the immediate feedback and the opportunity to retry, boosted the students’ confidence. And despite the repetition of Monday’s format, there were no complaints. In fact, 90% of the students finished the task, which is a win in itself.

Why I’m Sticking with Thin Slides
The Thin Slide strategy is becoming a staple in my classroom for a reason: it’s simple, familiar, and helps students feel like they can finish something. Pairing that with Gimkit, which builds their confidence through repeated practice, is setting the foundation for a stronger work ethic. These small wins will add up over time, and I’m seeing the early signs of engagement taking root.

Wednesday

Inquiry Lesson Link, Questions, Funko Pop, Gimkit

On Wednesday, we switched gears and used paper for an inquiry-based lesson straight from the textbook. The lesson focused on the hardships and survival stories of colonists in Jamestown and Plymouth, but let’s be real—the textbook readings were way too much. The language was jargon-filled, dry, and not exactly something an 8th grader doesn’t give a damn about.

Simplifying Primary Sources with AI
My goal was to simplify the lesson while still helping students build confidence and learn. To do that, I took the primary sources straight out of the textbook and ran them through Claude AI with a simple prompt: “Keep the primary sourceness of these documents but make them so 8th graders can understand them.” I also had Claude add author names and context since the textbook didn’t bother to provide that crucial information.

The revised documents were a mix of Jamestown and Plymouth hardships and survival stories. With the language made accessible, the students were much more engaged. They worked in pairs, reading the sources and answering questions. This took about 35 minutes and gave them a deeper understanding without the confusion of outdated jargon.

Funko Pop Character Creation
For the final part of the lesson, I wanted to tap into their creativity, so I had them create a Funko Pop character who had journeyed to either Jamestown or Plymouth. The biography for the Funko Pop had to include why their character went to the colony (reviewing the content from Monday and Tuesday), the hardships they faced, and whether they survived—or not. This activity took 25 minutes, and it allowed the students to synthesize what they had learned in a fun, engaging way.

Combining Jamestown and Plymouth in Gimkit
We ended the day with a combined Jamestown and Plymouth Gimkit. This was a great way to reinforce everything from the week so far. The class averages ranged from 86% to 92%, showing solid retention of the material.

Takeaway
The key here was breaking down the overwhelming textbook content, making it relatable, and allowing students to demonstrate their understanding through a creative, personalized project. By the end of the day, they had a solid grasp on both the hardships of colonial life and the survival strategies of early settlers.

Thursday

Thursday was all about pivoting and simplifying—sometimes less is more. I had originally planned to pack the lesson with multiple activities, but it quickly became clear that was overambitious.

Finishing the Funko Pop Characters
We kicked off class by wrapping up the Funko Pop characters from Wednesday. The students had 15 minutes to finalize their creations, adding in the last details about their colonial hardships and survival stories. Once that was done, we shifted focus to something new.

Colonial Regions Mapping
The natural next step was to move into the colonial regions. This is where I initially tried to cram in too much. My original plan was an Iron Chef, followed by a Sketch and Tell, followed by a mapping activity—but it became obvious after the first bell that this was a disaster in the making. I scrapped the Iron Chef and Sketch and Tell, deciding to focus solely on the map and some Wordwall practice.

Using a Mnemonic Device
The map we used came from Howson History, and it featured a helpful mnemonic device for remembering the colonial regions. I explained what a mnemonic device was using examples like ROY G. BIV and DeSSert means strawberry shortcake (never miss that double ‘S’ in dessert!). After that, the students created their own mnemonic device for the colonial regions.

Mapping the Colonies
Once the mnemonic was sorted, we got down to the mapping activity. The students looked up the colonies and labeled them on the map. It was simple but effective, reinforcing both geography and historical knowledge.

Wordwall Practice and Rolling Recap
To reinforce the mapping, I had the students practice using a drag-and-drop map on Wordwall. It gave them some hands-on repetition, which helps with retention. After finishing the Wordwall, we still had some time left, so I pulled out a Rolling Recap. This is a fun retrieval practice where I roll a 20-sided dice and give the kids a prompt. They have to respond to the prompt in exactly the number of words rolled. The questions focused on Jamestown and Plymouth, and it was a creative way to review key content while keeping things engaging.

Takeaway
Thursday reminded me that sometimes, simplicity wins. The mapping activity and mnemonic device were more than enough to carry the lesson. And, as always, building in some creative retrieval like Rolling Recap kept the students engaged while reinforcing their learning.

Friday

Iron Chef with Sketch and Tell-o, Thick slide

On Friday, we continued working on our colonial regions, focusing on reinforcing knowledge and boosting confidence. Here’s how the day went.

Starting with Gimkit: Colonial Regions
We began with a quick 4-minute Gimkit on the colonial regions, which featured 12 questions. The class averages were 68% to 73%. After running the game, I gave feedback, and we quickly moved on to the next activity.

Colonial Regions Iron Chef on Padlet
For the main part of the lesson, we did an Iron Chef on Padlet. Each student received a half-page of reading about a different colonial region. They logged onto Padlet and shared four facts related to their region using the PEGS format—political, economic, geography, and social. Once their notes were posted, they used the “I can’t draw” feature on Padlet to create a picture representing their region. This visual aspect gave them a creative outlet to express their understanding.

Experimenting with Thick Slide vs. Sketch and Tell-O
After the Iron Chef, I decided to try an experiment. In two classes, I had students create a Thick Slide using the shared information from Padlet. In the other two classes, I used a Sketch and Tell-O activity instead. The results were interesting—classes that made Thick Slides had second Gimkit scores of 85% and 87%, while the Sketch and Tell-O classes scored slightly higher at 88% and 89%. While the difference wasn’t huge, it was enough to show me that both methods can be effective, depending on the class dynamic.

Finishing with Wordwall
We wrapped up with the same Wordwall practice from Thursday, this time with a twist. I challenged the students to complete the activity without any map help. Many of them surprised themselves by getting 100% on their own! It was great to see that kind of confidence and self-assurance building as we closed out the week.

Takeaway
Friday showed me that the methods we’ve been using—whether it’s Padlet, Gimkit, Thick Slides, or Sketch and Tell-O—are all helping to build both knowledge and confidence. The slight variation in results also confirmed that students respond differently to various activities, but the key is keeping things engaging and accessible.

Experimental Idea

I created a Colony Founder GPT. This GPT is designed to let students immerse themselves in history by interviewing the founders of the original 13 American colonies. Instead of reading static facts, students can interact with historical figures like William Penn, John Winthrop, or Roger Williams and ask them questions directly. It’s an engaging way to explore the personal motivations behind each colony’s founding, the challenges they faced, and their unique perspectives. Whether you’re learning about religious freedom in Rhode Island or the tobacco economy in Virginia, this tool offers a conversational approach to make research more dynamic and memorable.

Here is the link – try it out!

The Week That Was In 505

Introduction

This week we continued and finished our unit on the constitution. We incorporated some eduprotocols such as Frayer, Hero’s Journey, and Archetypes with limited government. For example, we used an iCivics article about Alberto Fujimori to illustrate concepts of limited versus unlimited government. Next, we followed this up with a lesson on federalism. For federalism, I brought in Oreos for a mystery box lesson. I used Thin Slides, sketch and tell, and a 3xPOV challenge. On Wednesday, we began part 1 of our 2-part constitution assessment. I shared a CyberSandwich and an article about how the constitution limits the power of government. On Thursday, we did part 2 of our assessment which was the citizenship test questions that I originally gave on January 4th. We began a new unit with a Geography challenge on Friday—the New Republic—where I focus on the decisions and the presidencies of the first 5 presidents.

Monday – Limited Government

Tuesday – Federalism

Wednesday – CyberSandwich, Reading

Thursday – Citizenship Test

Friday – Geography Challenge

Monday

On Monday, we had a lesson on limited government. This was an extension from Friday’s class. For this lesson, I used an iCivics lesson about limited government. The first part of the reading involved words we already knew—such as separation of powers, rights, and popular sovereignty. I selected the word “rule of law” because the students had never heard that word before. So, students completed a Frayer model for that word and paraphrased the definition, found 3 connecting words, and found an image to represent it. Next, students read the article and sorted characteristics of limited and unlimited government. Next, students read an article on Alberto Fujimori who was elected President of Peru and eventually made himself a dictator. He got rid of separation of powers, removed people’s rights, abolished the Constitution in Peru. I took a Hero’s Journey template and changed it to a different format for comprehension—Somebody, Wanted, But, So, Then. I added a 6th element…..Therefore. Students read the article and mapped out the story. Students followed this up with a 4-square archetype about Alberto Fujimori. What’s interesting on the archetype is the number of students who read that Fujimori fixed Peru’s financial problems and terrorism problem and viewed him as a hero. Some even tried relating Rosa Parks and others to him. I intervened and said, “No, no—sorry that connection does not make sense.” I had to explain that Alberto Fujimori made himself a dictator, had opponents killed, and ended a democracy for his selfish interests. Maybe the students seeing him as a hero is a product of the world we live in now…..I do not know. With the archetypes, students chose images to represent Fujimori, chose an archetype, used evidence, and made a connection to another person in pop culture or history.

Tuesday

With my federalism lesson, I switched it up this year. I still did a mystery box lesson and I dropped hints about the Oreos in the mystery box. Without the lesson, I was still dropping hints about the Oreos inside the mystery box. However, this year I decided not to have the students use the Oreos in their sketch and tell. I began the lesson with a thin slide where I had the students read a brief description of federalism and they chose one word and one picture and then explained why they chose that word and picture to represent federalism. Next, we did a second thin slide where I had the students look up the ages in Ohio if they wanted to drive, vote, get married, and join the army. We then had a discussion on who sets these age limits—whether it is the state or national government. Next, I had the students use a sketch and tell template and they pulled information from an infographic I found on federalism. Students created pictures on the sketch and tell or found icons to represent expressed powers, state powers, or concurrent powers. Finally, I ended the lesson with a 3xPOV eduprotocol where I gave the students a scenario and asked them to consider the perspective of the national government, state government, and local government. I used a scenario involving the school wanting to ban Stanley tumblers, but as we started that activity, the students struggled to put themselves in the position of the different levels of government. I understand this difficulty because they are 8th graders. I also thought about what was missing from the lesson that could help them better grasp this concept. Ultimately, it is going to be tough for 8th graders to envision how national, state, and local governments would respond. Although I tried to guide them, they struggled, which is understandable at their age. However, I am reflecting on how to improve their perspective-taking ability on this topic.

Wednesday

On Wednesday, we began our final assessment for the constitution unit. I like to do two-part assessments because some students enjoy creating projects to demonstrate understanding while others prefer taking quizzes. So my units always contain both types. Part one of our assessment was a cybersandwich where I asked “How is our constitution a model for limited government?” During the cybersandwich, I linked to a reading that I had AI generate because I believe AI allows personalized lessons. I copied and pasted our unit essential question into AI, mentioned what we learned about popular sovereignty, federalism, separation of powers, checks and balances, individual rights, and limited government. Then I asked AI to write an article for 8th graders incorporating details from our specific activities like the tug-of-war on separation of powers and the Oreos representing federalism. AI helps tailor content for students, so that’s why I used it here. Students read the article, took notes, discussed in groups, and then created a paragraph answering how the constitution exemplifies limited government, with a topic sentence, 3 supporting details, and conclusion. I had AI scan their paragraphs and compare them to our first cybersandwich paragraphs of the year because I want to track their paragraph writing progress in regards to using evidence. The results are in the image below. After finishing the cybersandwich, we did a Gimkit review in preparation for part 2 of the assessment on Thursday.

Thursday

On Thursday, we completed part 2 of our assessment using the same citizenship exam questions from January 4th. I read the questions aloud while students wrote down answers. After 10 questions, they input their scores into a Google Form. I analyzed the results with AI—their average improved from 3.1/10 to 7.5/10! We closed with retrieval practice games where their averages were in the low 70% range, which is decent.

Friday

On Friday, I introduced our new early republic unit with a geography challenge from TCI. I pondered using a MapWich EduProtocol but opted to keep the activity simple since it was Friday. However, I had AI modify TCI’s original questions because I did not like them. On Claude, I explained what content students were analyzing and asked for DOK 1, DOK 2, and DOK 3 questions. While I dislike premade maps, I know when students need a bit of a relaxed day. The challenge allowed them to label maps and answer basic questions on the population increase, which sufficed for a Friday. Additionally, I incorporated a claims-evidence-reasoning question asking them to evaluate expansion as positive or negative—so they still did higher-order thinking.