The Week That Was In 505

This week I wanted to begin a deep dive into the Declaration of Independence. To me it’s an important document whose message runs deep throughout this country. The ideas put forth by Jefferson of equality, natural rights, governments are created to protect rights, and we have the right to alter or complain about government are the heart of our democracy. But, Jefferson’s words, as great as they are, are far from our reality today and throughout history. I try to stress to the students that our history is a series of people trying to uphold the ideas of Jefferson – the American Revolution, abolitionist movement, Women’s Suffrage Movement, soldier’s fighting overseas, Civil Rights Movement, LGBTQ rights, Black Lives Matter, the Me Too movement. Whether you agree or disagree with their actions and statements – they are fighting for equality, they are fighting for a better life, they are pursuing happiness.

Before I got into the Declaration of Independence, I needed to begin with the Enlightenment. I focus heavily on 3 things for the Enlightenment: John Locke, natural rights, and Social Contract. There is no need to overcomplicate it – these are the basic understandings students need to comprehend Jefferson’s words in the Declaration of Independence.

Monday – Fast and Curious Quizizz, Vocabulary evaluation, Sketch and Tell

Tuesday – Fast and Curious, Cyber Sandwich, Vocabulary Evaluation

Wednesday – Number Mania

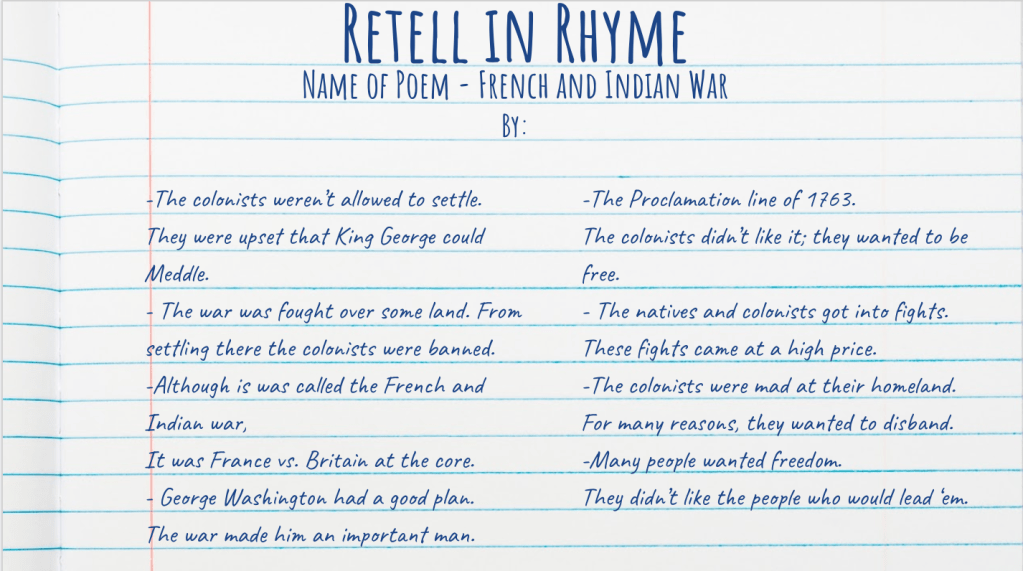
Thursday – Thin Slide, Begin Hyperdoc on the Declaration

Friday – Fast and Curious, 8pARTS

Monday

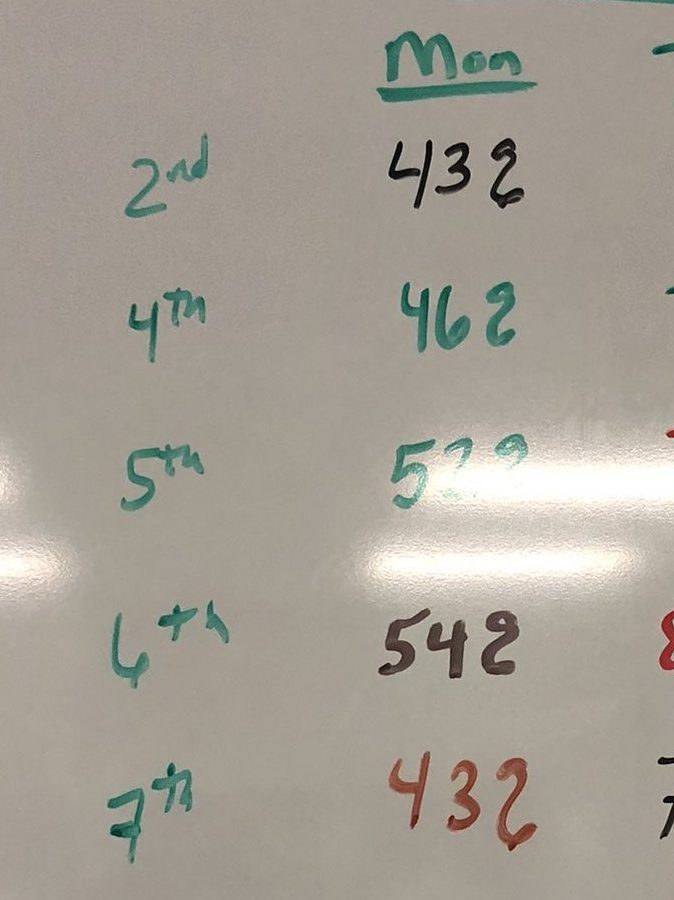
I began Monday with a Fast and Curious to introduce the Enlightenment period. As suspected, classes bombed the Enlightenment quiz because let’s face it – 8th graders don’t know much about the Enlightenment theories or government. This is such a weird, abstract concept to them. I have learned to take a different, hands on approach with government related topics, especially with middle schoolers.

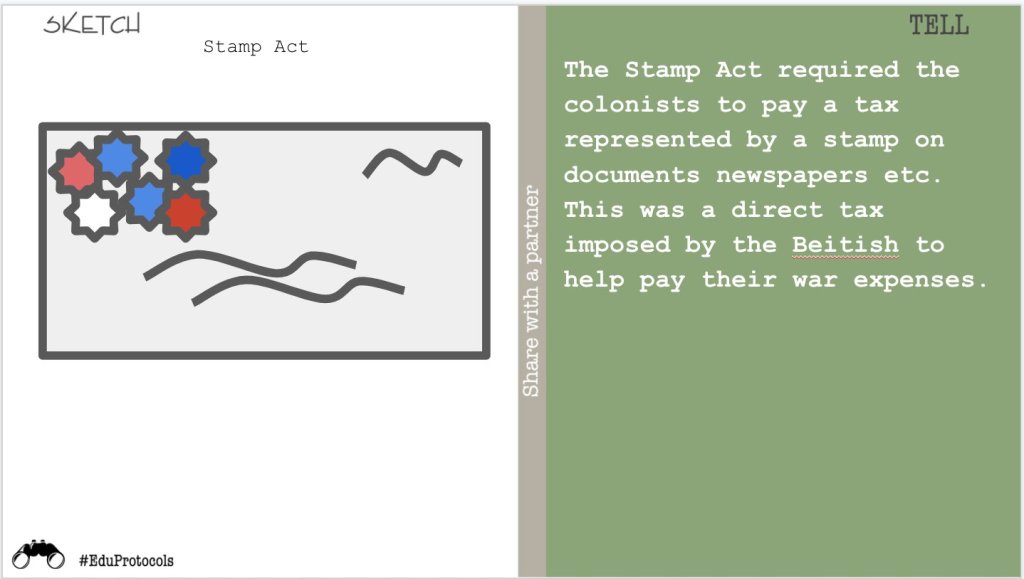
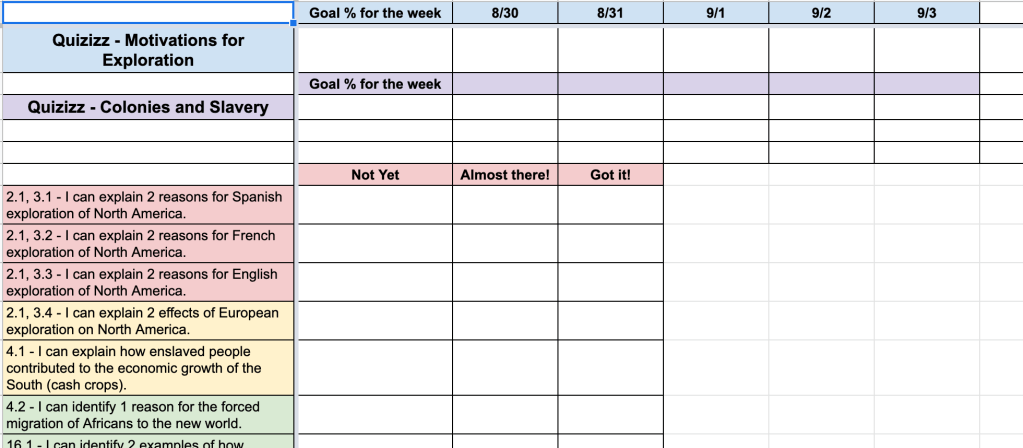
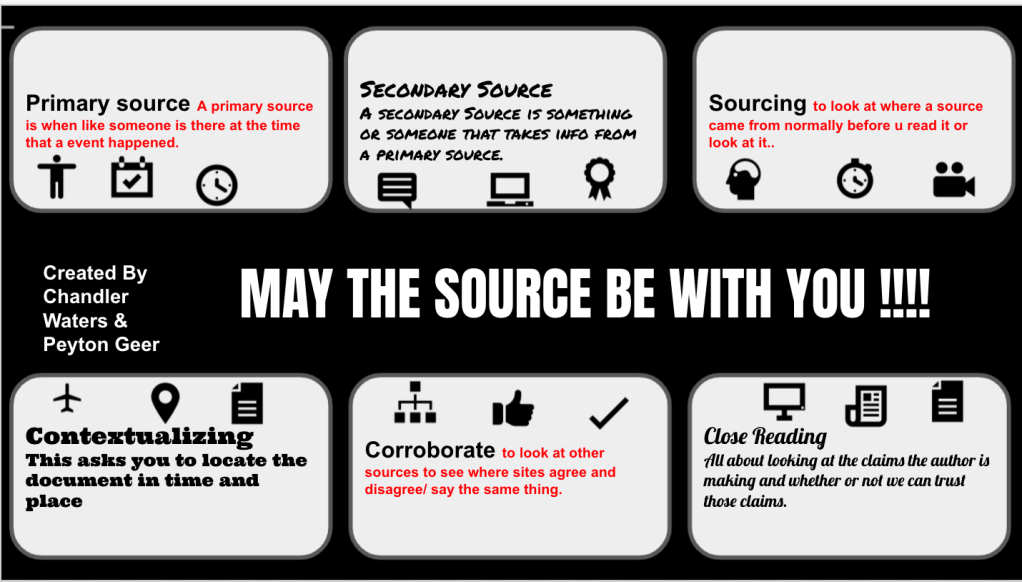
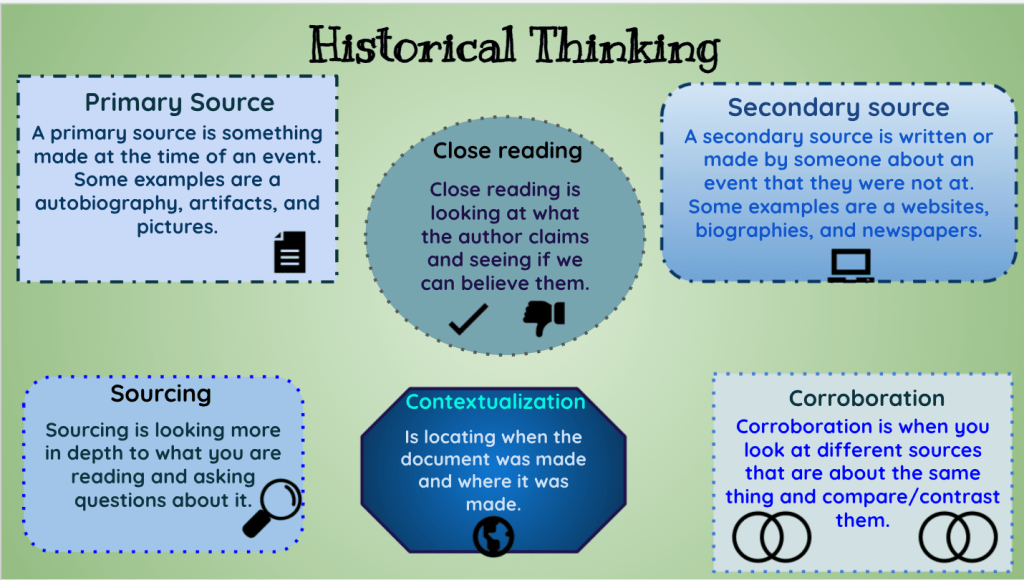
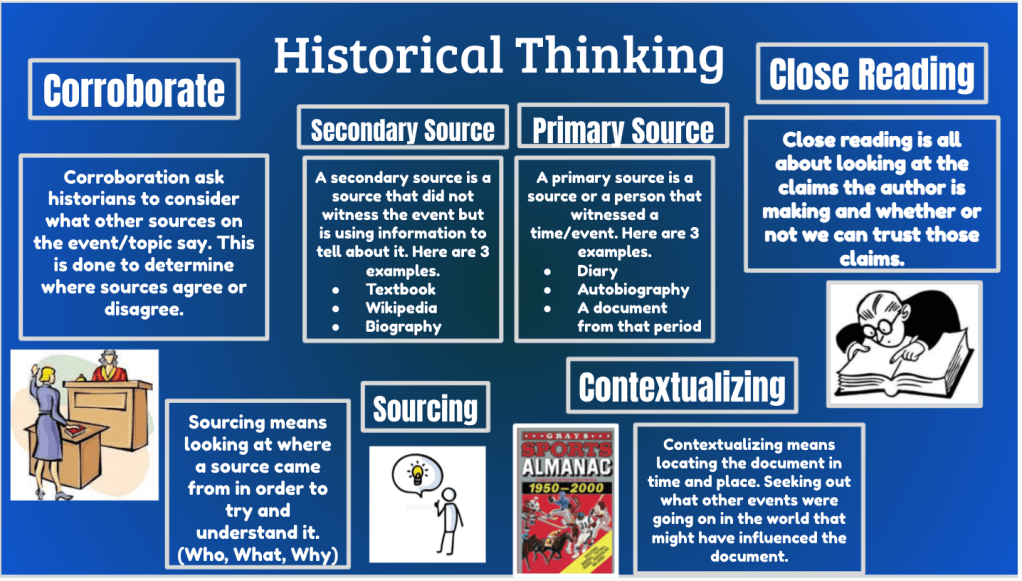
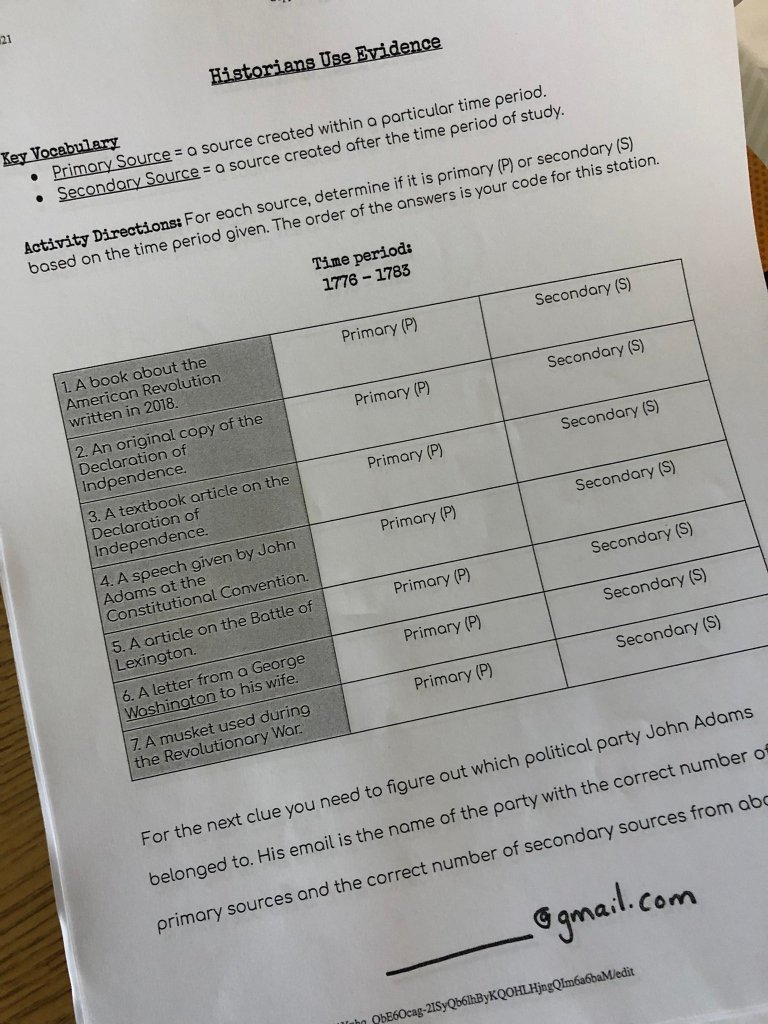
The first run of Fast and Curious (12 questions) my class averages across the board hovered around 52%. This brought us into our next part of the lesson with vocabulary. I am trying a new literacy strategy with vocabulary that I like to pair with Frayer models and/or Sketch and Tells. I have been using an evaluative vocabulary strategy (click here for sample) where I have the students evaluate their knowledge of words based on 3 items: Know It, Not Sure, or Don’t Know It.

When I first do this, I stress to the students to be honest with themselves. If they truly KNOW a word, they should be able to define it within seconds, in their own words. Then I explain if they are not sure of a word that means they have seen it, but can’t define it. Finally I explain, if they don’t know a word that means they have never seen it before. Anything they are unsure about, or don’t know, then they Frayer the word. I like to have the students state, elaborate, exemplify, and illustrate the unknown words. I don’t spend more than 10 minute on the Vocabulary evaluation.

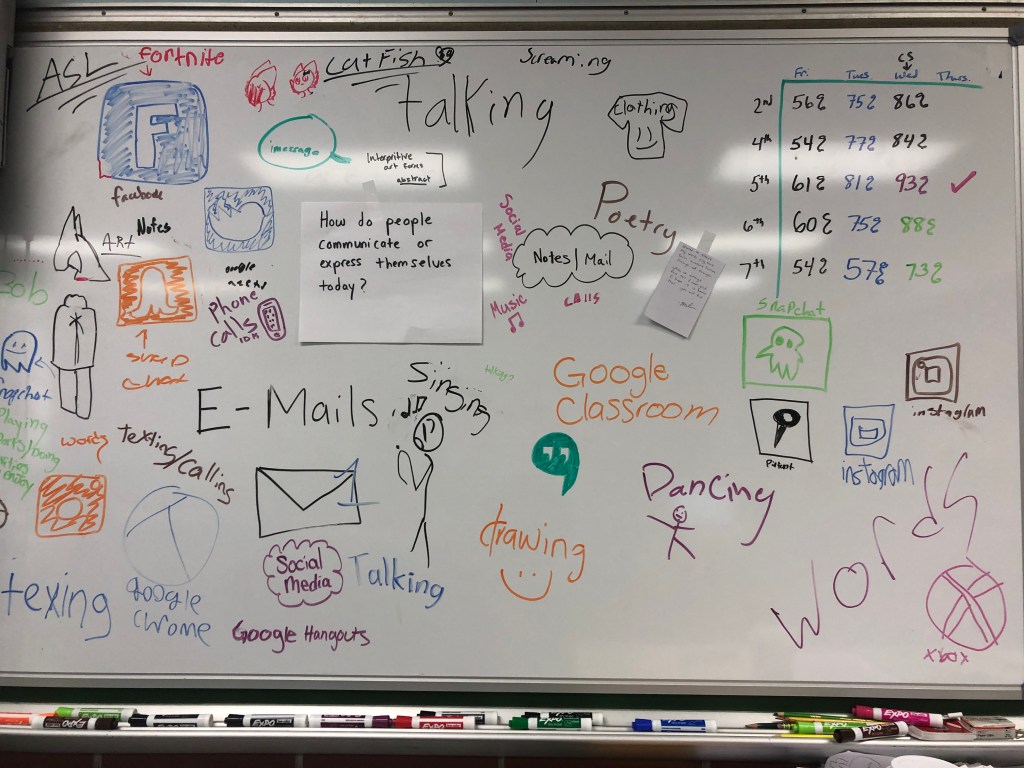
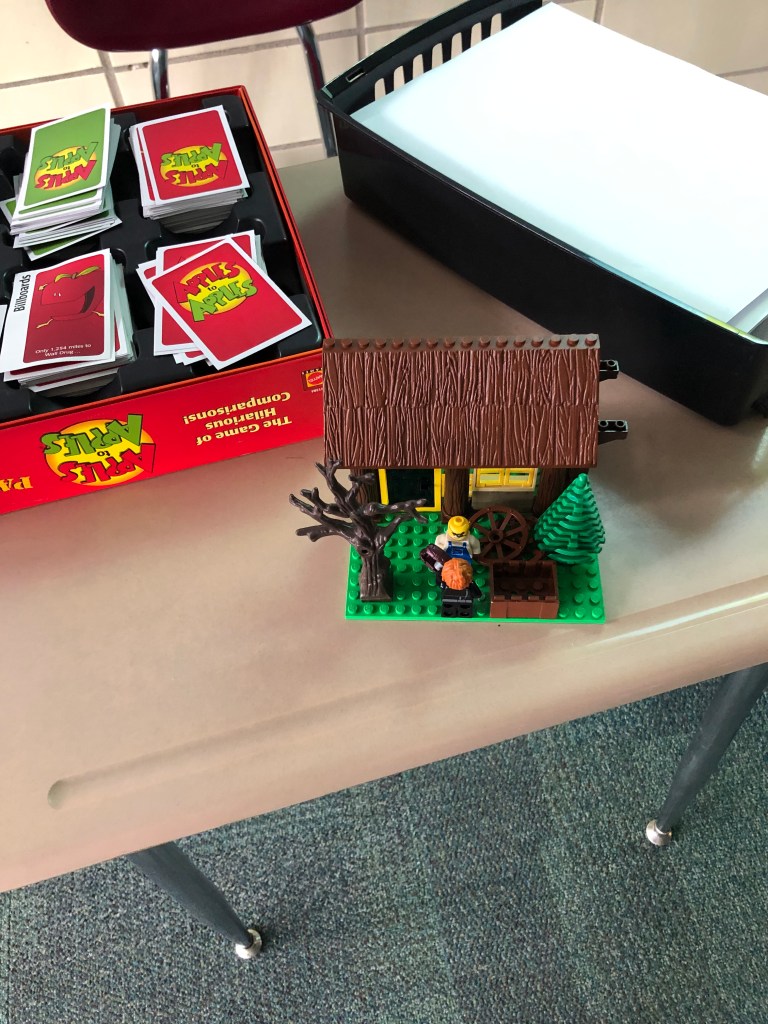
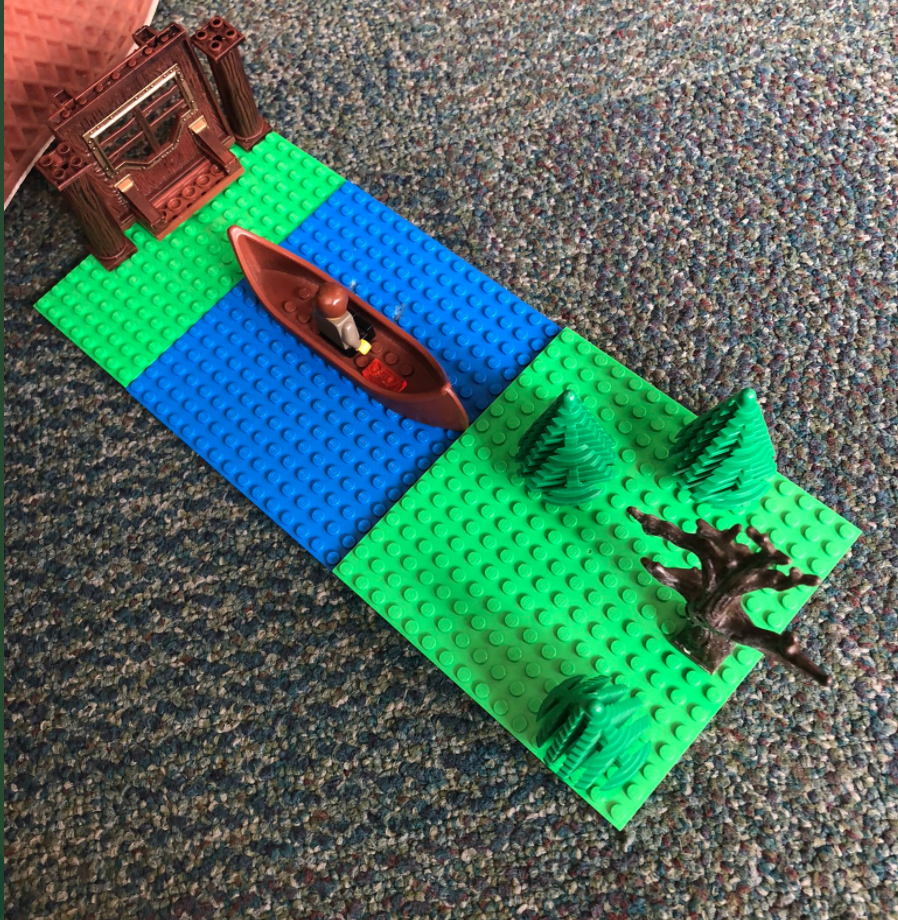
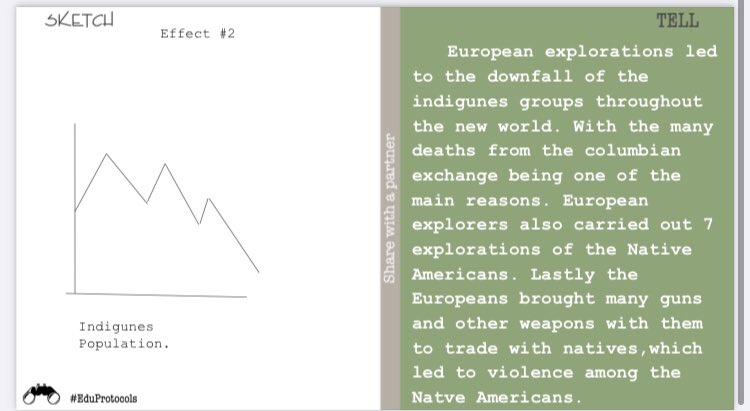
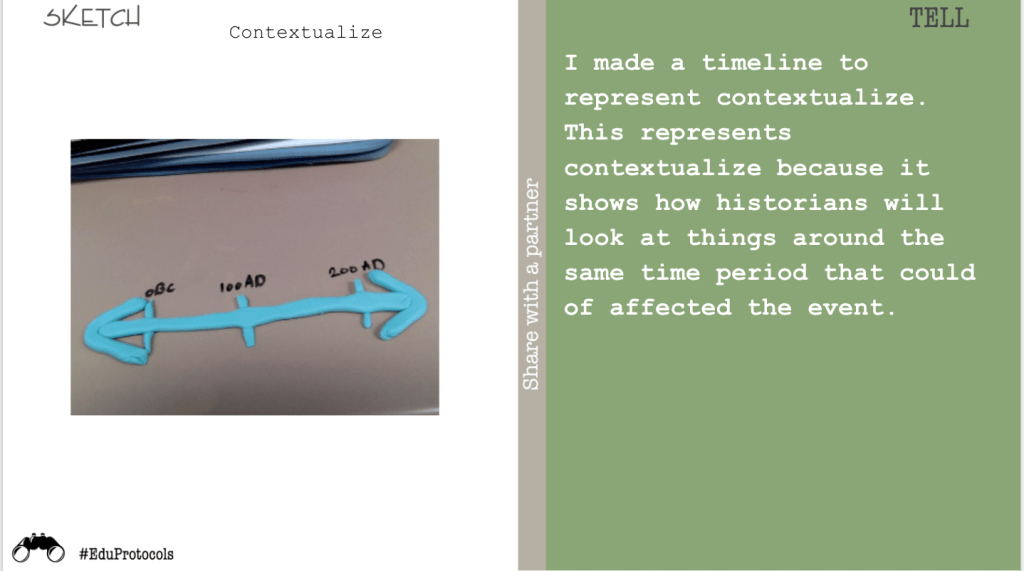
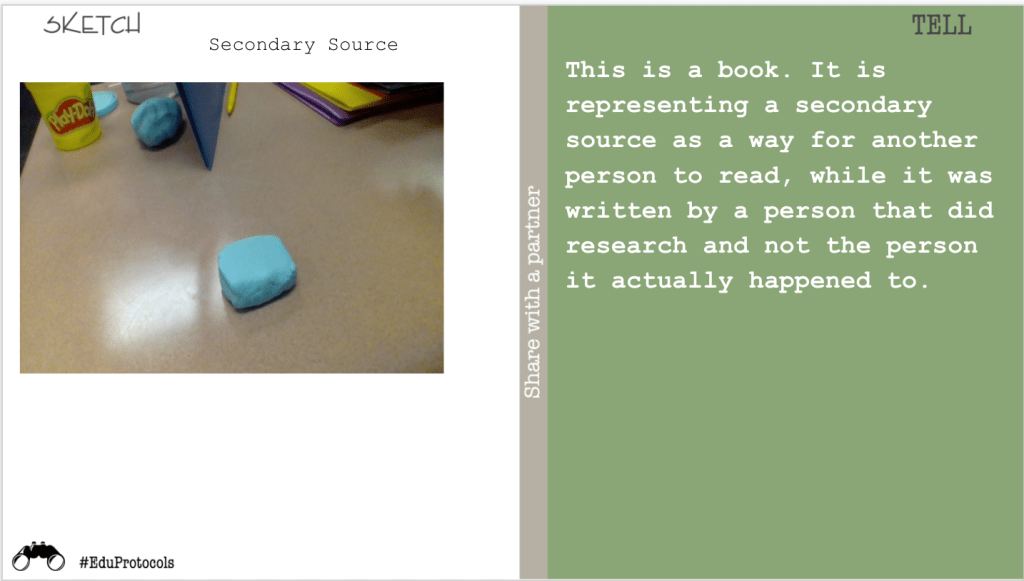
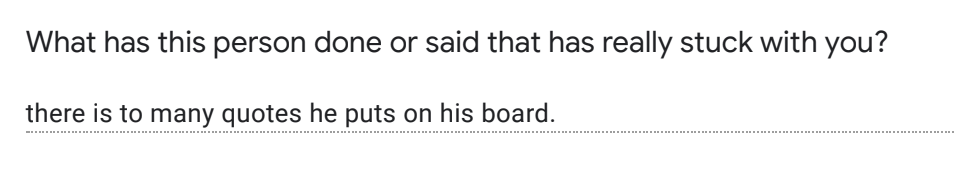
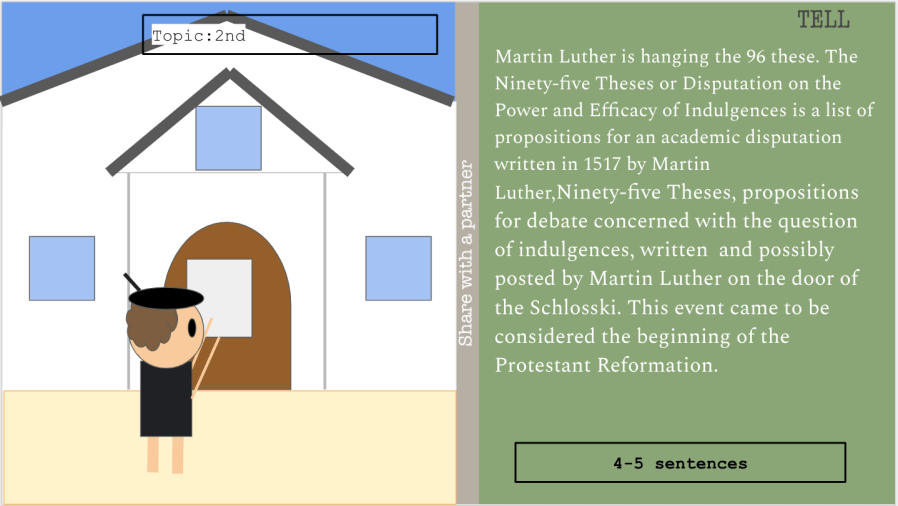
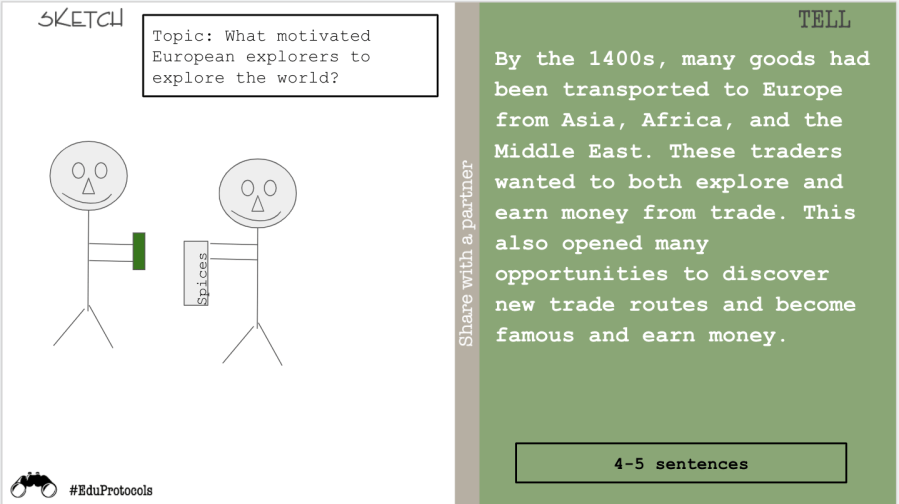
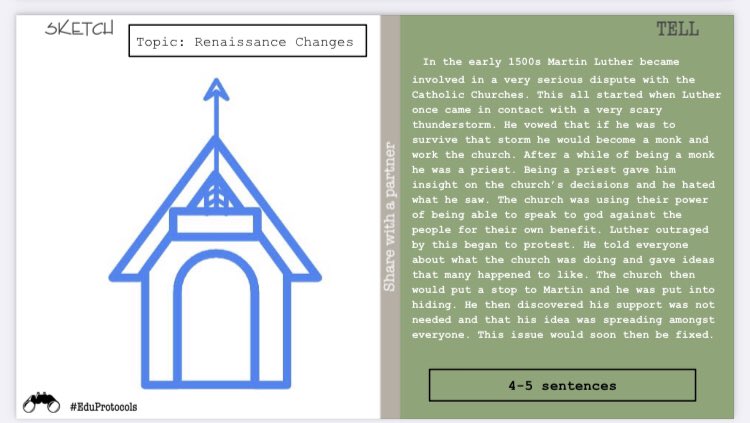
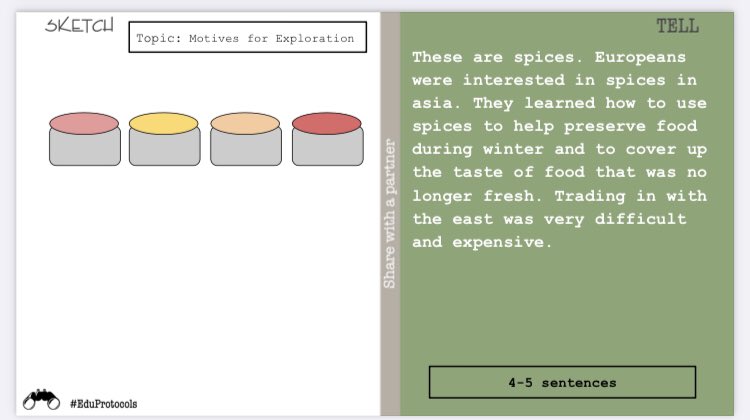
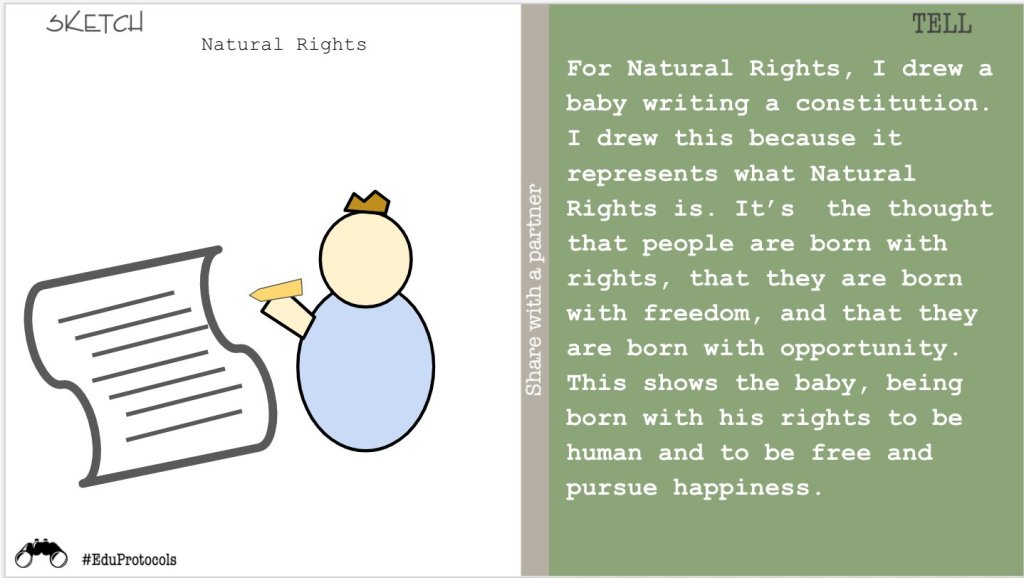
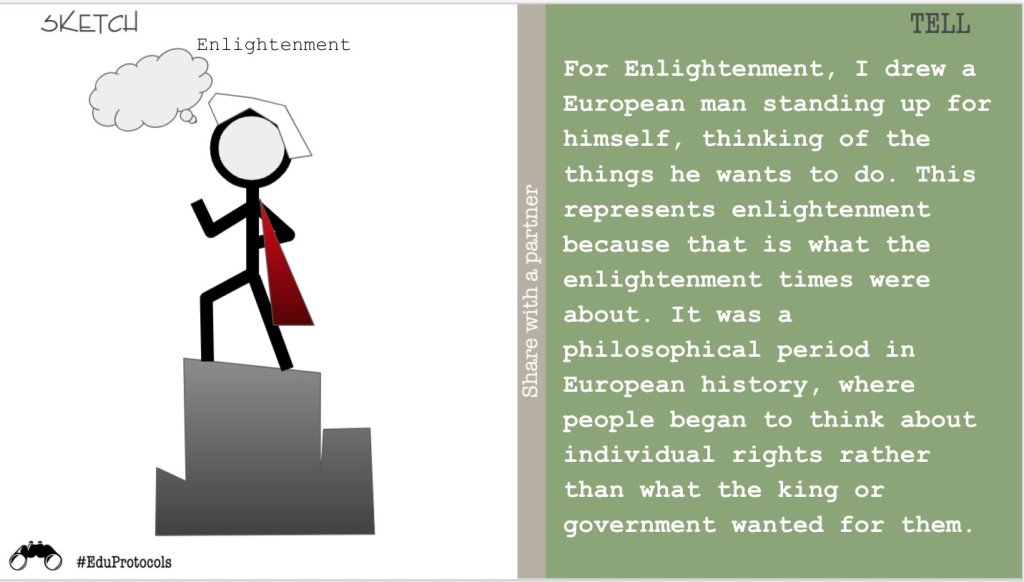
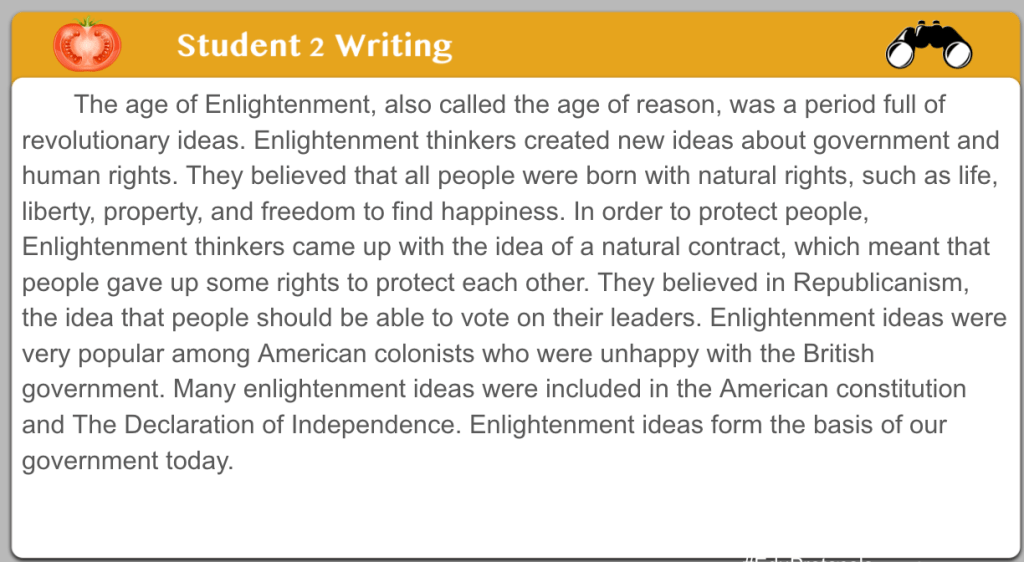
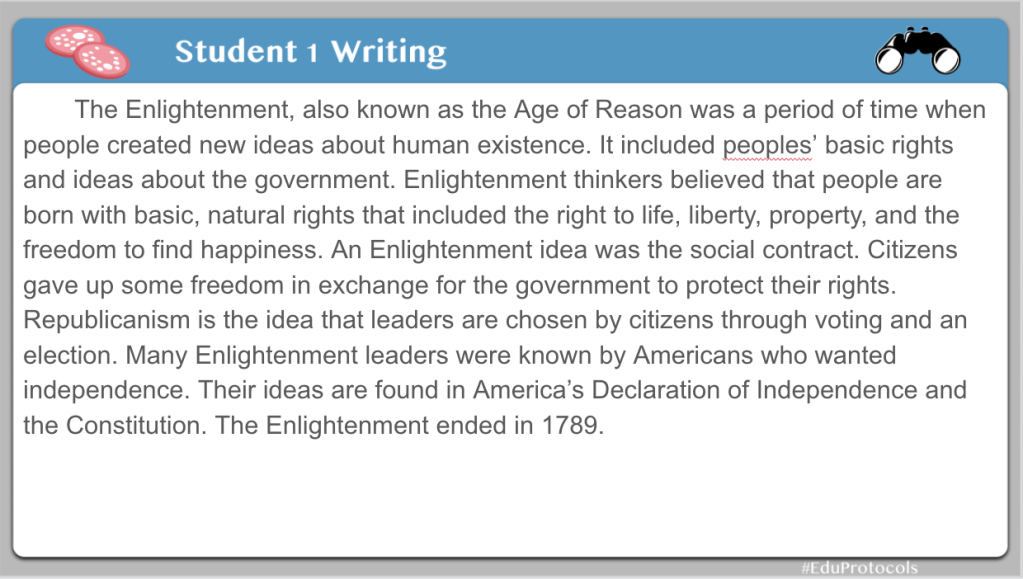
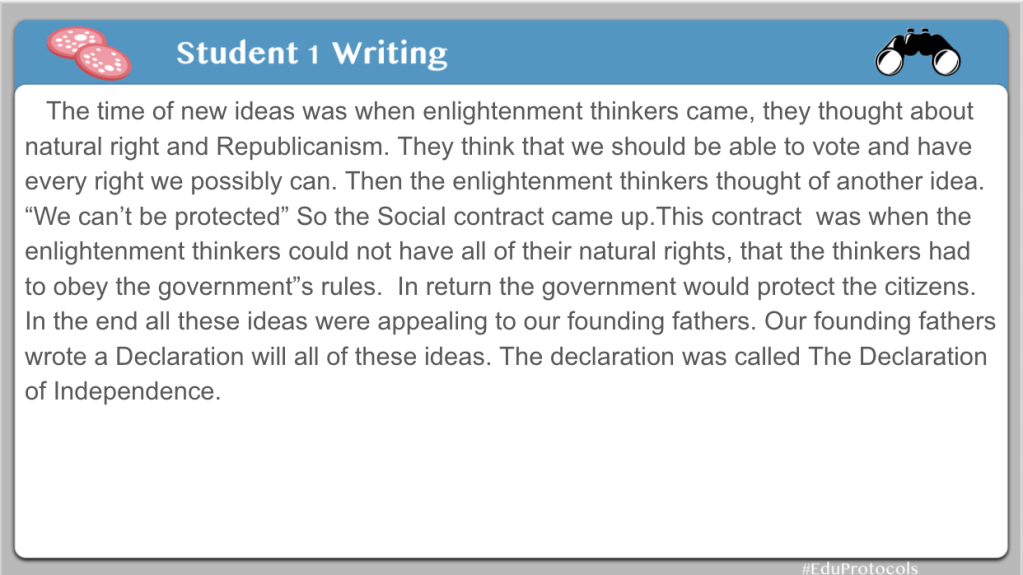
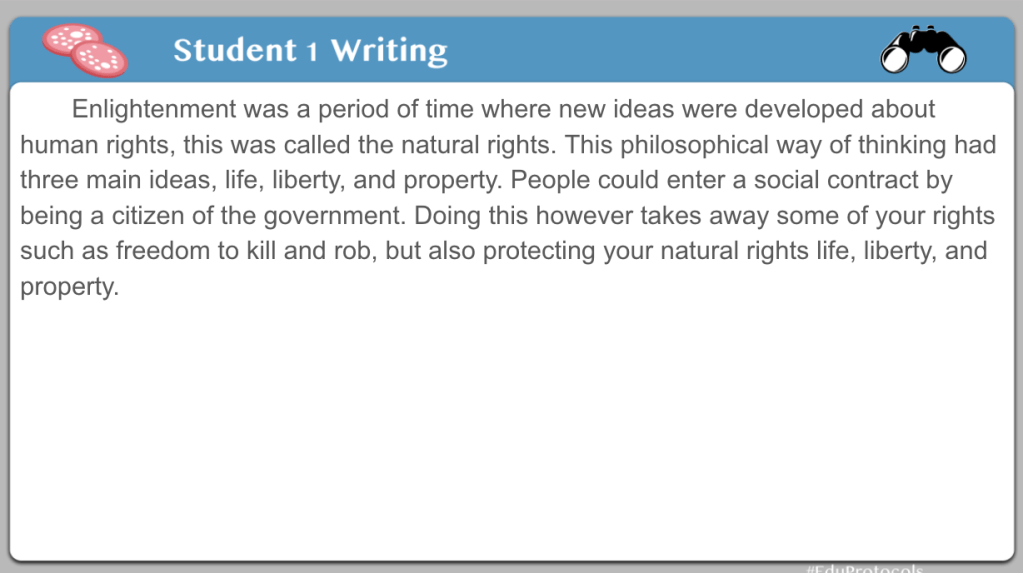
For the illustrate part of the Frayer, I had students do a Sketch and Tell (click here for file). They could use Google Shapes, Legos, or Playdoh for their creations. I really wanted to emphasize natural rights and social contract. Here are some examples:

Tuesday

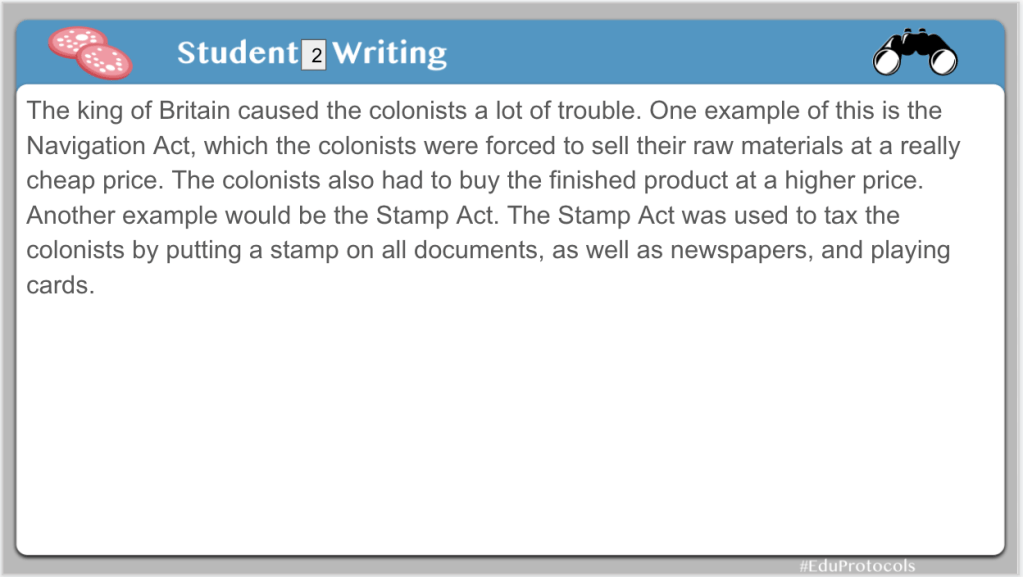
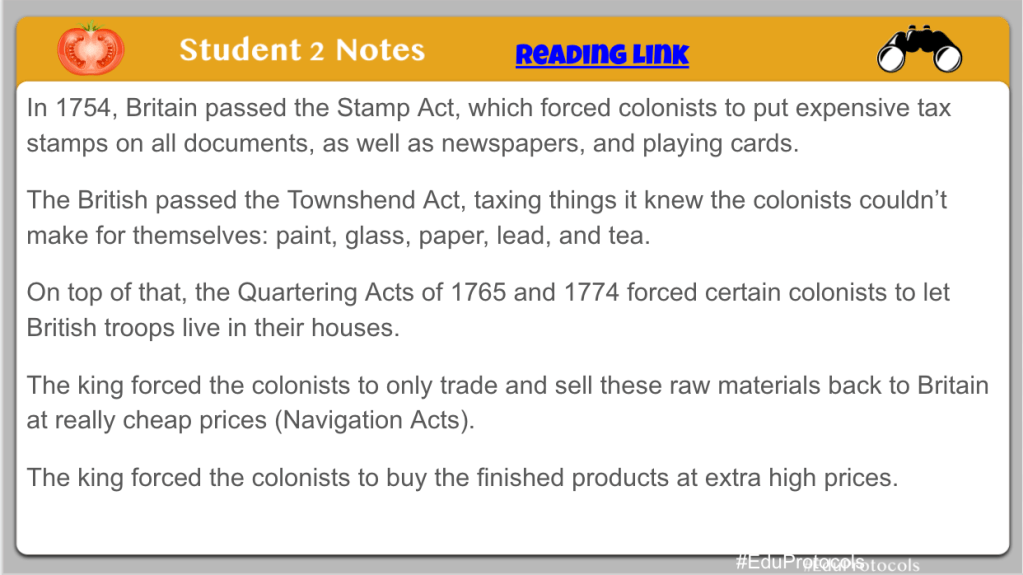
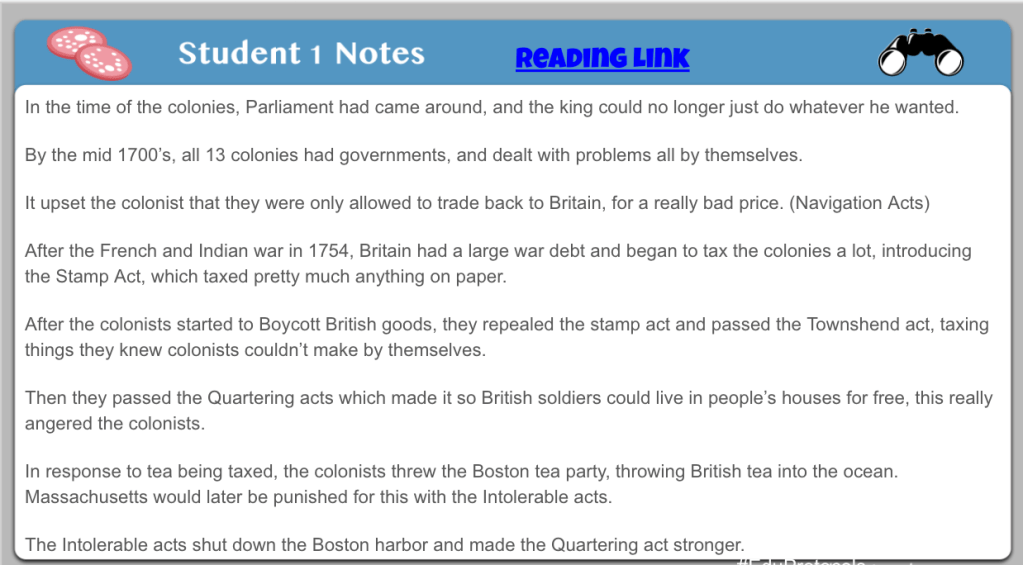
Tuesday I started with a Cyber Sandwich (click here for the file). I try to do one of these a week. Occasionally, I will structure the note-taking portion, and other times I will leave it alone. For our Enlightenment Cyber Sandwich, I left the note-taking unstructured – Find 6 or more facts from the reading. The reading came from ICivics – a great, simple article on the Enlightenment which is great for middle schoolers.

I loaded up Monday with vocabulary to prepare students for reading on Tuesday. Students read for 10 minutes and took notes about the Enlightenment – natural rights, social contract, the influence on America. I like to share notes that I took after the 10 minute timer goes off. This was followed by a 5 minute discussion and note comparison. Finally, students summarized their learning with a 5+ sentence summary.

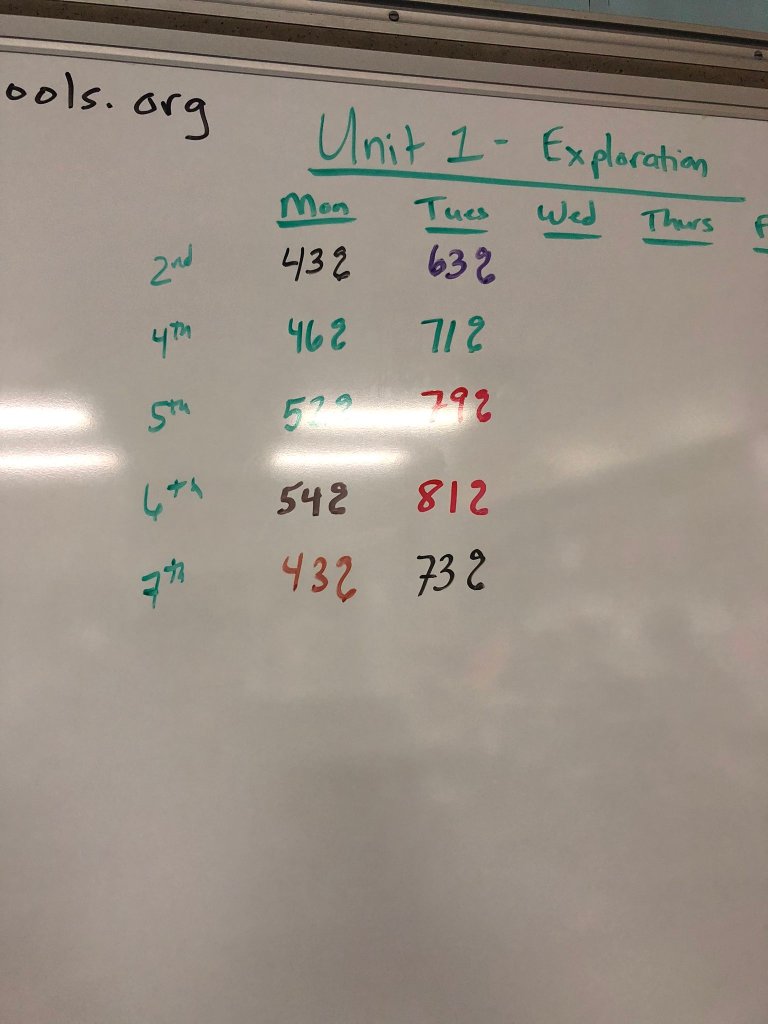
I like to do a fast and curious after a Cyber Sandwich to show the effectiveness of the vocabulary strategies and Cyber Sandwich notes, discussions, and summaries. All classes began with a 50-55% average and finished with: 82%, 87%, 90%, 94%, and 81% in 2 days. This is a huge confidence builder for students and helps create engagement and enthusiasm for the Cyber Sandwich.

Wednesday

Wednesday, I decided if I continued with the Enlightenment, it would not be good. The students demonstrated their knowledge of the key concepts of natural rights and social contract. I was ready to move onto the Declaration of Independence. They were ready to move on as well.

Here’s how I operate most days – I fly by the seat of my pants, go with the flow, and take it all in stride. I usually have a plan, but I’m always looking to change it to something better. With that being said, I had an introductory lesson for the Declaration of Independence, but a photo memory popped up in my phone. The photo memory was a Declaration of Independence Number Mania I put together 2 years ago.

Before I went into the Number Mania lesson, I began with a Thin Slide. I asked students, “What’s the importance of July 4th?” Students had 3 minutes to share 1 picture and 1 word about the importance of the 4th of July. I learned quickly to make one rule – the 1 word cannot be fireworks or anything to do with blowing stuff up. When the 3 minute timer went off, I went around the room and students presented for 10 seconds or less. Common responses:

  • “The Declaration of Independence was signed.”
  • ‘We won independence.”
  • “We became a new country.”

I use these quotes to clear up misconceptions and this created a nice transition to the Number Mania lesson.

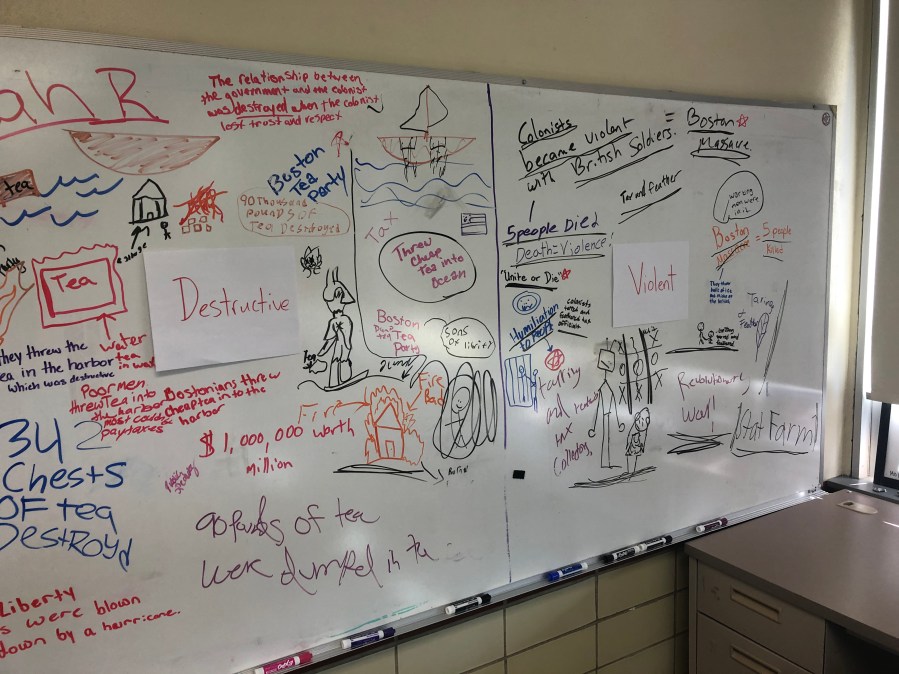
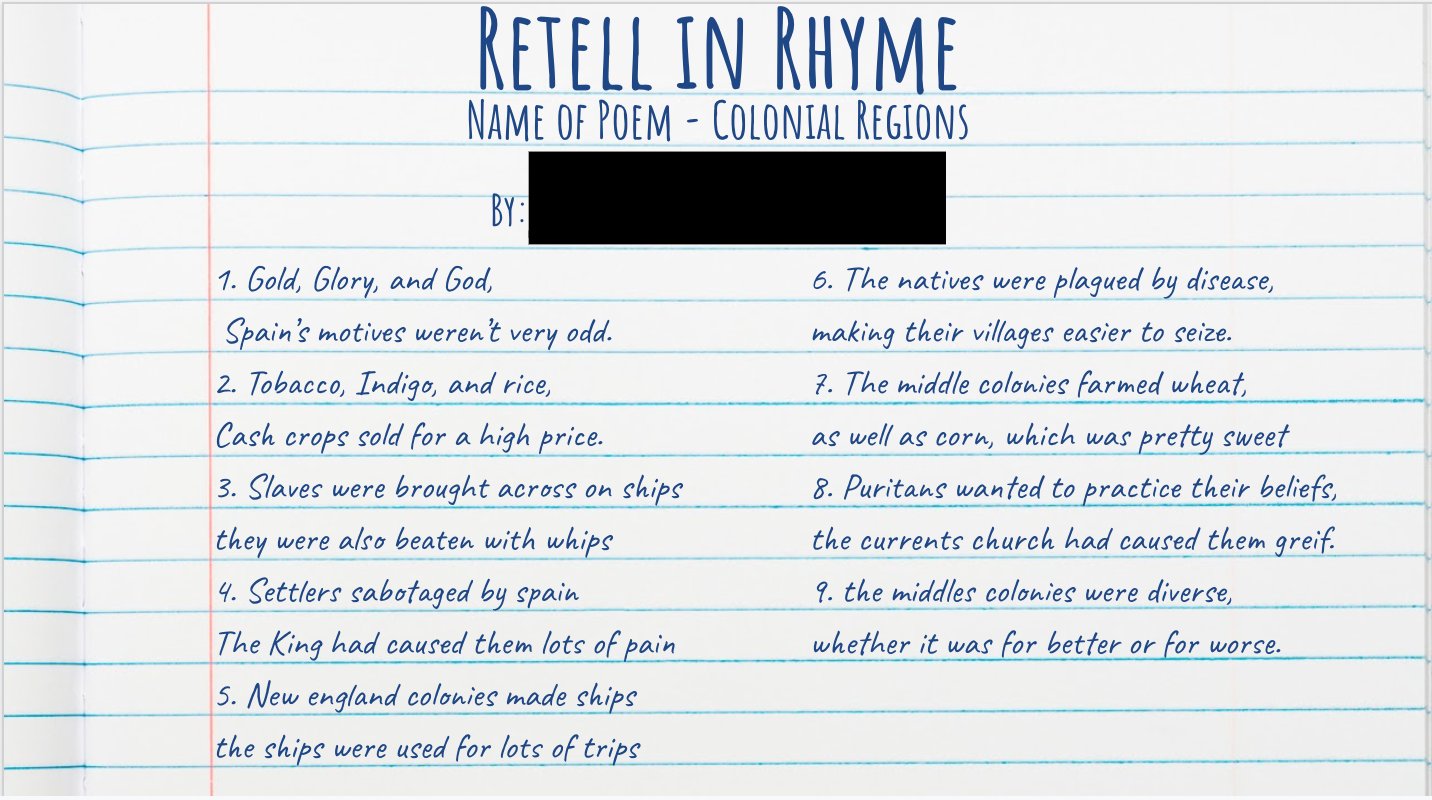
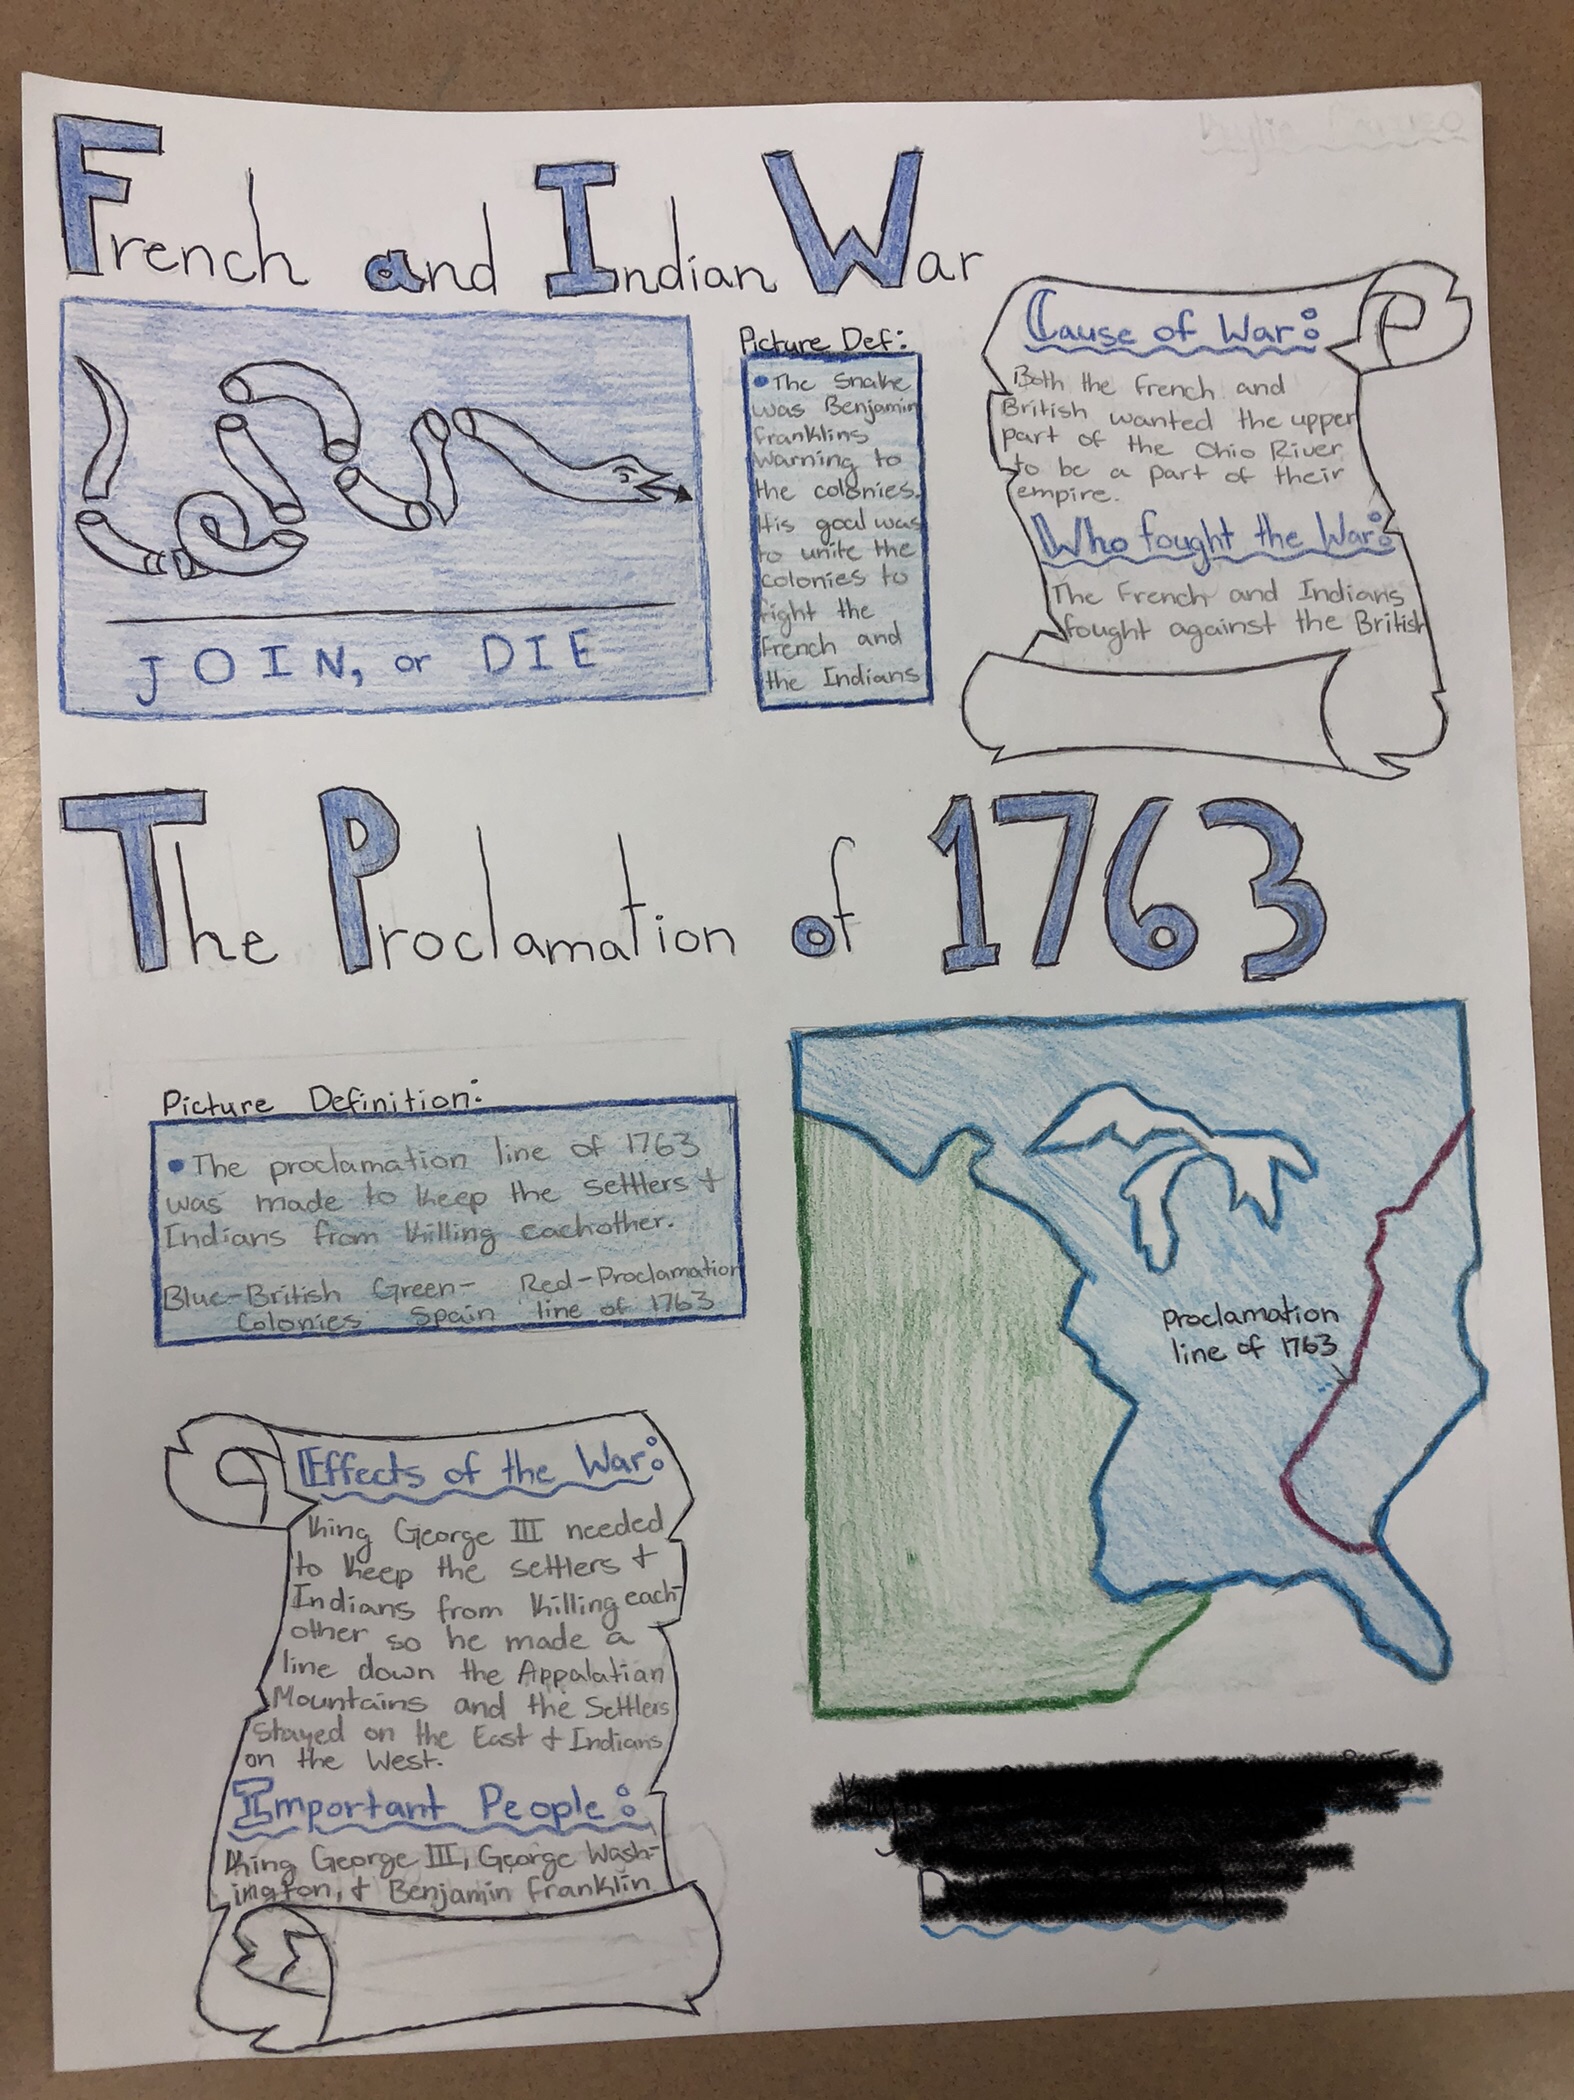
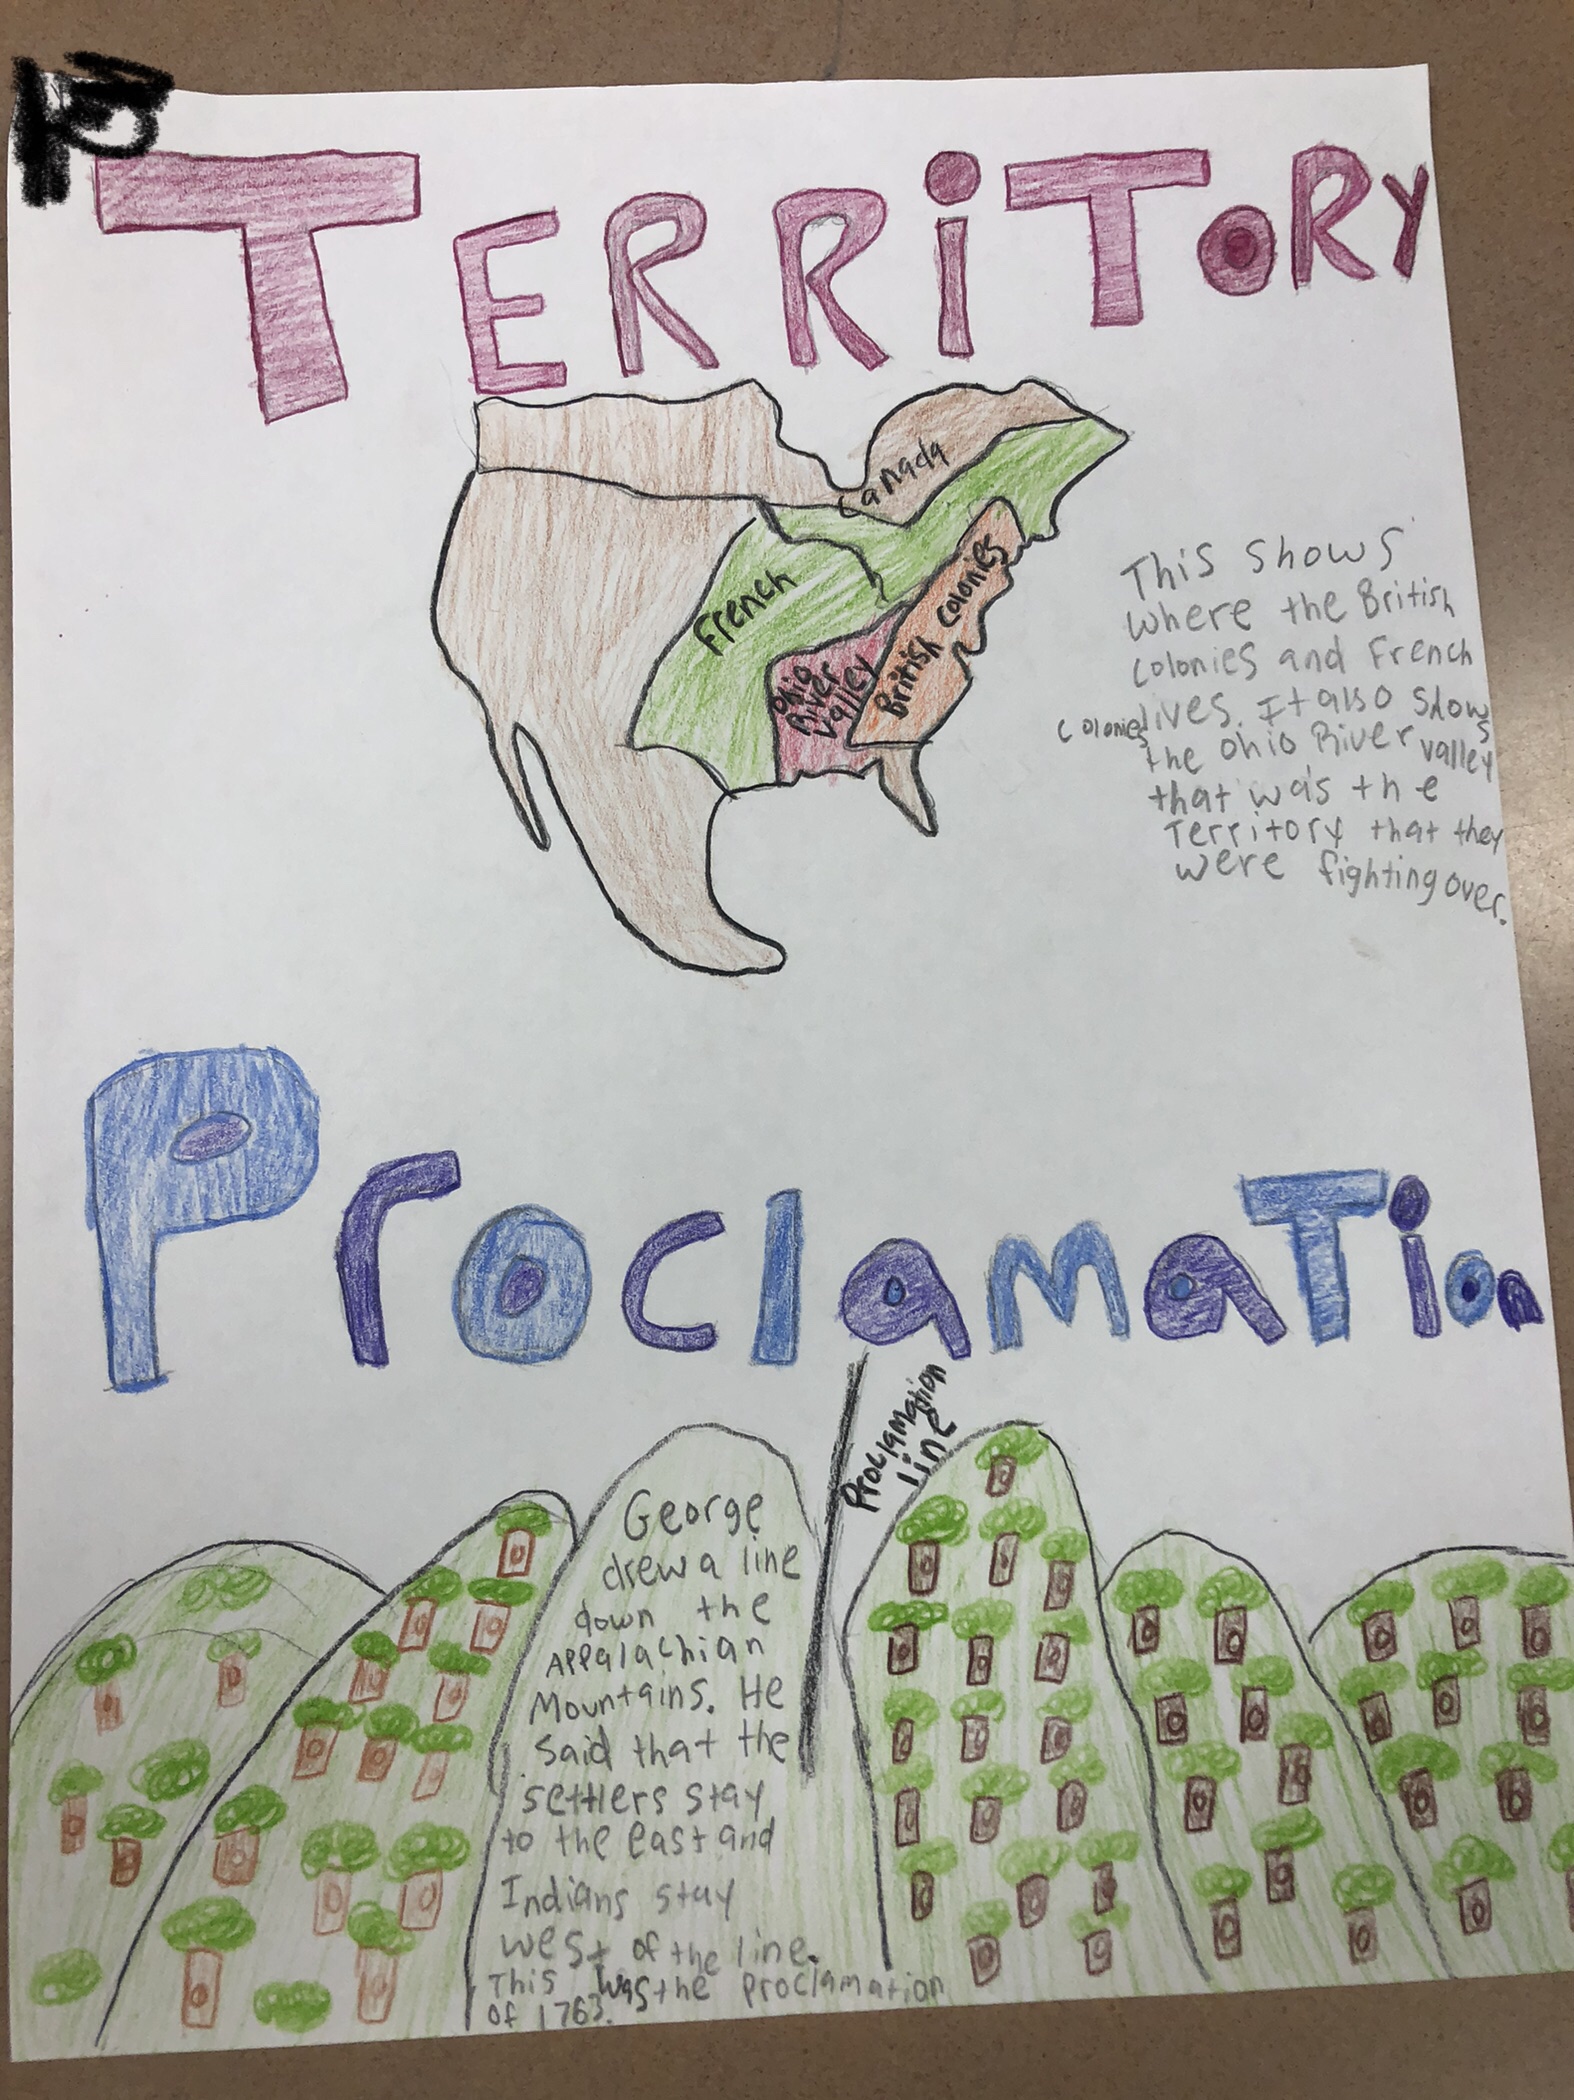
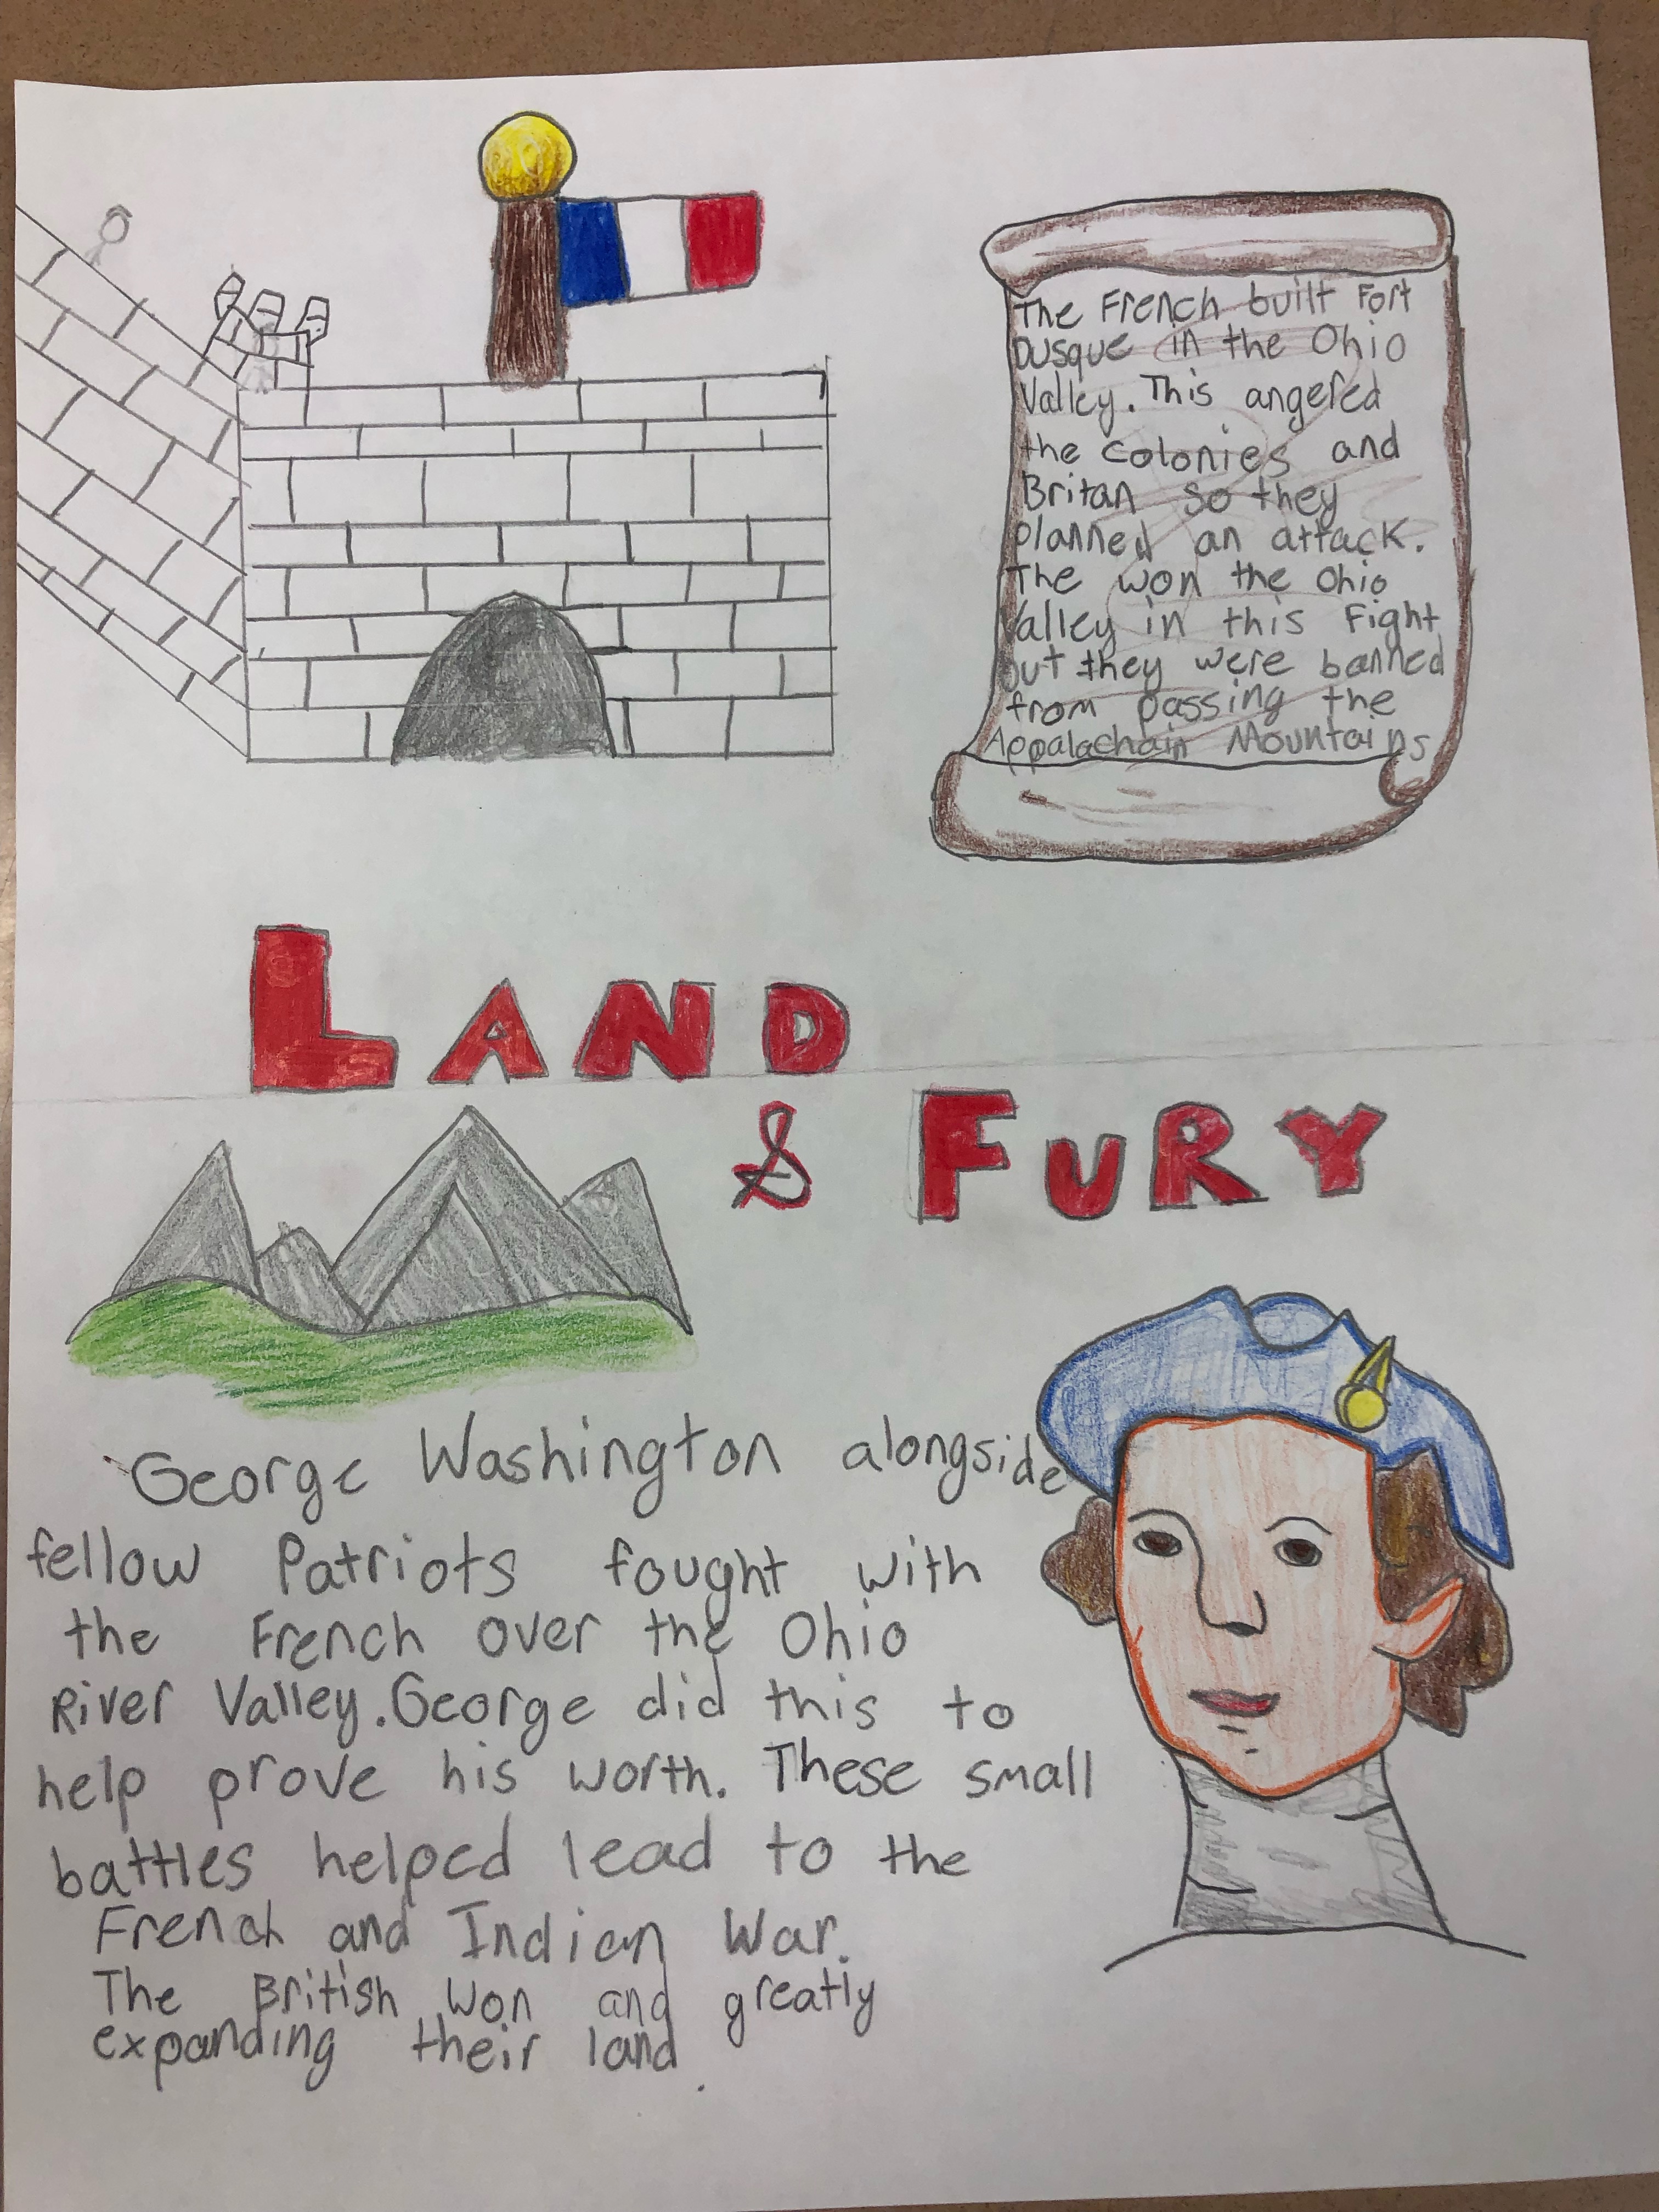
I saw the Number Mania picture in my photo memories and wanted to do this again. However, I remembered last time I did it, the lesson seemed unorganized and students were looking up random facts. It had no flow. It wasn’t that great. As a result, I searched for an article with numbers (dates and facts) about the Declaration. I found nothing. I did the next best thing – I typed my own article, added subheadings and loaded it up with numbers and related it back to the Enlightenment for some reinforcement of those ideas.

Here was the number mania lesson flow:

  1. Students read the article for 10 minutes.
  2. They submitted two or three numbers and facts through a Google Form.
  3. I shared the Google Sheet of facts with the class.
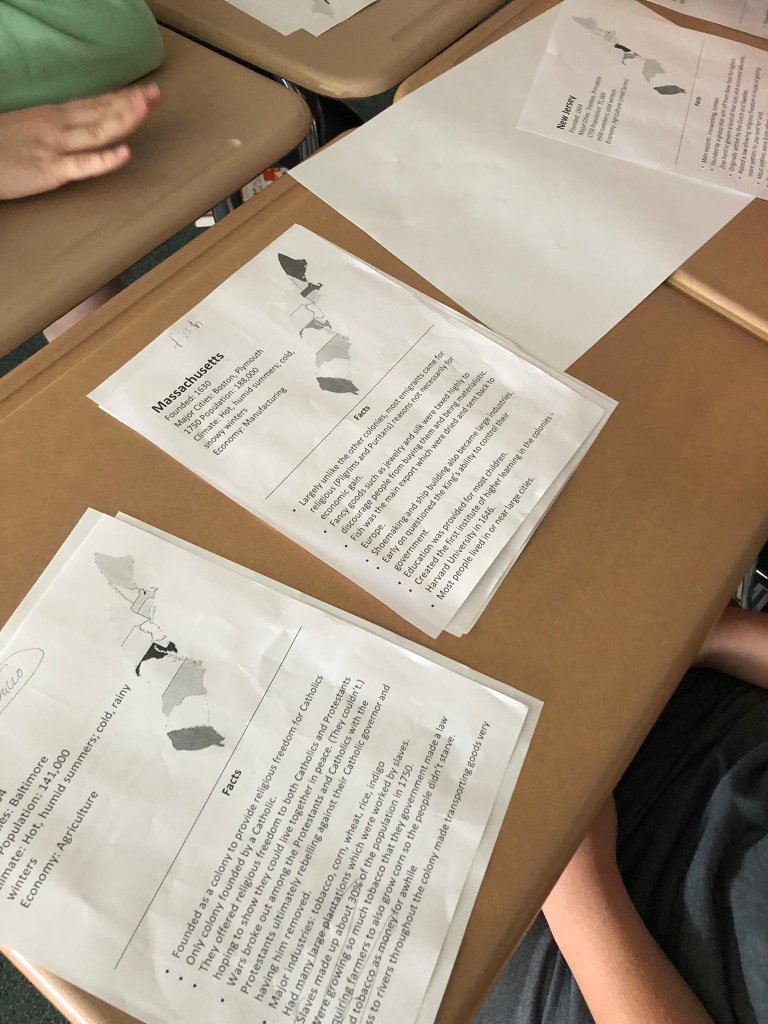
  4. Students created an infographic about the Declaration of Independence with 5-6 numbers. (The template was created by Stephanie Howell – @mrshowell24)

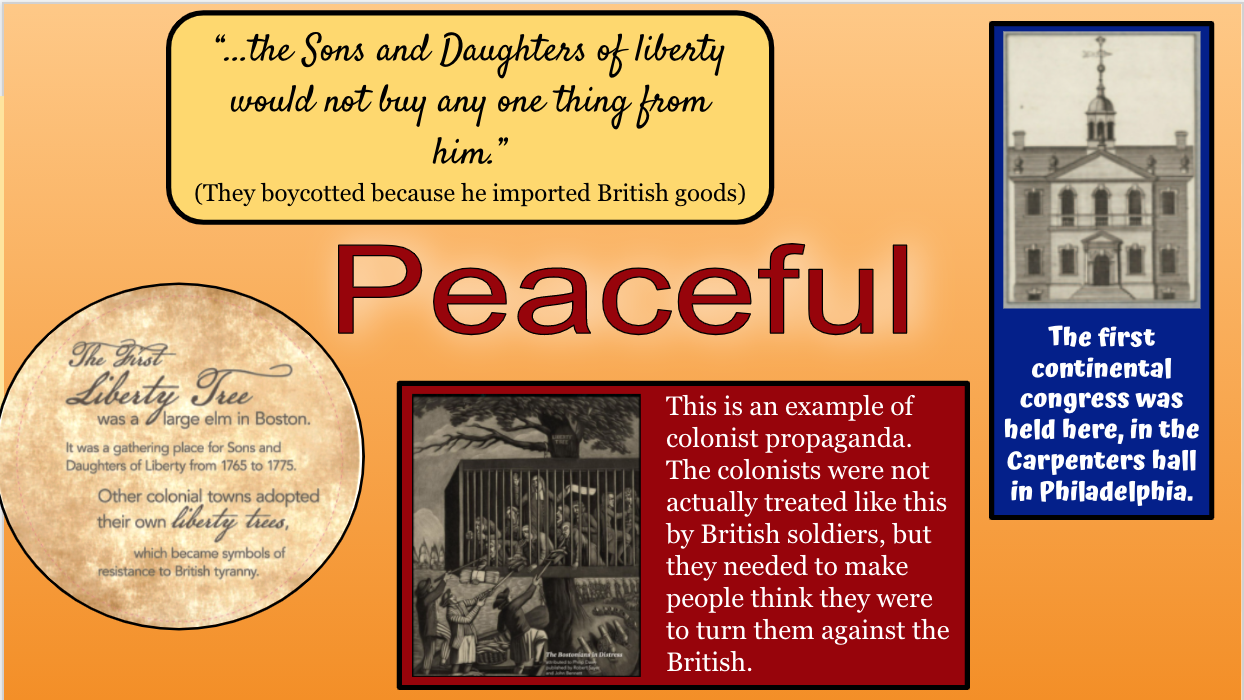
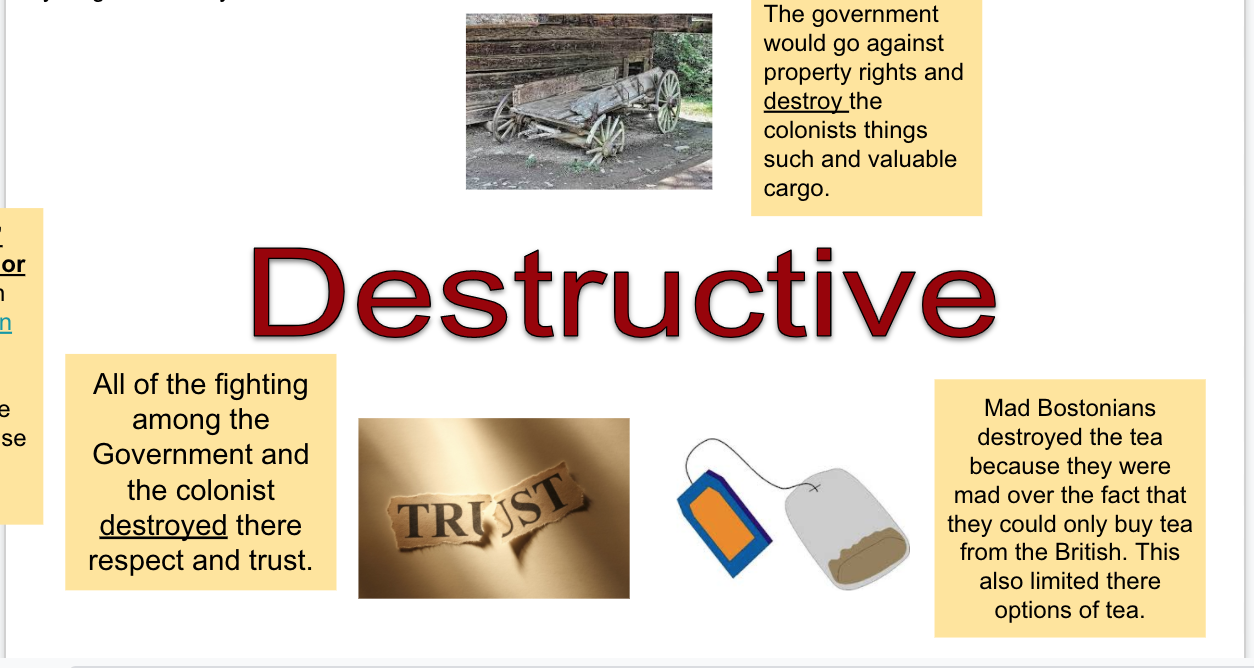
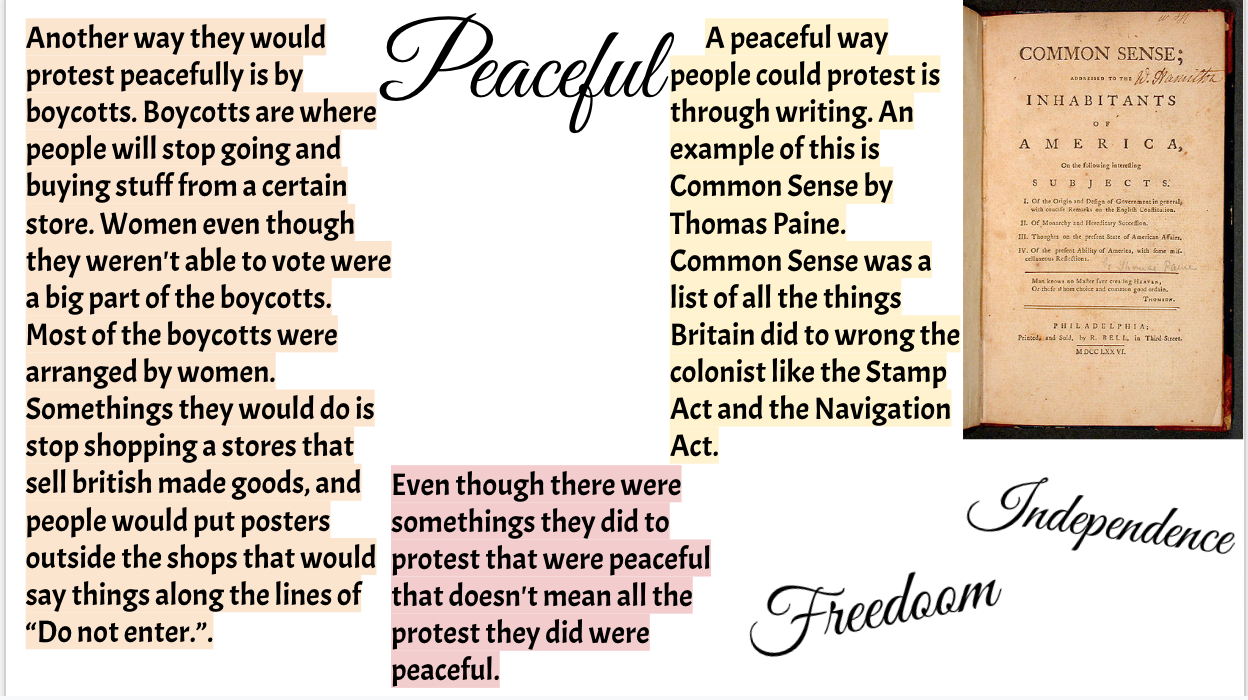
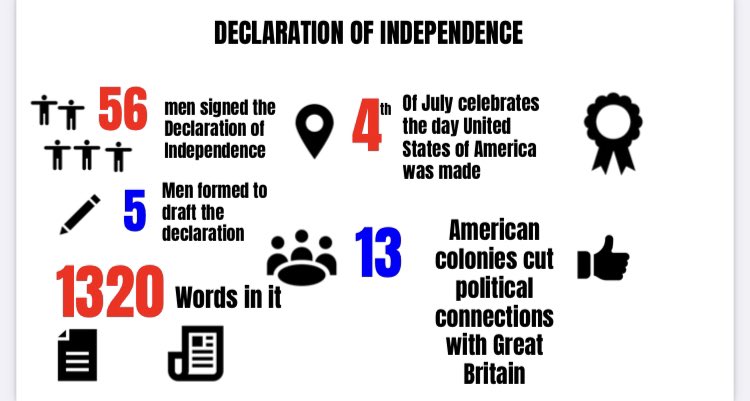
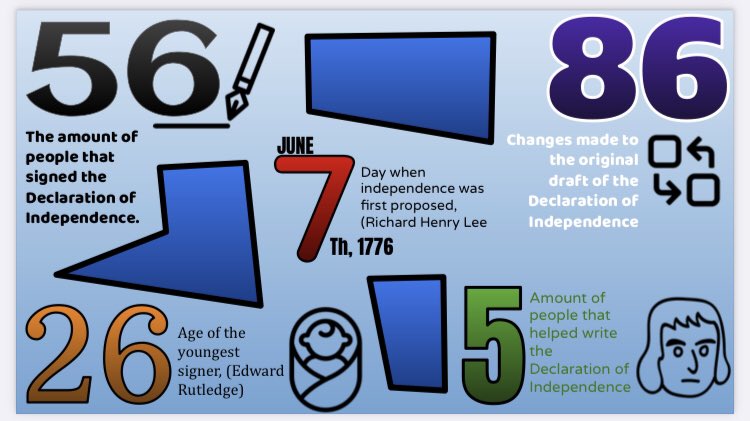
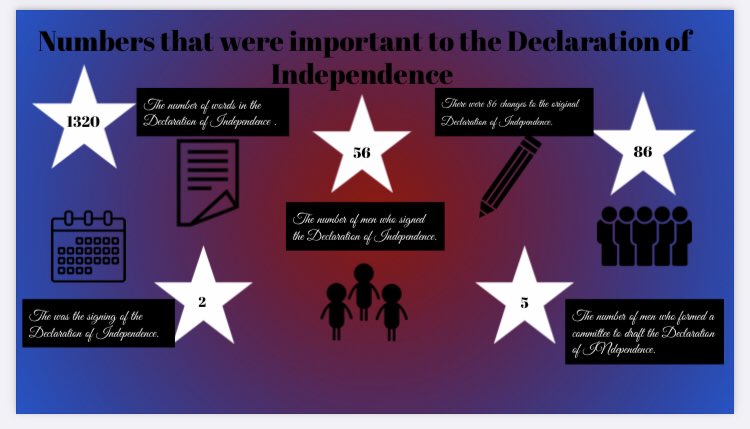
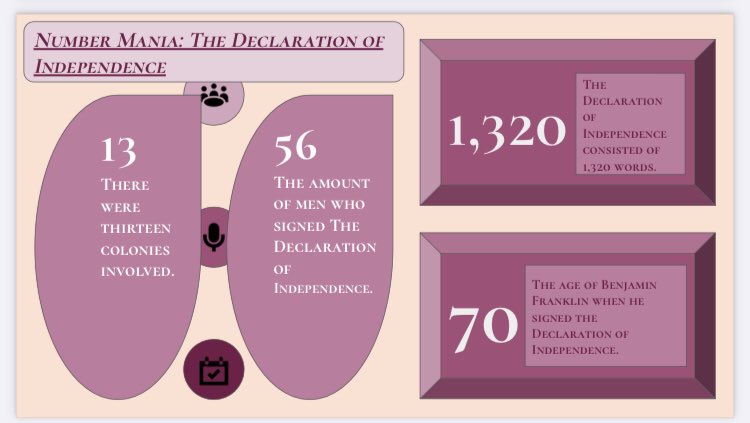
In 40 minutes, here are the results of our number mania:

Thursday

To begin class, I had students take 10 minutes to finish their Number Mania infographics. I asked them to answer these questions before submitting:

  • Does it have a title?
  • Is it easy to read or organized?
  • Did you add color and change fonts?
  • Do you have 5-6 facts?

When this was completed, I transitioned to a hyperdoc I created about the Declaration of Independence. The hyperdoc is located here. I designed my hyperdoc around 2 questions – What is the meaning of the American Revolution? and What is the meaning of the Declaration of Independence? Here are my sections on the hyperdoc:

Engage – Morgan Freeman’s stated, “True glory of the Declaration of Independence is our nation’s epic struggle to close the gap between the ideals of this beautiful document and the sometimes painful realities of our existence.” What have we done throughout history to close the gap?

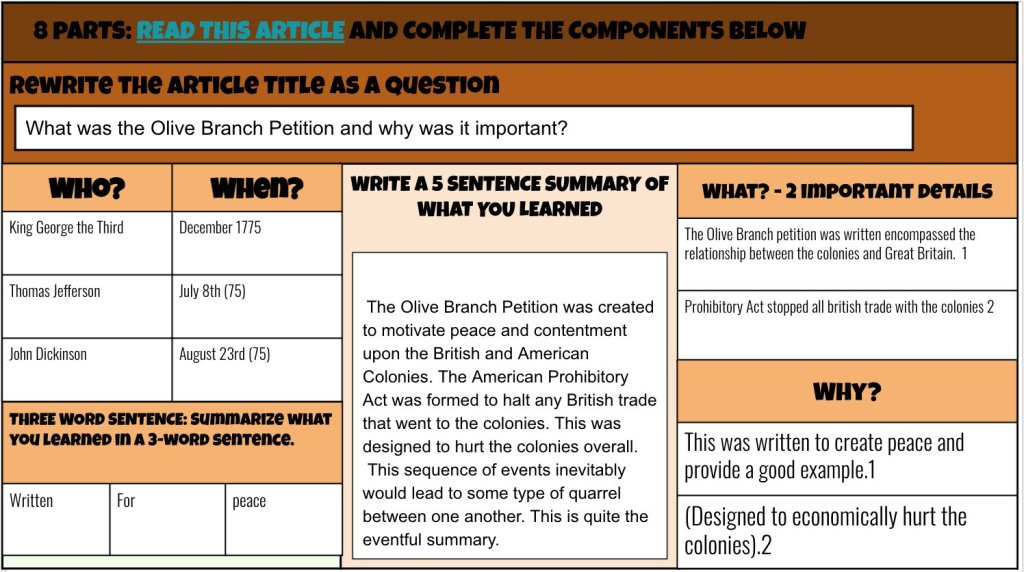
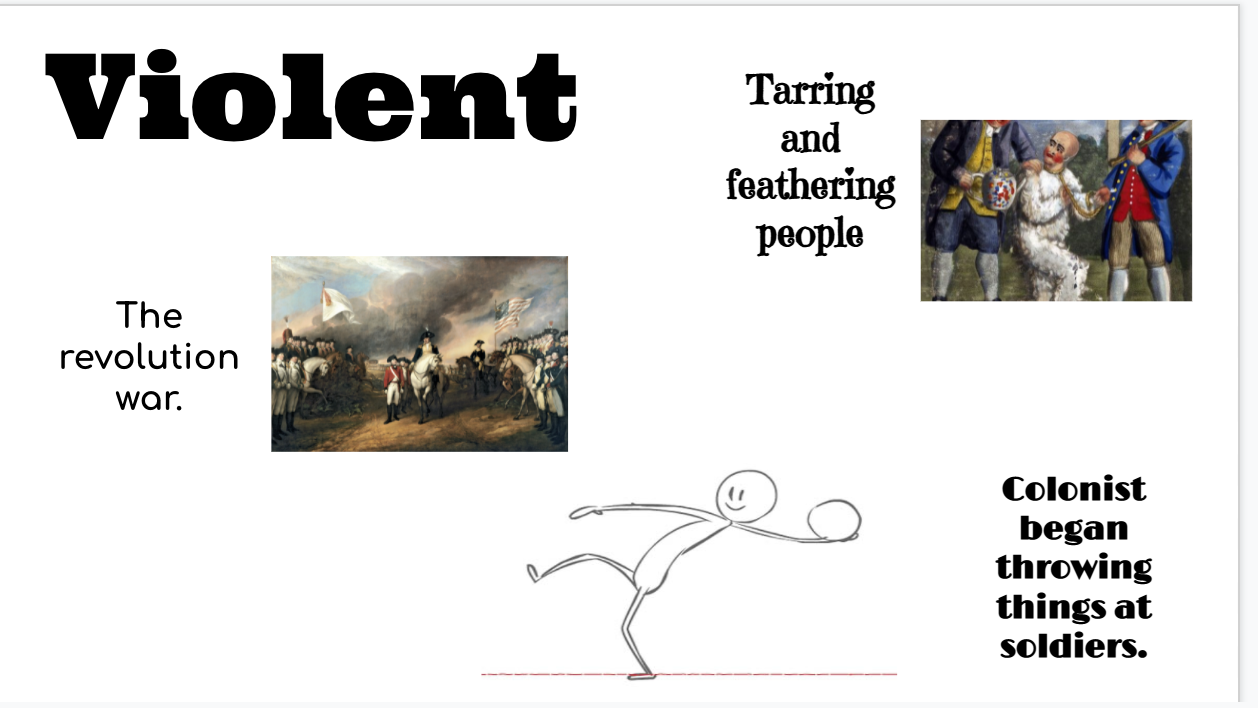
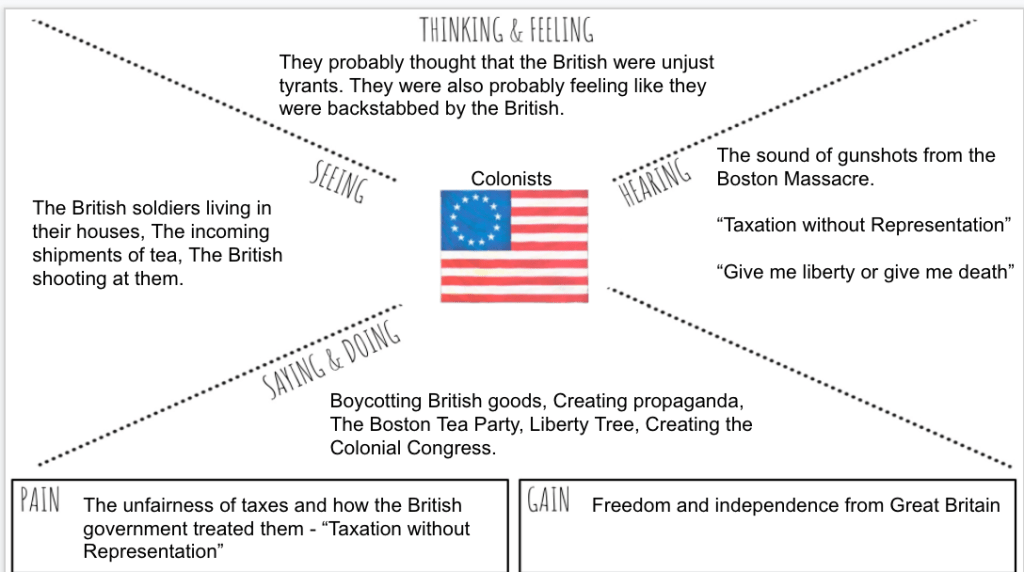
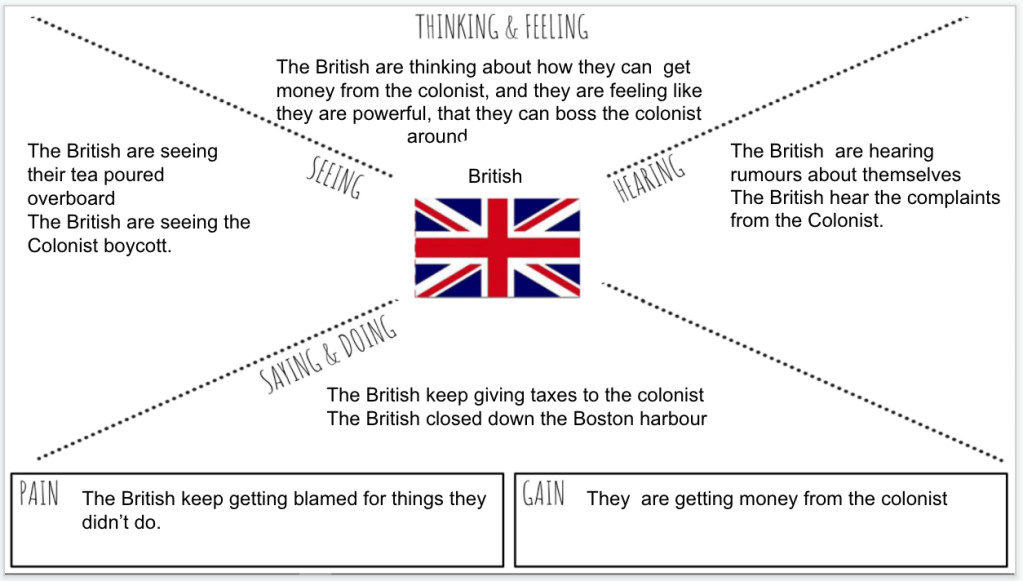
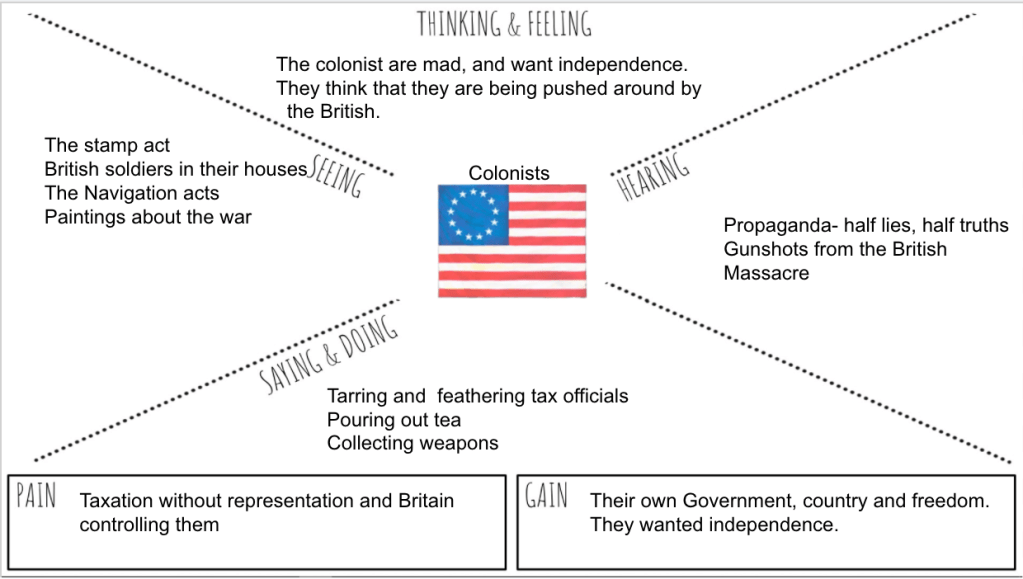
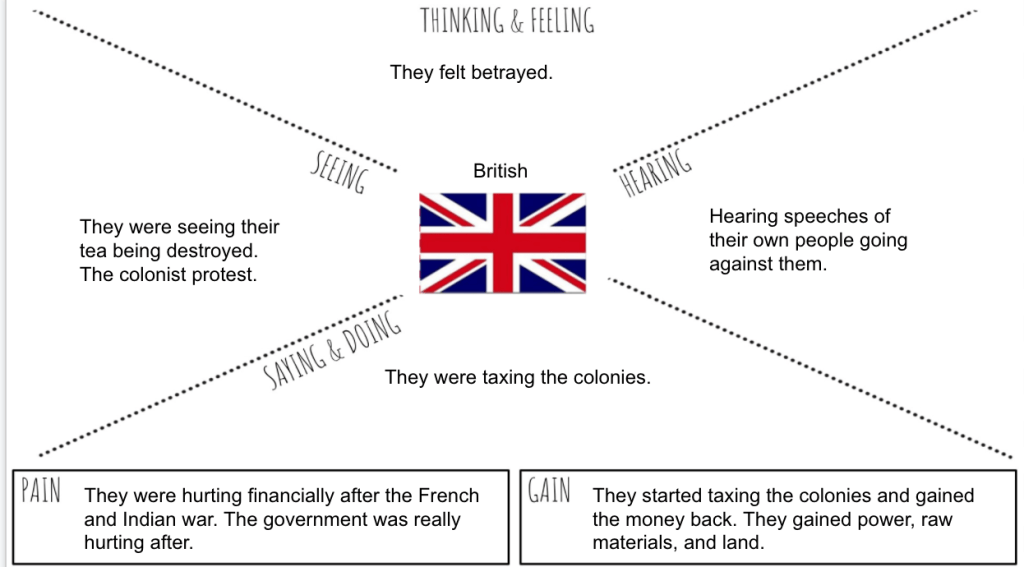
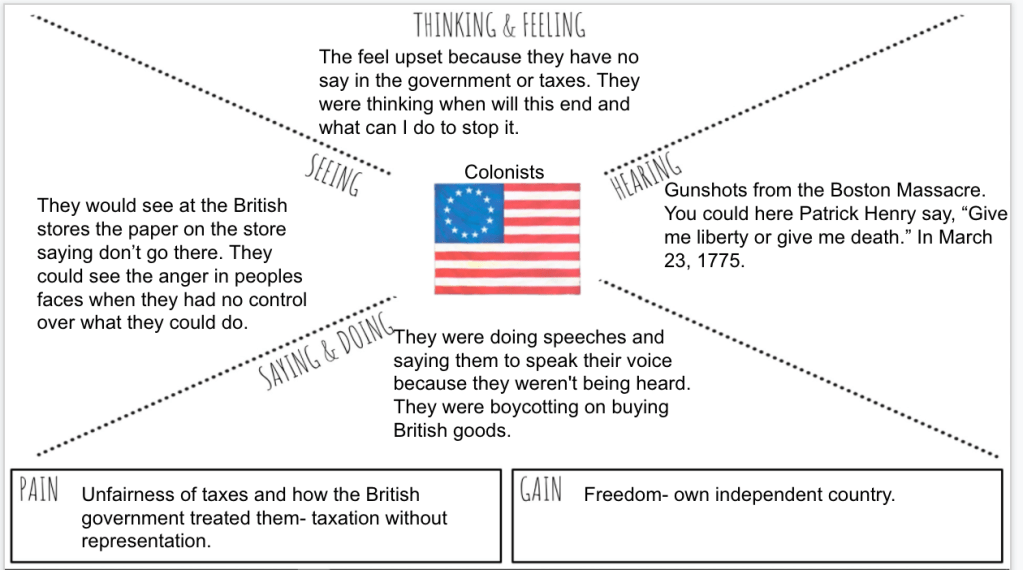
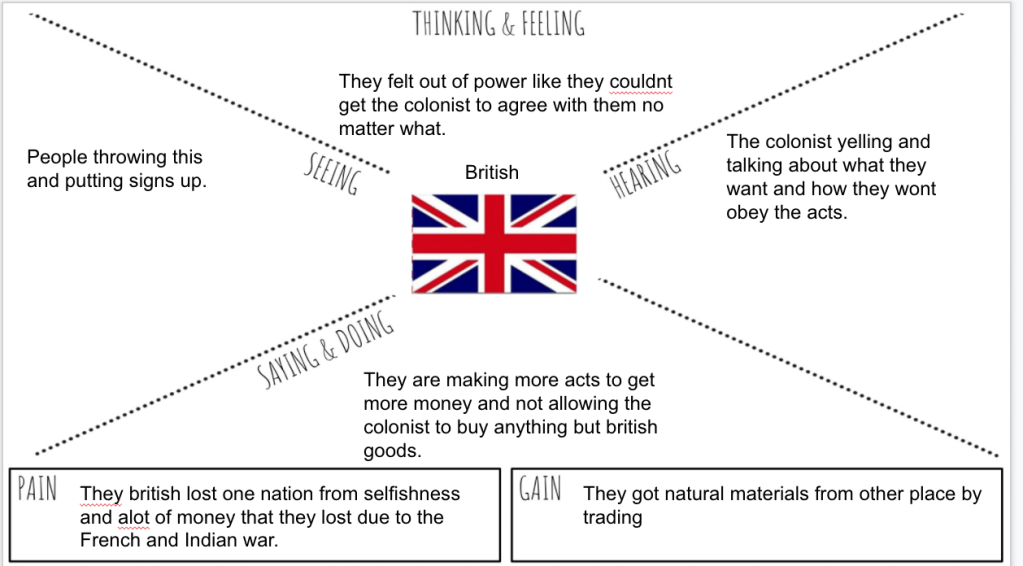
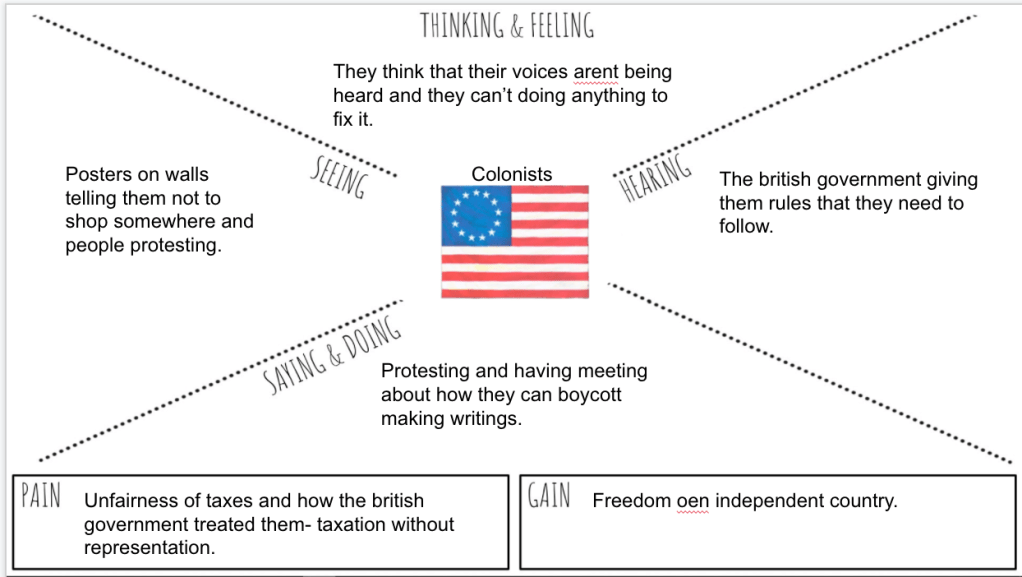
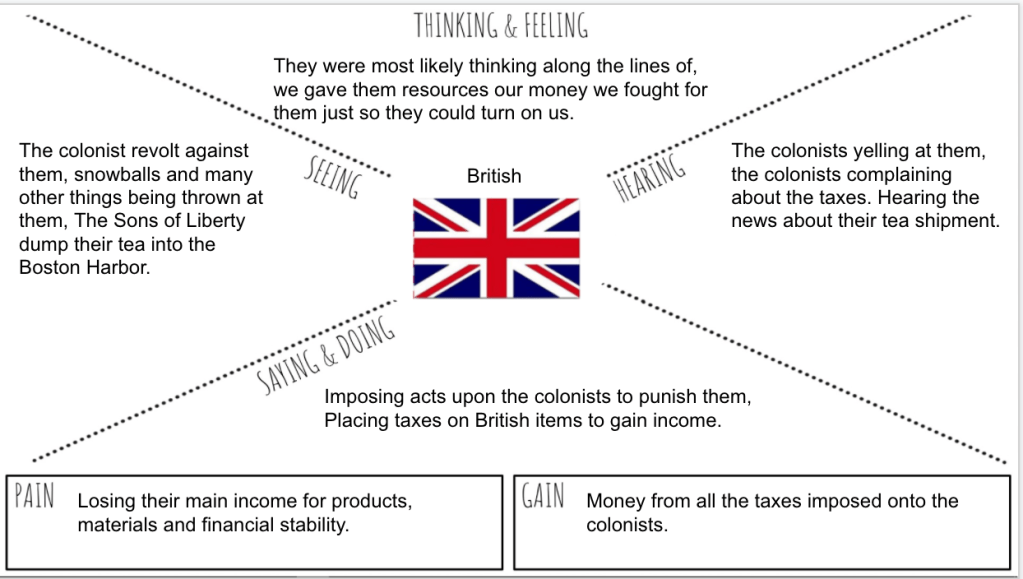
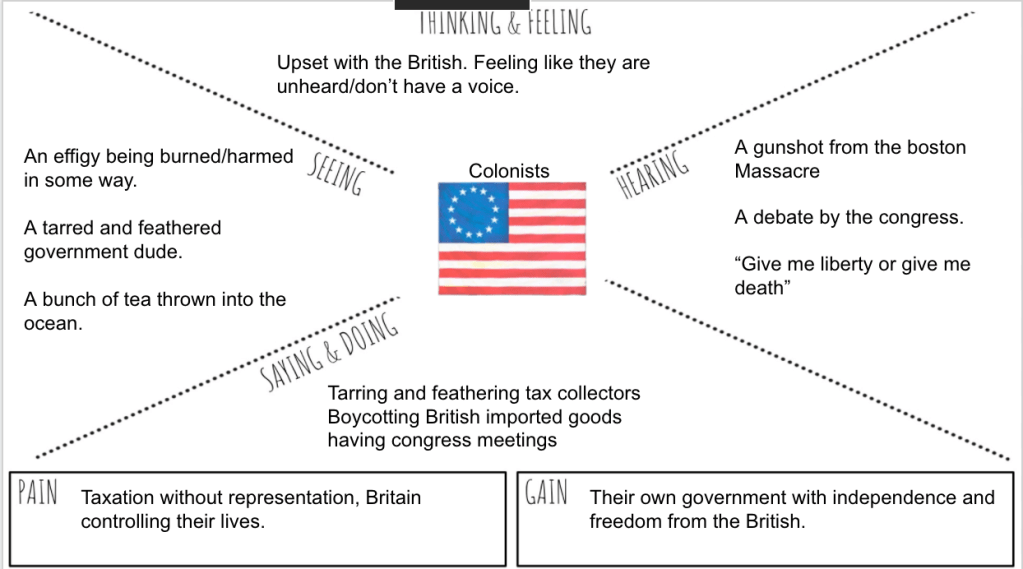
Explore – Who was involved with creating the Declaration of Independence? Why did they write this document? Students answered these questions with an 8pARTS.

Explain – with this section, students are diving into the Declaration of Independence. I will begin this part of the lesson by reading a fake breakup letter or sharing a compilation of break up videos. This hooks the students in before we make meaning of the document.

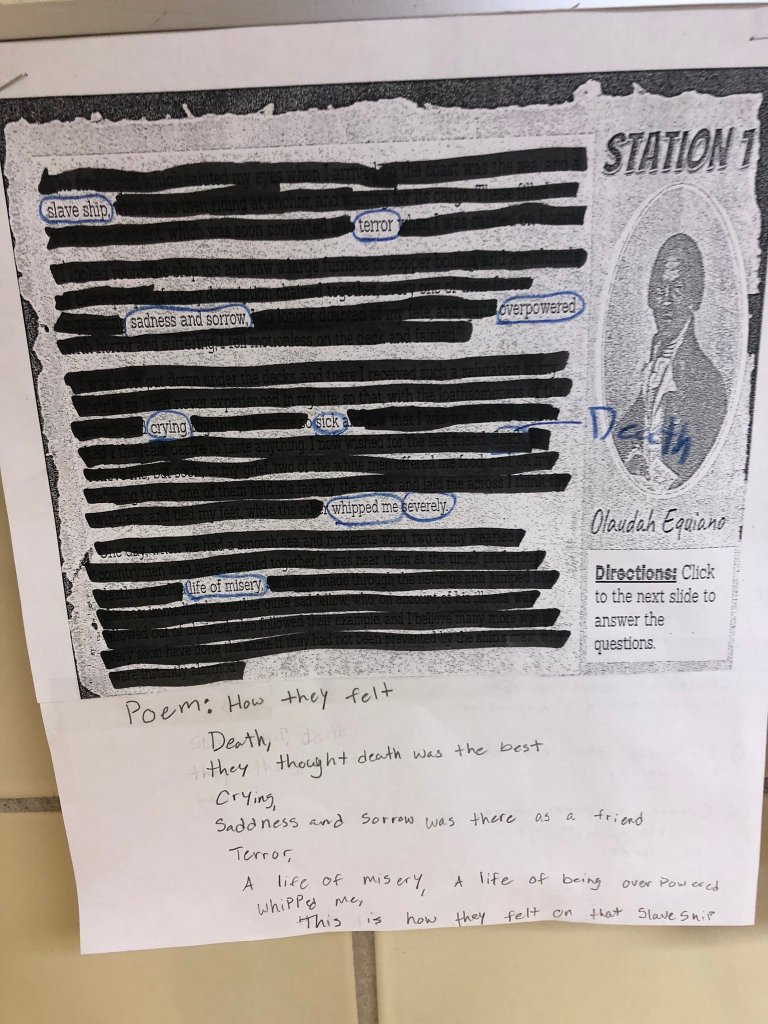
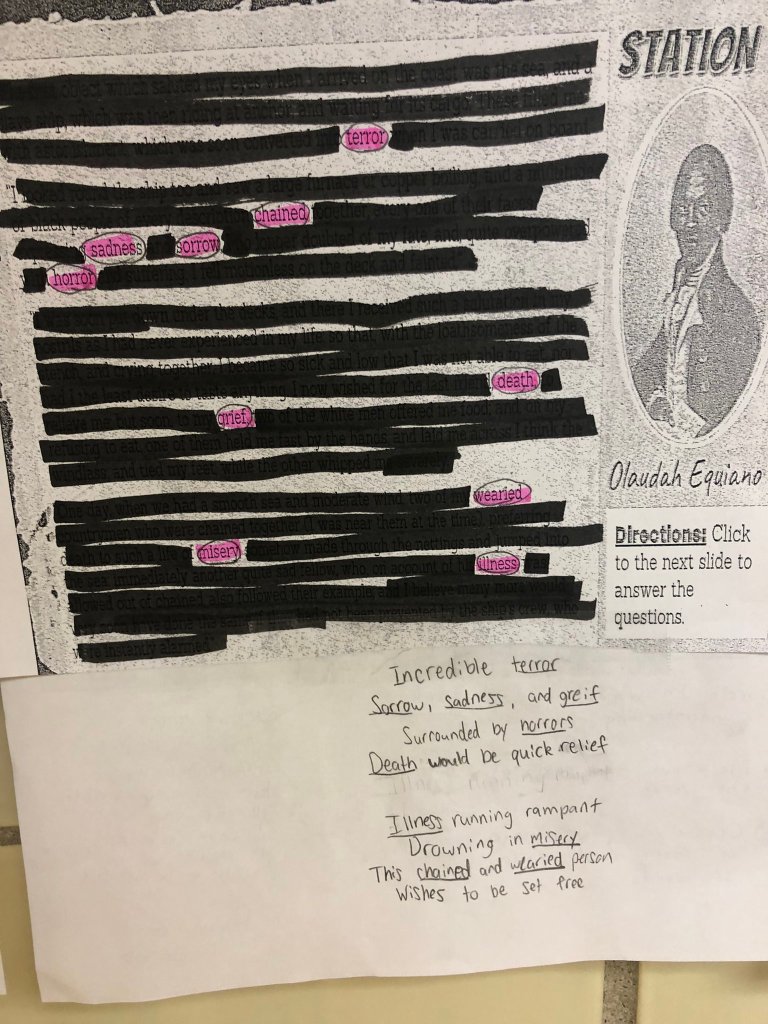
Apply – I’m having students do some blackout poetry as a mix up. They will circle or box words that help explain the meaning of the Revolution and Declaration.

Share – students will share their blackout poems with me.

Reflect – students will take a Quizizz one more time.

Friday

I started class off with a fast and Curious about the Declaration of Independence. The Quizizz I created related to the Number Mania article and ideas from the Enlightenment. The class averages students received determined my next move. If classes reached an 80% or higher, we were going to try out an Iron Chef – Archetype lesson I learned from my friend Dr. Scott Petri. If classes got below an 80%, we were doing an 8pARTS summary lesson.

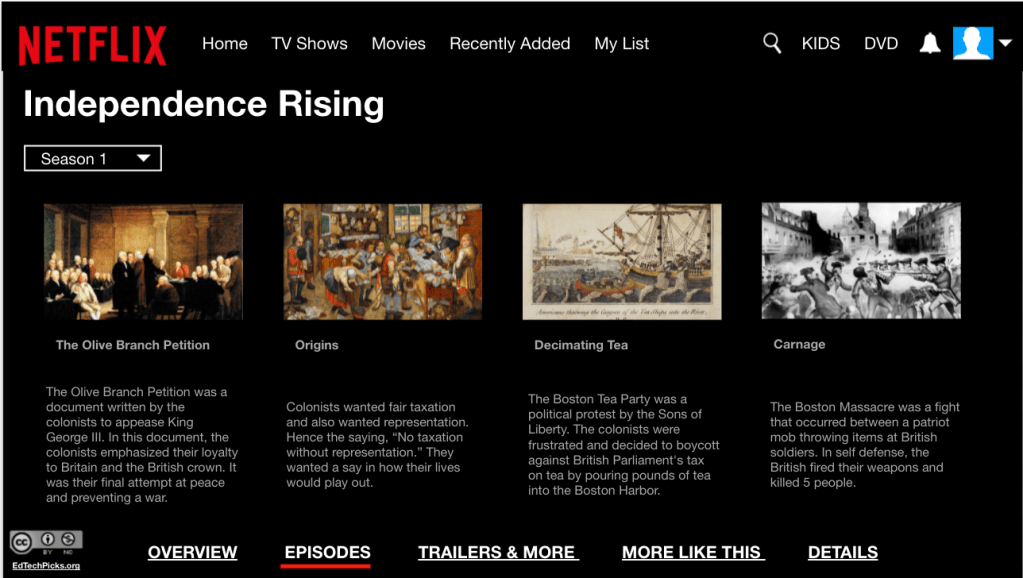
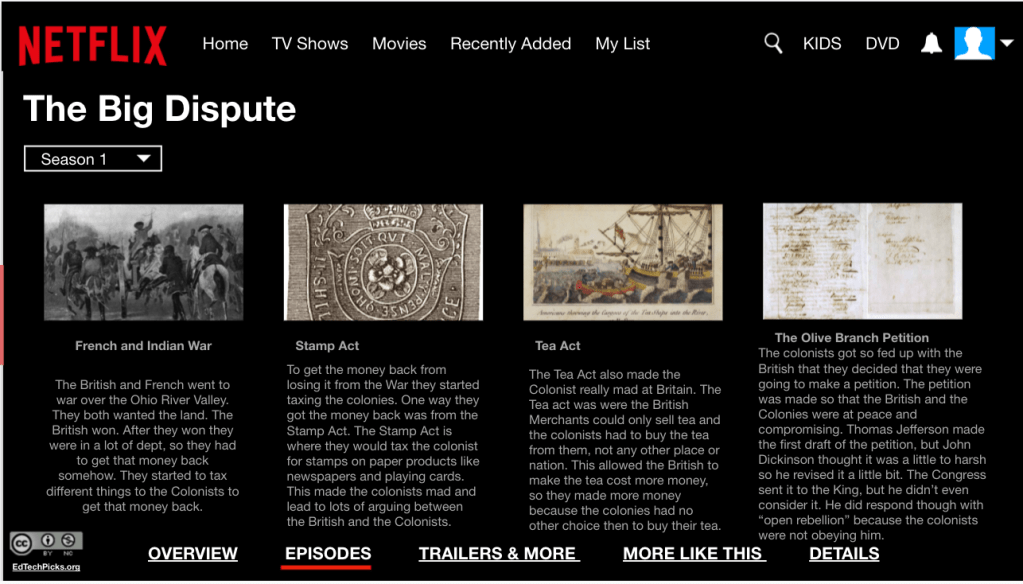
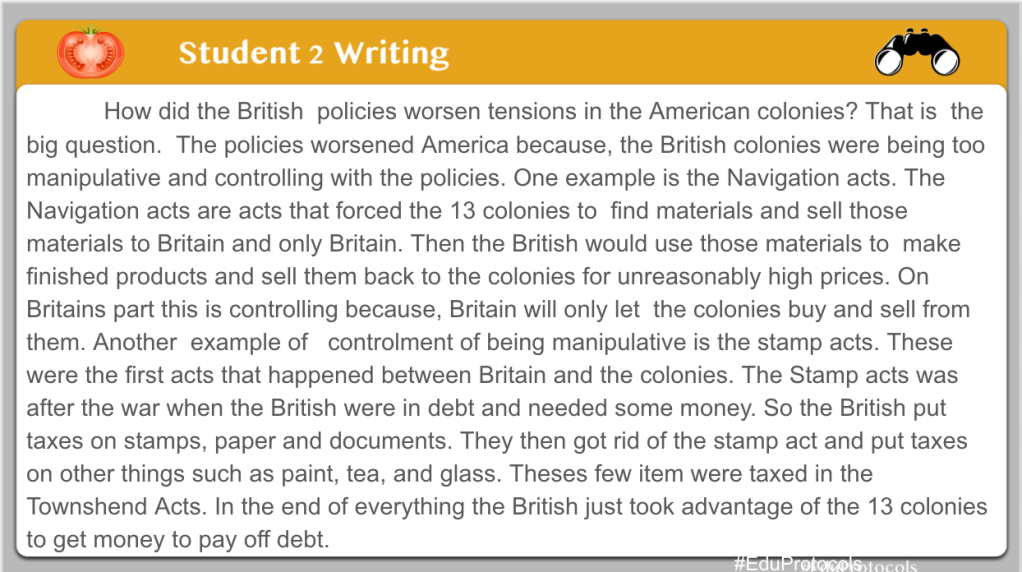
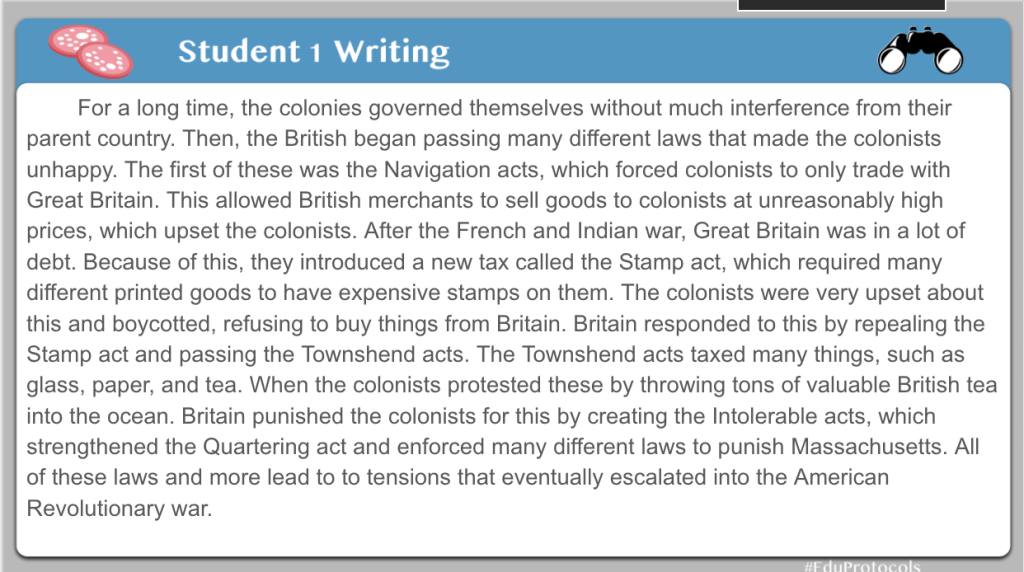
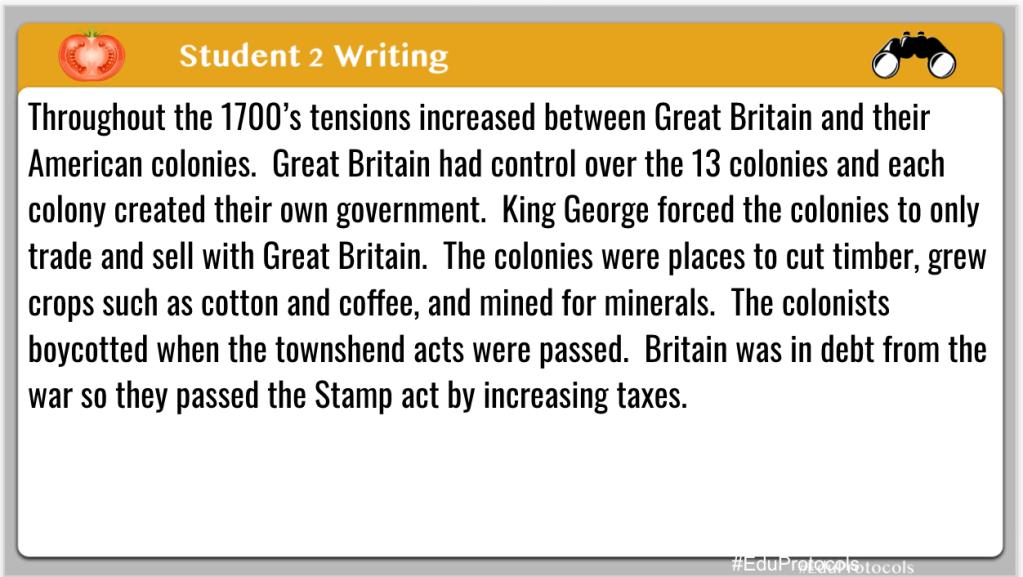
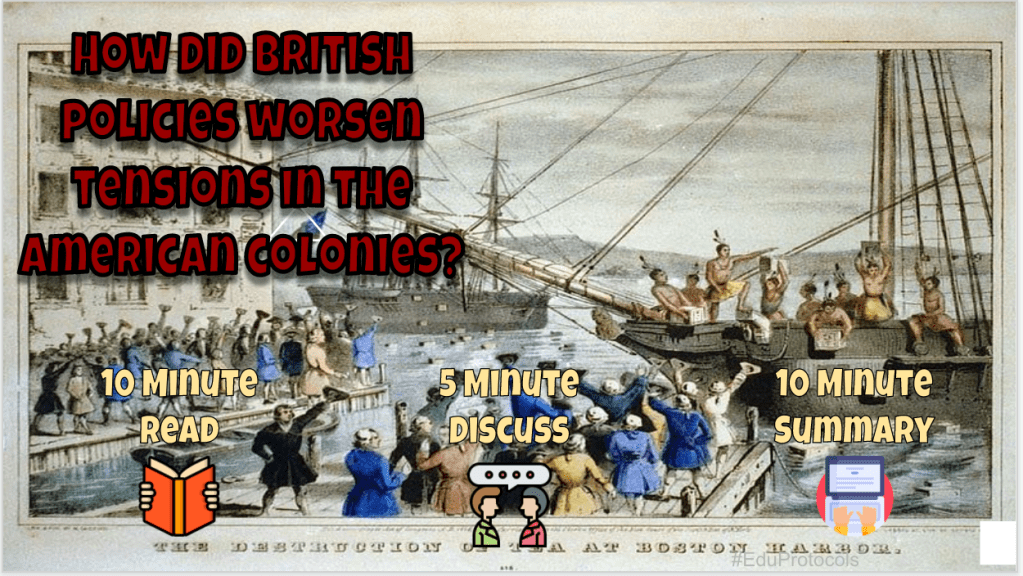
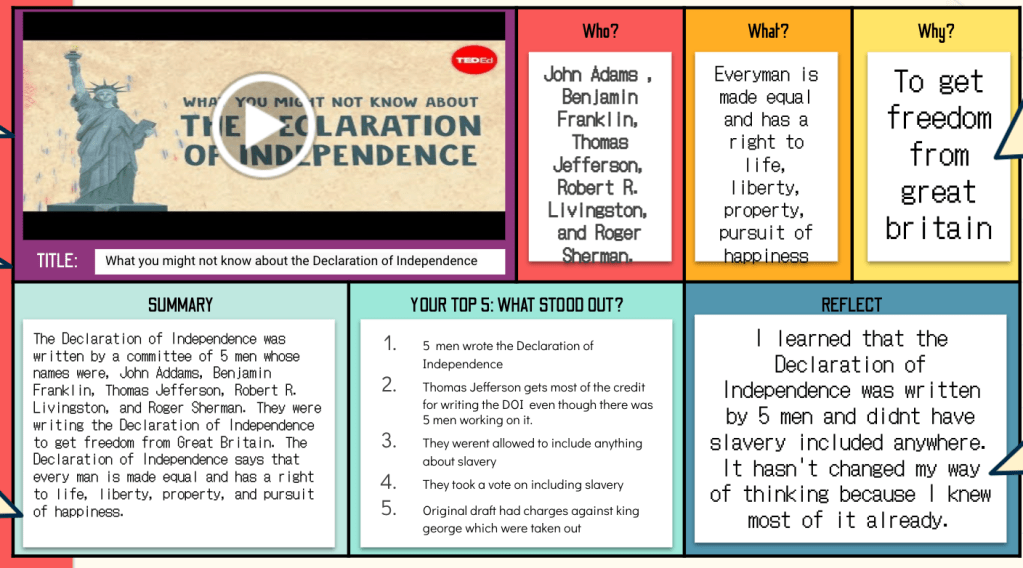
As a result, my 2nd, 4th, and 7th periods did the 8pARTS summary lesson (click here for the file). This lesson used a template from Amanda Sandoval (@historysandoval). Students watched a Ted Ed video about the Declaration of Independence and took notes about Who, What, and Why as they watched. I took notes as well and we had a debrief and discussion. I really like this Ted Ed video because it pairs really well with the Number Mania article I typed. After our debrief, students had 10 minutes to summarize, list 3 items that stood out the most, and reflect on new learning. Here are some examples:

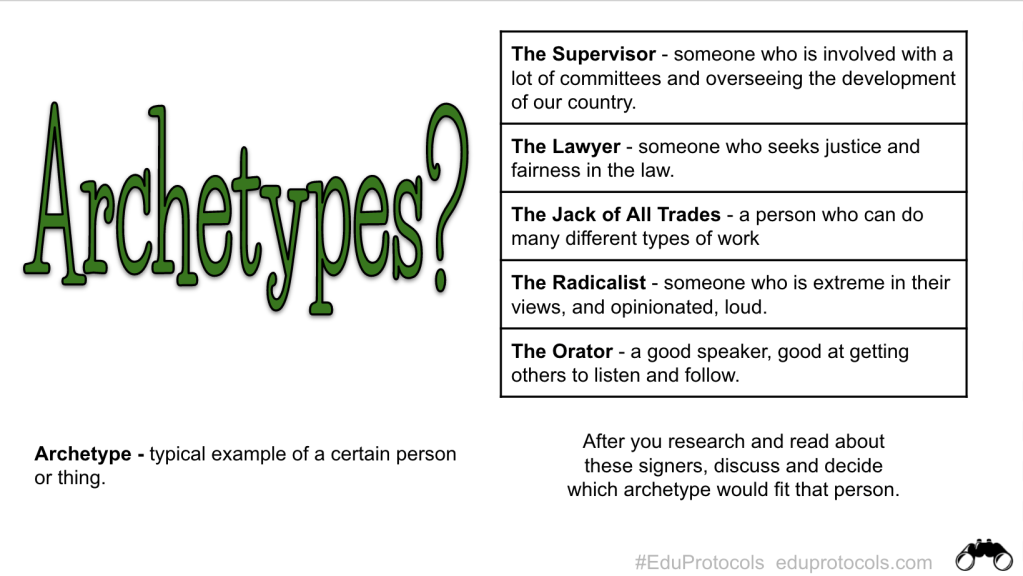
For my 5th and 6th periods, we tried out a new Iron Chef-Archetype lesson. An archetype is a title or persona you can connect to characters. Typical archetypes are: the hero, the jester, the lover, the caregiver, and so on…. You can learn more here. These archetypes, however, wouldn’t work with my lesson on the Declaration signers, so I created my own. Here are my archetypes:

  • The Supervisor – someone who is involved with a lot of committees and overseeing the development of our country.
  • The Lawyer – someone who seeks justice and fairness in the law.
  • The Jack of All Trades – a person who can do many different types of work
  • The Radicalist – someone who is extreme in their views, and opinionated, loud.
  • The Orator – a good speaker, good at getting others to listen and follow.

I created this archetypes after reading the bios of selected Declaration signers. The list of Declaration signers included: Benjamin Franklin, Thomas Jefferson, John Adams, Benjamin Rush, Edward Rutledge, and Samuel Adams. I wanted to choose a list of familiar Founding Fathers we would be studying in the future.

I had students get into groups of 2 or 3. Then I had students choose one of the Declaration signers from my list. They had to visit this site: www.ushistory.org and read a brief bio about their chosen signer. Here are the rest of the steps:

  • 20 minute timer.
  • Read and List 5 facts about their signer.
  • Decide and discuss which archetype to apply to their signer.
  • Explain why they chose that archetype.
  • Connect a modern day person to that archetype as well.

Here are some examples and a link to my template:

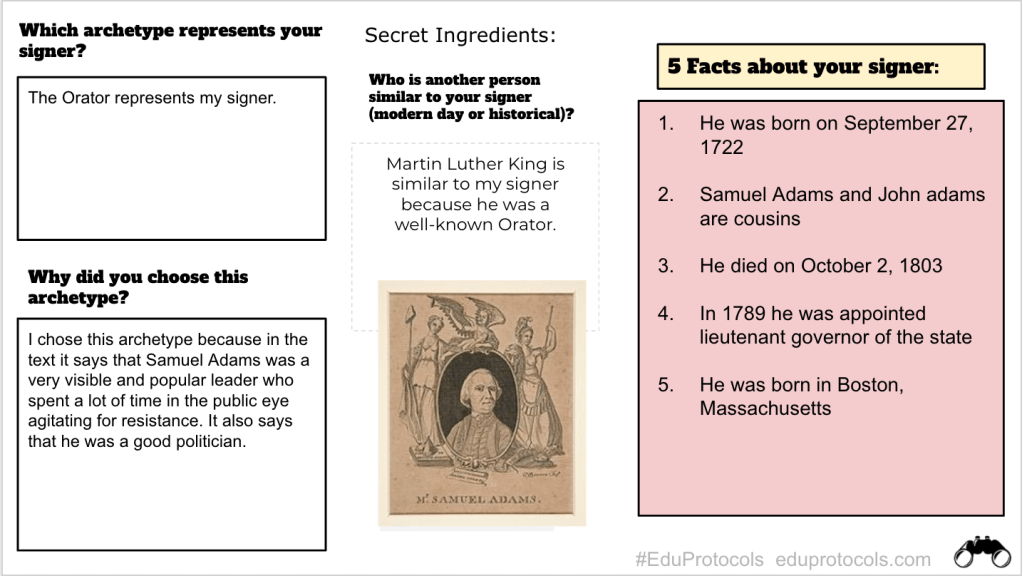
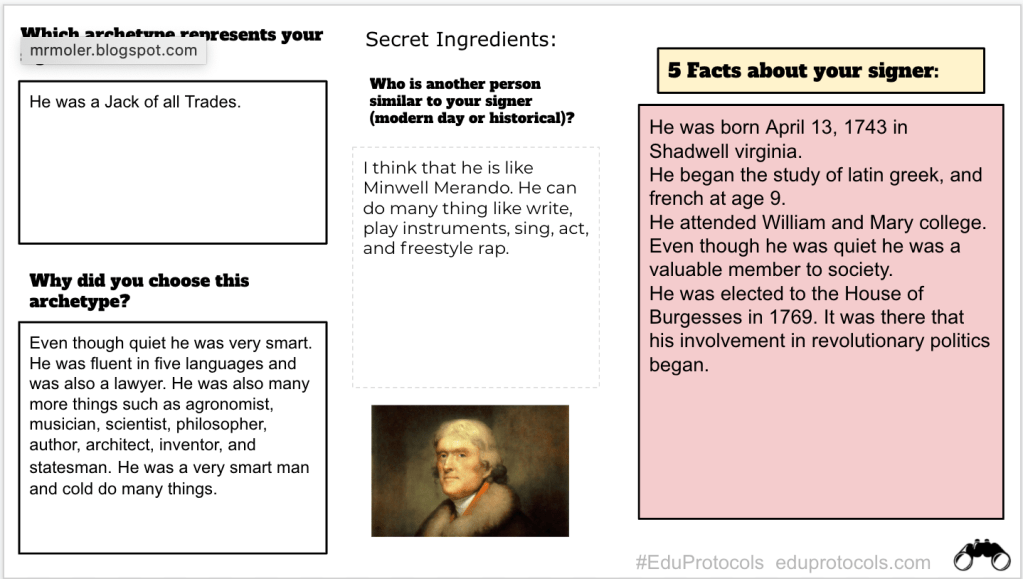
I really liked this lesson as it had students making connections between archetypes, historical figures, modern people, and using evidence. For a quick lesson on archetypes, and only 20 minutes, my students did a phenomenal job!

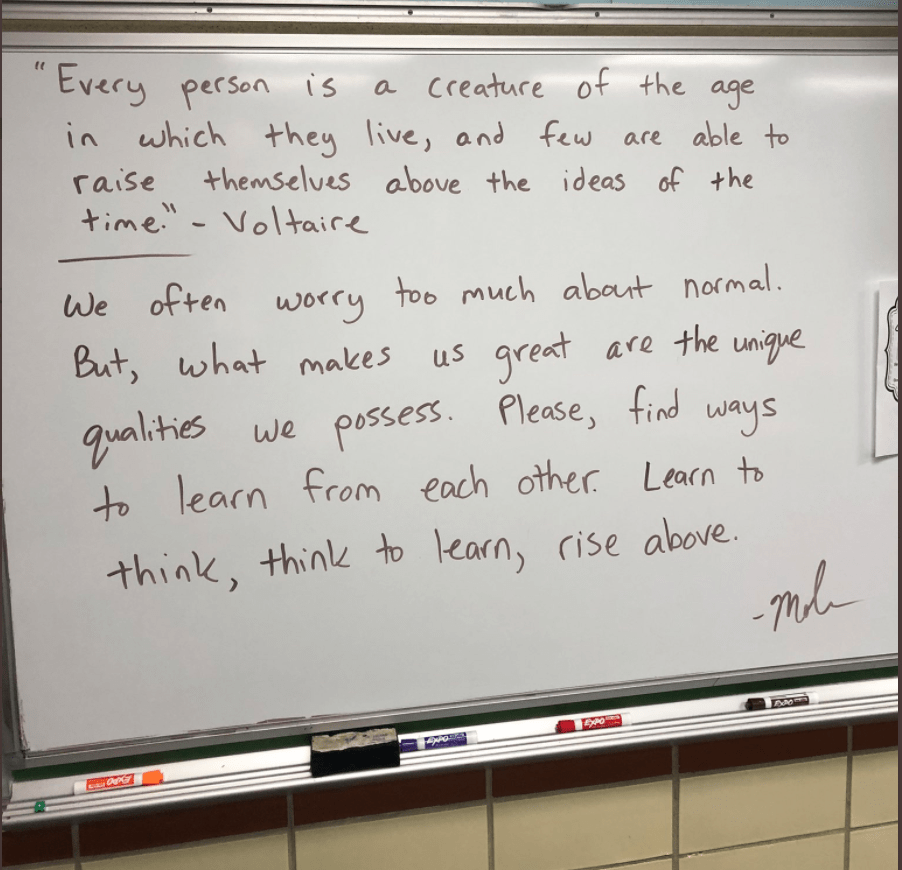
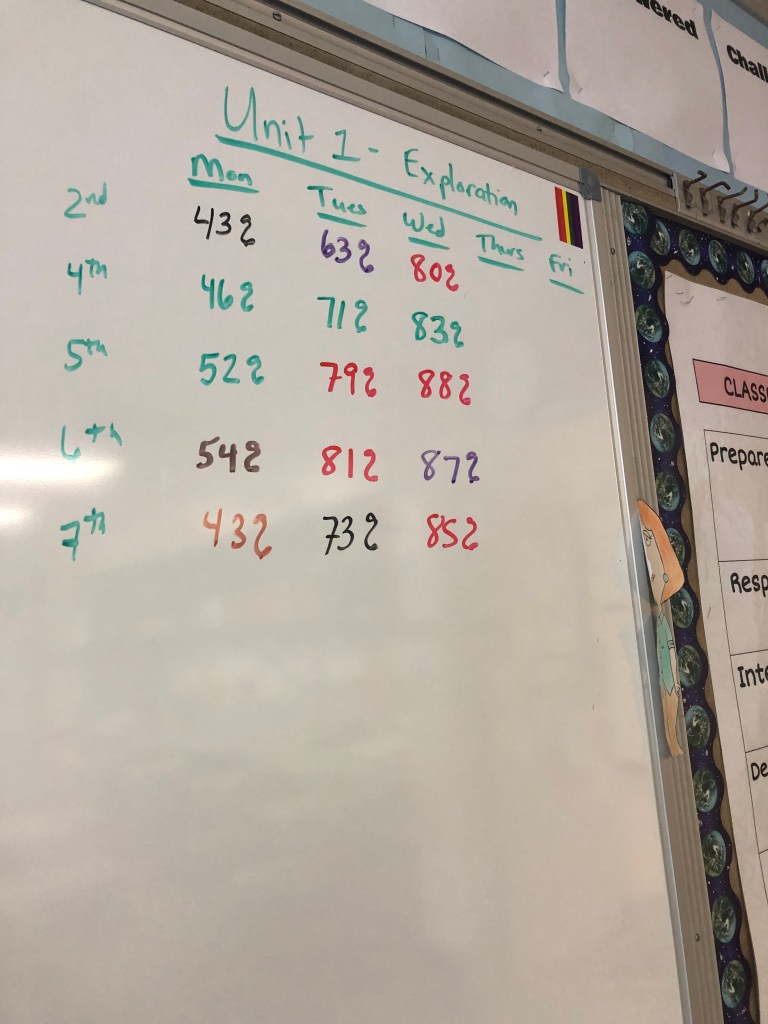
My Messages for the Week

Everyday for the last 2 1/2 years, I write a new message on my board. I don’t bring attention to it. I don’t ask students to read it. It’s just simply there. Yet, students always tell me it’s the highlight of their day and they look forward to reading my message. I post them to my instagram account everyday (Follow me at @moler.adam). I never thought to post them on here, but I will now:

The Week That Was in 505

This week our Road to Revolution unit was coming to a close. My focus this year is using more strategies to build literacy skills in social studies. I’ve been inspired by a Building Literacy Strategies in Social Studies and a podcast called, The Science Behind Reading. From these items, I’m learning some new strategies with vocabulary, building background knowledge, explaining text structures, and exposing students to more informational texts and reading.

Monday

Monday, was uneventful. I had students finish their empathy maps from Friday. However, I wanted to a Gimkit as a review before the went back to empathy maps. I was hoping the Gimkit questions would refresh their memories. Gimkit is one of my favorite platforms and they have a new Jeopardy mode! I love that students can earn money and they can bet their money with a final question. It was awesome and engaging!

The empathy maps had students comparing British and Colonial perspectives during the American Revolution. These maps led to great discussions among students and served as a great review. (I wish I could share this, but it’s a file located at www.emc2learning.com).

Tuesday

Tuesday was the final question of our unit, “What attempts were made to avoid war?” With this question we looked at from a British perspective and a Colonial perspective.

With the British perspective I created a Peardeck Lesson where we looked at the repeal of the Stamp Act. We used this as an opportunity to practice sourcing, contextualizing, close reading, and corroborating. I asked some basic questions:

  1. Who wrote this document?
  2. What motivated the author to write this document?
  3. Whose voice or opinion is missing?
  4. What information is left out?

These simple questions led to a great discussion and we dove a bit deeper and learned that the same day British Parliament repealed the Stamp Act, they passed the Declaratory Act which gave them total authority over the colonies.

Immediately following this, I tried out a literacy strategy which I oddly paired with 8*pARTS template (click here). This lesson was on Olive Branch Petition and showed how the colonists attempted peace. I created an 8*pARTS template with these headings around it:

  1. Rephrase the article title as a question.
  2. Who?
  3. When?
  4. Why?
  5. What?
  6. 3 word summary.

Here is the structure of the lesson I ran:

  1. I had students partner up.
  2. Student 1 read to Student 2, as Students 2 took notes.
  3. Students 2 then read to Student 1 as Student 1 took notes.
  4. Both students discussed notes.
  5. Then students wrote a 5 sentence summary about the article.

This lesson worked out wonderfully and the 8th graders surprisingly didn’t mind reading to each other. I went great! As students were working, I was walking around offering feedback, asking questions, and grading. I quickly realized this format could easily be implemented with a Cyber Sandwich.

This 1 day lesson finished off our unit and we were now ready to tackle the final assessment and answer our question, “Was the American Revolution Avoidable?”

Wednesday and Thursday

Wednesday and Thursday would be used for our final assessment – the Netflix Assignment. I forget where I found this awesome Netflix template, but I love it because it’s easy to change and manipulate for assignments.

During the Netflix assignment students write a title and description of a show they create. They can change the show pictures as well. After students create a title and description, they break their show down into 4 episodes with descriptions.

Before students began creating, I reminded them of our unit questions and the main compelling question, “Was the American Revolution Avoidable?” I encouraged them write their show description in a way that answered our compelling question. Then I encouraged students to create 4 episodes based on anything we learned during the last 2 weeks. There creations were awesome:

The Netflix assignment is so engaging and I’m always impressed by students work. This assignment works well with any subject and everyone should try it out!

Friday

After 2 days of designing Netflix shows, I wanted to use Friday as a fun day to try something new. The site www.emc2learning.com had a new idea. We played the 12 Topic Stitch Up.

I listed out 12 topics/concepts on a slide. Students formed groups of 4-5 and they worked together to choose 1 concept and relate it to 4 other concepts on the list. If they successfully explain their connections, they were given access to the Operation game board to pull out the piece without making is buzz.

This was so engaging as students worked together and just had fun! I will definitely be using this idea again and again.

The Week That Was In 505

This week we continued our unit on the American Revolution. We are focused on a compelling question – Was the American revolution avoidable? The lessons this week addressed the supporting questions of – How did British policies worsen tensions? and How did colonial responses and protests worsen tensions?

  • Monday – Professional Development Day
  • Tuesday – British Taxes and Policies and Quizizz
  • Wednesday – British Taxes and Policies Cybersandwich with Quizizz
  • Thursday – Colonial Protests graffiti wall, Iron Chef, Story time, Quizizz
  • Friday – Colonial Protests, graffiti wall, Empathy Maps

Tuesday

Tuesday’s questions was – How did British policies worsen tensions? Up to this point, the students studied the French and Indian War last week and learned how the relationship changed between Britain and the colonists. With this lesson we moved into the taxes, laws, and punishments the British Parliament passed onto the 13 colonies.

For this lesson I wanted something to review the French and Indian War after a 3 day weekend. I also wanted an engaging lesson. I went to Kevin Roughton’s site and found this great lesson that used the causes of the Revolution as analogies to a teenager struggling with, arguably, overbearing parents.

This lesson was phenomenal as the students were laughing as I read the scenarios between the parents and the child. After I read the scenario, I had the students write down and reflect on how they would feel as the overbearing parents gradually increased control over their lives. Finally, we read the historical event (Navigation Acts, French and Indian War, Proclamation, Stamp Act, Townshend Acts, Tea Act, Intolerable Acts) and students related the scenario to the historical events.

After we finished this lesson, I had students take the Quizizz. Based on the Quizizz results, I felt like students didn’t quite get everything out of the lesson that I was hoping for…..Whatever students are focused on is what they are learning. In this lesson, they were focused on the weird scenarios and crazy parents rather than the historical event. As a result of this, I decided to bust out a Cyber Sandwich for Wednesday.

Wednesday

Again, whatever students are focused on and doing is what they are learning. I wanted students to gain an understanding of the British taxes and laws that made colonists mad, so I created a Cyber Sandwich (click here for a copy). I used the same question – How did British policies worsen tensions? and we ran a standard 10 minute read and notes, 5 minute discuss, and 10 minute summary.

Students read the one page article for 10 minutes and I wanted them to have 6-8 important facts. When the 10 minute timer went off, I shared my notes with students and explained my thought process with my notes. My goal was to take notes that helped me answer the main question.

For the summary part of the Cyber Sandwich, I wanted students to write 4 or more sentences. This time I provided a sentence starter sheet to provide a scaffold, or support, for students. The students did a wonderful job with their summaries and we took the Quizizz.

After the Cybersandwich, students significantly raised their class averages. Over 3 days, one class went from 60% class average, 75% class average, to a 93% class average. I will always do a Cyber Sandwich once a week – IT IS AN EFFECTIVE LESSON AND CAN BE ADAPTED WITH MANY NOTE TAKING STRATEGIES!!

Thursday

On this day we moved to a new question – How did colonial responses and protests worsen tensions? I began this lesson with a graffiti wall where I posted this question, “How do people express themselves and communicate today?” I gave students 5 minutes to come up and draw, add a word, or add a sentence to the whiteboard. This was followed up with a quick discussion. The goal of this was to help the students realize that communication and expression are not that much different today than it was in 1776.

After this, I went through a quick slide deck where I shared stories about different forms of colonial protests. I call this Story Time With Moler. It’s my creative way to avoid saying lecture. Each slide has a picture with a cool story I like to share abput colonial protests (I love this talking about this stuff!). Story time took 15-20 minutes.

Next we switched to an Iron Chef (click here for a copy) where students did a virtual tour and explored the American Revolution Museum galleries to find examples of colonial protests. I wanted them to treat their slide like a graffiti wall – add pictures, words, sentences. I gave students 15 minutes to explore the galleries and find examples:

Friday

Friday was a continuation of the Iron Chef. I gave 5-10 minutes so students could finish their slides. When the timer went off, I had students contribute examples of protest to a graffiti wall(s). This led to a discussion about the amount of peaceful protests versus violent and destructive protest. Then we related these protests to today. I always mention violent and destructive protests are often done when people aren’t heard. In this case, the colonists weren’t being heard.

After our graffiti wall discussion, I pointed students back to our question – Was the American Revolution avoidable? I said to them, “You can truly understand this question when you understand the perspective of both sides – the British and the Colonists.” This was a perfect time for an Empathy Map. I got this from http://www.emc2learning.com so I will not share a link.

I had students work in groups to review past learning and new learning with the protests to understand the colonists point of view during the Revolution. I modeled this process and helped guide students to create some examples for the categories:

  1. Pain
  2. Gain
  3. Seeing
  4. Hearing
  5. Saying/Doing
  6. Thinking/Feeling

This was an awesome lesson as students worked together. Plus, there was no single correct answer. The discussions, thinking, recalling, and learning was AWESOME!! Here are some examples:

Reflection

Overall, this was a great week! I’ve been focused on research based, science based strategies to improve literacy skills in Social Studies. Plus, I have been focused on trying new, engaging lessons. The graffiti walls are awesome and my new favorite thing ever – the students loved writing and drawing on the whiteboard. The empathy maps were a great way to get students thinking outside the box. I love using the Cyber Sandwich as a way to build literacy skills in Social Studies.

The Week That Was In 505

Oh what a week it was in 505 – starting a new unit on the events that led to the American Revolutionary War. I brought back some classic Eduprotocols and an Eduprotocols I haven’t used in 2 years.

Monday – Finished our Text Quest.

Tuesday – Great American Race

Wednesday – Sketch and Tell

Thursday/Friday – French and Indian War Graffiti Page

Monday

We finished the Text Quest with Colonial Regions and teams had 3 options for the bonus battle: Retell in Rhyme, Upside Down Learning, or Story Cubes. I cannot share the Upside Down Learning or Story Cubes because it came from the site www.emc2learning.com – check out the site!

The Retell in Rhyme comes from Dr. Scott Petri where he has students retell main details about a historical person or historical event in rhyme. The goal is to see how many rhyming couplets students can create within a given time period. Most students think this is easy, but they quickly find out it’s pretty tough.

With Upside Down Learning students write a fact from the lesson on top of the line, then they change the fact to be untrue underneath the line. It sounds simple, but students have trouble with this one as well.

The story cubes are simple, students choose 9 story cubes and relate the images to anything they learned in the unit. It’s a cool way to create forced connections and really pushes students to think creatively.

Tuesday

I started a new unit called Toward Independence – I introduced our unit goals and I can statements. Then we began the Great American Race. The Great American Race is a simple way to introduce vocabulary for a unit. Here’s how it works:

  1. I created 20 or more cards – one side has a number, the other side has a vocab word.
  2. I distribute the cards and tell the students, “Don’t reveal the answer on your card.”
  3. Students have 10 minutes to type 3-4 clues, add a picture, and their card number to a blank slide.
  4. As students are working, I collect and organize their slides into one shared slidedeck. This way I give feedback on their clues.
  5. At the end of 10 minutes, students then work to Google the clues on the slides and figure out the answers.

Wednesday

Wednesday was shortened class period day due to testing. Each class was 28 minutes long. It was a perfect day to start with a fast and curious with our new unit and to use some sketch and tell. The Sketch and Tell was used to further build background knowledge with important concepts – French and Indian War, Taxation without Representation, and The Stamp Act. These words were included with the Great American Race as well. I just simply had students look these words up and create a sketch and tell using Google Shapes. The idea behind the Sketch and Tell was to build background knowledge about the French and Indian War before Thursday’s lesson.

Thursday and Friday

I had to scrap Thursday’s original plan and keep it simple because I was absent. Instead of doing the French and Indian war digital breakout, I kept it simple with a graffiti page.

The graffiti page is supposed to keep students actively engaged as they are reading. Students draw 2 pictures, draw 2 bigs words to represent main ideas, and I wanted students to include causes and effects of the French and Indian War. It is similar to sketchnoting. Looking back I should have the students sketchnote next time.

Some of the Graffiti pages were great. I felt like the French and Indian War reading was good as it was written in a way that picked up the story from our Colonial Regions Unit. However, I felt the like the students didn’t make the connections. Most of them missed the effect of the war in the British claimed the Ohio River Valley and were then prevented from moving there by the Proclamation of 1763.

The plan Friday was having the students complete a Retell in Rhyme about the French and Indian War. However this was not happening because most needed to finish their graffiti page.

After some reflection, I need to do a better job at writing I can statements. I need to write more I can statements to help guide the students through the entire process of the unit.

The Week That Was in 505

This week I wanted to finish up unit 1 on the colonization and the 13 colonies. However, shortened schedules due to testing get in the way. Plus, testing days are the worst – students come in either tired and zombies or wound up and crazy.

Monday – 30 minute classes – Triple Threat Throwdown

Tuesday – 30 minute classes – Triple Threat Throwdown

Wednesday – 40 minute classes – Text Quest

Thursday – 50 minute classes – Text Quest

Friday – 50 minute classes Text Quest

Monday and Tuesday

Monday with a MAP Math test is tough and tiresome – a perfect day to try something new. On EMC2Learning I found a new called the Triple Threat Showdown. Students had 60 total minutes to work as a team to show what they have learned the previous 2 weeks (colonization, Middle Passage, Triangular Trade, Columbian Exchange, Roanoke and English colonies). The goal was to win 2 out of 3 categories as a team. The categories you asked?

  1. Legos – build things related to content learned the previous 2 weeks and explain to me how it relates to something they learned.
  2. Sketchnotes – sketch and annotate content they learned.
  3. Apples to Apples – draw 3 cards (nouns or adjectives) and relate/connect each card to something you learned.

This game sparked some engagement in 505 – it was unbelievable the creations, connections, and sketch note ideas the students were creating. When we first started this, I wished their connections and explanations were a bit more detailed. As each student showed me and/or told me about their connections it provided me with an opportunity to give feedback. The feedback from me really helped students perfect how to speak and write about the content.

I really liked this 2 day Triple Threat Throwdown because it was a perfect fit for a 2 day shortened class period. (I’m not sharing the Triple Threat Throwdown because it’s a file from www.emc2learning.com).

Wednesday

With a longer class period, Wednesday was a good day to start new content. We started with a Text Quest to learn about the impact of geography on the English colonies. (I’m not sharing the Text Quest because it’s a file from www.emc2learning.com).

Some people get caught up in the fact that students need to know and label ALL of the 13 colonies. Yes, it’s good to know stuff, but I don’t waster much time doing that. Instead, I randomly use a 13 colonies Blooket game as a side competition during the Text Quest. What is the Text Quest?

The Text Quest came from EMC 2 Learning. Basically, students are placed on 3-4 teams that compete in 2 rounds every class period. The teams are playing for 1st through 4th place, every round, every class period.

Round 1 – I had teams debate for 5 minutes about what happened to the lost colony of Roanoke. Teams submitted their responses through Socrative. Socrative is a tool I used to use all the time, stopped using it, and now it’s back in my life again. I love how students/teams can submit responses to short answer questions and you can hide the names and judge teams 1st through 4th without any bias.

Teams submitted responses, I read them word for word (spelling errors and all) and give feedback on their claims, evidence, and reasoning. The discussions students had about Roanoke were amazing. Plus, I love being to provide feedback in real time.

Round 2 – Students worked within their groups to do a colony sort. I used the Categorizing the Colonies from Mr. Roughton’s website. Students had 25 minutes to create their own categories for the 13 colonies.

Some groups sorted by population size while others sorted by agriculture vs. manufacturing. Each group wanted to know the right answer, and I replied, “There are no wrong or right answers, just better answers.”

At the end of this activity, students did a really great job of working together and creating categories to better understand the colonies. The winning teams were chosen by me based on a completed product, simple/general categories, and a good explanation of what they could learn about the colonies based on the categories they created.

Thursday

The Text Quest continued on Thursday with another set of 2 rounds. This time our focus was on the geography of the colonial regions.

Round 1 – For this round I had teams debate this question, “Which colonial region would the worst to live in?” Students had great discussions and submitted their responses through Socrative.

When judging this round I was looking at their claims for improvement from the previous days feedback. My main feedback on writing claims is, “Stop using pronouns when writing claims. Get the point and state your opinion.” I was also looking at evidence used from the Colony Sort papers.

Round 2 – I used an Annotation Scramble in round 2 so students could read our upcoming text and make connections to it. Students worked in groups, on one Google Doc, with the same article linked to our upcoming Cyber Sandwich. Students had 15 minutes to make as many connections (annotations) as possible to this text on colonial regions I received from Megan Ferne (@MeganFerne). My goal with this assignment was to have students connect with a cut and dry article about colonies – let’s face it, colonies aren’t that exciting. Here are the connections they made:

  1. Text to Text
  2. Text to Self
  3. Text to World
  4. Unknown words

I judged this round based on every group member making a connection, the quality of connections, and the amount of annotations.

We did a bit of time left, so I busted out a Blooket about identifying the 13 colonies and tied 5 extra team points to it for the overall winner and 5 extra team points for the most correct questions.

Friday

Today we moved into the Cyber Sandwich portion of the Text Quest. The article annotated by students the previous day was the same article today. I love to have students work with a text multiple times (even though they don’t realize it). However, today I broke the article into 3 sections (New England, Middle, and Southern) because it would be an easier load to handle. It worked out really well. Instead of a summary at the end of the Cyber Sandwich, I had students create an infographic comparing the geographies of the colonial regions.

Round 1 – Students had 25 minutes to work together on the Cyber Sandwich. I encouraged them to read their section and takes notes for 10 minutes. Then they should spend 15 minutes designing the infographic. I walked around the room and gave some feedback, but, for the most part, I let them do their thing. Students came up with some amazing work in 25 minutes explaining how geography impacted the way of life in the colonies.

Students submitted their infographics and I projected them on the board. I used this time to give feedback and fill in missing gaps of information. I judged the infographics based on the quality of information, creativity, and organization.

Between giving the feedback and doing or Friday check in, I missed the opportunity to do a Fast and Curious Quizizz after the Cyber Sandwich. I wish I had 10 extra minutes. However,m one class got to do the Fast and Curious and raised their class average from a 49% to and 80% over 2 days.

Overall Thoughts

Overall, it was a good week. I was a bit mad at myself that I didn’t fit the fast and curious quiz in more because I like for students to see growth and learning. Sometimes the rounds and work seem a bit rushed, but I’m fine tuning as I go. Plus, as students gets used to Eduprotocols and the timer, it will get better!

The Week That Was In 505

This shortened week was a continuation from the effects of colonization. Last week, during our lesson on the effects of colonization I hinted at slavery and the Middle Passage knowing I was going to build off of that topic and conversation this week. This week turned out to be an EduProtocols free week, which is super rare for 505. My focus this week was to get students up and moving whether it was in the classroom or outside.

Tuesday – Middle Passage stations

Wednesday – Middle Passage stations, blackout poetry

Thursday – History Mystery Investigation – Roanoke

Friday – History Mystery Investigation – Roanoke

Middle Passage

When it comes to teaching about the Middle Passage and slavery, I don’t try to shock the students. I don’t show any videos that require a permission slip. I’ve even heard of having students lay side by side to create an experience – no, nope, not me. I thought and thought about a way to introduce the students to the Middle Passage. I really like the SHEG lesson about the Middle Passage, but it didn’t seem right for what I was trying to teach. A great idea hit me as I was looking at the SHEG lesson! The Middle Passage Slave Ship diagram listed the dimensions of the space set aside for enslaved adult males at 6′ x 1’4″ space. So, as students came in on Tuesday, I had a 6′ x 1’4″ space marked off with tape and the diagram on the board.

The taped off space with the picture created lots of questions. We used some questions to figure out that the diagram was a slave ship. It’s one thing to read about a 6′ x 1’4″ space, but it’s another to actually see it and make a connection.

After our introduction to the Middle Passage, I set up stations around my room. I’ve had people ask me to share the stations, but I cannot because I got them from Peacefield History. The stations begin with a quick Ted Ed video on the Middle Passage to build background information. The other stations included a primary source from Olaudah Equiano, a great video from Slate showing the amount of slave ships leaving Africa, some statistics, and a map. I love the mix up of sources for the stations. In an effort to mix things up, I had paper copies of the stations for students, I had the stations set up around the room in case students was to move around, I had the stations online, and I had QR codes for scanning. (This seems excessive, but I try to cater to every possible need.) The Middle Passage stations lasted 2 days. As students finished their station questions, they brought them to me and I gave some quick feedback and graded.

Through these stations students learned about Triangular Trade and applied it to past learning about European colonization. They also learned about misconceptions regarding the Middle Passage. Finally, they learned about the horrors of a slave ship on the Middle Passage from the Olaudah Equiano source.

To wrap up the Middle Passage stations, I got a great idea from the Fully Engaged book from Michael Matera and John Meehan. I had students go back to the Olaudah Equiano primary source. Students selected 10 words important to understanding the source. They blacked out the remaining words. The final step was create a poem, story, or drawing related to the 10 chosen words. I phrased it as, “Unlock the a hidden meaning” within the source. With middle schoolers, it’s all in how your phrase things to create excitement and buy-in.

History Mystery – Roanoke

About 2 weeks ago as student asked me, “Do we study Roanoke in here?” I replied, “I haven’t done that in 5 years, but we can.” If a students inquires about a relevant topic, I should honor that question to build trust, rapport, and engagement for 505. I found my lesson from years ago, but I knew Mr. Roughton had something better. I went to Kevin Roughton’s site and found his History Mystery – Roanoke Lesson. I like this lesson for several reasons:

  • It includes great primary and secondary sources.
  • It works well with our historical thinking skills (sourcing, contextualizing, corroborating).
  • It includes conflict between Spain and England which ties to Ohio’s standards of conflict over resources.
  • It has students writing a claim with reasoning and evidence.

I printed off the lesson and I like to organize the exhibits (evidence) by writing the exhibit letter on the sources. To kick this lesson up a notch, I found out custodian and asked for a hammer and nails. I walked across our campus and nailed all of the exhibits to trees. The trees were located near the woods and my thinking was to create a “you just arrived in the New World with trees, grass, and nature” feel. I don’t know if it worked, but we got to go outside, move around, and students were engaged.

As the day progressed, I realized I had to do 3 things with this lesson:

  1. I had to place the Roanoke story in context by comparing the Roanoke to Jamestown and Plymouth with a map and a timeline.
  2. I had to model historical thinking skills with an exhibit – especially sourcing, and contextualizing. I thought out loud as I modeled the process.
  3. I had to explain the story of Simon Fernandez. If you don’t know who that is, it’s an interesting story so click here.

This lesson took 2 days to finish and once students knew about Jamestown, Simon Fernandez, and saw me modeling historical thinking skills – full student engagement. They worked well together, asked great questions, and enjoyed the story of Roanoke. Next time I run this lesson, I might provide context better with a quick Cyber Sandwich or Frayer some important words. In the end, this lesson was a great set up for our 13 colonies lesson next week.

The Week That Was In 505 – A Reflection

Sometimes students ask me, “Why do we do the same things all the time?” It’s a question that occasionally bothers me and pushes me to do better. Other times, it’s a question that annoys me.

This week in 505 we went into the motivations and effects of exploration and colonization of North America. We focused on 3 European countries – Spain, France, and England.

I have 47 minute classes. Here is the layout of the lesson I’m describing….

Monday – Fast and Curious, Thin Slide, Frayer

Tuesday – Finish Frayer, Cyber Sandwich, Fast and Curious

Wednesday – Fast and Curious, Gallery Walk or Sketch and Tell

Thursday – Fast and Curious, Hexagonal Learning

Friday – Finish Hexagonal Learning, Annotated Map with 3 Connections

Fast and Curious – Every Day

On Monday we began the Fast and Curious with a Quizizz over exploration and colonization of North America. The questions related to vocabulary and content from a reading linked to our eventual Cyber Sandwich. Students took the quiz with very little background information. The results were awful, but I remind students that it’s okay to miss questions and potentially fail. As you can see, the results were not great..

Despite the poor results, I give immediate feedback and I run this same quiz at the start of class each day.

Frayer – Monday

One of my favorite teaching strategies to build vocabulary knowledge and background information is through the Frayer model. Immediately following our first run with a quiz, I have students skim the article attached to the eventual Cyber Sandwich. I set a timer and instruct them to find 3 unknown words that could help them understand the article. They submit their words through a word cloud generator on Mentimeter.

As words are submitted to the Mentimeter word cloud, they show on on the Smartboard. The same words submitted over and over again appear to be larger on the board. It makes it easy to choose those words to Frayer. At the conclusion of the 5 minutes, I quickly go over some of the smaller/lesser words. We often choose the larger words to frayer. In this instance, students chose the words ‘Colonization’ and ‘Indigenous’ as the important words to know.

I like to pair the Frayer with the SEE-IT model. SEE-IT is an acronym that stands for State, Elaborate, Exemplify, Illustrate, and Talk. With our first Frayer, I modeled how to paraphrase definitions, elaborate on the definitions, and how to add 3-4 examples. For the illustration box, I like to use www.thenounproject.com for icons. This practice works best when students are collaborating and talking about the words.

Cyber Sandwich – Tuesday

After Frayering unknown words, and giving students a chance to skim the article, it’s time to do the Cyber Sandwich. I like to do the Cyber Sandwich at the beginning of class then run the Fast and Curious quiz. This way, students can see their growth in learning after the Cyber Sandwich is complete

The Cyber Sandwich I created was paired with a National Geographic article entitled, “Motivations for European Colonization.”Students read the article, and took notes, for 10 minutes. I encouraged them to get 2 important facts from each subheading (6 or more facts). Students then discussed and compared notes for 5 minutes. Finally, students summarized the article with 5 or more sentences for 10 minutes.

Setting a 10 minute timer is a great way to get students focused on reading. This is a practice we use in my school with SSR (sustained silent reading), so it lends itself nicely with a common practice.

With this particular Cyber Sandwich, I chose to do it with paper. This is the nice thing about EduProtocols – they can be used with tech or paper. I was inspired by a podcast called The Science of Reading which discusses a lot of research based practices we should be doing with literacy skills within any classroom. One important takeaway from a recent episode was using a nice blend of paper vs. digital tools for reading comprehension. This inspired me to do my Cyber Sandwich on paper.

At the conclusion of the Cyber Sandwich, students completed another fast and Curios quiz using Quizizz. Here are those results, with the highest percentage raise being 7th period with a 30% raise:

Gallery Walk or Sketch and Tell – Wednesday

On Wednesday, I began class with a new style of Frayer. I turned the 4 boxes on the Frayer into recall questions and encouraged the students to answer the questions without looking up the answers. After we discussed the Frayer responses, we jumped into another Fast and Curious. By this day, all classes raised their overall class averages to 80% or higher.

For Wednesday, our question was, “What were the effects of colonization on North America?” Students had a choice to do a Gallery Walk or Sketch and Tell. With the Gallery Walk, I used a document based question (DBQ) that I split up and turned into 5 stations. I taped the 5 stations around the room and created an organizer so students could write their responses.

The Sketch and Tell had a mini article attached, and students had to create and tell about 2 effects colonization had on North America. Students could use Legos, Play Doh, or Google Shapes for their creation. Most students chose to use Google Shapes.

Hexagonal Learning

I don’t know who created Hexagonal Learning, but it’s a strategy I learned from social studies teacher Chuck Taft. For this teaching strategy, I typed some of the concepts we learned about into hexagon templates on Google Drawings. Template 1 is here. Template 2 is here.

I love hexagonal learning because it helps create great discussions among students. The hexagon has six sides where connections could be made to other ideas. When you place many ideas on many hexagons, the discussion about where to connect what will be different every time.

I had students get into groups of 2 or 3 and they began to cut out the hexagons (I would suggest having students do this the day before). I gave each group a large sheet of construction paper and explained the idea of making connections between hexagons and ideas. I also reminded the students it’s important to listen to each other as discussions are being made about connections.

After the students had discussions about the placement of the hexagons, they glued the hexagons into place.

At the end of our discussions and glueing, students took another Fast and Curious and quiz with Quizizz and all class averages were raised to 90% or above. This is great because our goals was to reach a 90% class average by Thursday.

Annotated Maps

I’m not going to get into annotated maps, but you can learn more about them here. In short, annotated maps are hand drawn maps where students make connections between geography and history. It seemed natural to combine hexagonal learning with annotated maps.

I had students hand draw a map of North America where they labeled New Spain, New France, and the British Colonies. Next to their map, they wrote about 3 connections they made with hexagonal learning. When everything was completed, they taped their maps to their hexagonal learning papers.

Final Thoughts

Overall, this was a great lesson and students were involved and engaged through the whole process. When I run a Cyber Sandwich in the future, I will mix up the notes and task at the end to keep students engaged week to week.

One thing I’m trying to do more this year is self-reflection. I had students self reflecting, setting goals, and keeping track of scores on a Google Sheet.

A Reflection On My First Unit

Each new school year I’m committed to trying new, creative teaching strategies while making old lessons better. One of my favorite strategies is smashing some EduProtocols together for lessons and/or larger units. The unit I’m featuring in this post is a historical thinking mini- unit where the students learn about primary sources, secondary sourcing, sourcing, contextualizing, corroborating, and close reading. These skills come directly from the Stanford History Education Group (SHEG) site.

In years past when teaching historical thinking skills, I felt like I spent way too much time on the topic. I would usually spend a week or more going over sourcing, corroborating, and contextualizing. During the unit we would practice these skills with topics the students probably didn’t know much about. It wasn’t the best way to begin the school year in social studies. Ultimately, my historical thinking skills unit wasn’t very engaging. The new mini-unit I put together lasted 3 days (I have 47 minute classes).

Wednesday – Fast and Curious, Sketch and Tell.

Thursday – Fast and Curious, Sketch and Tell, Number Mania

Friday – Fast and Curious, Number Mania, Digital Breakout

Fast and Curious

This year I began the historical thinking skills unit with a Fast and Curious on Quizizz. I asked basic vocabulary questions about historical thinking skills. Moreover, I asked questions about primary and secondary source examples. Once we finished the quiz, I saw the questions that were color coded yellow and red and gave some feedback. The average across the classes the first day was a 65%.

The 2nd class day we did the Fast and Curious on Quizizz again. I gave feedback as I discussed the yellow coded questions. The class averages were raised to a 73% for the 2nd day. The 3rd day of classes, we did the Fast and Curious one more time. All of the classes averaged together ended up being 84%.

I like Quizizz because it provides so much data to help with feedback. For example: yellow and red coded commonly missed questions, average time per question, and it keeps track of student data. I also like that Quizizz randomizes answer choices, questions, and students aren’t memorizing letter choices. Here is my Quizizz link.

Sketch and Tell

In past years I would have students write out definitions with examples as they worked in groups. I started to do this with my 1st period class, but as I was circulating around the room, I was bored. Next period, I switched it up to a Sketch and Tell Eduprotocol. Here is my template link.

I created a slide deck with directions and 5 sketch and tell slides for the words: primary source, secondary source, sourcing, contextualizing, and corroborating. When the next class came in, the slide deck was ready to go and we got out the Play Doh. Using the Play Doh, or Google shapes, students created abstract representations of each historical thinking word. For example, some created a question mark or magnifying glass for the word sourcing. Students then explain the meaning of their representation ultimately creating a definition for each word. This ended up being more engaging and more hands on for these basic vocabulary words.

Infographic/Number Mania

Once students finished their Sketch and Tell, they created groups of 2 or 3 and made a Historical Thinking Skills infographic using a Number Mania template (I love using this template I got from Stephanie Howell – @mrshowell24). I explained to students that infographics share large amounts of information in condensed, easy to understand formats. I also gave my classes 40 minutes of class time to complete the task. The success criteria I established was this:

  • Simple definitions used for each historical thinking skill.
  • 3 examples provided for primary sources 3 examples provided for secondary sources.
  • Icons and images used relate to historical thinking skills.
  • Information was organized and easy to understand (no large blank spaces)

Digital Breakout

To end this unit, I put together a digital breakout. Instead of my typical breakouts where I use a Google Form for students to collect clues, I set up fake email accounts with vacation responses that sent their next puzzle. With each puzzle, students had to figure out the email address so they could send an email and get the next puzzle. There were 3 puzzles students had to complete:

  1. Determining if a source was primary or secondary.
  2. Determining which source would be the best to use to understand different historical events.
  3. Sourcing a painting and justifying if it would be useful with understanding the first Thanksgiving (a SHEG lesson).

The last sourcing puzzle had to be approved by me. When it was approved, I gave them a clue to help figure out the 3 digit code to open up the lockbox.

This digital breakout proved to be awesome because it was a crazy Friday for our first full week of school and super engaging. Plus, it wasn’t super hard and intimidating. I like for students to have a good first experience with digital breakouts so it keeps their interest throughout the year.

Final Thoughts

All in all this was a much more engaging lesson.

  • The Fast and Curious was great for repetition and learning the material.
  • The Sketch and Tell was great for hands on learning, dual-coding, and having students relate the abstract to more concrete examples they created.
  • The infographic was a creative way for students to work together. Plus, this was a great way to see how students would/could work together. Alao a great way to see their creativity with a blank slide.
  • Digital Breakouts are always fun and engaging – especially on a Friday.

2 Things I Learned This Year

Just finished a crazy school year. Mask covered, remote learning, not remote learning, some kids quarantining, some not. Man oh man….what a year! In many ways it was a great, rewarding school year. In other ways it was tiring. Nevertheless, here are 2 things I learned this year:

Desks in Rows are Fine

I put my desks in traditional rows. Guess what? It was just fine. Students still worked in groups. They got up and moved around. It went well, and I don’t feel this need to have desks in groups anymore.

Messages Matter

Students cared more about my daily message than Social Studies. Every day I write a new message on my board for students. I don’t read them out loud. I don’t even ask students to read them. The messages are there. Sometimes a poem, sometimes a life lesson, sometimes my thoughts on what school should be. I go through the year not knowing what these messages mean, but I discovered they mean a lot to many students….what I thought they didn’t read, they do read. So, check in with students. Share messages with them. Sometimes it means more than the subject and/or content.

With the school year coming a close, I’ll share with you my final message to the students:

A Current Unit Reflection – Survivor Renaissance

I started a new unit I have never done before – Survivor Renaissance – inspired by Michael Matera. The unit has students studying and learning about the Renaissance, Reformation, and Exploration. In Ohio, the standards covered are this:

  1. The decline of feudalism, the rise of nation-states and the Renaissance in Europe introduced revolutionary ideas, leading to cultural, scientific,
    and social changes
  2. The Reformation introduced changes in religion including the emergence of Protestant faiths and a decline in the political power and social influence of the Roman Catholic Church.
  3. European economic and cultural influence dramatically increased through explorations, conquests, and colonization

This unit is still ongoing, but I wanted to reflect on the work completed so far. I broke up this unit into 3 missions.

Mission 1 – Meet and Greet

Mission 1 has students getting into teams and choosing their Renaissance Influencer from a unique group. Each team had their own list of Renaissance influencers to choose from to ensure that the same person wouldn’t be picked twice. Examples of people included: Galileo, Petrarch, Johannes Gutenberg, or Leonardo DaVinci. Students spent 2 days researching, and becoming experts, about their chosen Renaissance person. They used some cornell notes found here. During the Research process I had students keep their Renaissance person a secret because they were going to design a slide for our Great American Race Competition.

Mission 1 – The Great American Race

After the research was completed, students made slides about their chosen Renaissance Influencers. They featured characteristics of the person’s early life, what they were famous for (artwork, voyages, inventions), and some random facts. I emphasized not putting the Renaissance person’s name on the slide because we were going to have a competition. My next step was compiling students created slides into a Google slide deck. I created a “copy” link and pasted it into a Google Form. Students opened the shared form, created a copy of the Great American Race slide deck and submitted their answers. An example can be found here. After the Great American Race, I averaged the amount of correct answers per team to determine the winner.

I like the Great American Race because students assume it’s easy. They always say, “We have to Google answers? That all?” However, students quickly learn that Googling answers can be an art. They have to choose the correct key words when searching. This lesson also teaches students to design slides with quality information. When I made the slide decks for each class, I included every slide no matter how great or bad the information. It created nice discussions of designing slides with good, credible information for others.

Mission 2 – Diving into the Renaissance, Reformation and Exploration

What changes occurred with arts and science during the Renaissance? Why did Martin Luther, and others, challenge the Catholic Church? Why did European countries begin exploring? I brought teams back together and shared 3 different Iron Chef slides designed around these questions. One team had Renaissance, one team had Reformation, and another team took on Exploration.

In one class period, teams worked together to design slides to teach others about these topics. Each slide included a link to a short reading and I gave success criteria for a good presentation. Here is that success criteria: 4-5 important facts, 2-3 relevant images, and the secret ingredient question answered. Here are some examples here:

Renaissance Arts and Sciences

Reformation

Exploration

Up to this point, I was using past tense because we completed the Iron Chefs. However, this next step I haven’t had a chance to get to because I had to leave school early. The next step in this process is having students create a presentation video with Flipgrid over their information. They will record their screens and tesch other classmates. I will hand out Frayer models students so they can watch other presentation videos and collect information. The final step in the process will be a Quizizz with student created questions.

Since I had to skip a day and skip the Flipgrid, I had students create a Sketch and Tell about their slides. Here is why I like this idea…..

  1. I could read their Sketch and Tell explanations while I was out and look for any misunderstandings.
  2. I could provide quick feedback.
  3. A lot of the students wrote their sketch and tell explanations in a way they could read and record for their Flipgrid.
  4. The Sketch and Tell is something the students are familiar with.
  5. The Sketch and Tell provided a way that students didn’t have a gap in learning before making their presentations.

Here are some Sketch and Tell examples:

Next steps (literally typing and thinking out loud):

As this unit progresses, I need to build in some review competitions to keep up the gamification and team aspect of the Survivor Renaissance format. I also need to plan out how to set up the tribal council to vote off Renaissance people.

  1. Maybe have students vote on the best sketch and tell.
  2. Turn the Quizizz paired with the Iron chef into a competition – highest team average wins.
  3. Lego or Playdoh build competition.
  4. Review game competition – mystery boxes, Gimkit paired with apples to apples, tower builder review game.
  5. Empathy Maps – do before tribal council?
  6. Alphabet Battle
  7. Sudoku Learning to show relationships between people, concepts, etc…
  8. Linking logs to show relationships between concepts

More to come……