The Week That Was In 505

My goal this year: cut out the fluff, get to the point, and reach Reconstruction. In my 7 years of teaching Social Studies, I have reached Reconstruction one time. I rushed through it in 3 days. It was pointless. This year, I gave myself 12 school days for Reconstruction (2 1/2 weeks).

This is unchartered territory for me. Honestly, it’s something I don’t remember much from school. The lessons I am designing for the unit are meant to help me figure out how the topics/content are connected. Furthermore, the lessons are designed to help the students gain some background information.

I wanted to begin the unit by having the students research and define the Reconstruction Era. I learned from my good friend, and co-author, Dr. Scott Petri that we often don’t focus on helping students understand and define historical eras. From here, I wanted to focus on these topics:

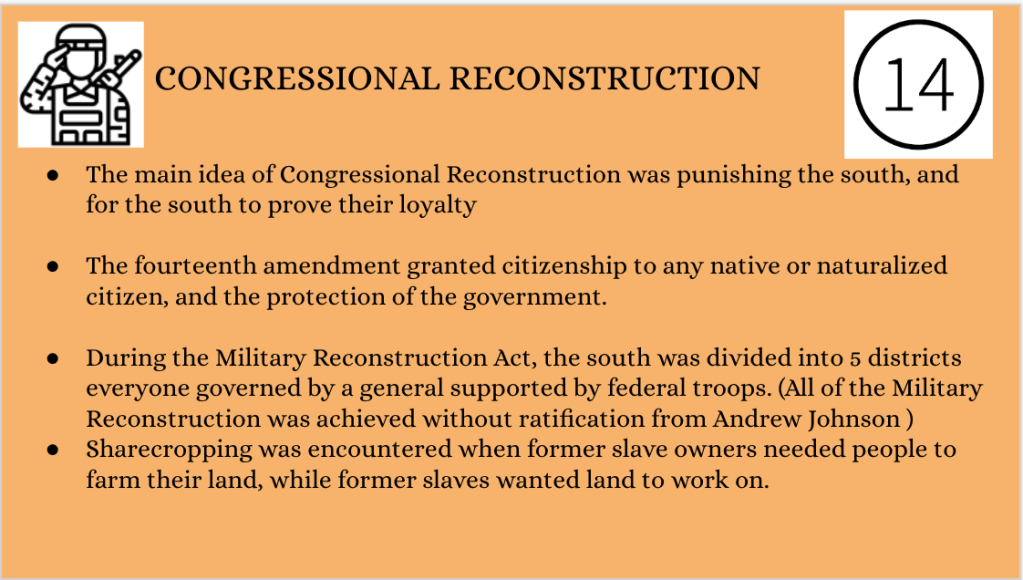
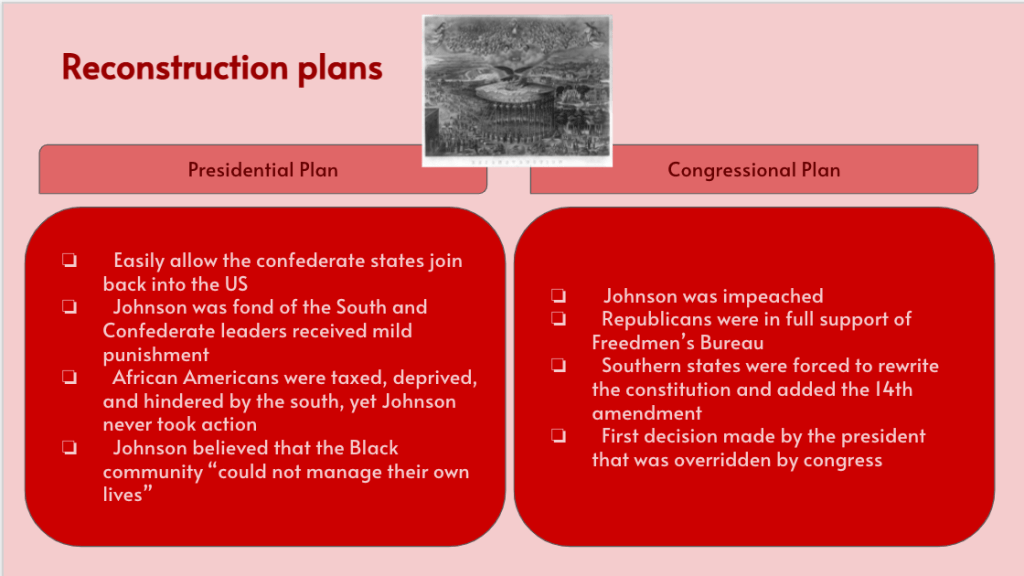
  1. Reconstruction Plans – Presidential and Radical.
  2. Reconstruction Amendments and Southern Responses.
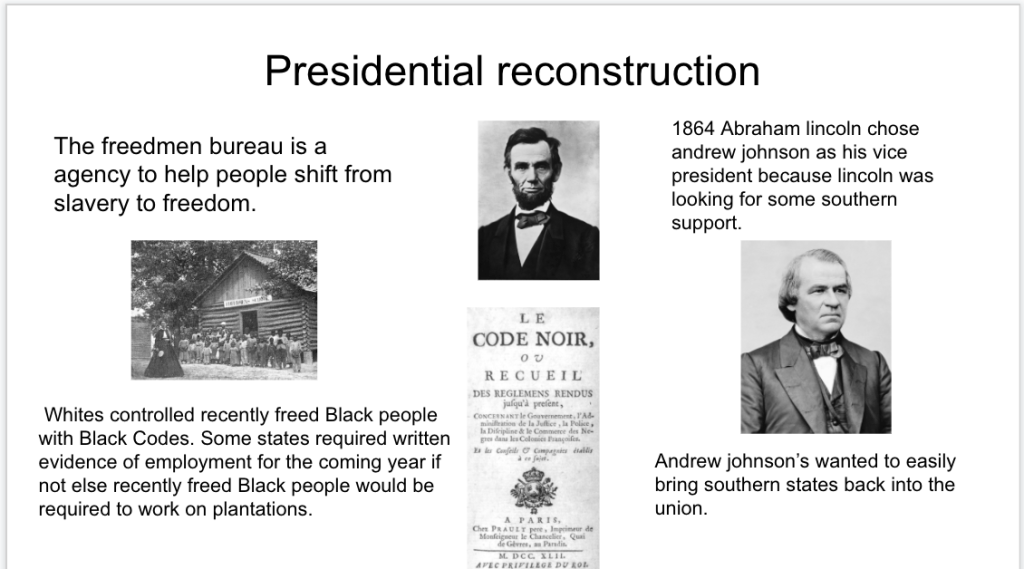
    1. Black Codes
    2. Jim Crow Laws
    3. Voter Suppression
  3. People from the Reconstruction Era.

I need to think of a better way, and a better essential question for this unit. There are some awesome Reconstruction units I have seen, and would like to use. But, for now, I’m content with myself, and students, finding their way through new territory.

Monday – Reconstruction Era Iron Chef, Fast and Curious

Tuesday – No instruction (walk-a-thon)

Wednesday – Fact Mania

Thursday – No instruction (Field Trip)

Friday – Finish Fact Mania

Monday

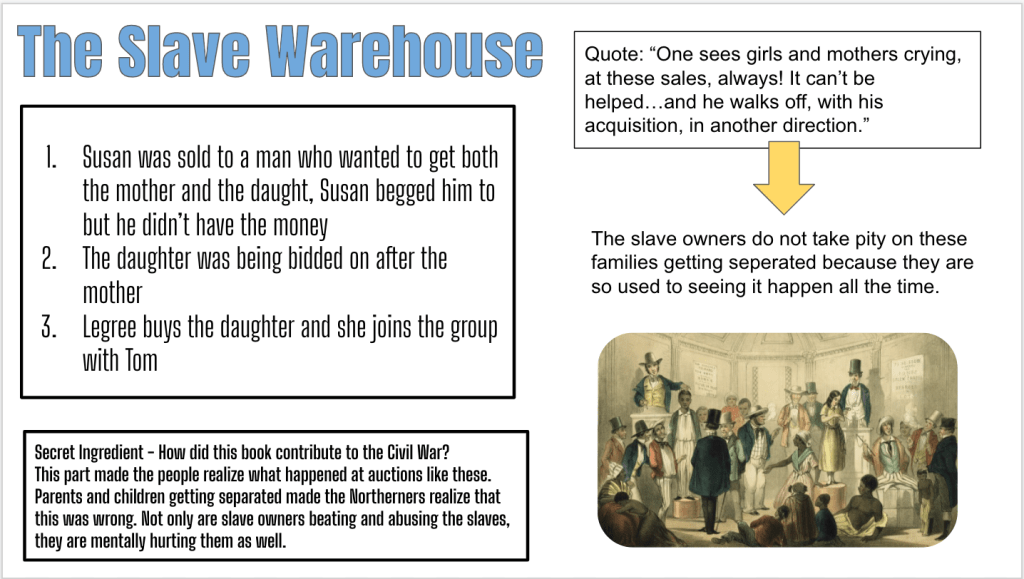
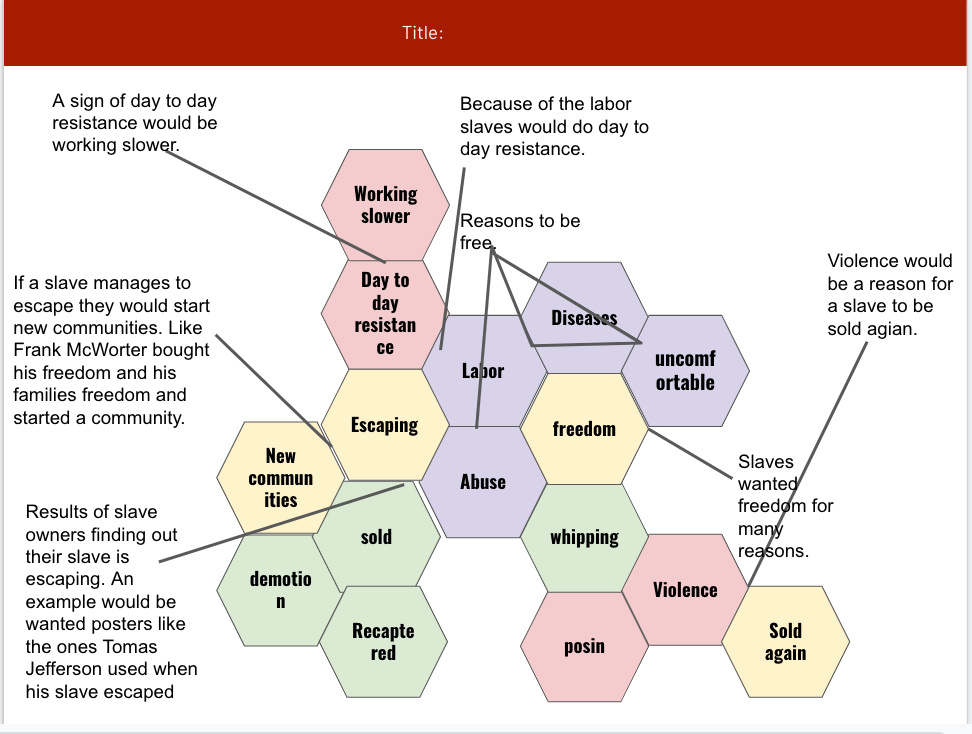
Today I used class to introduce the Reconstruction Era. The first we completed in class was a Fast and Curious with Quizizz. After the Quizizz finished, I had students leave the questions and answers up on their screens. They were going to use the questions and answers for their Iron Chef on the Reconstruction Era.

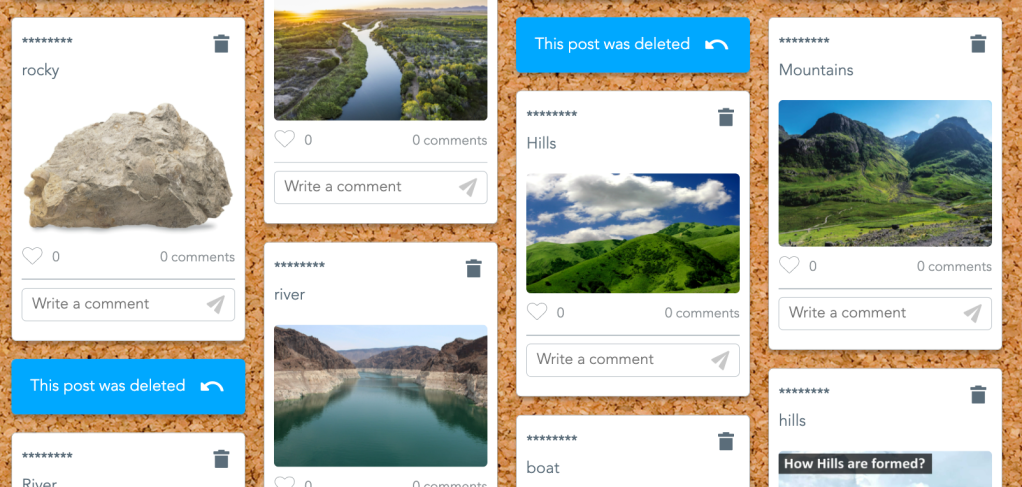
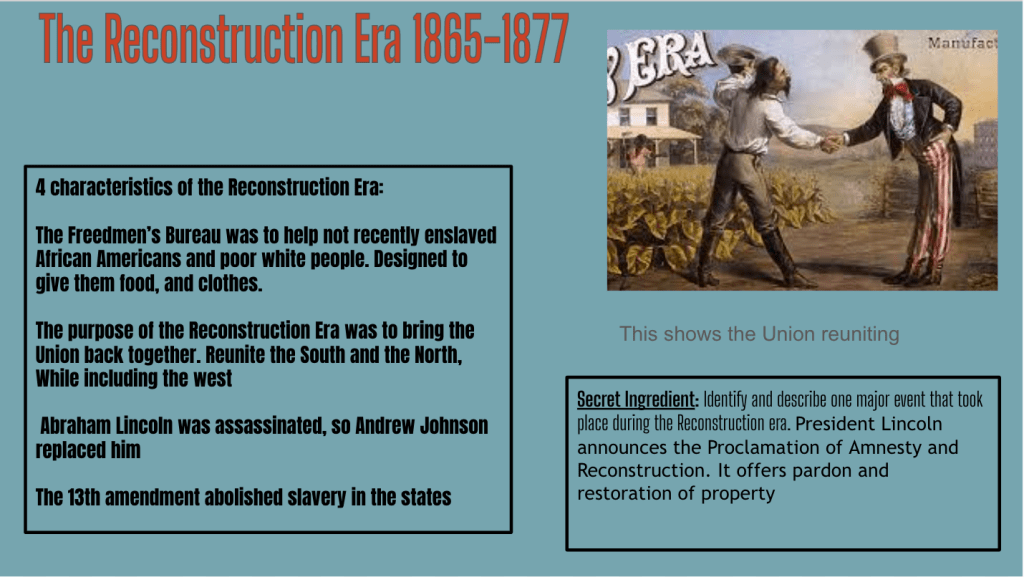
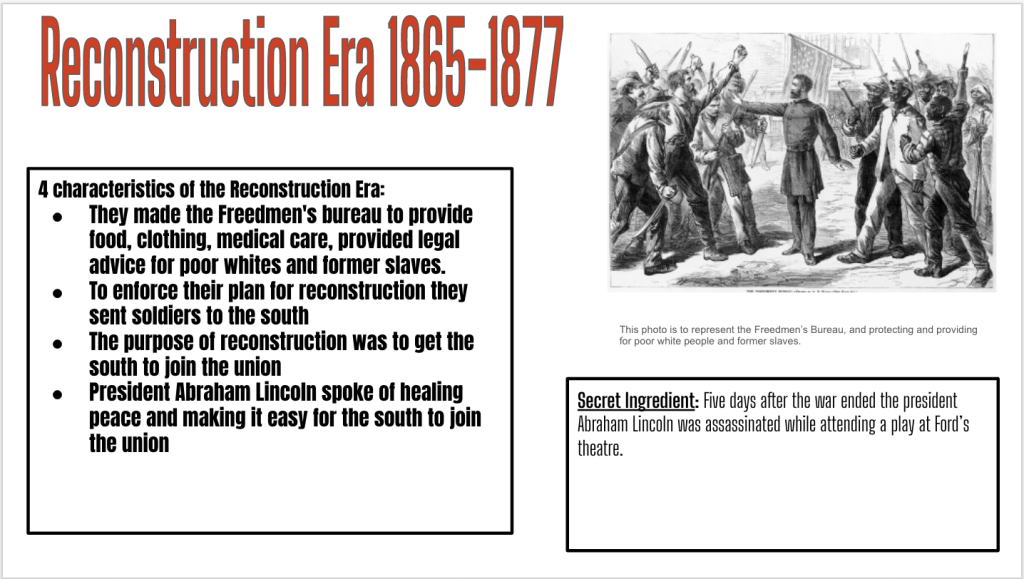
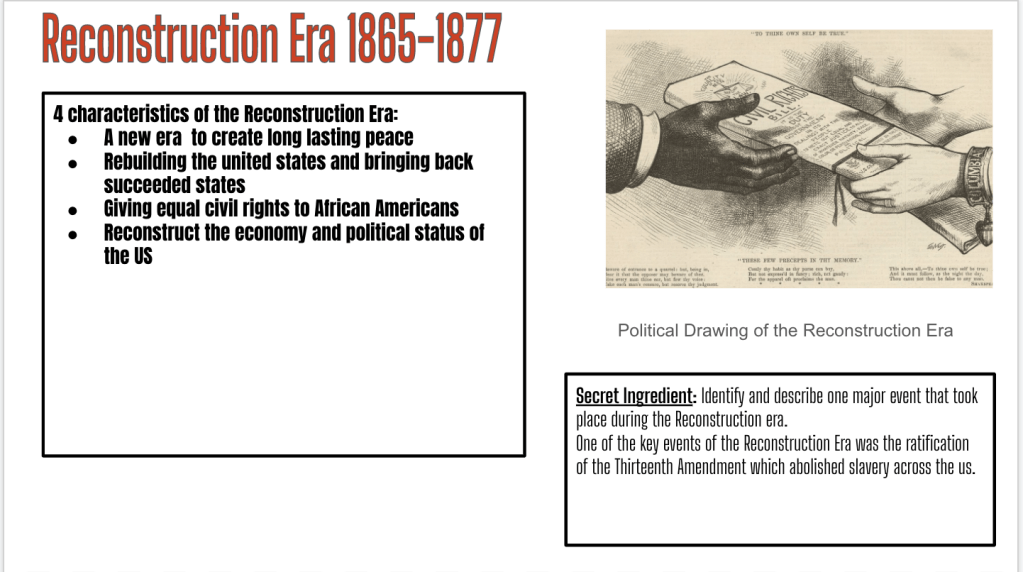
Next, I shared an Iron Chef slide for students to design. In the speaker notes, I copied and pasted a brief introduction on Reconstruction. The secret ingredient question was, “What was an important event from Reconstruction?” We read the brief introduction and discussed. Then I had students take 20 minutes to share 4 characteristics of the Reconstruction Era, a relevant picture with caption, and an important event. They could use the information from the Quizizz for help.

Introducing historical eras is something we often overlook. It helps place events in context and helps with sequencing. After students completed their Iron Chefs, we switched to a Thin Slide.

With the thin slide, I simply had the students share 1 characteristic and 1 picture related to Reconstruction. This was meant to help students add any information they may have missed, clear up misconceptions, and give students a chance to discuss Reconstruction in their own words. After our Thin Slide, we finished class with the same Fast and Curious Quizizz.

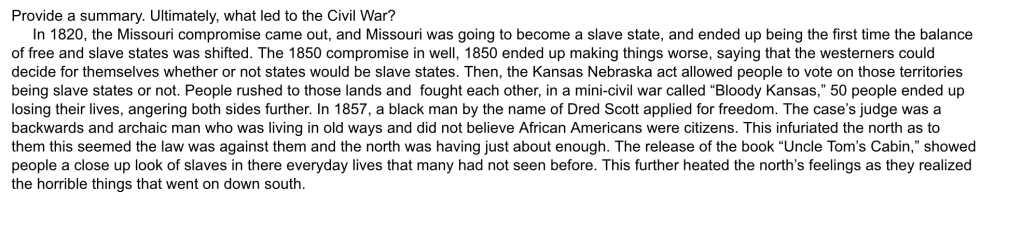
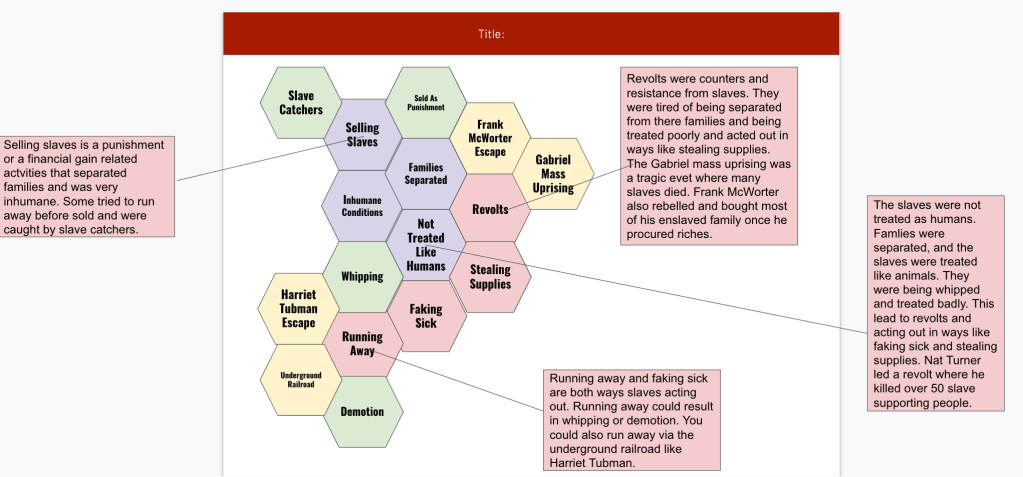
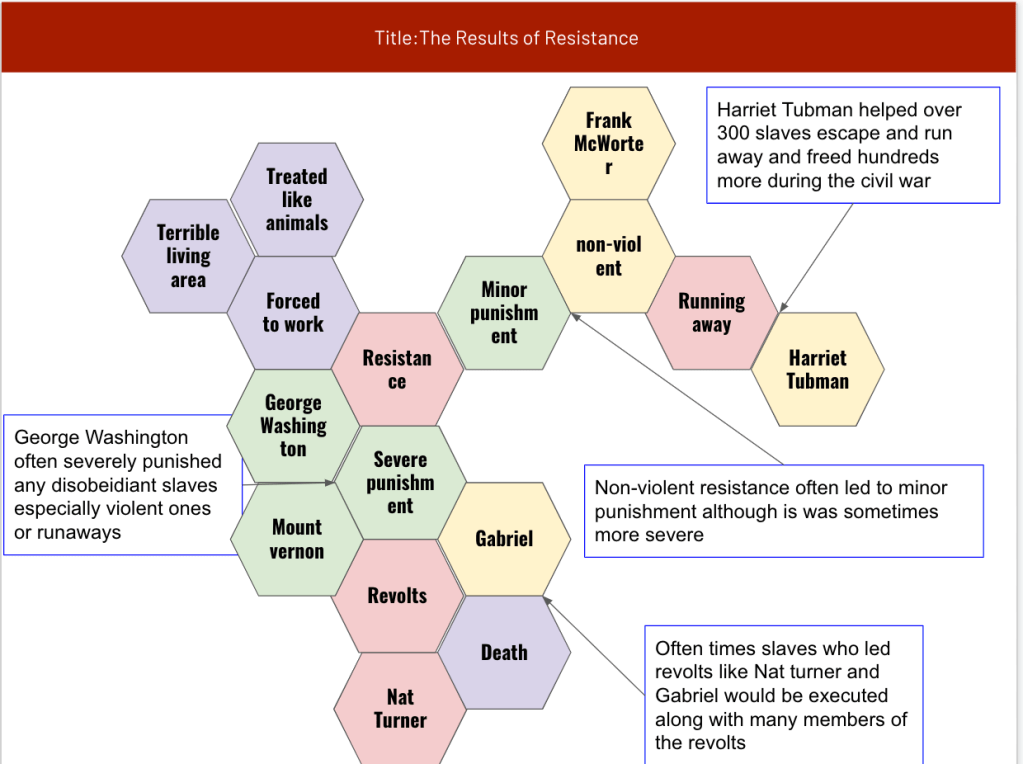
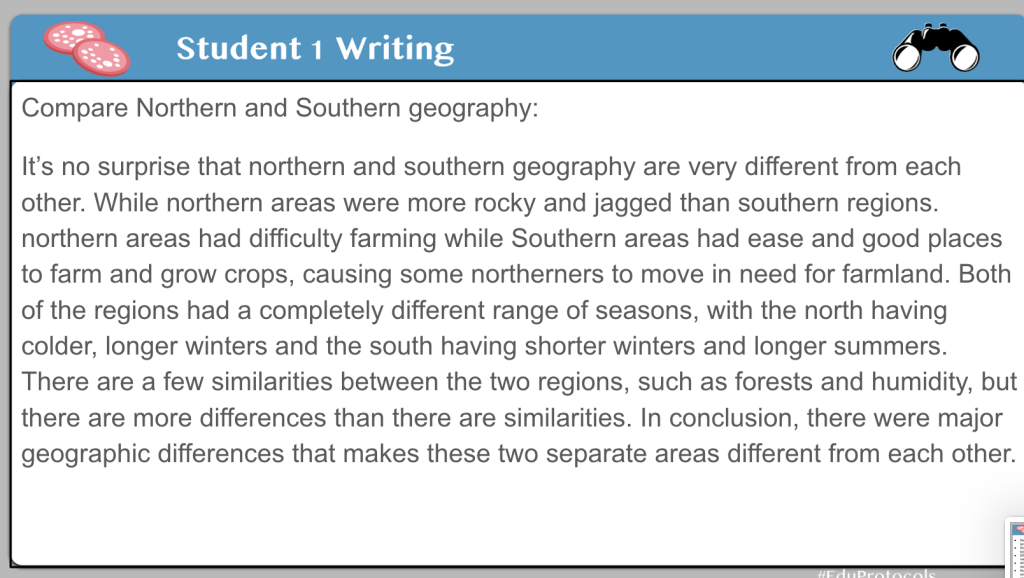
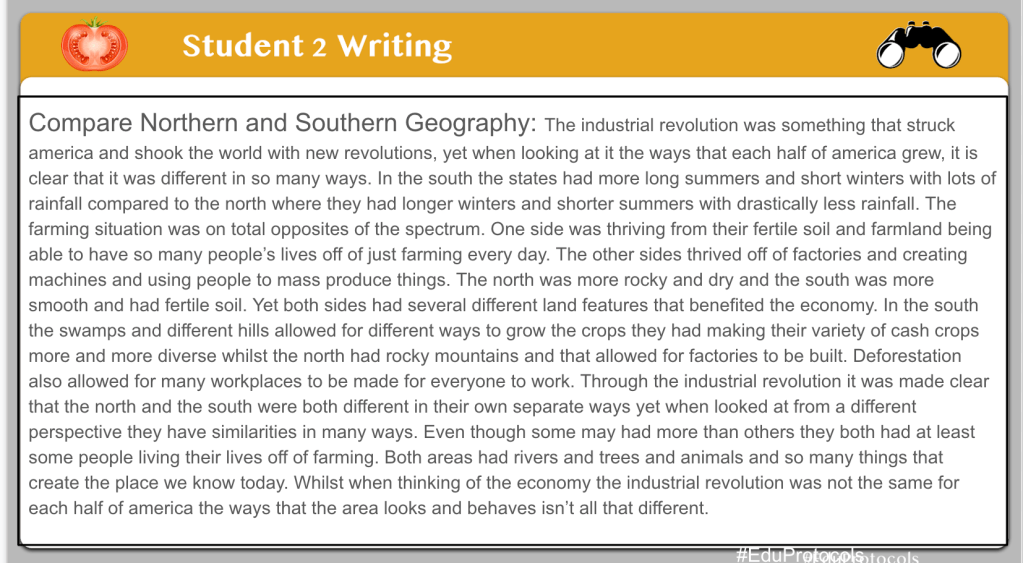
Here are some student Iron Chef examples:

Wednesday

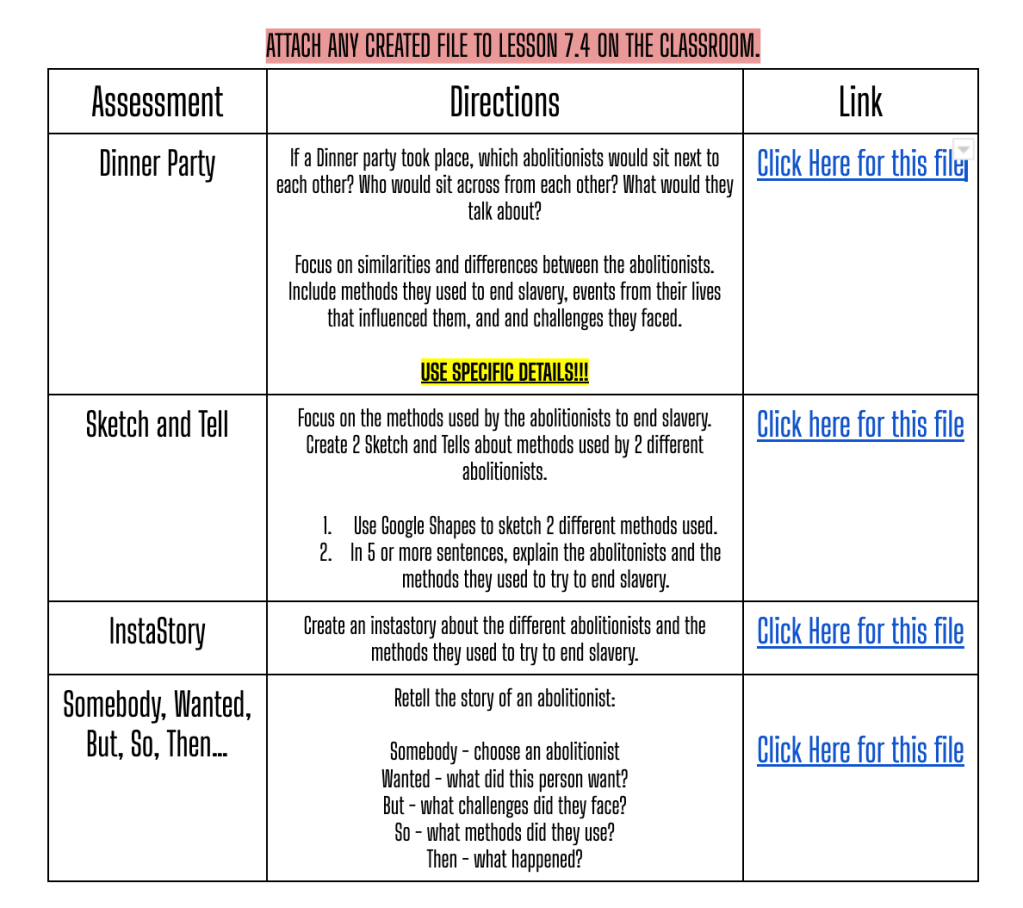
Tuesday night I have a Zoom meeting with some educators – Dr. Sonny Magana, Marlena Hebern, Jacob Carr, Ariana Hernandez, Gabor Kertesz, Jen Goodman, Dr. Scott Petri, etc… We talk about ideas, student learning, effect sizes, and everything education. A great discussion with great ideas. In this particular meeting, Gabor Kertesz shared shared an activity completed by a student that was called Fact Mania. No numbers, just facts, pictures, and a title. This caught my eye and had my mind churning.

When Wednesday’s classes began, I started with the same Fast and Curious Quizizz. After the quiz, I asked students, “We are going to learn about Reconstruction plans. How do you want to learn it?” I shared a Mentimeter with 3 options – Fact Mania, Iron Chef, or CyberSandwich with Nearpod. A majority chose Fact Mania.

I created the assignment right there in class. Think about that for a second… I’m not completely comfortable teaching Reconstruction (because it’s been forever), I asked the students how they wanted to learn, and developed the assignment in class. That is the power of EduProtocols. Students reflect and decide how they want to learn. Students create “learning artifacts” and do the work. As a result, Fact Mania was born….

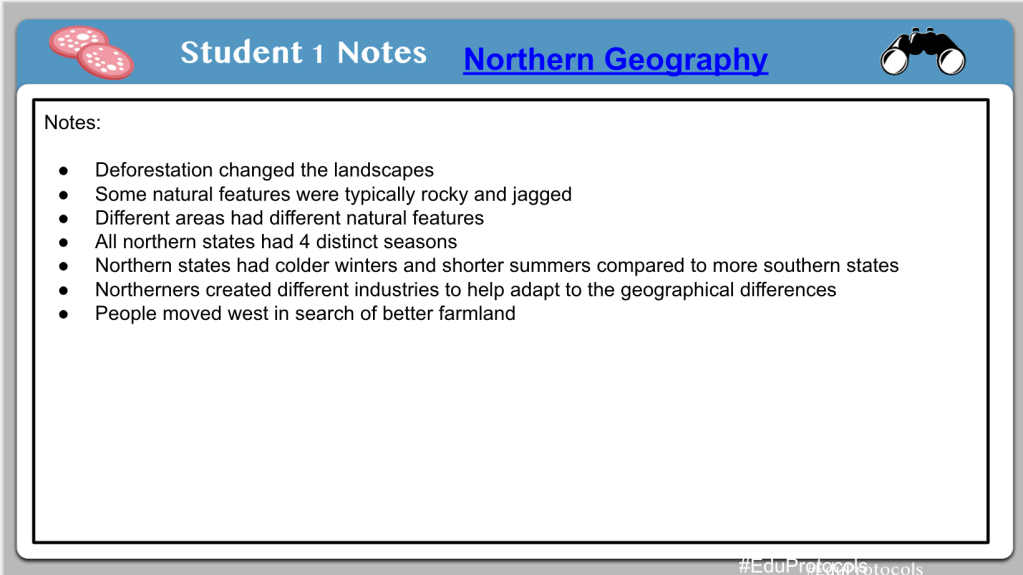
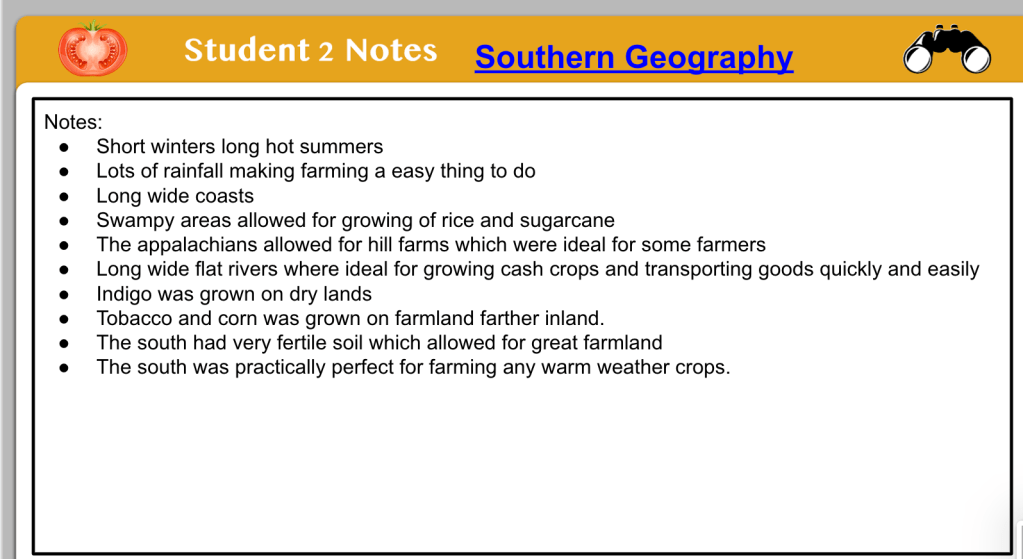
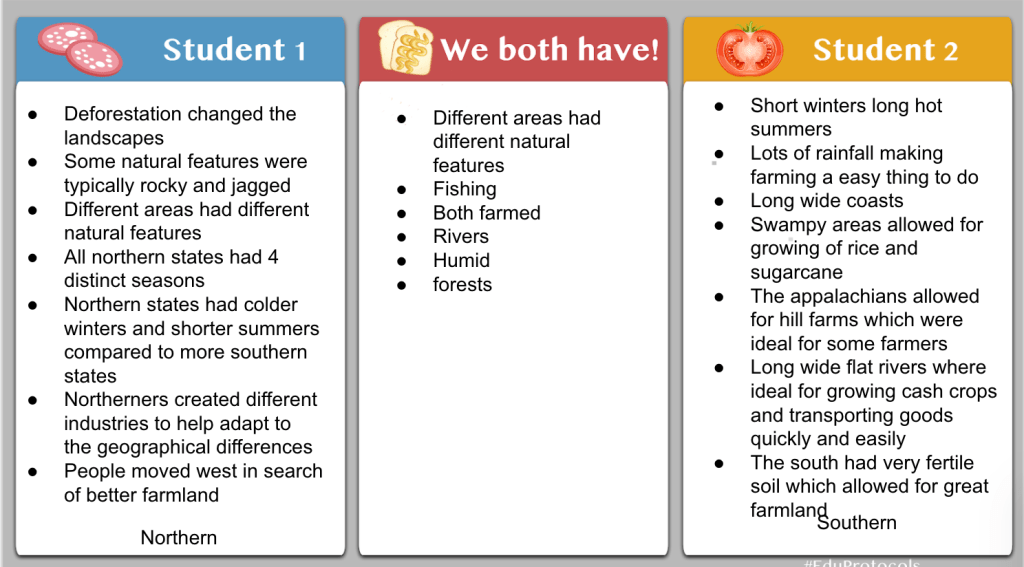
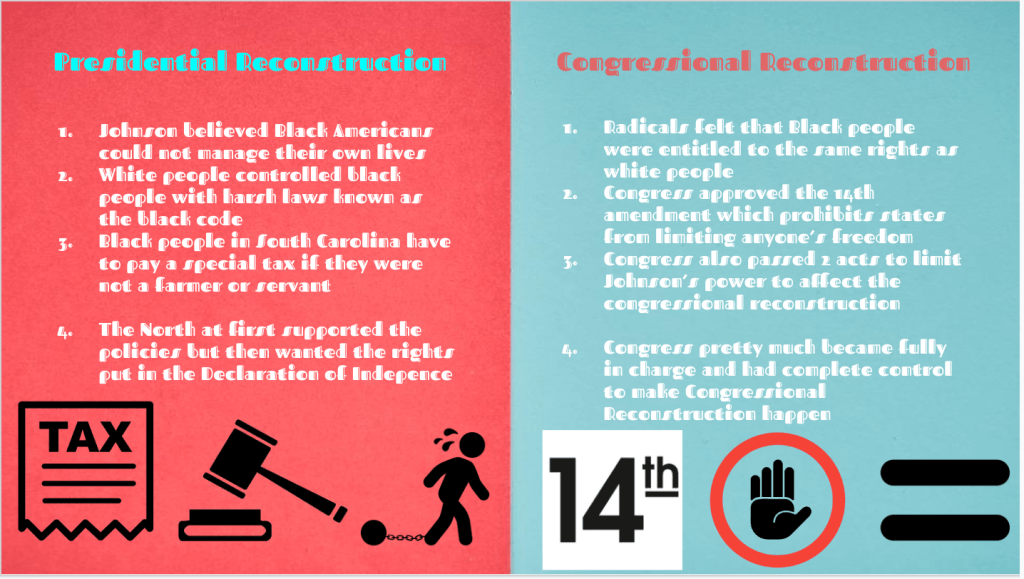
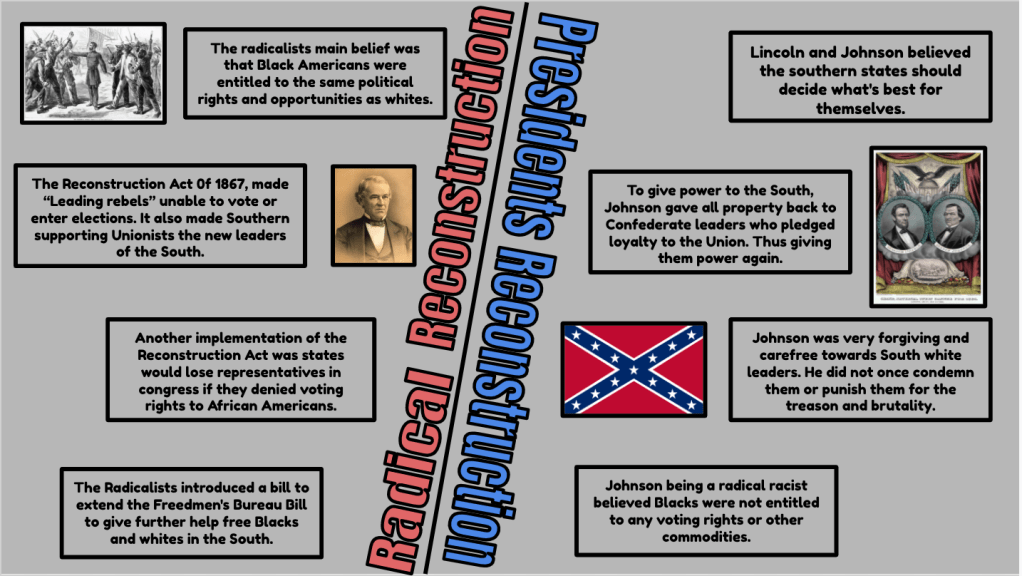
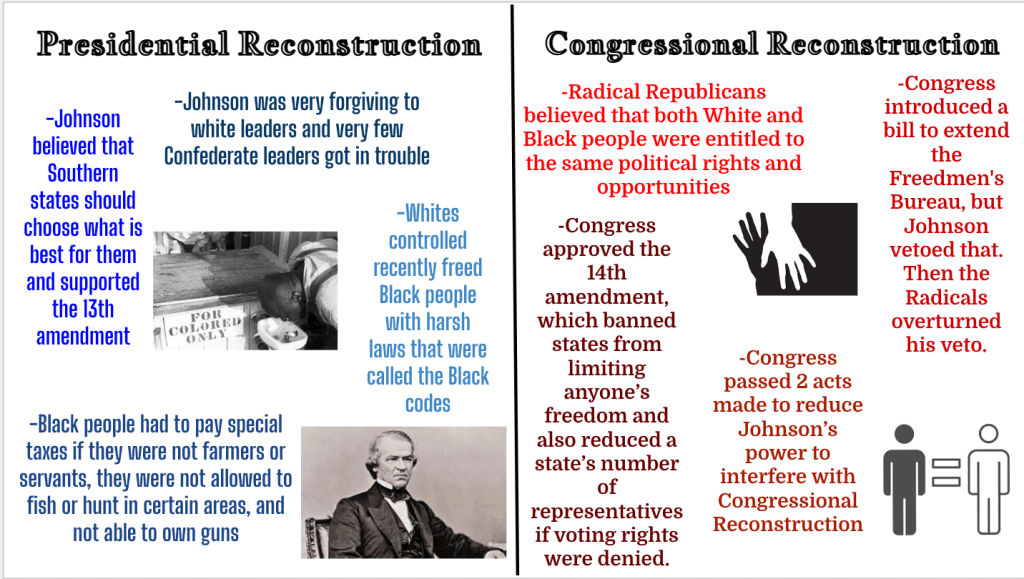
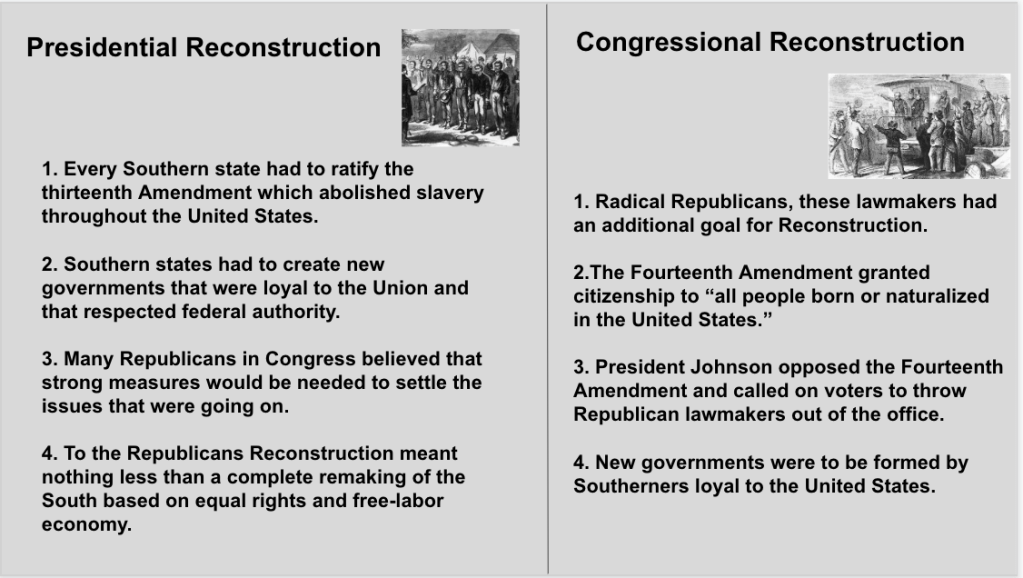
  1. I shared a blank Google Slide and a Newsela Article on Reconstruction Plans.
  2. Students needed to think about 4 BIG (important) facts related to each plan. I framed it with, “If you need to fully understand this topic, what are 4 main facts that you would need to know?
  3. Design a slide – add pictures, title, 4 facts for each, and organize it. Be creative.

That’s it. I admitted to the students that I was developing this as I went. That’s usually how I roll – I fly by the seat of my pants. Students are used to it. I’m used to it. It’s all good. However, I needed something more with this lesson…

Friday

What more did Fact Mania need? I love when students collaborate and communicate their learning with each other. I love creativity. I love games. It hit me…

  1. Have students reflect on their important facts and share them through a Google Form.
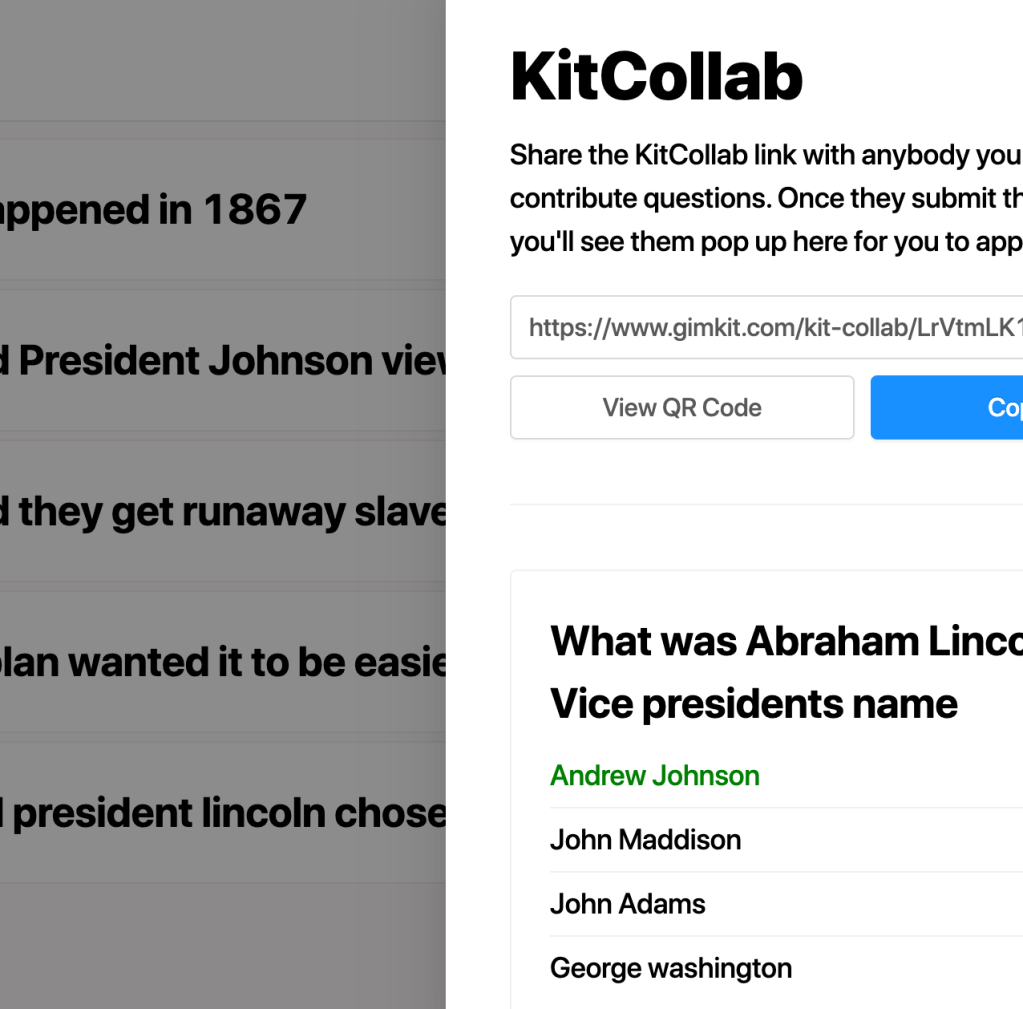
  2. Have students create questions using the Gimkit Kitcollab.

When class began, I set a timer for 15 minutes to finish up the Fact Mania slides. I also asked the students to share 2 facts from their slides. For this process, I created a Google Form where students could select which Reconstruction plan and type their fact to share. Then I created a Google Sheet of information and shared with the students. I like having students share their learning because it makes for nice discussions, feedback opportunities, and helps other students who might be a bit behind.

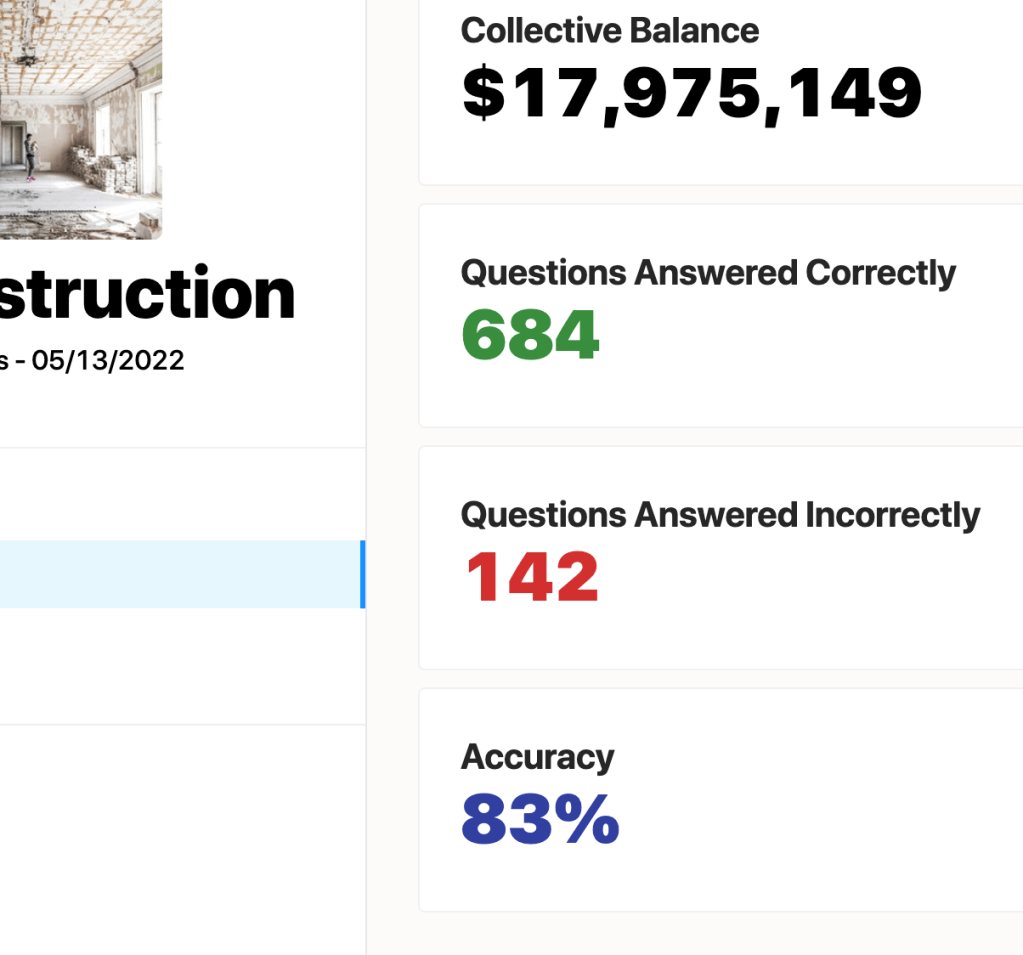
After 15 minute timer ended, I created a new Gimkit quiz, but I didn’t create any questions. I hit the Kitcollab option and it generated a link I could share with students. This link allowed students to create Gimkit questions to make a class Gimkit quiz. The Kitcollab allowed me to accept or reject questions. Plus, I could provide feedback in real time on the questions, wording of questions, and answer choices. This was super cool!! Onl 1 class was able to play the Gimkit, and they did a nice job with a class average of 83%.

The Week That Was In 505

Have you ever had a lesson idea only to kick it aside and do something else? This happens to me all the time. However, I write these ideas down and sit on them for a while and the time is right. Or, until the lesson is ready. The time was right on Monday. I could have easily taught about some Civil War battles, the Anaconda Plan, strengths and weaknesses of the North and South. Why though? It’s the end of the year and I wanted something new and engaging.

There is an old cemetery next to my school named Watkins Hill Cemetery. This was the original cemetery created for the village of Susanna before it was merged into the village of New Richmond. It’s a historic cemetery and I have always been interested in the people buried there. The cemetery contains a few Revolutionary War veterans, Civil War veterans, WW1 veterans, etc. However, I never knew where to begin with uncovering some of the stories surrounding these people. I didn’t know how to spot Civil War veterans buried in the cemetery.

All of the above was true until I learned a few things from the student teacher in 505. We took a trip to the cemetery and he pointed out some gravestone commonalities for students.

For Union soldiers, he pointed out to look for marble headstones containing a shield. We also discussed Co. C stands for Company C. The 2nd Ohio H.A. stands for 2nd Ohio Regiment, Heavy Artillery division. This was an awesome learning experience for everyone and we visited the cemetery with a purpose. This was the start we needed to shed some light on these Civil War veterans and tie some local history into the Civil War.

Monday – Cemetery visit and name collection, Fast and Curious

Tuesday – Research, Iron Chef

Wednesday – Research, Iron Chef, bio

Thursday – Thick Slide Battle, add to bio

Friday – Finish bios and record tribute

Monday

To begin the Civil War, and out local history research project, I created a Fast and Curious Quizizz with some basic information. In the quiz I included terminology such as Company, Regiment, mustered, and basic information about the Civil War. Students took the Quizizz and all classes ended up with a low 40% class average. I gave some feedback and we took the Quizizz immediately and raised class averages to 60% or a bit higher.

After the completion of the Quizizz, we took a class trip to the Watkins Hill Cemetery. Here we asked students to find Civil War veterans. The goal was to write down 3-5 names and all of the information from the gravestone (company letter, regiment number, etc). After 20-25 minutes, we returned to the classroom with information to begin research on Tuesday.

Tuesday and Wednesday

Now that students had their 3-5 names, we began research for people. WE used the National Park Service site (NPS), Ancestry, and Civil War Index. I encouraged students to find as much information as they could – enlistment date, age at enlistment, rank, discharge date, battles they fought in. I explained the ultimate goal was to explain how this local Civil War veteran contributed to the Civil War.

At first, students were caught up in only using one site. Some were confused by the terminology. Other were bound and determined to find something out about 1 soldier. We encouraged students to try another soldier, try another site, or ask questions. When this entire project began, I knew as much as the students knew. As a result, this experience created a collaborative environment for the students and me. We worked together researching and sharing information with each other. It was fun as we tried to unravel some mysteries.

During this process, here are some cool things we discovered:

  1. Some of these veterans never fought in battles.
  2. Some veterans signed up near the end of the war for a $100 enlistment check.
  3. One veteran had the rank of musician.
  4. One veteran’s brother was captured and died at Andersonville prison.
  5. One veteran was wounded in the Battle of Shiloh.

Once students collected 8-10 facts, I had them rank their facts from the most interesting to the most boring. The goal was to use some boring facts to set up the veteran’s life, but use the interesting facts to enhance the bio. It was cool to watch this experience play out and to discover new information about local veterans. Here are some biographies typed up by some of the students:

Thursday

After finding some enlistment and discharge dates, it was time to figure out how these Civil War veterans contributed to the Civil War. To do this, I created a Thick Slide with places to include basic battle info, numbers related to the battle, a relevant picture, and a quote.

As the research continued, we discovered that many veterans fought in the Battle of Shiloh as many men from New Richmond fought in the same regiment. Some of the men only fought in minor “skirmishes” in Tennessee. In order to learn more about these battles, a great site we used was American Battlefield Trust. After students researched a battle and completed their Thick Slide, they went back to their biography and added a new paragraph.

Once their 2 paragraph bio was complete, I had the students revise/edit and think about recording a tribute to their veteran with Flipgrid. Here are some Battle Thick Slides:

Some students asked what to do if their veteran didn’t fight in any battles…..here was my suggestion, “Change the heading on the Thick Slide to make it work you.” They followed my suggestion and did an awesome job!

One idea I changed during this project was a paraphrasing idea. I originally had the idea of students paraphrasing their original biography paragraphs. However, they were cutting out too much information and important details. I stopped paraphrasing and focused on having them record a tribute on Flipgrid.

Friday

I hoped research and biographies would be finished for Friday. I set up a Flipgrid so students could record a tribute to these local Civil War veterans. Here is that link: https://flipgrid.com/b79d05a5

It’s amazing how we started with a simple gravestone, researched some information, and created a small story about these local Civil War veterans.

This project is something I’ve had on my mind for years and I finally made it happen. I love flying by the seat of my pants and trying things out. It’s exciting and I plan to add more to this project in the future.

My Role – A Reflection

My role is not just about teaching social studies content or preparing learners for state tests. In fact, one of my daily messages I write says, “I”ve come to terms with the fact that you will forget most of what I taught in 505. However, you will always remember how you felt. When I’m faced with content and connections, I will always choose connections.” 

As a teacher, I see my role as motivating the learners in 505 to develop their abilities and aspirations to learn. My role involves inspiring students to change and develop their personal, social and professional skills to the best of their abilities. My role is to help learners to understand how to own their learning and development. I fulfill these roles by planning and preparing teaching and learning activities that take into account the needs and well-being of each individual student.

As a former special education teacher, I’m not a fan of labels. I understand the purpose of labels in education – to help provide services, to gain a better understanding of the student, etc.  However, once a label is applied, teachers tend to focus on the disability instead of the child. They focus on the students’ limitations and not their strengths. In the case of gifted students, we tend to see the student as a straight A, intelligent, hardworking student rather than a student. 

Yes, I read IEP’s and WEP’s. However, I do not read these documents until a few weeks into the school year. I want to get to know every student for who they are instead of what some paper is telling me. Maybe that’s not the best approach, but it works for me. 

I’m going to go back to my role as an educator – motivating the learners in 505 to develop their abilities and aspirations to learn. I will accommodate and modify for any student at any time to help them learn. I will do whatever I can for any student because they will always remember how they felt in 505 when the year ends.

The Week That Was In 505

This week wasn’t much of a week with all kinds of different things happening. With the end of the year fast approaching, many interruptions are taking place week to week.

Monday – Guidance Counselor came in to do career stuff.

Tuesday – Guidance counselor came into to finish career stuff.

Wednesday – Testing, 15 minute classes.

Thursday – Testing, 28 minute classes – Uncle Tom’s Cabin lesson.

Friday – Reward Day for all students, all day.

Yes, I had 43-50 minutes of instructional time all week. Thursday, we did a simple lesson on Uncle Tom’s Cabin and I planned some other lessons that I will share with you here.

Uncle Tom’s Cabin

Thursday was a perfect day for this mini Uncle Tom’s Cabin lesson I put together. Many times we teach about Uncle Tom’s Cabin as contributing to the Civil War. We discuss the author, Harriet Beecher Stowe, at great length. However, how many of our students (or teachers) have actually read excerpts from the novel?

In this lesson, I begin by discussing how the novel acted very much like the television in the 1950’s and 1960’s bringing Southern segregation and treatment of blacks into people’s living rooms across the country. The novel brought slavery into the homes of people all over the country.

After my brief introduction, we did a Fast and Curious about the characters and basic facts regarding the novel. After the fast and curious, I gave some feedback and then we hit again right away.

After 2-3 rounds of quick Fast and Curious, students could choose from 3 chapter excerpts to read:

  1. A Mother’s Struggle
  2. Slave Auction
  3. Cassy

As students read their selected chapter, they designed a slide about that chapter. They focused on retelling the events from the chapter, sharing and analyzing a quote, adding a relevant picture, and analyzing why this would contribute to the start of the Civil War.

  1. Fast and Curious Quizizz
  2. Iron Chef

First Emperor of China

I don’t teach 6th grade, but I help out our 6th grade teacher with designing lessons and incorporating some EduProtocols. I designed this lesson for Lesson 19 – The First Emperor of China using History Alive.

Day 1
  1. Thin Slide – add one picture, one word to show what makes someone an effective or ineffective leader. This was to get students thinking about the overall question they were trying to answer – Was the emperor of Qin an effective leader?
  2. Sketch and Tell – to me, three important vocabulary words for students to understand in this lesson are Great Wall, Legalism, and Qin Shi Huangdi. The Great reflects Qin major accomplishment. Legalism reflects his ruling style, Qin himself is important for students to create a representation based on some basic information they learned about him.
  3. Fast and Curious Quizizz – try to run this twice.
Day 2
  1. Fast and Curious Quizizz – try to run this once or twice during the class period.
  2. Iron Chef – the Iron Chef was designed for students to create a character profile about Qin Shi Huangdi. Students read the section about him and list adjectives and facts related to his life and leadership. Students will then partner up for some Glows and Grows – what is one thing you ike about your partner’s slide? What is one thing they need to improve on their slide?
Day 3
  1. Fast and Curious – run this at least once during class.
  2. Thick Slide – students choose one of the sections related to Qin and his highlights, or lowlights and design a thick slide. The options are – Standardizing culture, the Great Wall, removing opposition, and his death.
  3. Frayer – this is done on paper. Students share their Thick Slides with each other and collect notes in a Frayer model. The slide links are shared through a Google Form that in convert to a Google Sheet.
Day 4
  1. Frayer – students finish the Frayer and use their notes for the final project.
  2. Archetype – the archetype lesson is from the upcoming Eduprotocols Social Studies book that I co-authored with Dr. Scott Petri. Students will apply an archetype to Emperor Qin to decide if he was effective or ineffective as a leader. They will use their frayer information to defend their choice.

Civil War Lesson

Near my school is an old cemetery – Watkins Hill Cemetery that was one of the original burial grounds created for the village of New Richmond. In fact, one of the founders of New Richmond is buried there. It’s a cool spot to take the students and we look at the grave stones, discuss the history of New Richmond, and I teach them the difference between a cemetery and a graveyard. (Do you know the difference between a cemetery and a graveyard? Give my history, this is seriously not a dad joke.)

One thing I always wanted to do was figure out who some of these people are, but relate it to a current lesson. However, I didn’t know how to go about looking people up. This was the case until my students teacher showed me the national archives site for looking up veterans. (If anyone else knows another way, please help me out! I would love some feedback and more sources.) This cemetery has several Civil War veterans and this National Archives site is a great way to get us started.

Here is my plan that was inspired by a lesson design from Dr. Scott Petri:

Day 1
  1. Great American Race – to teach about Civil War Battles, people, basic terms. Examples include: Abraham Lincoln, Ulysses S. Grant, The Union, Confederate States, Secession, etc…
  2. Frayer – (Amanda Sandoval template) the Frayer is used for students to learn some vocabulary.
  3. Fast and Curious – to learn some basic military terms – company, infantry, general, private, etc…
Day 2

On this day, we would head to the cemetery looking for Civil War Veterans. I would have students try to writ down 2-3 names and the information from the grave stone. We would then head back to class and I would have students submit names through a Google Form.

Day 3

On this Day I would have students list 10 facts about their veteran. Then I would have students list the facts from interesting to boring. Then I would have them design an Iron Chef slide about their veteran. The Secret Ingredient would have the students list the battles the veterans fought in during his service in the Civil War.

Day 4

Design a Thick Slide about a battle or battles the Civil War Veterans fought in. Take the battle information and add it to the Iron Chef to complete a better picture of this veteran.

Day 5

Have students take their paragraphs from the Iron Chef and paraphrase their words down into an easy to read format. For example, if they had 200 words, shrink it down to 160 words or something. Finally, have students record their paraphrased tribute through Flipgrid.

I wish I had more to share in the way of links for some of these lessons, but I was literally thinking out loud and typing. More to share soon….

The Week That Was In 505

Sorry for the late post – I have a lot going on right now:

  1. I had a small part in the school musical, Newsies.
  2. I am taking a gifted class.
  3. I am also taking another class on the T3 Framework.
  4. I am teaching tennis again.
  5. The ins and outs of teaching 8th grade.

That is my shortened list (not kidding). This week we continued state testing and we began a new unit on the causes of the Civil War. As I mentioned in my last post, I have a student teacher I have been working with since January. He really like the structure of a Group Playlist (inspired by Catlin Tucker and Amanda Sandoval). He also wanted the students to understand that slavery was a cause of the Civil War – not states’ rights, not secession. He also wanted to work in some local history because Harriet Beecher Stowe has ties to Cincinnati and the New Richmond area (her brother was a preacher in the New Richmond Village right down the hill from my school). The resources put together in the playlist represent these topics:

  1. Missouri Compromise and the Compromise of 1850.
  2. Kansas Nebraska Act
  3. Dred Scott
  4. Uncle Tom’s Cabin

This post will not follow the typical Monday, Tuesday pattern because each class started on a different day. With testing, field trips, and fun days planned, every class is off schedule. I was so excited to begin the Civil War in April because I usually start it in May. Starting in may means I rush through it and don’t have time for Reconstruction.

You would think since I started the Civil War on April 18th that I would have time to get to Reconstruction – nope. It’s not looking good. Think about that for a minute – 30 days of school left and I don’t have time to get through Causes of the Civil War, Civil War Battles, and Reconstruction. That’s how many interruptions take place the last days of school.

  1. The Causes of the Civil War Group PlayList (@historysandoval template)
  2. The Graphic Organizers

All Week

The student teacher I’ve been working with loves the idea of Group Playlists. He put a playlist together for the causes of the Civil War. With each playlist the students focused on reading, listening, and watching various sources to help them fill out graphic organizers. The students used their information to help them make connections between events related to the causes of the Civil War. Here are the questions for each playlist:

  1. How did the issue of western expansion and the extension of slavery help spark war ?
  2. What did popular sovereignty and the Kansas-Nebraska Act reveal about U.S. sectionalism?
  3. How did political divisions over slavery spark war?
  4.  How did the exposure of slavery lead to war?
Directions

Let use Playlist #1 for this example – students read and watched about the Missouri Compromise and Compromise of 1850 as they took notes in a Venn Diagram. He also included a couple of questions for students to evaluate the topic of compromises. When students finished, they made a copy of the collaborative task which had them make connections between events. Students would discuss and summarize what they learned about the Compromises in the Playlist 1 box. Then they would move onto Playlist 2 (Kansas Nebraska Acts).

Students would complete the graphic organizers to learn about the Kansas Nebraska Act. Then they would go back to their collaborative task. Now they would discuss and summarize the Kansas and Nebraska Act in the Playlist 2 box. Now that students have 2 events summarize, they would find 1 to 2 connections between the events.

In the end, when the collaborative task was complete, and connections were made, students would use their information to respond to this prompt, “Provide a summary. Ultimately, what led to the Civil War?”

Here are some examples:

My Feedback

I personally liked the layout of the lesson. However, I would have mixed it up with more EduProtocols (I’m a protocols guy). For example, I would have added these protocols to each playlist question:

  1. CyberSandwich to compare the compromises – How did the issue of western expansion and the extension of slavery help spark war ?
  2. Thick Slide for info on one event – What did popular sovereignty and the Kansas-Nebraska Act reveal about U.S. sectionalism?
  3. Frayer – How did political divisions over slavery spark war?
  4. Iron Chef to create a slide about a chapter from Uncle Tom’s Cabin – How did the exposure of slavery lead to war?

OR run a stack:

  1. CyberSandwich – How did the issue of western expansion and the extension of slavery help spark war ?
  2. CyberSandwich – What did popular sovereignty and the Kansas-Nebraska Act reveal about U.S. sectionalism?
  3. CyberSandwich – How did political divisions over slavery spark war?
  4. CyberSandwich – How did the exposure of slavery lead to war?

I also gave feedback on question 2 with sectionalism. Many students finished the playlist not knowing what sectionalism meant. It would be good to throw it into a Fast and Curious or run a quick Frayer with it.

I also mentioned that I would drop 1 source from some of the individual tasks. It seemed overwhelming, or too much for some of the playlist. For example, either drop the Edpuzzle on the Kansas Nebraska Act or the reading.

My point with this feedback was simple – teaching and education is a constant reflective process. As Monte Syrie states, “Do. Reflect. Do Better.” I have embraced this quote and use it each day. Teaching and learning should be an ongoing reflective process class after class, day after day, year after year.

The Week That Was In 505

I’m currently writing this on Good Friday. However, I could call this day Bad Friday:

  • 3:00 AM wake up call from my 2 year old daughter who puked.
  • I drove my 5 year old daughter to the bus stop and my front axle broke.
  • Ran the 5 year old to the bust stop.
  • A marker found its way into the laundry and ruined 2 pairs of my pants and a shirt.
  • I had all these plans to work on 2 classes I’m taking and memorize my lines for the school play ONLY to do none of it.

If I write this with a bit of extra snark then I have 5 reasons listed above.

If I covered all of the standards laid out by the state, I could cover it all, but I could only do a mile wide and an inch deep. Why am I going to cover content just to say I covered it? That’s stupid. I’m going to cover important topics and cut out the unnecessary stuff. Last week we covered the different methods Abolitionists used to push for an end to slavery. I had a choice – so I switch to the women’s suffrage movement or go into resistance to slavery? After a discussion, we (my student teacher and I) decided to move into resistance to slavery.

Side note: I rarely teach the same stuff year to year because I would get bored and probably quit. This is why I quit teaching tennis – the feeling of doing the same lessons over and over, saying the same stuff over and over day after day. Awful. As a result, I mix up my lessons year to year. Sometimes I change how I teach. Other times I change what I teach.

The Resistance to Slavery lesson is a C3 Inquiry Unit on www.c3teachers.org. (Even though it says grades 3-5, it doesn’t matter. It can be used with any grade level 3-9, in my opinion). Every C3 unit has a “stage the compelling question” activity. With this particular unit, I turned the compelling question into a Number Mania. The unit itself was broken into 4 questions:

  1. What about the daily life of enslaved people would have prompted resistance?
  2. What were the means of resistance to slavery?
  3. What were the risks of resisting slavery?
  4. What were the results of resisting slavery?

I like the C3 units because they usually have great formative assessment tasks, EduProtocols can easily be incorporated into them, and they are very adaptable to different formats.

Nevertheless, here is my week:

Monday – finish Abolitionist assessment choice, Number Mania

Tuesday-Thursday – Resistance to Slavery Group Playlist, Thick Slide

Friday – No School

Monday

Monday was a day with all kind of stuff happening. Some students were finishing their assessment choices from the Abolition lesson.

Other students began the new C3 lesson on resistance to slavery. I wanted to begin this lesson with some little known statistics about slavery. The statistics that textbooks won’t tell you. I found an article written by Henry Louis Gates (I shortened it down a bit for 8th grade). We turned this into a Number Mania. Students read the article for 10 minutes, and shared 2-3 numbers and facts with the class through a Google Form. I created a Google Sheet with the Form data and shared with the class.

Once I shared the Google Form Data, students had 15 minutes to design their Number mania slide. However, I framed the lesson like this, “When you select your numbers and facts, think of how you can tell a story with your infographic.”

The students did a really nice job with their infographics. They put a lot of thought into their creations. Many of them were surprised to learn that enslaved women had an average of 9-10 children. They were also surprised to learn that 75% of white families in the south didn’t enslave people. All in all, this was a powerful way to introduce the Resistance to Slavery C3 unit.

Tuesday-Thursday

I mentioned earlier the C3 Units are adaptable to any formats. When I was at Spring CUE in Palm Springs, I learned of the Group Playlists from Amanda Sandoval. These PlayLists are a modified version of the Playlists created by Catlin Tucker. I like these Group Playlists because they have students working individually, have self checks, and provide opportunities for students to collaborate. Here is an example (@historysandoval template):

When I created these Group Playlists, I used similar sources the original C3 unit had linked. However, instead of youtube videos provided, I found the same videos on EdPuzzle. I also included primary and secondary sources into the individual tasks.

For the Self-check part of the Playlists – I made mini organizers on a Google Doc and made copies. I also made a Frayer model for students to collect notes. Some students really liked the Frayer. Other students really liked the mini organizers.

The goal for the individual tasks and self-check are building background knowledge with DOK 1 and 2 tasks. The collaborative task should be a DOK 3 or 4 with students applying, or creating, with their knowledge. I thought and thought about this for a day and a half. Then I thought of a great application strategy – hexagonal learning. Here were my thoughts:

  1. Share a blank hexagonal learning slide deck (have a paper version too).
  2. The blank slidedeck has 16 blank hexagons (4 for each playlist).
  3. At the end of each playlist, the students add 4 different ideas to 4 hexagons. The idea is to think about the answer to the playlist essential question.
  4. When all 4 playlists are completed, the students pait the hexagons and make connections.
  5. Finally, students find connections to people, narratives, and events they learned about from the playlist primary and secondary sources.

I didn’t know how this would turn out, but the students did awesome! They started from scratch and created their own learning and connections. I give credit to the clear learning objectives and goals for the awesome students creations.

The other part to C3 Units that I like are the extensions to learning. The extensions have students connecting their learning to today. In this particular unit, it wanted students to research a modern day resistance movement and make comparisons to slave resistance. When I read this, my mind went right to a Thick Slide idea.

Number Mania Creations
Hexagonal Learning
Thick Slides – Extension

The Week That Was In 505

This week we started state testing – “yeah” (sarcastic voice). Thursday and Friday were shortened days as students completed parts 1 and 2 of the Ohio ELA test. Classes were 22 minutes in length. As for social studies, Students finished the comparing the Northern and Southern United States during the Industrial Revolution with an annotated map.

After this lesson, I have a student teacher who designed a mini-lesson on the abolitionist movement to end slavery. The focus for the lesson was teaching students about different abolitionist, tying in some local history, and the methods abolitionists used to ends slavery.

Monday – Finish Annotated Maps on paper or with Google Drawings.

Tuesday – Thin Slide (nearpod), Fast and Curious, Thick Slide

Wednesday – Fast and Curious, Frayer

Thursday and Friday – Assessment Choice

Monday

Today was used for students finishing their annotated maps showing differences between the Northern and Southern United States during the Industrial Revolution. I offered two options – a digital version on Google Drawings or a hand drawn map on paper.

With the rubric, I had students adding symbols to represent the differences in geography, economy, and transportation. They had to include 2 geographical differences, 3 economic differences, and 1 transportation difference. After their map completion, students answered some basic geography map analysis questions I got from Robert Mayfield:

  • What is the purpose of the map?
  • What patterns do you see?
  • Why was that pattern created?
  • What can you conclude?

Here are some completed student maps (I forgot to take pictures of the hand drawn maps, but they are incredibly well done):

The completed maps were awesome, but I ran into a problem on Monday. Some students missed a lot of days and there was no way they were going to make some of this up. This is where my special education background kicks in and I excel – adapting, accommodating, and modifying things on the fly. I remembered another idea I got from Robert Mayfield – a Mapwich.

I took the original Google Drawing map template from above and added a premade map. I kept the questions the same, but changed the map. Here are those results:

Tuesday

Today was the start of the mini-lesson created by my student teacher. I shared the standards about reform movements with him and here is the lesson he created:

  1. Thin slide on Nearpod – what does it mean to reform something?
  2. Thin slide graffiti board – Without looking it up – can you name an Abolitionist?
  3. Fast and Curious Quizizz
  4. Thick Slide – a focus on abolitionists and their motivations and methods used to bring an end to slavery.
  5. Share the Thick Slide link through a Google Form
  6. Create a Frayer – collect information on 4 other abolitionists
  7. Create a Brochure about Abolitionists and their methods.

We ran a test run of this mini lesson in 2nd period and made adjustments. Going from a Nearpod to Graffiti Board to Quizizz to Google Classroom to a Thick Slide – whew, too much!! So, we changed the “Name and Abolitionist” graffiti board to a Nearpod collaborative board. That small change made a huge difference.

Then we adjusted the “Name and Abolitionist” discussion after the Fast and Curious. We did this because the Fast and Curious gave some ideas for Abolitionists. Many students listed Abraham Lincoln as an abolitionist which led to a great discussion.

The Fast and Curious results ranged from 40% to 53% class averages. The questions and answer choices were well done and related to the topics. Some of the questions were vocabulary related, with the main question being, “What is the best definition for abolition?” After the first lesson test run, I asked my student teacher, “On Quizizz, does your definition for abolition contain the word reform?” I asked this because we started with the word reform, but it the word appeared again the rest of the lesson or throughout any reading. We made that small adjustment and we were set.

Next, students rolled dice to determine their abolitionist to study for the Thick Slide. The Thick Slide was set up for students to include background information, motivations, conflict, and methods of reform. Plus, it included a space to define abolition and include a picture with a caption. This is the 5th or 6th Thick Slide completed by students and each one gets better. Here are some examples:

A couple of teachable moment from the Thick Slide – addressing background information. For example, students would say to me, “Mr. Moler, I don’t see where he/she is from for the background information.” I replied with, “Does background information always mean where someone is from? Are you only defined by where you are from?” It led to a nice discussion.

We finished the day with another Fast and Curious and the class averages were raised 30% to 35%. Feedback and the Thick Slide are powerful tools for student learning.

Wednesday

The next day, we began class with a Fast and Curious again for a third rep. Class average remained the same or went a bit higher – 85% to 90%. Following the Fast and Curious, we shared a Google Form for students to share their Thick Slide. From the form we made a Google Sheet with the slide links and shared with the students. During this time, I highly recommend to teach your students how to change the share settings on a Google Slide.

Originally, we were going to have students use a Frayer on a Google Slide and then I suggested using paper. I suggested this to limit copying and pasting. Students made a Frayer on paper and chose 4 abolitionist to study. They collected background information, motivations, conflicts, and methods used for each abolitionist. Students were going to use this information to make a brochure.

Thursday and Friday

The final part of this mini lesson was making a brochure highlighting the abolitionists and their methods to end slavery. I was going to stay out of it, and not suggest anything. However, I can’t help myself. I remembered an Amanda Sandoval template and suggested a Dinner Party – choose 4 abolitionists to send to a dinner party and place them at the table. Then think about these questions:

  1. Why did you seat them next each other?
  2. What would they discuss or debate?

To me a brochure is great for a hands on project if the internet is down. But the dinner party takes critical thinking and creativity to a new level. What was awesome is my student teacher created conversation starters to scaffold the dinner party.

As students began the dinner party, they struggled to include details and the answers were basic. Was this from taking a 2 part ELA test? Was it from lack of knowledge? We pushed the students for more and they ended up doing a great job.

In typical Moler fashion, I didn’t stop with the dinner party, I decided to create a list of assessment options for all students. I ended up offering a dinner party, sketch and tell, Instastory, or Somebody – Wanted – But – So – Then. Here are some students exmaples:

The Week That Was In 505

First week back from Spring Break. A new unit began – The Industrial Revolution. In past years, I asked the question, “To what extent was the Industrial Revolution beneficial for people?” In the old unit, I would focus on new inventions, Lowell Mills, cotton production, etc. It just felt like it was isolated, and no context.

This year, I decided to focus on the differences in North and South based on the Industrial Revolution. We focused on geography, economy, and transportation. I wanted to go this route because it provided context and would eventually set us up for the Civil War unit afterwards.

Monday – Industrial Revolution – whirlygigs (Mr. Roughton lesson)

Tuesday – Fast and Curious, CyberSandwich

Wednesday and Thursday – Station Rotation, Fast and Curious

Friday – Thick Slide, Annotated Map Directions, Annotated Map

The end goal of the unit for students is having them understand how the Industrial Revolution impacted northern and southern states differently. The end assessment is an annotated map where students create symbols highlighting the differences and analyzing their maps.

Monday

This was the first day back from Spring Break. I needed something uplifting. I needed a hook to get the students into the Industrial Revolution. Then I suddenly remembered a lesson I saw on Mr. Roughton’s Website – it was a lesson where students experienced the transition from the Cottage Industry to Factory life making whirlygigs. This lesson is engaging and helps the students understand that some people made things in their homes; we didn’t always have factories.

For this lesson, I found some old paper (It’s a paper waster). Before we began, I showed the students a whirlygig and how it twirls around when dropped in the airs. For the first round, I didn’t give any instructions on how to make it. I didn’t give students any tools. They were frustrated as they tried to figure it out. After 5 minutes, I had them record their feelings and the number of functional whirlygigs they created.

The next round, I actually gave instructions, rulers, and scissors (but no paper clips). Students had 5 minutes to work independently to make as many whirlygigs as possible. At the end of time, I had them record the number of functional whirlygigs they created. I also had them record their feelings during this round. The big idea I pointed out during this round was some whirlygigs were better than others due to various reasons: we understood the directions differently and some had better tools than others. Lastly, I asked the students, “What would make this better?” They thought and thought and finally someone said, “If we got into groups, we could each specialize in something.” Lightbulb moment.

The third round, I had students get into groups. Each students specialized in creating some part of the whirlygig. Someone cut rectangles, someone cut a slit down the middle, someone folded the edges, and someone added a paper clip. This time the whirlygigs were similar, functional, and I brought up the idea of interchangeable parts with the paper clip.

This lesson idea is awesome and super engaging. It was a great way to introduce the Industrial Revolution and a great way to kick off the week the first day back from Spring Break.

Tuesday

Tuesday I got into the first main part of the lesson – the differences in geography between Northern and Southern states. Here is my initial lesson set up…

  1. Begin with an 8parts – I wanted the students to choose an image representing the North or the South. Students gave it a 3 word title, focused on nouns, adjectives, verbs, and adverbs. They would also list out an example of geography, economics, and transportation.Students finished the 8parts by writing a descriptive paragraph about the image.
  2. Transition to a Quizizz – the Quizizz had 12 questions, 5 vocabulary words and 7 questions related to Geography. If students did well with vocabulary that meant I didn’t have to waste time doing vocabulary activities.
  3. CyberSandwich – The CyberSandwich would be a 10 minute read and note take, 5 minute discuss, and a 10 minute summary. One students would read about northern geography and their partner would read about southern geography.

This plan would change throughout the day…

8Parts

I began the day with this period and took a chance with the 8Parts. I broke a golden rule and used the 8Parts for the first time this year with actual content. I should have known better. It’s interesting, though, because students that had me last year did an excellent job with this activity. However, I didn’t like some of the results and the 8Parts took entirely too long. Again, I should have known better – low cognitive load to begin and more reps!!

I decided that I needed something simpler and quicker. As a result, I switched this to a Thin Slide. However, the Thin Slide was done with a NearPod Collaborative Board. I uploaded the same images and gave students 3 minutes to share one word and one picture of a geographical feature they observed. This proved to be more effective as we looked for similarities in the posts…thank goodness for the Thin Slide in my toolbox. Plus, the setup on Nearpod was super easy!

Quizizz – Fast and Curious

The Quizizz I put together had 12 questions – 7 questions related to geography and 5 related to vocabulary. I included vocabulary questions to see how the students would do. The class average on vocabulary questions was 90% or higher across all classes. The class averages on geography questions was 40% or lower across all classes.

The goal was to run the Quizizz twice before the end of class. Here were the class averages the first time taking the Quizizz – 62%, 57%, 49%, 40%, 33%. After completing the CyberSandwich, the class averages were: 82%, 86%, 89%, 79%, 77%. This was a significant jump and shows the power of the Fast and Curious reps.

CyberSandwich

The CyberSandwich evolved throughout the day. We began the day with a completely digital CyberSandwich using Google Slides. One student read about northern geography and their partner read about southern geography. I felt bad that I didn’t have paper copies of the reading available of a physical copy of a note taking sheet. I try to have these things available for students. For 4th period and beyond, I had the copies available.

By the time 7th period rolled around, I had to switch up the CyberSandwich. This class is made up of 50% or more of students with an IEP and it’s tough for me to get around to everyone. With this class differentiation and UDL is a must. As a result, I created a CyberSandwich on Nearpod.

The Nearpod adaptation was such a great mixup!! I shared my Nearpod link and gave every student a Venn Diagram on paper and had them takes notes. I also had physical copies of the readings as well. There’s no doubt if I left the CyberSandwich as a Google Slide, it would not have gone as smoothly. I set up my Nearpod like this:

1st slide – I can statements.

2nd slide – Thin Slide with a Drawing Slide

3rd slide – Thin Slide with a Drawing Slide

4th slide – Read about Northern Geography – takes 4-5 notes.

5th slide – Collaborative Board – share 1-2 important notes you wrote

6th slide – Read about Southern Geography – takes 4-5 notes.

7th slide – Collaborative Board – share 1-2 important notes you wrote

8th slide – type a summary, write a summary on paper, or record audio of your summary.

All in all, it was cool how this lesson evolved throughout the day. My goal is to strive for better for my students and myself on a daily basis. Switching the CyberSandwich to a Nearpod was a huge move that proved to be effective for my 7th period students.

Wednesday and Thursday

For Wednesday, I was going to roll with another CyberSandwich. As usual, my mind changed and I wanted to try something different. I created a station rotation model that was to be completed in 2 days. The station rotation was set up on an interactive image made created with Genial.ly. When I created this set up, it was intentionally done with these options:

  1. EdPuzzle – Lowell Mills and the women of Lowell Mills (watch).
  2. Listenwise – NPR Podcast and the negative effects of the Industrial Revolution (listen).
  3. CyberSandwich – read about the Northern/Southern economies, discuss, and summarize.
  4. Sketch and Tell – Research an invention that was invented between 1790-1840 and summarize your findings.
  5. Card Sort – get the paper bag and sort pictures into Northern or Southern categories.

Within these lessons, I provide accommodations and modifications as necessary. For example, if a students didn’t want to do a CyberSandwich with a partner, I had them read about the northern economy and I would share notes I created. Then we discussed the information together. In some cases for the written summary, I provided sentence starters for students. I also showed students how to use voice typing for a summary. As usual, I offered physical copies of the CyberSandwich and the readings. With any lesson or activity, my special education background kicks in for all students. All in all, the station rotation model was engaging and I had 80% of students complete all 5 stations.

Friday

Friday was used to cover changes to transportation in the North. Students created a Thick Slide about railroads, canals, and steamboats. I gave students 20 minutes to read and design their slide. This is the 4th or 5th Thick Slide we have done, and they are getting so much better. Plus, the students love creating their slide. Reps are important!! Here are some student samples:

Through the week I kept emphasizing the CyberSandwiches and Thick Slide served a purpose. The students would look back on the information to help them create an annotated map. Here is the start to one of the maps:

My Final Thought

Earlier in the week I visited another class and walked the students through a Thick Slide. The students could choose a section to read for their slide. The slide had students writing details about the topic, copying a quote, adding a relevant picture, picture cation, and they explained a vocabulary term. I showed some examples and then gave them 20 minutes.

Near the end the states to me, “How do I know they’re done? What if they aren’t adding a caption? I’m going to have to take 10-15 minutes to go over this so they have everything they need.”

I replied, “It’s okay. They’re fine.”

She replied, “How do you know? Some of these kids aren’t going to have a caption or a quote. I come from a generation where I did everything asked of me.”

I replied, “I’m 38 with a masters degree. You have a masters degree. They’re in 6th grade. I come from a different generation, and I would have everything required of me too. There are people from all generations that don’t do everything required of them. It’s okay. You’re working too hard.”

Then I proceeded to use something I learned from Kim Voge at Spring CUE. I had all the students partner up and then I had them state one “glow” and one “grow” for their Thick Slides. Students gave each other feedback and they proceeded to correct the thing they didn’t have.

I don’t know where this distrust of students came from? To me it’s a self-fulfilling prophecy – if you expect them not to do things, then you will treat them as such, and that creates a negative situation for everyone involved. Kids are remarkable people and will rise to the occasion. We were blown away by their feedback and corrections and it took about 5 minutes. Trust students. Give them opportunities to speak with each other.

A Lesson Evolving – My 100th Post

This is my 100th overall post on this site since I created it about 4 years ago. I started this blog as a way to reflect on my teaching and lesson designing. This particular post is a reflection for my new unit on the Industrial Revolution in relationship to Northern and Southern states.

I have the unit set up for students to learn about the Northern and Southern region differences from 3 perspectives geographical perspective, economic perspective, and transportation perspective. Ultimately, students need to understand how geography contributed to the types of jobs and economies of each region, they need to understand how the Industrial Revolution impacted the North versus the South, and they need to understand why the North had different means of transportation from the South.

I’m writing this post to share my thought process on a daily basis with my lessons. For me it’s an ongoing reflective process throughout the day. Here was my initial plan:

  1. Begin with an 8parts – I wanted the students to choose an image representing the North or the South. Students gave it a 3 word title, focused on nouns, adjectives, verbs, and adverbs. They would also list out an example of geography, economics, and transportation.Students finished the 8parts by writing a descriptive paragraph about the image.
  2. Transition to a Quizizz – the Quizizz had 12 questions, 5 vocabulary words and 7 questions related to Geography. If students did well with vocabulary that meant I didn’t have to waste time doing vocabulary activities.
  3. CyberSandwich – The CyberSandwich would be a 10 minute read and note take, 5 minute discuss, and a 10 minute summary. One students would read about northern geography and their partner would read about southern geography.

This plan would change throughout the day…

8Parts

I began the day with this period and took a chance with the 8Parts. I broke a golden rule and used the 8Parts for the first time this year with actual content. I should have known better. It’s interesting, though, because students that had me last year did an excellent job with this activity. However, I didn’t like some of the results and the 8Parts took entirely too long. Again, I should have known better – low cognitive load to begin and more reps!!

I decided that I needed something simpler and quicker. As a result, I switched this to a Thin Slide. However, the Thin Slide was done with a NearPod Collaborative Board. I uploaded the same images and gave students 3 minutes to share one word and one picture of a geographical feature they observed. This proved to be more effective as we looked for similarities in the posts…thank goodness for the Thin Slide in my toolbox. Plus, the setup on Nearpod was super easy!

Quizizz – Fast and Curious

The Quizizz I put together had 12 questions – 7 questions related to geography and 5 related to vocabulary. I included vocabulary questions to see how the students would do. The class average on vocabulary questions was 90% or higher across all classes. The class averages on geography questions was 40% or lower across all classes.

The goal was to run the Quizizz twice before the end of class. Here were the class averages the first time taking the Quizizz – 62%, 57%, 49%, 40%, 33%. After completing the CyberSandwich, the class averages were: 82%, 86%, 89%, 79%, 77%. This was a significant jump and shows the power of the Fast and Curious reps.

CyberSandwich

The CyberSandwich evolved throughout the day. We began the day with a completely digital CyberSandwich using Google Slides. One student read about northern geography and their partner read about southern geography. I felt bad that I didn’t have paper copies of the reading available of a physical copy of a note taking sheet. I try to have these things available for students. For 4th period and beyond, I had the copies available.

By the time 7th period rolled around, I had to switch up the CyberSandwich. This class is made up of 50% or more of students with an IEP and it’s tough for me to get around to everyone. With this class differentiation and UDL is a must. As a result, I created a CyberSandwich on Nearpod.

The Nearpod adaptation was such a great mixup!! I shared my Nearpod link and gave every student a Venn Diagram on paper and had them takes notes. I also had physical copies of the readings as well. There’s no doubt if I left the CyberSandwich as a Google Slide, it would not have gone as smoothly. I set up my Nearpod like this:

1st slide – I can statements.

2nd slide – Thin Slide with a Drawing Slide

3rd slide – Thin Slide with a Drawing Slide

4th slide – Read about Northern Geography – takes 4-5 notes.

5th slide – Collaborative Board – share 1-2 important notes you wrote

6th slide – Read about Southern Geography – takes 4-5 notes.

7th slide – Collaborative Board – share 1-2 important notes you wrote

8th slide – type a summary, write a summary on paper, or record audio of your summary.

All in all, it was cool how this lesson evolved throughout the day. My goal is to strive for better for my students and myself on a daily basis. Switching the CyberSandwich to a Nearpod was a huge move that proved to be effective for my 7th period students.

The Weekend That Was Not In 505

This past weekend two awesome events happened:  my school started Spring Break and I spent my time at the Spring CUE conference in Palm Springs, California. At the conclusion of the conference, Jon Corippo asked me a simple question, “What was your biggest take away?” I replied, “The people.” 

I feel like I live 3 lives on a daily basis. My family life. My tennis life. My Education life. When I my education life – I refer to New Richmond, Twitter world, EduProtocols. Spring CUE gave me a chance to meet my Twitter/EduProtocol friends in person. The magic of social media made me feel like I have known these people for a long time. 

While in California I experienced great conversations, new learning experiences, connecting with others, and visiting other schools. I attended many great sessions at Spring CUE as well. 

The People

Here are some awesome people to follow on Twitter: 

Dr. Scott Petri (@scottmepetri) – We are co-authors of EduProtocols: Social Studies and talk once or twice a week. Every time I speak with Scott, I learn something new. Sometimes a new piece of research data. Sometimes it’s a new teaching strategy or idea to use in my classes. It was a pleasure to meet Scott in person. I had the honor of visiting John F. Kennedy High School and observing Scott’s interactions with students. He’s. heck of a teach and an even better person!

Jon Corippo (@jcorippo) – From 3,000 mile away, Jon changed my life. The power of social media and technology. Jon is another person that teaches me something new every time we talk. This time I had the pleasure of meeting Jon in person and being a part of one of his live sessions featuring EduProtocols. Despite my extensive use of EduProtocols, I learned two new protocols – the 3x genre protocol and the For the People protocol.

Kim Voge (@kvoge71) – Kim warned me I was getting a hug when I arrived in Palm Springs. As soon as I arrived, the first session I attended was Kim’s session on EduProtocols. Sure enough – I got a hug and a selfie. Through the power of Twitter, I feel like we have known each other for years. She featured Thick Slides, Thin Slides, and Iron Chef. Despite using these items on a regular basis, I took away some new, awesome ideas from the session to implement in class. Oh yeah, Kim’s new book came out – Deploying EduProtocols. It’s a must read for any teacher or administrator. Great ideas for planning or the research behind implementing EduProtocols.

Val Sun (@mllevalsunshine) – Val is another person who I feel like I have known for a long time. Val has great ideas for implementing EduProtocols and uses them with the future teachers she trains with her college class. Plus, she has a book, Navigating Dual Immersion releasing soon! OH yeah, she laughs at my stupid dad jokes too.

Jacob Carr (@mrcarrontheweb) – It was fun meeting Jacob in person. He is the future author of the EduProtocols: Language Arts edition. I thoroughly enjoyed Jacob’s session on implementing EduProtocols at the DOK-1 level. I learned some Dutch with Fast and Curious which was fun. Lastly, I learned about a possible new protocol called the Repuzzler that I’m excited to use when I return from Spring Break next week.

Brianna Davis (@MrsDavisRCHS) – It was great meeting Brianna Davis. I believe I introduced myself in the Hilton parking lot (which was probably creepy, but oh well). Brianna is an avid user of EduProtocols and Social Studies. She also makes some rad templates and lessons for her students. She was awesome to create a template for the Archetype Four Square lesson featured in the EduProtocols: Social Studies edition book!

Diane Mapes (@mrsmapess) – It was great to connect with Diane as she is another avid user of EduProtocols with Social Studies. Look for her great ideas using Great American Race, CyberSandwich, and Thin Slides. It was great meeting Diane for dinner with Jon and Kim the first night of the conference.

Robert Mayfield (@MrMayfieldRHS) – Robert has been rocking the EduProtocols lately with his classes.He’s been using some CyberSandwich, Great American Race, Iron Chef, and Thin Slides. Oh yeah – he even invented a new protocol called Thin Chef (2 pictures and 2 words). Robert is another person I feel like I have known for a while and I look forward to him visiting Cincinnati in June.

Jamie Halsey (@mrsjamiehalsey) – It was great meeting Jamie briefly at the EduProtocols Social Studies session. Then talking more in depth at Shakey’s Pizza. Jamie is an EduProtocols and EMC2Learning expert and does amazing stuff fusing gamification into the protocols. Please, please, please check out her stuff and templates. Oh, and thanks for helping me charge my phone!

Adam Juarez (@techcoachjuarez) – Although briefly, I met Adam Juarez. He has great ideas infusing technology into lessons. It was awesome of him to give me a copy of his book – The Complete EdTech Coach. I can’t wait to dive into this book!

The Sessions

Through EduProtocols and virtually presenting, I have learned the importance of creating a session that is hands on. People learning new ideas actually need to do something to learn how to implement those ideas. From each session, I took notes and tried to take away something positive and something new to use with my classes.

Relationships – One of my favorite sessions was on the importance of building relationships. This session was run by Roni Habib (@Roni_Habib). The session was interactive and he had the participants connecting. I liked his honesty and straight talk in the session. I liked getting to know my partner Justin Berzon throughout the session. Each activity we did took 30 seconds and really had us listening, laughing, and sharing honestly.

EduProtocols – With EduProtocol sessions, I took away some new ideas. The For the People protocol is a great idea to get students working on feedback using a Google Form. I also like the idea of Glows and Grows from Kim Voge. Glows and rows has a nice positive spin for peer to peer feedback.

I can’t wait to use the RePuzzler lesson I learned from Jacob Carr. It’s a great, hands on activity (reminded me of a concept sort) with vocabulary. This lesson can easily be adapted to any subject.

Listenwise – I learned about Listenwise from Dr. Scott Petri. Listenwise is a short podcast site that can be used for any subject. The 6-7 minute podcasts, or news stories, were archived by NPR and can now be used to incorporate with any lesson. They are used to help students work on listening skills and really help students visualize being in the story. Here are 2 other things I learned during this session:

  1. Students can read 2-3 grade levels above their level as they listen to the reading along with a transcript.
  2. Students need a working vocabulary of 50,000 or more words by the time they graduate high school.

Keynote – The message of the Keynote from Amanda Sandoval (@historysandoval) was incredible. I loved Amanda’s Group Playlist idea for this crazy time in education. The Group Playlist is a spin on Catlin Tucker’s Station Rotation Playlist idea. What I took away the most, however, were these 4 questions Amanda used to help her design the group playlist:

  1. What is most important?
  2. How does this connect to the real world?
  3. Will this engage students?
  4. Will they find it meaningful?

These are the questions she developed from students survey answers and the questions used to help design lessons. In this age of Covid, these questions are crucial for any teacher developing lessons.

All in all, this was an awesome conference. Amazing people. Amazing sessions. What an awesome experience!