This week was all about pulling the thread—tracing how specific events pulled the country apart and pushed us toward war. I built everything around one central theme: A Nation Divides Over Slavery. From court cases to debates, from compromises to elections, we kept the structure tight: retrieval, repetition, and real thinking. The protocols stayed familiar, the tasks stayed purposeful, and students had a chance to connect the dots, not just memorize them.
Monday – Kicking Off “A Nation Divides Over Slavery”
We kicked off our new theme this week: A Nation Divides Over Slavery. The idea behind this theme is to help students connect key events and legal decisions that drove the wedge deeper between North and South – like the Dred Scott case, the Fugitive Slave Act, the Lincoln-Douglas Debates, and the Election of 1860.
We started with a Quizizz set that previewed these four topics – both vocabulary and content. I told the students upfront: this isn’t just about getting right answers. This is about seeing where we are before diving in and building context all week.
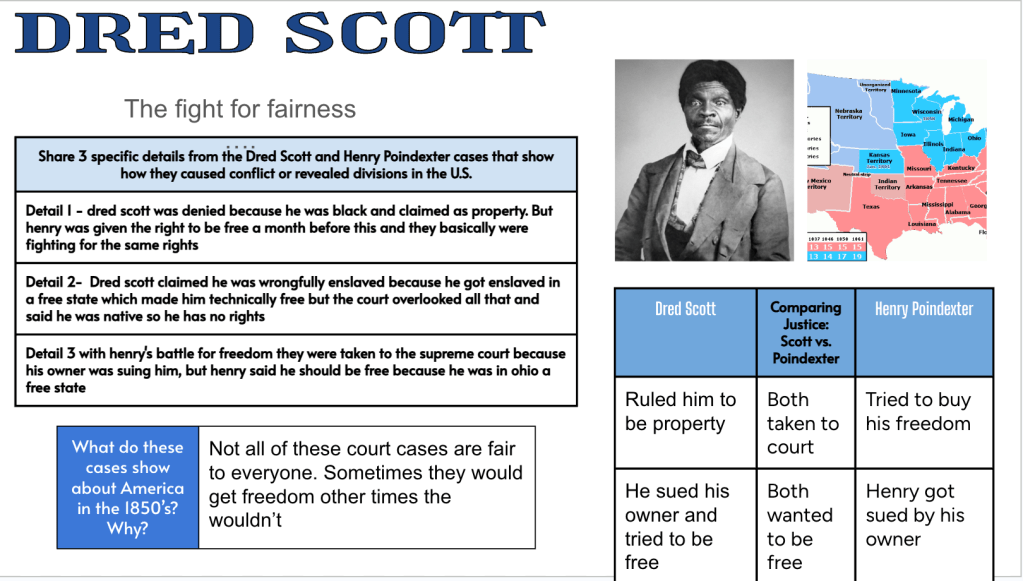
From there, we went straight into a Thick Slide on Dred Scott. I gave students four guiding questions:
Who was Dred Scott?
What did the court decide?
What impact did it have on the country?
Why does it matter today?
They added a powerful quote, one or two relevant images, and a title that helped summarize the case’s importance. I’ve used Thick Slides a lot this year, but I liked this one because it helped students pull together multiple layers of information on a tough topic and create something visual that forced them to organize their thinking.
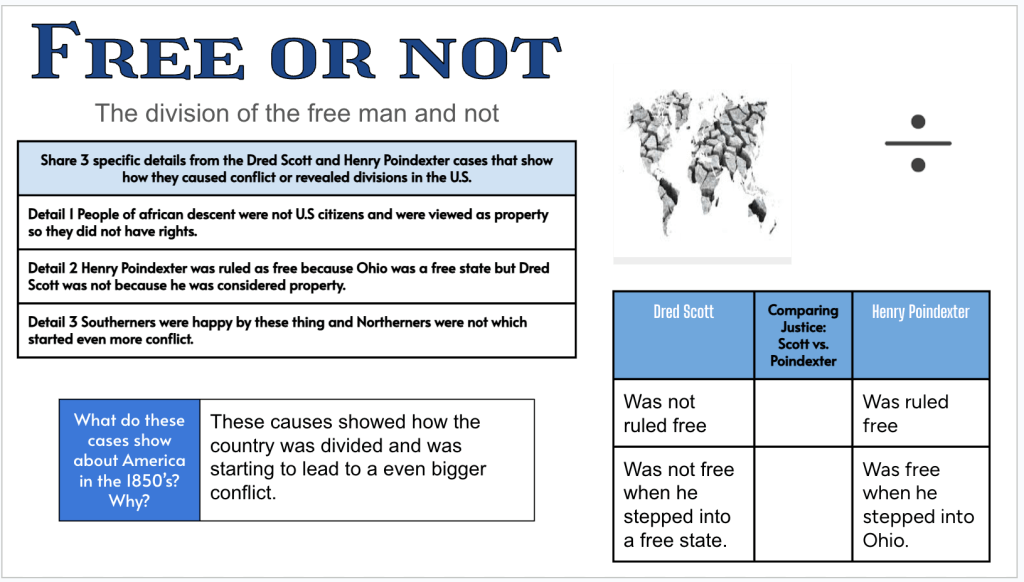
To add a local lens, we wrapped up class with a short reading about The Case of Henry Poindexter – a lesser known but powerful Ohio case that challenged the logic of Dred Scott. Poindexter was ruled free when he entered Ohio, even though the Dred Scott ruling said enslaved people weren’t citizens. That contrast hit home for students. It was a great way to help them see that not all courts agreed—and that the debate over slavery and citizenship wasn’t as cut and dry as some textbooks make it seem.
Why this lesson worked:
Quizizz built background and gave us data
Thick Slide gave students a structure to produce and reflect
The Poindexter case grounded the learning in local history and made it real
Tuesday – A Twist on the Lincoln-Douglas Debates
Tuesday was one of those days where I wanted to keep the content heavy, but the delivery light. We were building off of Monday’s work with Dred Scott, and I needed a way to connect to the Lincoln-Douglas debates without it feeling like just another block of text.
We started with an EdPuzzle, a solid recap of the Dred Scott case that also dropped in mentions of Stephen Douglas and Abraham Lincoln. It served two purposes: review Monday’s learning, and plant seeds for what was coming next. No extra slides. No extra talking. Just a well-placed video.
The the twist – instead of reading straight from the textbook, I decided to rework the passage on the Lincoln-Douglas debates. But I didn’t rework it myself—I asked AI to do it. Specifically, I asked ChatGPT to take the reading and embed five hidden clues to a mystery object. The object? An orange.
The clues: wedge, sections, bitter, peel, squeeze.
The students didn’t know this at first. They just read the modified version, answered the reading questions, and moved on. Until I dropped the twist.
I shared a Padlet and told them: “Based on what you read, I was thinking of an object. It’s hidden in the clues. Guess what it is, and explain how it connects to a country being pulled apart by the issue of slavery.”
I changed the Padlet settings to manual approval so no one could copy answers. Kids were rereading, piecing together metaphors, trying to figure it out.
The guesses ranged from “lemon zest” to “an instrument” but when a few landed on “orange” and explained it like this…
“The country was in wedges, pulling away from the center.”
“There were different sections that couldn’t stay together.”
“Everyone was getting squeezed from both sides.”
This wasn’t about right answers. This was about interpretation.
It was late in the year. Attention spans were slipping. But curiosity still works.
Why This Worked
The EdPuzzle grounded us in prior knowledge without slowing momentum.
The AI-rewritten reading kept all the important facts but added a playful puzzle.
The mystery object metaphor gave kids a reason to reread and think differently.
The Padlet added a layer of mystery and ownership—students weren’t just responding, they were interpreting.
We talk a lot about curiosity in learning, but sometimes it’s as simple as hiding a metaphor in plain sight.
Wednesday – Number Mania and Division Over Slavery
I decided to build the day around a lesson adapted from Retro Report, focused on how the Fugitive Slave Act further divided the nation and fractured the Democratic Party. We’d touched on the law last week, but this time we went deeper, analyzing its consequences more intentionally.
We opened class with a quick discussion about how a single law could force citizens to choose between their conscience and the law. Then we moved into a Number Mania. I provided students with a short, impactful reading on the Fugitive Slave Act that was rich in context and included some powerful data: $1,000 fines, $40,000 to return one man, over 300 people returned to slavery, and more. Students had to use three numbers to prove this quote true:
“The Fugitive Slave Act of 1850 deepened the divide between the North and South by punishing citizens who helped runaways, rewarding biased decisions, and sparking costly conflicts over slavery.”
They added visuals, a title, and paraphrased facts supported by numbers. It was more than just pulling data, it was about making meaning with that data. This protocol always helps students see the weight that numbers can carry in understanding a moment in history.
We ended with a Fast and Curious Quizizz, looping back to the same content vocabulary and themes from Monday. Every time we run that loop, accuracy improves. It’s low stakes, high impact, and it sets kids up for deeper thinking in the next lesson.
Why it worked:
Number Mania turned data into narrative and helped students visualize division.
The reading provided the foundation, and the task forced synthesis.
Quizizz helped reinforce essential vocabulary and context.
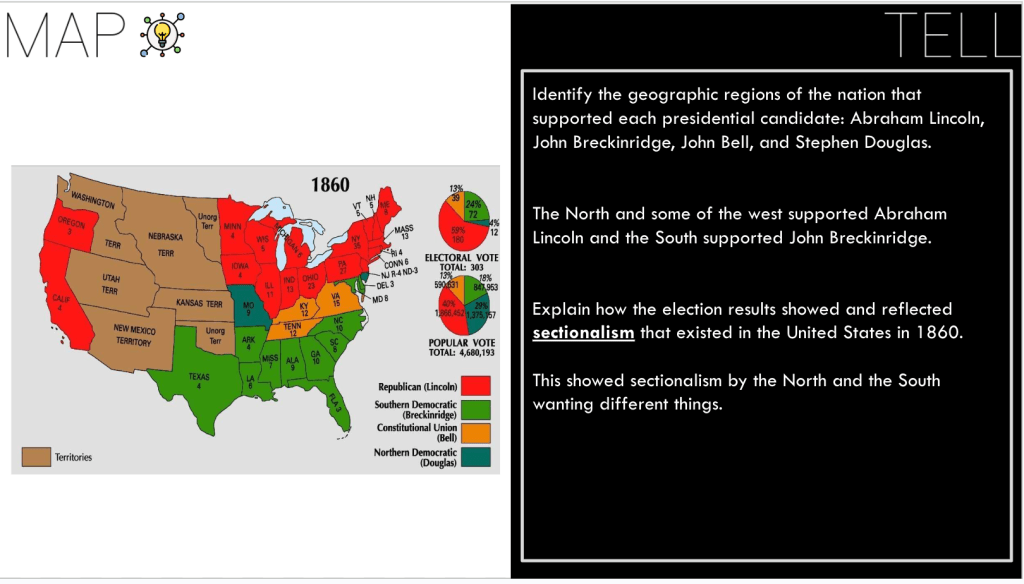
Thursday: Election of 1860 and the Nation Splits
Thursday we wrapped up the second part of our Retro Report lesson on the road to the Civil War—this one focused on the Election of 1860. After covering the Fugitive Slave Act earlier in the week, this was a natural next step. It helped students see how deep the divisions were not just in laws, but in politics.
We started with an EdPuzzle on the Election of 1860. Just a four-minute video with a good breakdown of the four major candidates and how their platforms represented the different regions of the country. It was a great primer, quick, clear, and helped set up the rest of the lesson.
After the video, students read short excerpts from each of the party platforms. We didn’t go overboard here, I just wanted them to pull out the core ideas: What did each party believe about slavery? About federal power? About the territories?
We wrapped it up with a Short Answer Battle Royale using the platform. The question was simple:
How did the results of the 1860 presidential election show that the United States was becoming more and more divided?
There was candy on the line, so they wrote like it actually mattered. Some of the answers were solid—claims, evidence, explanations. Some still needed guidance. But that’s the beauty of ShortAnswer. Students saw each other’s responses in real time. They adjusted, they improved, and they learned from one another.
It wasn’t a loud or flashy lesson, but it worked. The video gave them context. The reading gave them specifics. The writing gave them purpose. And the candy didn’t hurt, either.
Friday – Choice and Review to Close the Theme
We wrapped up the week and our “A Nation Divides Over Slavery” theme with a final round of Quizizz. This was our retrieval layer to see what stuck after hitting the Dred Scott case, the Fugitive Slave Act, Lincoln Douglas Debates, and the Election of 1860. The class averages were solid: 94%, 85%, 90%, and 86%. That tells me this themed structure is working. The repetition, the chunking, the protocols—it all adds up.
But what I liked even more was the choice students had in their assessment.
Option 1 was “Divide the Pie”—a visual breakdown of how much each event contributed to the growing division between North and South. Students had to assign a percentage to each of the four events and then justify those numbers with specific evidence. Not just pulling numbers out of thin air—but actually defending them based on class work and content we’ve layered all week. It wasn’t just about what they remembered. It was about what they understood.
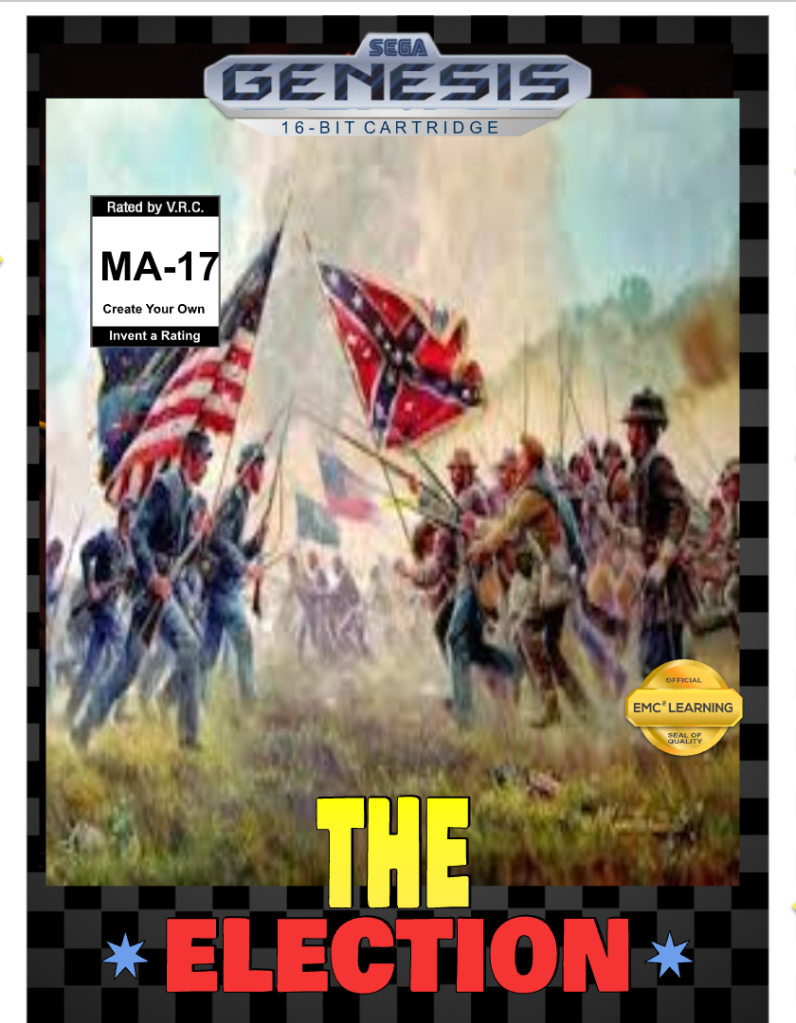
Option 2 was the Sega Genesis Game template from EMC² Learning. This one let students reimagine the week’s events as a vintage video game. Their job? Turn historical conflict into gameplay. What would the levels be? What obstacles would the player face? What’s the story arc? It’s creative, but it still demands content knowledge. I built out some success criteria so they weren’t just designing for fun—they had to make their game tie back to each event.
That’s the point. We’re giving students tools to own their thinking. Whether it’s defending a pie chart with historical evidence or turning a political crisis into pixelated gameplay, they’re showing what they know in ways that stick.
This week was all about keeping the momentum going—connecting reform movements, industrialization, and women’s rights in ways that actually made sense to students. Some lessons flowed just like I hoped. Others forced me to think on the fly (shoutout to the surprise Wi-Fi outage). But through it all, I leaned on purpose-driven protocols, reframing simple tasks to get kids thinking deeper, and using tools—whether AI or no-tech—intentionally.
I’ve really grown to love the way a well-structured Rack and Stack can turn a test review into something way more meaningful than just a study guide. The trick is keeping it fast, focused, and rooted in retrieval. Monday’s review hit all of those.
Each protocol I used was capped at 5 to 8 minutes. That time limit keeps the pace quick and the energy up. Shoutout to Dominic Helmstetter—this structure is 100% something I borrowed from him, and it just works.
Here’s how we ran it:
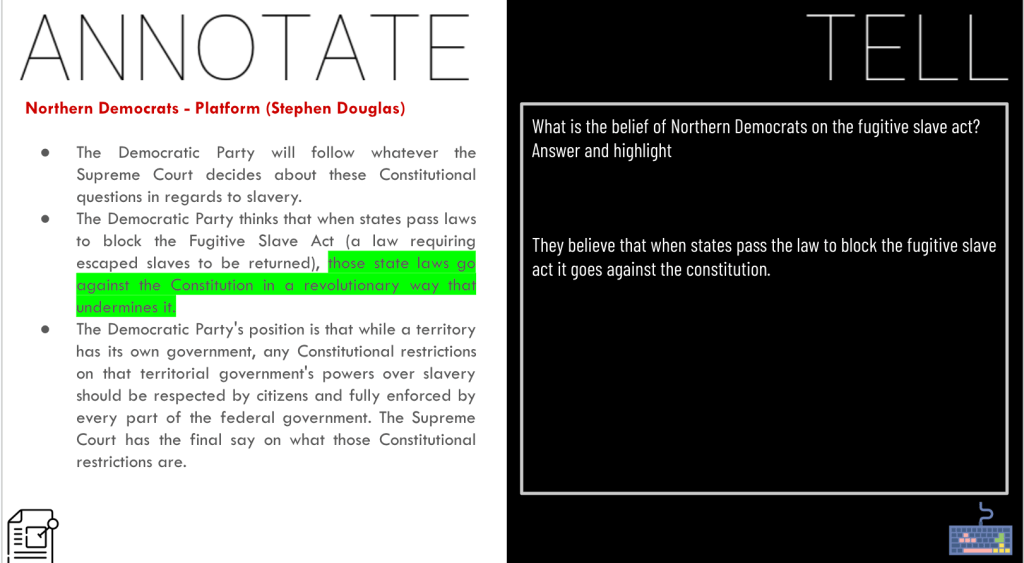
Annotate and Tell: A quick dive into industrialization sources. Students highlighted key sentences and had to explain what they meant in their own words.
Sketch and Tell: We processed key events and concepts visually—simple drawings, one-sentence blurbs. It forced kids to make connections and explain big ideas fast.
Frayer Model (Labor Unions): We broke down this concept in four parts—definition, facts, examples, and why it mattered. Took no more than 8 minutes.
Cause and Effect (Cotton Gin): Straightforward but powerful. Students made the link between inventions and unintended consequences. This also worked as a setup for Tuesday’s writing.
Parafly (Immigration): Students had three paragraphs and rewrote it using clearer language, and discussed how it could be improved. We did it fast, but it stuck.
We ended the day with a Quizizz practice test, and I threw in a little extra credit for any student who scored 100% on their first try. Four students pulled it off. That’s big.
To wrap up the period, I had students begin the Bento Box final—a creative, visual summary showing key differences between life in the North and South. The Bento Box is an Amanda Sandoval creation. They had to use symbols, captions, and organization to demonstrate understanding, not just spit out facts.
Tuesday
Tuesday was test day. No frills. No extras. Just students showing what they’ve learned—and the numbers speak for themselves.
When this unit started, my first-period class had a 35% average on the pretest. By the final test? 85%.
Second period? From 34% to 77%.
Fifth period? 35% to 81%.
Sixth period? 35% to 79%.
You can’t fake that kind of growth. It doesn’t happen by accident. That’s the result of layering protocols, keeping the tasks meaningful, and giving students multiple ways to engage with the content.
After the test, students finished up their Bento Boxes comparing life in the North and South. These were creative, visual, and packed with insight. It’s always a great way to reinforce what we’ve learned without just regurgitating facts.
And if there was still time? We rolled right into the next unit—the Second Great Awakening and Reform Movements. I had an Edpuzzle ready to go as a soft launch into that next wave of content. No wasted minutes.
The transitions were smooth, the growth was real, and the learning kept moving.
Wednesday
Wednesday kicked off the second half of our unit. The first part was focused on life in the North and South—slavery, the cotton gin, immigration, all of it. Now we’re pivoting into reform movements, and based on how heavy the content can feel, I knew I needed to chunk it.
Thin Slide: The Second Great Awakening and Reform
We started class with a Thin Slide about the Second Great Awakening. I gave students a couple paragraphs with the keywords “religion” and “reform” highlighted, and asked them to think about how a religious revival could lead to social change. I also made a local connection to Utopia, Ohio—a small town just down the road from us that people literally named “Utopia” while trying to build a perfect society in the 1840s. That little story gave the kids something to anchor to and brought the big ideas a bit closer to home.
Reform Movement Frayers
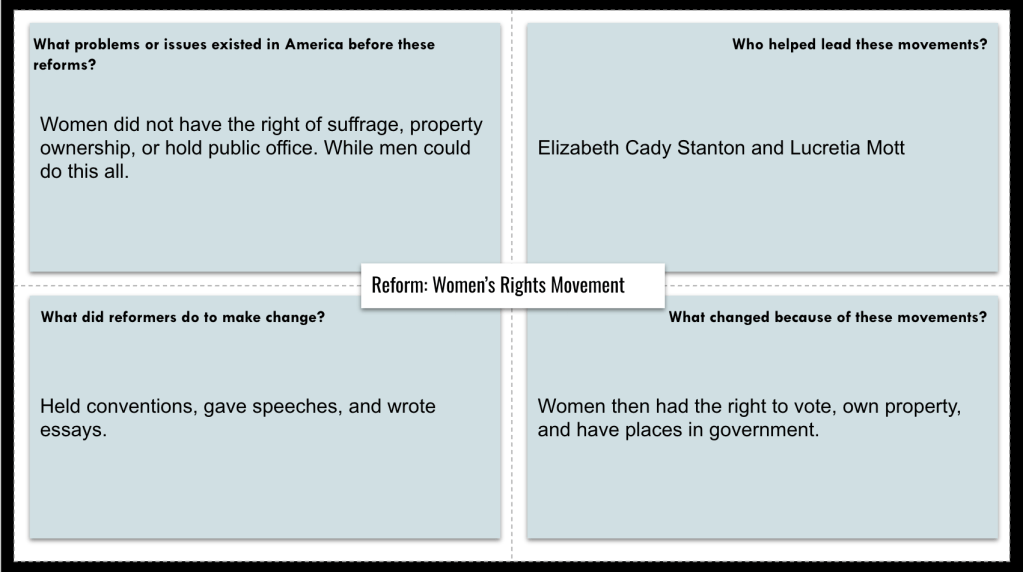
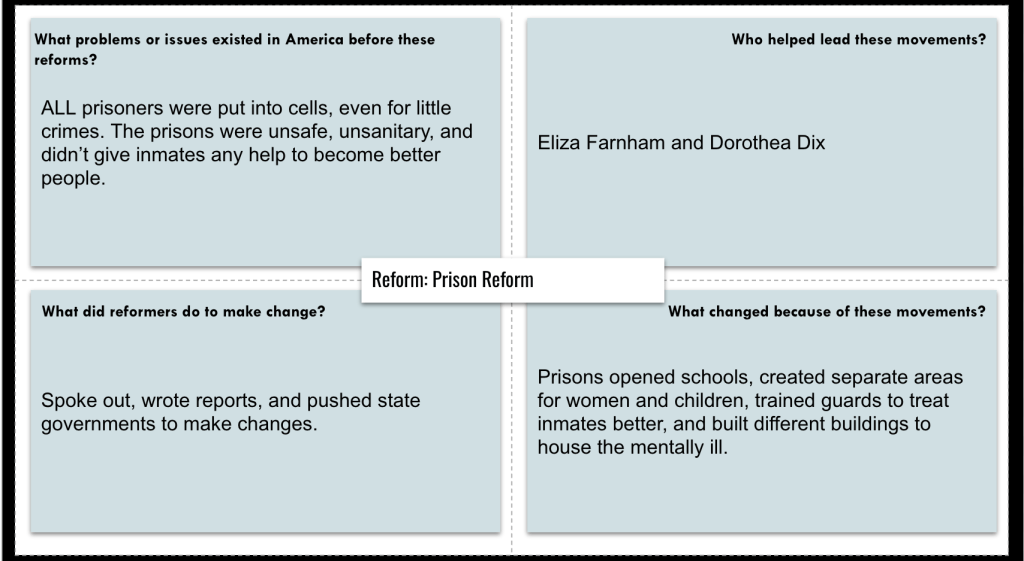
Then we jumped into four reform movements: education, prison, temperance, and women’s rights. I gave them one-page readings for each. They had to pick two and fill out a Frayer Model—with prompts like:
What were the problems before the reform?
Who was involved?
How did people push for change?
What changed?
It was all about giving them enough structure to make sense of what they read without overwhelming them.
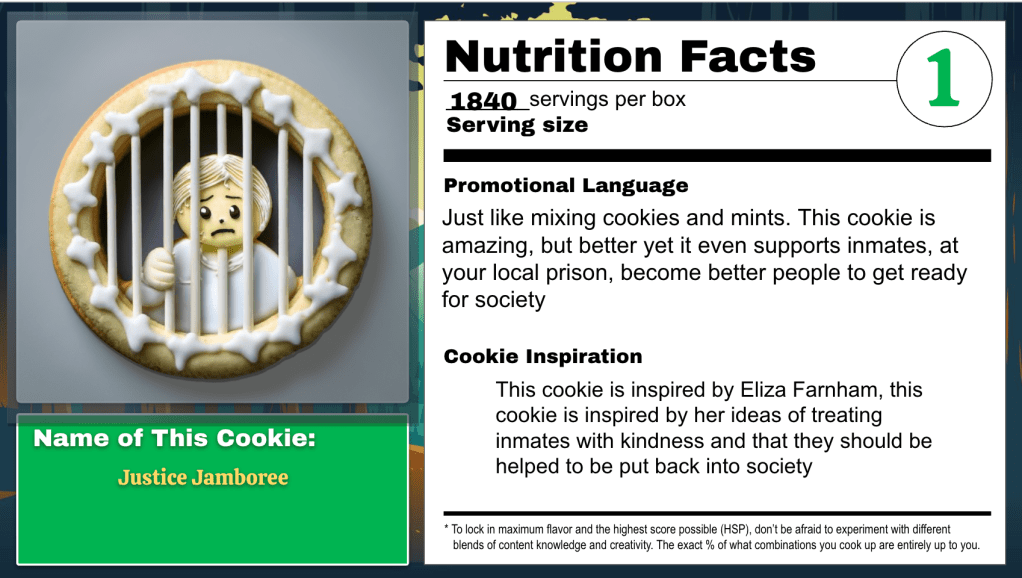
Designing a Reform Movement Cookie
The fun part came next. I had each student pick one reform movement and design a cookie that symbolized it—name, promotional language, and inspiration. Not because I think students should go into advertising, but because it gives them a creative outlet to synthesize what they’ve learned. I didn’t use a fancy template. I just gave them space and a task: connect what you learned to something that feels new and fun.
But I knew this would be a challenge. So I built a MagicSchool Idea Generator for them to use. That’s where the AI came in.
Some kids got it immediately. Others just hit “enter” and copied the first thing that popped up. That led to some awesome conversations about how to prompt AI and how to be more intentional with your thinking. One student said, “It said it couldn’t help me… then gave me a list anyway?” Welcome to AI. That’s how it works sometimes.
We talked about AI literacy without even planning to. We talked about responsible use. About editing. About pushing your thinking. It all came up naturally just by giving students a space to explore and test things out.
Why This Mattered
Some people might ask, “Why let kids use AI for something like this?” And honestly, this is exactly the kind of task where they should.
Because it’s not about copying. It’s about prompting, refining, questioning, and thinking through ideas in real time. These students are growing up in a world where AI isn’t going away. They need practice using it—not just to get an answer, but to develop a thought, build on it, and decide if it’s even worth using.
Watching students try to get the right response from the AI was the best part. Some had to reword their question three or four times before they got something useful. That’s the kind of persistence we want. That’s literacy—not just reading and writing, but digital reasoning, critical thinking, and adaptability.
It wasn’t perfect. But it was meaningful. And it was real.
Thursday
Thursday morning started with one of those classic curveballs—no Wi-Fi. Not ideal, but it forced me to think fast and strip things back to what mattered. I still wanted to build off the reform movement lesson from the day before, but I needed something fully offline that still had purpose.
I knew I wanted the lesson to focus on women’s rights—more specifically, the role suffrage played within that movement. So I kept it simple: what do I want students to understand by the end of class? I wrote that down—“Explain why suffrage was important to the women’s rights movement.”
First, I pulled a section from the textbook about the Seneca Falls Convention and the demands women were fighting for. Then I found a short, 4-minute History Channel video that gave the movement some faces and energy. I was able to play that from my desktop—no internet needed on the student end.
To process all of this, I created a Sketch and Tell-o with three textbook questions and a fourth space that asked: “Why was suffrage important to the women’s rights movement?”
But even as I was making the copies, I thought to myself—this feels basic. It felt like a worksheet. So I reframed the whole lesson with a challenge.
I started class with this statement: “Suffrage wasn’t that important to the women’s rights movement—it was just one of many demands.” Change my mind.
That one sentence shifted the tone. Suddenly they weren’t just answering questions—they were preparing a rebuttal. They watched the video, read the section, answered questions, and sketched visuals of what women were fighting for. And at the end, they had to change my mind.
It took some time to click. Some students didn’t totally get what I meant by “change my mind.” I ended up clarifying—I’m asking you to explain why voting was important. Convince me it wasn’t just another demand—it was the demand.
Once I shared an ideal response and modeled what a strong one might look like, the gears started turning. And honestly, the thinking that came out of it was way better than I expected for a no-tech day. The reframing really mattered.
We closed class with a quick Quizizz to check understanding of reform movements, suffrage, and the Seneca Falls Convention. Results were solid—and the engagement? Way better than if I’d just handed them a worksheet.
This week wasn’t about cramming in new content or racing toward a test—it was about building something that lasted. We used a layered mix of retrieval, reading, analysis, structured writing, and reflection, and each protocol helped us answer a bigger question. Coming off spring break, I knew students would need structure but also some momentum. So I stacked the lessons with intention.
We used Fast & Curious with Quizizz every day, not just to review terms, but to show how retrieval works when it’s spaced out and tied to deeper learning. We layered in Annotate & Tell for close reading and sourcing, and we used Graph & Tell to compare data with perspective. Students analyzed primary sources, revised flawed writing, and built arguments from multiple viewpoints.
We pulled in Archetype Four Square to reframe historical figures like Eli Whitney, then brought it full circle with Class Companion, Thick Slides, and a hands-on word wall review to tie everything together.
We came back from spring break, and I knew better than to pretend everything would pick up right where we left off. After 10 days off, kids needed a ramp—but that didn’t mean the day had to be a throwaway. I wanted to build back some content momentum while still reinforcing writing skills. So I stacked the lesson around a clear essential question and layered the tasks with a mix of retrieval, source analysis, and structured writing.
Quizizz:
We kicked things off with a Quizizz that blended review and preview questions from our industrialization unit. The idea was to warm up their brains without pressure. It gave me a quick read on what stuck over break, what needed refreshing, and where we could push forward.
Primary Source Pack: Framed by a Big Question
The textbook has a set of primary source lessons—usually I tweak or skip them, but this one had potential. The essential question was: How can changes in work and social life affect a society?
I ran all six sources through AI and had it reword them to be more accessible without losing meaning. I also had AI generate two basic questions per source to give kids a little guidance. After each source, students wrote a 6-word summary that directly tied back to the essential question. That’s what kept the focus. No wandering. Every source came back to that one big idea.
The sources included:
A Lowell Mill girl’s journal
An immigrant’s first letter home
A factory owner’s defense of conditions
A political cartoon from the time
A protest flyer
An anti-immigrant speech
Each gave students a different perspective, and the layering really helped them start to think critically about the intersection of work, immigration, and social change in the 1800s.
Short Answer: Revising a Bad Paragraph
Once we had enough content, I dropped them into a Short Answer task. I gave them a clearly incorrect paragraph that oversimplified everything. Their job was to revise it using evidence from the sources.
Here’s what they had to fix: Changes in work and population didn’t really affect anything. Most people stayed on farms and worked outside. Immigrants had an easy time finding jobs and were treated fairly. Factory workers only worked a few hours a day, and their jobs were fun and safe. No one complained, and the government made sure everything was perfect.
The responses were solid. Short Answer let them see peer examples and compare their thinking, which always boosts engagement. We weren’t writing full-blown essays—just clean, focused revisions with evidence and reasoning. That’s the kind of writing practice that sticks.
Fast and Curious Again:
To finish class, we went back to Quizizz with a Fast and Curious round. It was the same set as earlier, but now students had background knowledge from the readings and writing. I wanted to see if the scores improved, and they did. Retrieval practice works—especially when the content is layered.
Tuesday
This lesson was all about getting students to see the layers of impact behind Eli Whitney’s invention—not just the praise in textbooks, but the real, complicated ripple effects. We used a mix of protocols to help students analyze, compare, and respond to those consequences.
Quizizz Check – Fast and Curious
We started with a Fast & Curious Quizizz round. The goal was to preview key terms tied to the cotton gin: invention, economy, agriculture, slavery, unintended consequences. I saw right away where the gaps were. Some students had never really connected the cotton gin to slavery. That told me the rest of the lesson needed to go beyond “Eli Whitney invented something helpful.”
Archetype Four Square: Who Was Eli Whitney?
Next, we moved into an Archetype Four Square. After reading a short bio of Eli Whitney, students picked an archetype they felt best represented him. Then we had them support it with evidence from the reading and make a historical or pop culture comparison. It sparked some great thinking. Was he a hero? A sage? A magician?
Annotate & Tell
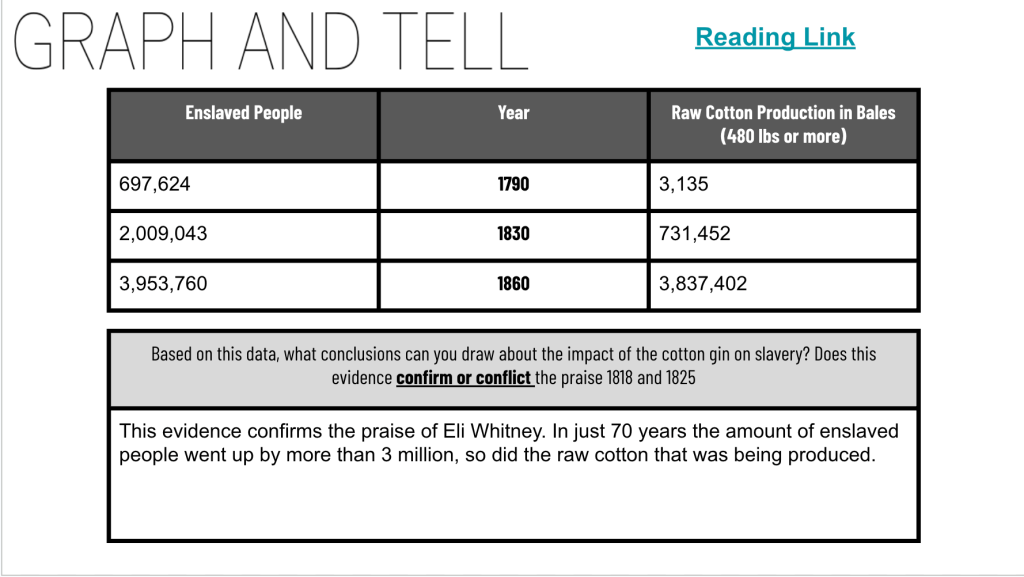
From there, we jumped into an Annotate & Tell using two primary sources—newspaper articles from 1818 and 1825 celebrating the cotton gin. Students highlighted quotes that showed the invention’s impact: increased cotton production, land value, and Southern prosperity. Then we paused and asked the real question: What’s missing from this praise?
Graph & Tell
To bring in the other side, students examined a chart showing the rise of enslaved persons alongside the rise of cotton production. This was our Graph & Tell moment. They filled in a chart and wrote a short summary of what they noticed: a clear correlation between more cotton and more slavery. Then we pushed further—Does this data support or challenge what the primary sources said? That question changed everything.
Class Companion
To wrap things up, students went to Class Companion and wrote from a chosen point of view: Eli Whitney, a plantation owner, an enslaved person, or a Northern factory worker. Their task was to explain the consequences of the cotton gin from that lens, including both short- and long-term effects.
The AI feedback blew me away. It didn’t just give grammar tips—it recognized their POV and gave specific feedback tied to it. For example, students writing as enslaved people got suggestions on expressing emotion or explaining hardship more clearly. It was targeted, authentic, and helped them revise in real time.
Wednesday – Friday
Wednesday through Friday were choppy. State testing threw off our schedule, kids were in and out, and nothing was consistent. But in some ways, that made the lesson better. We had space to slow down and focus on the people most impacted by what we’d learned earlier in the week—enslaved individuals.
After exploring the unintended consequences of the cotton gin, we shifted into the question: What was life like for the people whose lives were changed by it? It wasn’t about moving on—it was about going deeper.
Starting with Language
We began with a short but important conversation about how we talk about people in history. I introduced person-first language:
“enslaved person” instead of “slave”
“enslaver” instead of “master”
“freedom seeker” instead of “runaway”
I told students these words don’t just sound better—they shift how we see people. They’re human first. Not property, not background characters in someone else’s story. The kids caught on quickly and started using the new terms without being reminded. That one shift helped everything else land better.
Quizizz
Next, we ran a Quizizz. I built it around key vocabulary like abolitionist, resistance, enslaver, overseer, and oppression. I also kept a few questions from earlier in the week to bring back some of the Eli Whitney and cotton gin context. The goal wasn’t a grade—it was to activate thinking, catch misconceptions, and see what needed clearing up before we hit the heavier stuff.
A lot of kids didn’t fully understand “resistance,” so that told me where to lean in next.
EdPuzzle
We watched a high school-level EdPuzzle on slavery and resistance. I picked the 9–12 version on purpose—it talked about the Underground Railroad as a metaphor instead of a literal train line. That helped break a common misconception right away.
More importantly, the video gave a broader definition of resistance. It wasn’t just running away—it was breaking tools, learning to read, preserving family bonds, working slowly on purpose, singing coded messages in songs. It gave them a new way to understand how enslaved people fought back.
Annotate & Tell
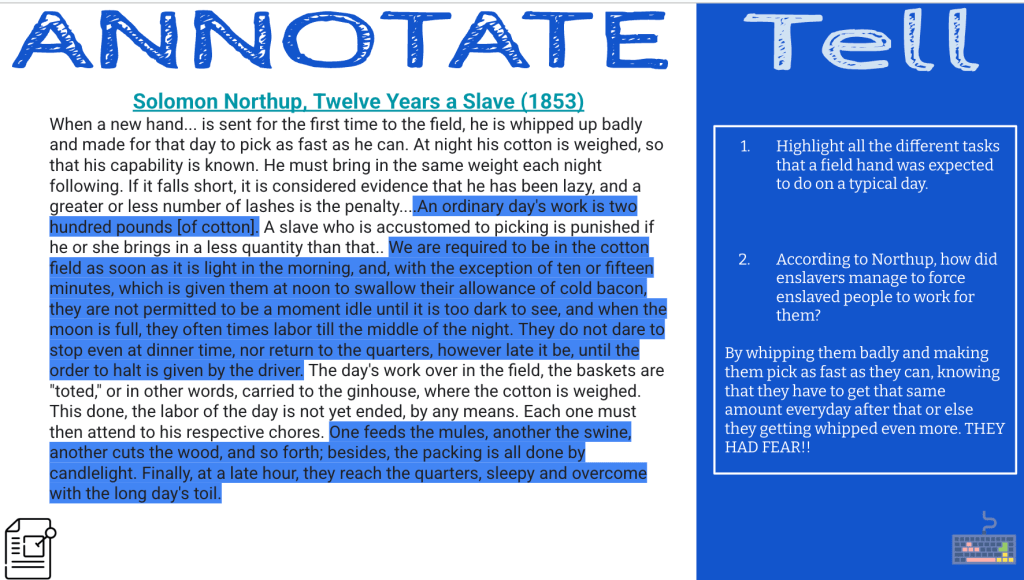
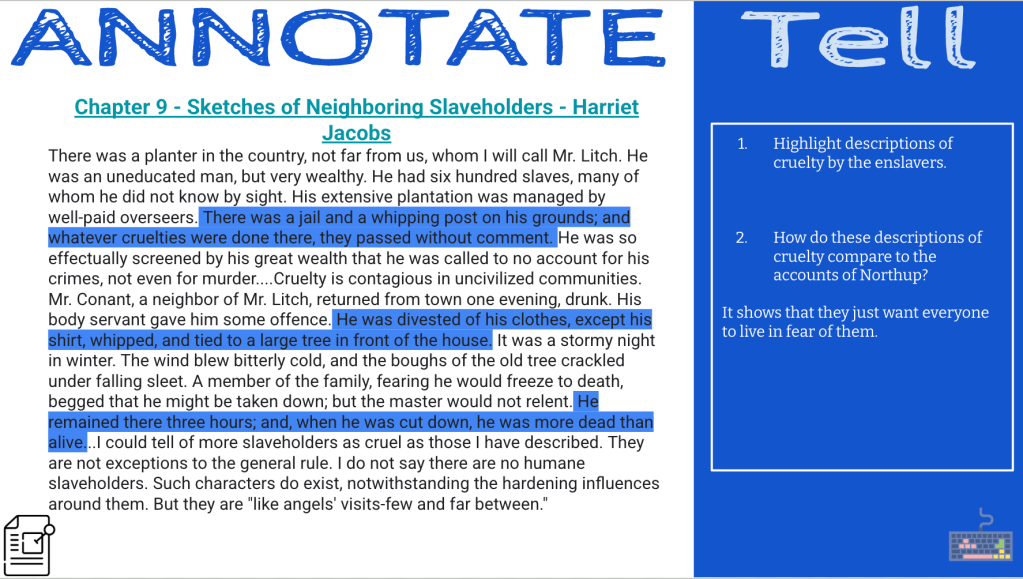
After that, we moved into Annotate and Tell with two powerful excerpts:
Solomon Northup from Twelve Years a Slave
Harriet Jacobs from Incidents in the Life of a Slave Girl
We started with short background blurbs so students knew who these people were and why their stories mattered. Then we read each passage together, pausing to highlight key phrases and answer focused questions.
Northup described long days in the field, being forced to pick 200 pounds of cotton, being punished if you fell short, and chores that lasted well into the night. Jacobs described the cruelty and control that came with wealth—enslavers who tortured without consequence and normalized abuse.
Thick Slide: Be the Abolitionist
Then it was time to apply what they learned. Students created a Thick Slide from the point of view of an abolitionist trying to convince others that slavery must end. Their slide had to include:
Three quotes from the readings that exposed the reality of slavery
An explanation of why those quotes mattered
One form of resistance from the EdPuzzle and why it was important
A Human Spotlight featuring Harriet Jacobs, Solomon Northup, or someone from the video
A picture and a short caption telling that person’s story—what they saw, suffered, or stood for
Some students picked quotes that showed the physical brutality. Others focused on how people kept resisting anyway. Their captions were sharp, and a few were honestly emotional. They weren’t just checking boxes—they were making a case.
Teaching the AI Workflow
After they built their slides, I walked them through a quick Chromebook skill: Ctrl + Shift + Window Switcher = screenshot tool.
Then I showed them how to upload that screenshot into a MagicSchool chatbot I had set up. I modeled how to ask for specific feedback. As I always say, “If you give the AI tool crappy prompts, you’re going to get crap back.”
The whole point was to show them how to use AI after the thinking is done—to reflect, revise, and improve. Not to let AI do it all for them.
Word Wall Review
To wrap everything up, we did a drag-and-drop word wall. Students sorted terms and ideas between North and South—factory, agriculture, slavery, resistance, cotton, railroads, canals, unions, etc. It tied together everything we’ve covered the last two weeks in one quick review. Fast, visual, and a good reset after a deep few days.
Truth With Sprinkles
On Friday, I wanted something new for retrieval practice. I began class with a Class Companion – but with a twist!
I had AI create 2 paragraphs with 4 historical errors. Here is what AI came up with:
In the early 1800s, the United States began to shift from farming to factory work. Most industry grew in the South because of its strong transportation system and large population of factory workers. One major invention that helped speed up this progress was the cotton gin. Created by Eli Whitney, this machine made cotton easier to clean and reduced the need for enslaved labor in the South.
Meanwhile, in Massachusetts, young women flocked to places like Lowell Mills for clean and safe factory jobs. They worked short hours and were treated fairly under new labor laws. Many factory owners supported the rise of labor unions because they wanted to keep their workers happy. These early unions helped workers demand better conditions with the full support of the people in charge.
I called it “Truth with Sprinkles” – sprinkles of fiction, that is! I brought sprinkled donuts for my 1st period because they worked so damn hard on the state test. It was unbelievable. They wrote their hearts out and gave it everything they had – it was awesome.
So, as they were eating their donuts (some with chocolate frosting and sprinkles) they were finding the sprinkles of fiction in the paragraphs. They were historical detectives.
I set up the Class Companion for only 1 submission – I didn’t want them submitting right away and trying to get the answers. They were discussing, analyzing, and acting as historical detectives fixing the errors. This was an awesome retrieval practice. Class Companion gave them great feedback on each error they tried to correct – it worked out so well!
This week was all about building depth and complexity while keeping students engaged with a variety of EduProtocols. We wrapped up Westward Expansion with strategies that helped students compare perspectives, analyze sources, and refine their writing skills.
We used Annotate & Tell to break down Texas independence and the Mexican-American War, Map & Tell to visualize territorial disputes, and Thick Slides to connect primary and secondary sources on the Mormon migration. Parafly helped students paraphrase historical texts, while MiniReports with Class Companion pushed them to synthesize information and improve their writing with AI feedback. We even tied in local history by exploring Clermont County’s own Gold Rush in 1868.
Each of these protocols ensured that students weren’t just memorizing facts—they were actively engaging, thinking, and making connections across history.
Tuesday’s lesson wasn’t just about reviewing Texas Independence—it was about digging deeper into how Texas annexation shaped American expansion and government policies. Instead of running through surface-level review questions, I stacked Annotate and Tell and Archetype Four Square to help students analyze the political and social consequences of annexation, make connections across history, and examine the perspectives of different groups.
Annotate and Tell: Breaking Down Texas Independence
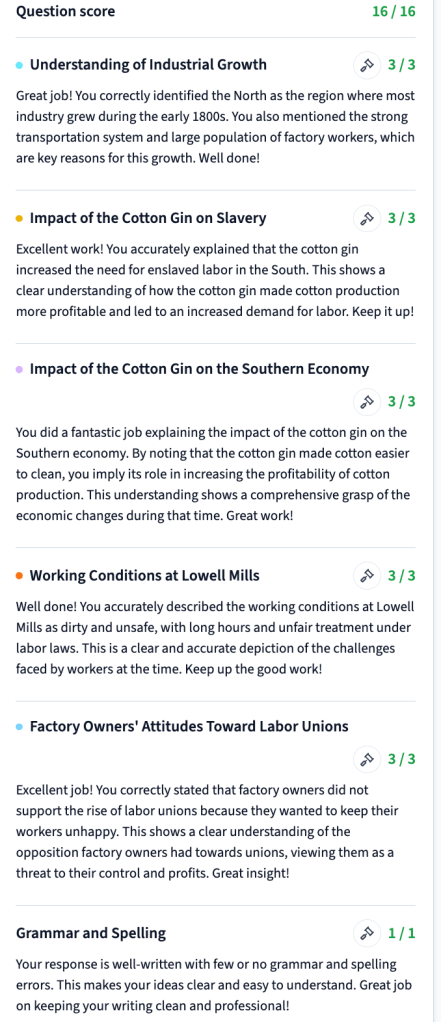
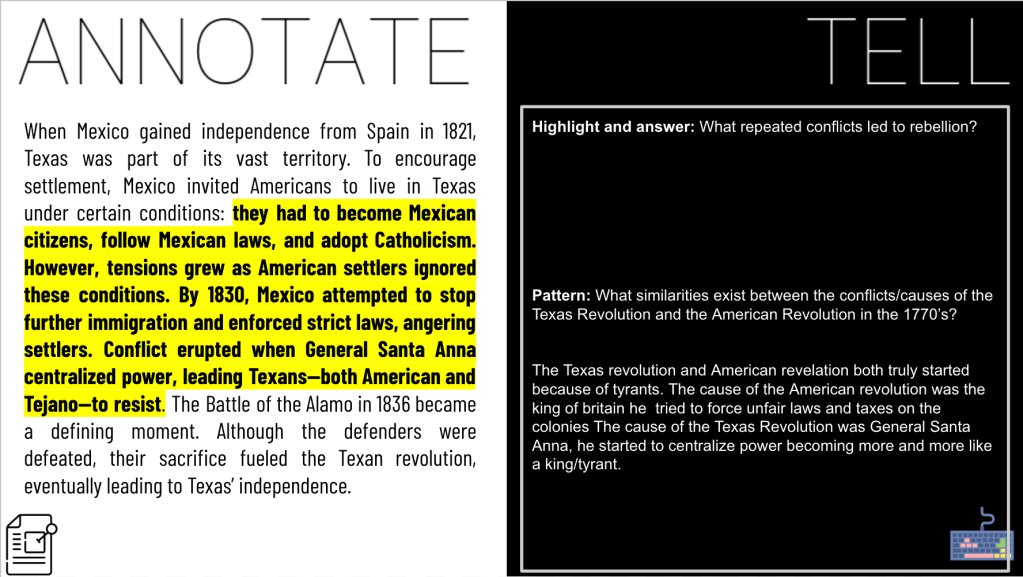
We started with Annotate and Tell, where students worked through a reading on Texas Independence, highlighting key points and responding to Depth and Complexity-aligned questions. What major conflicts led to rebellion? How did tensions between Texas and Mexico mirror other revolutions in history?
Students identified patterns in why revolutions happen, comparing Texas’s fight for independence to the American Revolution and other independence movements. After annotating, we had a discussion about how perspective shapes historical narratives, particularly in how Texas Independence is viewed by Americans versus how it was seen by Mexico.
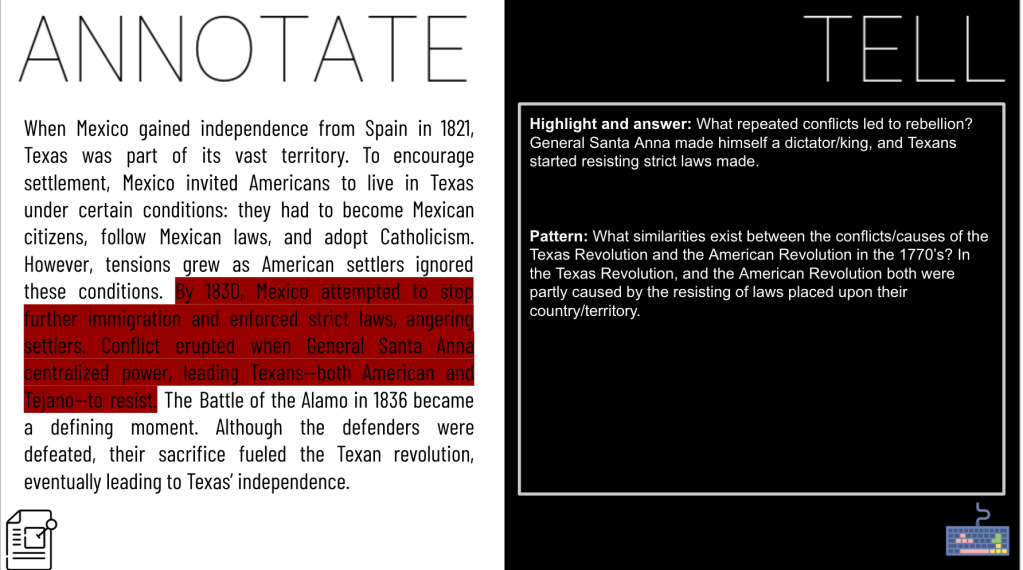
Archetype Four Square: Analyzing Government Post-Texas Annexation
Once students had a solid foundation on Texas Independence, we shifted focus to the role of the U.S. government in Texas annexation. Using Archetype Four Square, students analyzed the U.S. government’s actions through different archetypes. Was the U.S. acting as a Protector, an Opportunist, or an Aggressor in annexing Texas?
The connect piece was built into this activity as well. Students had to relate Texas annexation to another historical event. Many connected it to the Trail of Tears, recognizing that U.S. expansion often came with the displacement of Native American groups. Others linked it to the Louisiana Purchase, seeing it as another example of the U.S. growing its territory at the expense of others. This led to a discussion on whether Manifest Destiny justified these actions or simply provided an excuse for expansion.
Wednesday
Wednesday’s lesson was all about analyzing the causes and outcomes of the U.S.-Mexican War through layered activities that encouraged critical thinking. Using Map & Tell, Annotate & Tell, and Sketch & Tell-O, students built a deeper understanding of how territorial disputes, political decisions, and war shaped the history of the United States and Mexico.
Map & Tell: Setting the Stage
To start, we used Map & Tell to provide a visual representation of the territorial dispute between the U.S. and Mexico. Students labeled key locations, including the Nueces River, Rio Grande, and disputed land. We discussed why both countries claimed the land and how this disagreement escalated tensions.
Annotate & Tell: Analyzing Justifications for War
Next, students examined primary and secondary sources through Annotate & Tell to break down the events that led to war. Using depth and complexity prompts, they highlighted key parts of the text and answered questions that pushed them to think critically:
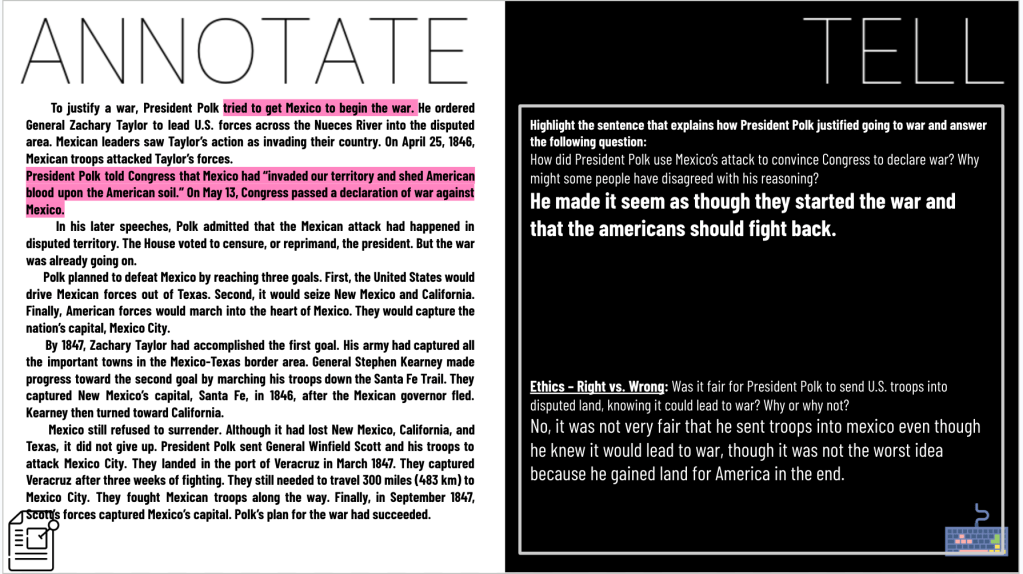
Why did Mexican leaders refuse to discuss John Slidell’s offer, and how did their response influence Polk’s decision to go to war? Students highlighted the sentence explaining Mexico’s refusal and discussed how it reinforced Polk’s belief that military action was necessary.
Perspective: How might Mexico’s refusal to sell land be viewed differently by American expansionists and Mexican leaders? Many students noted that expansionists saw it as an opportunity to fulfill Manifest Destiny, while Mexican leaders saw it as an unjust attempt to take their land.
Annotate & Tell: Justifying War
The second Annotate & Tell focused on how President Polk framed the conflict:
Highlight the sentence that explains how Polk justified going to war. How did he use Mexico’s attack to convince Congress? Why might some people have disagreed? Students highlighted Polk’s statement about “American blood on American soil” and debated whether this was a valid reason for war or a strategic move to gain support for expansion.
Ethics – Right vs. Wrong: Was it fair for President Polk to send U.S. troops into disputed land, knowing it could lead to war? Why or why not? This question sparked discussions about whether Polk provoked Mexico into war and whether the conflict was avoidable.
Sketch & Tell-O: Understanding the Treaty of Guadalupe Hidalgo
To close out the lesson, students completed a Sketch & Tell-O focused on the Treaty of Guadalupe Hidalgo. Each student created a visual representation of:
The land acquired by the U.S.
The impact of the treaty on Mexico
How the treaty shaped future territorial expansion
They also wrote a short explanation connecting the treaty to previous historical events, with many linking it to the Trail of Tears, recognizing the continued displacement of people as the U.S. expanded westward.
Thursday
Thursday’s lesson focused on the Mormon migration and the challenges they faced during westward expansion. To make the content engaging and meaningful, I used a mix of EduProtocols, incorporating depth and complexity elements to push students’ thinking beyond just recalling facts.
Wicked Hydra: Generating Inquiry from Primary Sources
We started with a Wicked Hydra, where students analyzed Executive Order 44, also known as the “Extermination Order” issued by Missouri’s governor in 1838. The document stated that Mormons must be treated as enemies and either exterminated or removed from the state.
Students generated questions such as:
Who were the Mormons?
Why were they hated?
What did they do to provoke this response?
How could a state issue an extermination order?
These questions helped frame the lesson, setting up historical context and encouraging students to think about discrimination, religious freedom, and government authority.
Number Mania: Proving the Statement with Evidence
Next, we ran a Number Mania to reinforce the scale of the Mormon migration. The statement to prove was: “The Mormon migration was one of the largest and most significant westward movements in U.S. history, involving thousands of people traveling thousands of miles to settle in Utah, where they established a thriving community despite early challenges.”
Students had to:
Find four numbers that proved the statement true.
Paraphrase facts from the textbook reading.
Add four icons or pictures to visually represent key details.
Title their Number Mania creatively to reflect the historical significance.
This protocol pushed students to analyze the numbers behind historical events and justify the migration’s impact with data.
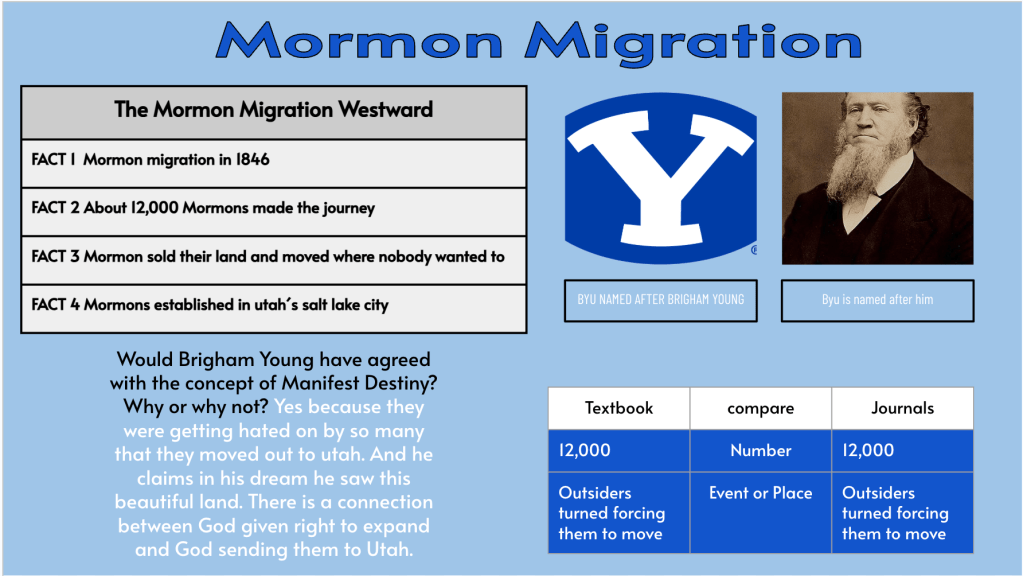
Thick Slide: Memory, Complexity, and Comparison
Students then created a Thick Slide, recalling four important facts about the Mormon migration from memory. But instead of stopping at just listing information, I added a depth and complexity twist:
“Would Brigham Young have agreed with Manifest Destiny? Why or why not?”
This question encouraged students to think critically about how religious groups viewed expansion differently than the U.S. government. Some argued that Young supported expansion for the survival of his people, while others pointed out that Mormons weren’t interested in spreading democracy or territorial claims in the same way as the federal government.
To deepen analysis, students then compared secondary source facts from the textbook with primary source excerpts from Mormon journals. They looked for corroborating details between historical records and personal accounts of migration hardships. This activity helped reinforce sourcing skills and historical interpretation.
Friday
We started the day with a Friday check-in: What seemed like an exciting experience but ended up being a complete letdown or genuinely difficult once you were actually there? I wanted students to connect with the experience of prospectors who traveled west expecting instant riches but faced harsh realities. This helped students build a personal connection to the topic before diving into the content.
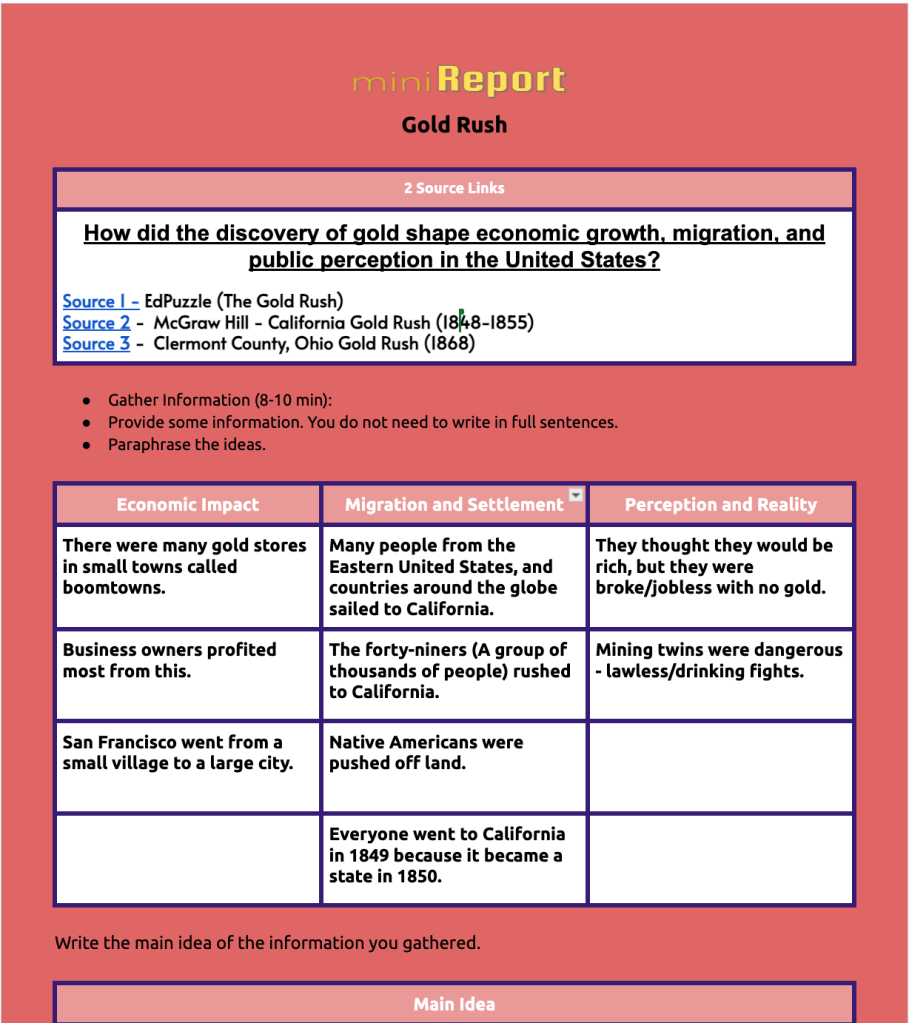
MiniReport: Analyzing the Gold Rush from Multiple Perspectives
To examine the impact of the Gold Rush, we structured our lesson around a MiniReport paired with Class Companion for writing and feedback. The central question for this activity was: How did the discovery of gold shape economic growth, migration, and public perception in the United States?
Step 1: Gathering Information from Multiple Sources
Students worked with three sources:
An EdPuzzle video on the California Gold Rush, which provided an engaging, visual introduction.
A McGraw Hill textbook reading on the economic and social effects of the Gold Rush.
A local history connection—the 1868 gold rush in Clermont County, Ohio.
Students organized their findings into three categories:
Economic Impact: How the rush transformed industries, trade, and the economy.
Migration and Settlement: How it spurred mass movement westward.
Perception vs. Reality: The myths versus the actual struggles of prospectors.
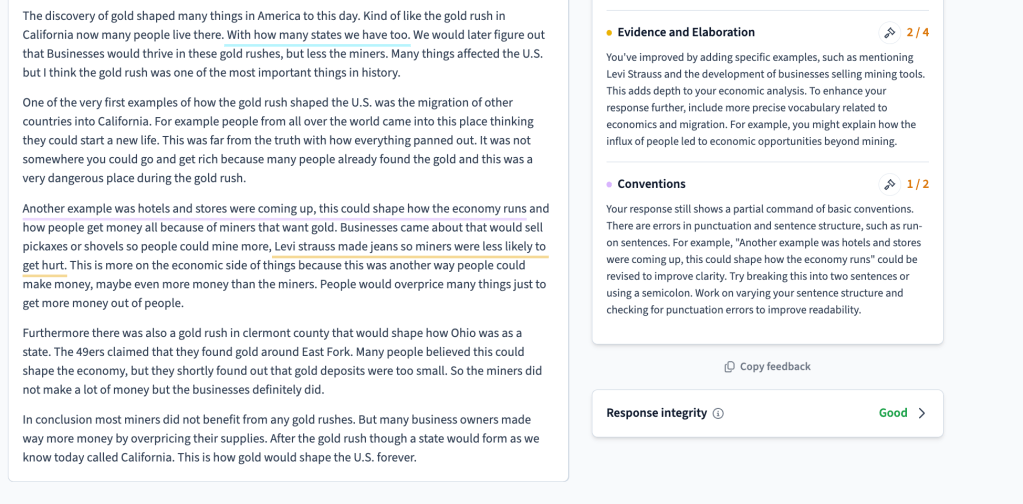
Step 2: Writing & Feedback with Class Companion
After gathering their evidence, students wrote a structured paragraph in Class Companion, where they received instant AI-driven feedback. I linked the Ohio State Test informative/expository rubric to the assignment, reinforcing the writing expectations they will face on standardized tests.
Students focused on:
A clear topic sentence.
Supporting details from their sources.
A strong concluding statement.
I also used this opportunity to discuss how AI scoring systems on state tests look for specific key phrases, transitions, and evidence-based reasoning—helping students understand how to write for their audience.
This past week, EduProtocols made Andrew Jackson’s presidency more interactive and engaging, helping students analyze his impact through Fast & Curious, Annotate & Tell, MiniReports, Somebody-Wanted-But-So-Then, Thin Slides, and Number Mania. We started each day with Gimkit vocabulary practice, reinforcing key terms before diving into content. The Nullification Crisis worked well with Somebody-Wanted-But-So-Then, helping students break down key perspectives, while the Bank War MiniReport with Class Companion pushed them to strengthen historical writing using AI feedback.
For Indian Removal, we layered Edpuzzle, Annotate & Tell, Thin Slides, and Number Mania, making connections between the Seminole Wars, Indian Removal Act, Worcester v. Georgia, and the Trail of Tears. In Number Mania, students had to justify a quote using numerical evidence, reinforcing cause-and-effect thinking. Some students were testing Class Companion to outsmart AI, while others were pushing themselves to write more, but either way, they were improving. Using EduProtocols helped students engage deeply with Jackson’s presidency, making complex historical topics more meaningful and accessible.
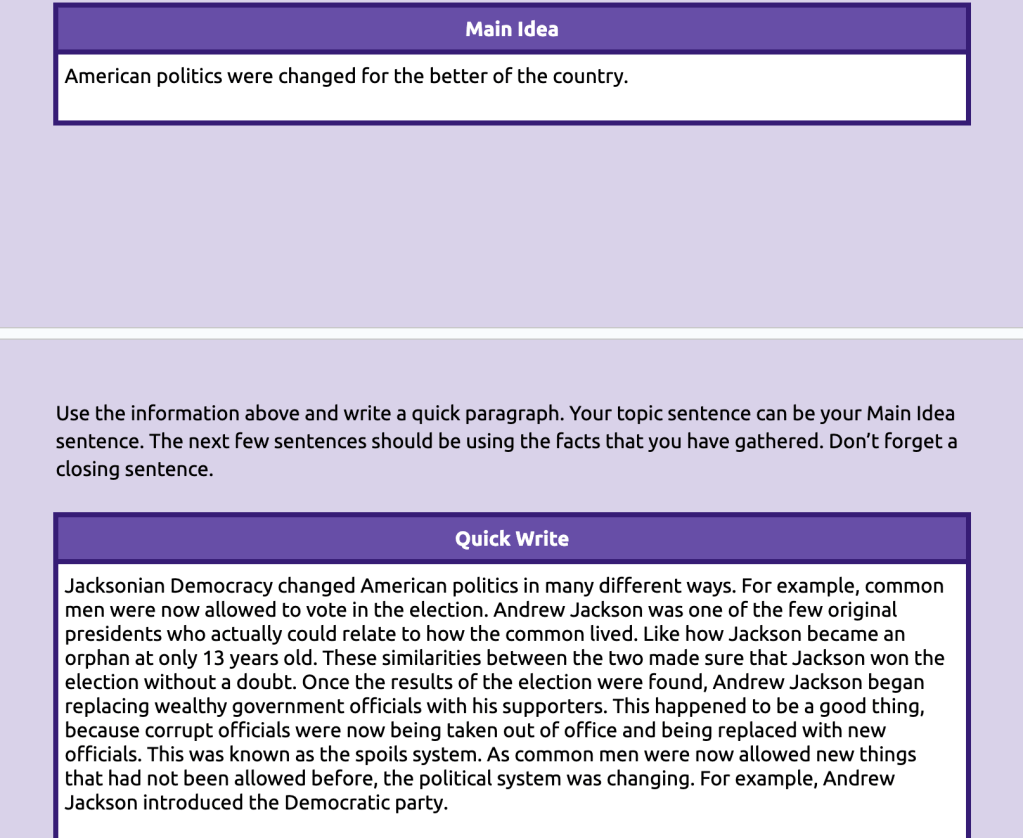
We started our new unit on Andrew Jackson with the central guiding question: Should Andrew Jackson be considered a good president or a bad president?
To establish a baseline understanding, students took a pre-assessment, and as expected, the class averages were low—ranging from 19% to 25%. These results weren’t surprising since many students had little prior knowledge of Jackson beyond his presence on the $20 bill.
From there, we jumped into Jacksonian Democracy, starting with a Gimkit Fast & Curious to introduce key vocabulary terms like Jacksonian Democracy, democracy, spoils system, suffrage, and nominating conventions. We ran one round for two minutes, reviewed the words, and ran it again for another two minutes. This strategy paid off—every class improved their average score by at least 35% after just two rounds.
Building Understanding Through Multiple Lenses
Frayer Model: Breaking Down Jacksonian Democracy
After locking in vocabulary, students created Frayer Models for Jacksonian Democracy, helping them explore: ✔ Definition ✔ Characteristics ✔ Examples ✔ Non-examples
This was crucial because Jacksonian Democracy is not just about Andrew Jackson—it’s about a shift in political power and voting rights for the “common man.”
Map & Tell: Geography & Political Shifts
Next, we tied Jackson’s election to geographic and political changes through a Map & Tell activity. Students analyzed maps of voter participation in 1824 vs. 1828 to answer: 🔹 Where did voter turnout increase the most? 🔹 Which regions supported Jackson? 🔹 What does this suggest about democracy in the early 1800s?
Seeing how voting patterns shifted helped students visualize how Jackson’s presidency was fueled by an increase in voter participation among everyday Americans—one of the defining elements of Jacksonian Democracy.
MiniReport: Expanding Democracy vs. Controversy
Students then worked through a MiniReport to gather information from two sources: 1️⃣ The Election of 1828 – A Victory for the Common Man 2️⃣ The Spoils System
They had 8-10 minutes to collect key information on how Jacksonian Democracy expanded political participation while also bringing controversy through shifts in power. This helped them paraphrase key ideas and prepare for a structured quick write summarizing their findings.
After drafting their paragraphs, we used Class Companion to provide AI-generated feedback on their responses. I’m starting small with the MiniReport to help students build skills in comparing sources and developing structured paragraphs. The goal is to strengthen their ability to synthesize information, support their claims with evidence, and refine their writing with targeted feedback.
2xPOV: Seeing Jackson From Different Angles
To wrap up, students engaged in a 2xPOV activity where they analyzed Jackson’s impact from two perspectives: 1️⃣ A common man who benefited from his policies 2️⃣ A government official who saw issues with his leadership
This exercise helped students recognize how historical figures and policies aren’t just good or bad—they affect people differently based on their circumstances.
This structured approach ensures students aren’t just memorizing facts—they’re analyzing how Jacksonian Democracy shaped American politics, making it easier to answer our big guiding question in the weeks ahead: ➡️ Should Andrew Jackson be considered a good or bad president?
Wednesday – Continuing Our Exploration of Andrew Jackson
We continued exploring Andrew Jackson by focusing on the Tariff of Abominations and the Nullification Crisis. I started with some quick notes to provide background on tariffs and their impact, then we jumped into another Gimkit with new vocabulary words—tariff, abomination, nullification, and states’ rights.
Fast & Curious – Vocabulary Review
We ran a Gimkit for two minutes, paused for quick feedback, and then ran it again for another two minutes. Every class raised their average by 38% or higher, showing solid growth in understanding key terms. This quick retrieval practice helped students solidify their understanding before diving into deeper analysis.
Frayer Model – Clarifying Key Terms
I told students that if any question scored below 80% accuracy, we would Frayer it. The most commonly missed words were Union and secede, so we used the Frayer Model to break them down. Students worked together to define each term, provide examples, and illustrate their meaning, ensuring a stronger grasp of these key ideas before moving forward.
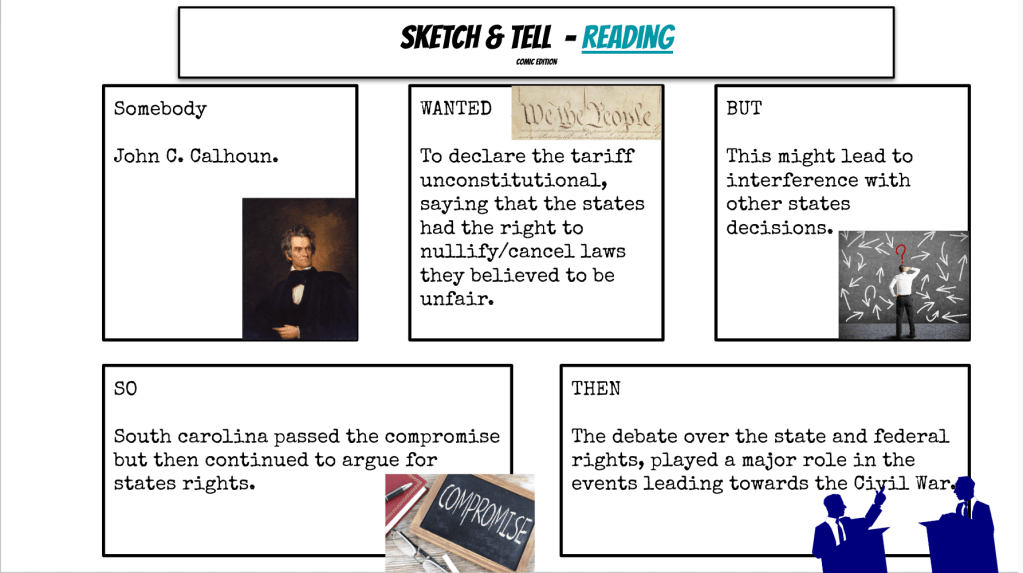
Somebody-Wanted-But-So-Then – Breaking Down the Crisis
We kept coming back to our main unit question, using it to frame our discussion on how tariffs and nullification created tension between the federal government and the states. To break things down, we used a Somebody-Wanted-But-So-Then chart to map out key players and their perspectives. This led us into a discussion about Andrew Jackson’s response to South Carolina’s threat to nullify the tariff and John C. Calhoun’s argument for states’ rights.
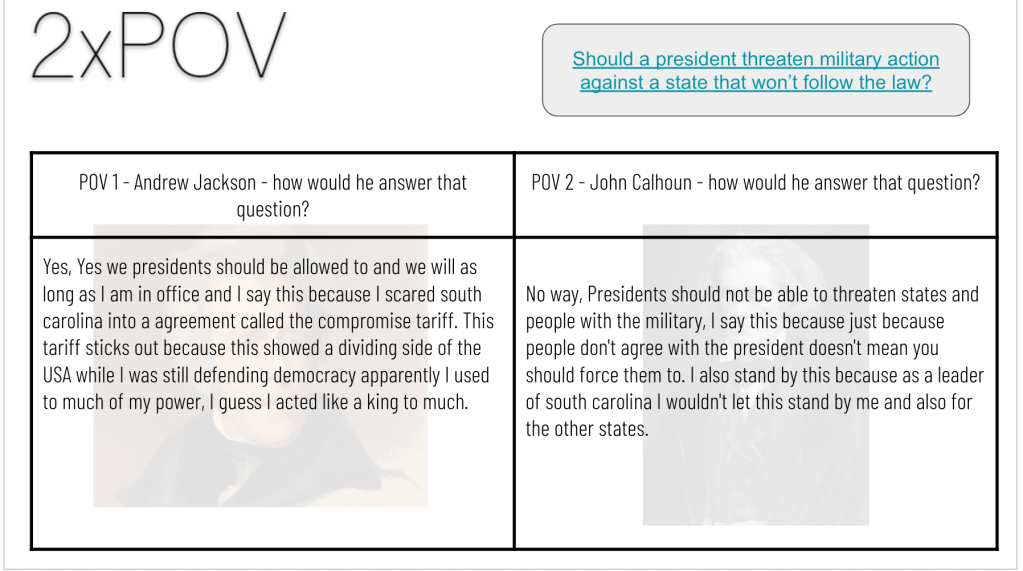
POV Analysis – Jackson vs. Calhoun
To take it a step further, students examined the point of view (POV) of both Jackson and Calhoun by answering: “Should a president threaten military action against a state that refuses to follow federal law?”
This activity pushed students to think critically about federal vs. state power, a growing issue leading up to the Civil War.
🚀 By layering Fast & Curious, the Frayer Model, Somebody-Wanted-But-So-Then, POV Analysis, and Sketch & Tell, students engaged with history in multiple ways, making the complexities of the Nullification Crisis more accessible and meaningful!
Thursday – Jackson’s Bank War
We continued our exploration of Andrew Jackson by focusing on the Bank War and its effects on the U.S. economy. To kick things off, we ran a Gimkit with key vocabulary terms—inflation, depression, banknotes, economy, and others. The first round lasted two minutes, followed by quick feedback, and then another two-minute round. As with previous days, every class raised their average by 38% or higher, reinforcing key concepts before diving into the content.
Originally, I planned to incorporate a Frayer MiniReport and 2xPOV, but due to a two-hour delay, I adjusted the plan to focus on the MiniReport with Class Companion to make the best use of our time. With a test coming up on Tuesday, I wanted to keep things streamlined while still reinforcing key ideas.
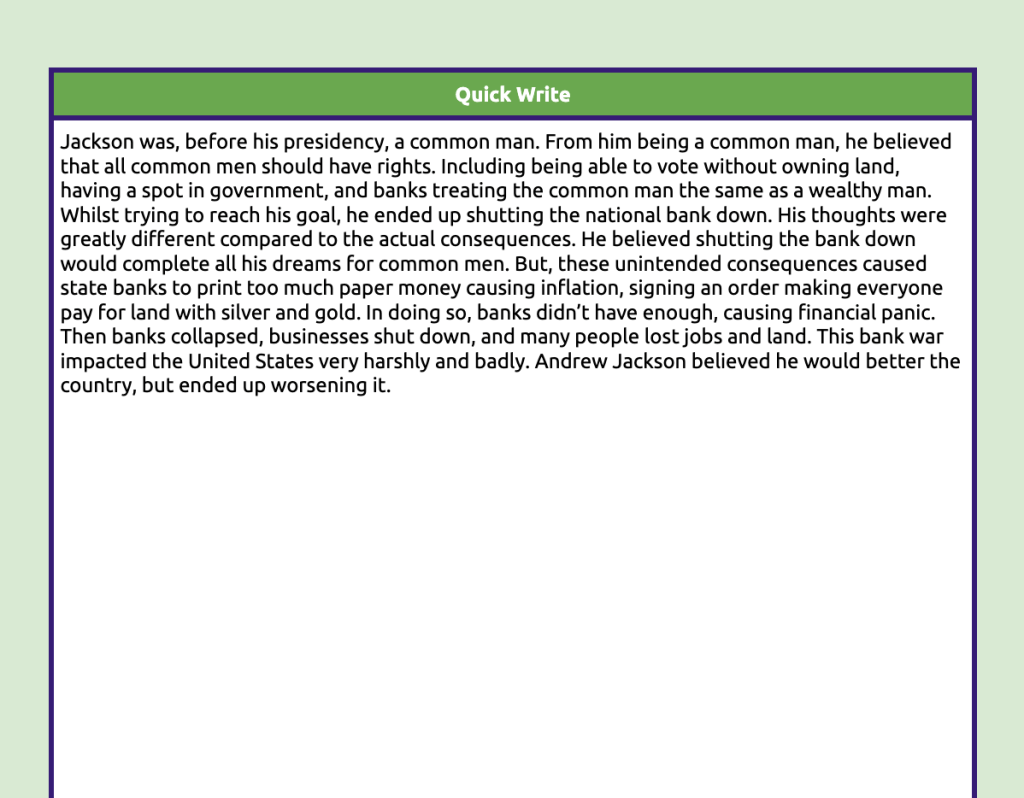
MiniReport – Understanding the Bank War
Students worked through the Bank War MiniReport, using two sources—one primary and one secondary—to answer three key questions:
Why did Jackson hate the bank?
What were the intended consequences of his decision?
What were the unintended consequences?
After gathering their information, students wrote a quick paragraph summary, ensuring they could explain Jackson’s motivations, the impact of his veto, and how closing the National Bank affected the economy.
Class Companion – Writing Growth in Action
This is where things got interesting. Some students are writing more than they ever have, growing in confidence as they refine their responses with AI feedback. Others? They’re determined to outwit and outsmart the AI, testing how much they can push its limits. Either way, the result is the same—they’re writing more and getting better.
🚀 Even with the schedule adjustment, students engaged with the Bank War in a meaningful way, using historical sources and AI feedback to analyze Jackson’s choices and their lasting impact.
Friday – Native Removal
Friday was all about bringing together multiple aspects of Indian Removal—the Seminole Wars, Indian Removal Act, Worcester v. Georgia, and the Trail of Tears—and making them fit into one class period. With so many connected historical events, I had to be intentional about how each piece flowed together while keeping students engaged.
Fast & Curious – Vocabulary Review
We started with a Gimkit focused on key vocabulary—removal, treaty, sovereignty, resistance, forced migration—running the game in two two-minute rounds with quick feedback in between. This ensured students had a foundation before diving into content.
Edpuzzle – The Seminole Wars
To kick off our discussion on Native resistance, we watched an Edpuzzle covering Osceola and the Seminole Wars. As they watched, students answered embedded questions about why the Seminole resisted removal, how they fought back, and how their response was different from other tribes. This set up an early comparison between military resistance (Seminole) and legal resistance (Cherokee in Worcester v. Georgia).
Annotate & Tell – Indian Removal Act & Worcester v. Georgia
Next, we used Annotate & Tell to break down two key readings:
The Indian Removal Act – Students highlighted government actions in yellow and Native American responses in green, analyzing how Jackson justified removal and how different tribes reacted.
Worcester v. Georgia – Students did the same with this case, focusing on how the Cherokee used legal resistance and how Jackson refused to enforce the Supreme Court ruling.
After annotating, students paired up to explain one key takeaway before we discussed as a class.
Number Mania – Justifying a Quote with Data
For the activity, I gave students a quote:
“The Trail Where They Cried was not only a physical journey but also a moment that reshaped Cherokee history, causing loss, suffering, and ultimately resilience.”
Their task was to justify this quote using numerical evidence from the reading. They worked in pairs to pull at least four key numbers that supported the quote. Some of the most commonly cited numbers included:
1,200 miles – Representing the physical journey of forced removal.
¼ (25%) – The portion of the Cherokee population that died, proving suffering and loss.
2,000 died in camps – Highlighting the harsh conditions even before the journey began.
1839 – The Cherokee wrote a new constitution – Demonstrating their resilience and ability to rebuild.
Once they collected their numbers, students added them to a Number Mania poster, writing a brief explanation of how each number connected to the quote. A few students even challenged themselves by finding additional numbers beyond the reading to reinforce their argument.
Thin Slide
To bring everything together, students created a Thin Slide on the Trail of Tears, following the one word, one image format. They had three minutes to choose an image that captured the impact of the Trail of Tears and one word that summed up its historical significance (e.g., suffering, survival, injustice, displacement, resilience).
After creating their slides, students did a rapid-fire share, explaining why they chose their word and image in one sentence.
Quizizz Assessment
I ended class with a Quizizz assessment over everything we learned this week about Andrew Jackson. The class averages were as follows: 70%, 55%, 76%, and 55%.(87%). The last class of the day, I stopped part way through after looking at some of the scores and we had a heart to heart, life lesson talk and we tried again. I knew they could do better because they were rocking it this week – so they finished at an 87% class average. These scores were good considering we began with 19% to 25% pre-assessment averages.
Last week was all about layering EduProtocols to tackle complex historical topics in engaging, meaningful ways. From political parties to the War of 1812, we used Thin Slides, Archetype Four Square, Frayer Models, Progressive Sketch and Tell, Map and Tell, and Class Companion to help students synthesize, visualize, and apply their knowledge. Instead of passively reading from the textbook, students were analyzing, predicting, debating, sketching, and writing, making these historical moments stick. Here’s a breakdown of how EduProtocols transformed our week and why they worked.
Monday: The Birth of Political Parties and the Election of 1796
If I had my way, I’d start the Early Republic unit with political parties and go deep. I’d have students analyze the decisions of early presidents through the lens of Federalists and Democratic-Republicans, helping them connect ideology to action. But instead, I’m following the textbook—a textbook that does a poor job of explaining how early party beliefs shaped America’s foreign and domestic policies and ultimately led to the War of 1812.
Rather than let the textbook dictate a shallow, disconnected lesson, I did what I always do—I adapted, structured, and layered EduProtocols to make political parties click for my students.
Quick Notes: Laying the Foundation
We started with quick notes to introduce how political parties formed in the 1790s, the key differences between Federalists and Democratic-Republicans, and the founding figures behind each party—Alexander Hamilton vs. Thomas Jefferson. These notes were designed to be brief and targeted—just enough to set up the next activity while keeping students engaged.
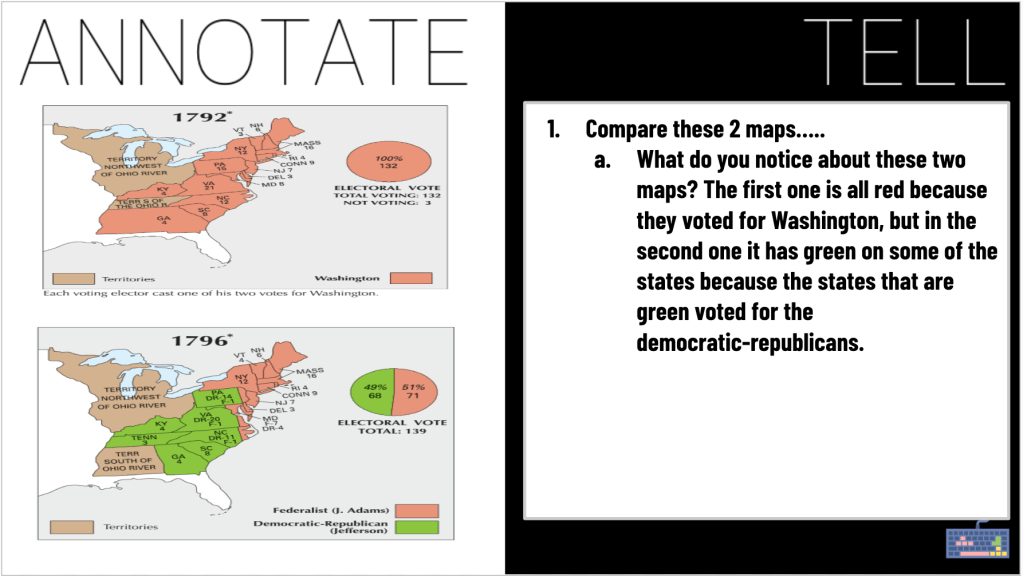
Map and Tell: Visualizing Political Divides
Next, we used a Map and Tell to analyze the elections of 1792 and 1796. Students examined who won the elections (Washington in 1792, Adams in 1796), where each party gained support (Federalists dominated New England, Democratic-Republicans gained strength in the South and West), and how political divisions emerged geographically. This was eye-opening for many students, who could see how early America was already divided in ways that still echo in modern politics.
Annotate and Tell: Organizing Party Beliefs
To make sense of the ideological divide, students used Annotate and Tell to highlight and code their readings. They highlighted Federalist beliefs in blue and Democratic-Republican beliefs in green. By the end, students had color-coded party perspectives on government power, the economy, foreign relations, and constitutional interpretation. This strategy helped students organize and visualize each party’s stance, making it easier to compare and contrast.
Quote Sort: Who Said It?
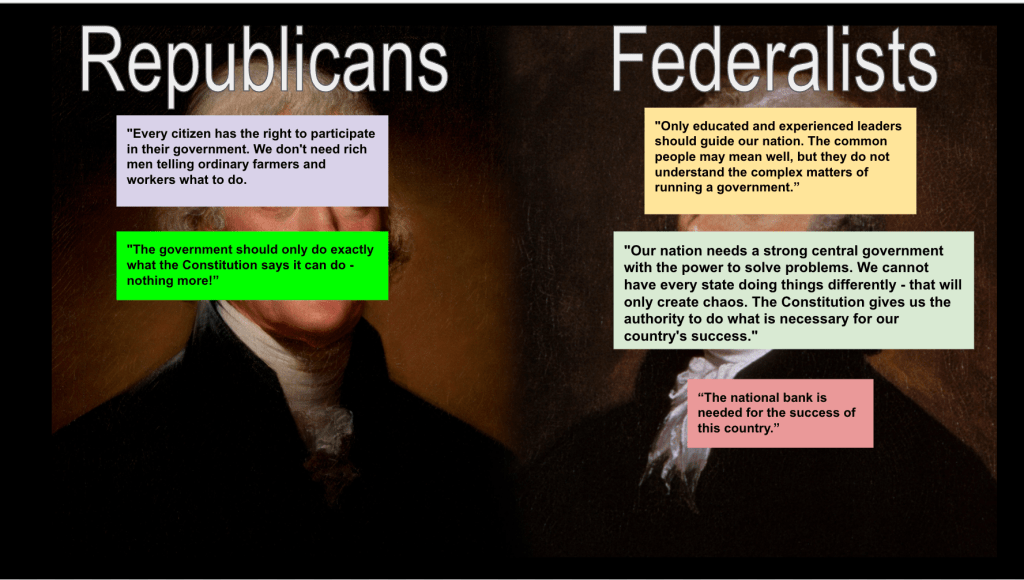
Now that students had a solid grasp of each party, we moved into a Quote Sort. I gave them statements from historical figures, and they had to drag and drop them under either Federalists or Democratic-Republicans. Examples included:
“The country should be led by the wealthy and educated.” → Federalists
“States should have more power than the national government.” → Democratic-Republicans
This activity forced students to think critically and apply their knowledge, reinforcing party beliefs in a hands-on way.
Thick Slide: Bringing It All Together
To synthesize everything, students completed a Thick Slide where they assigned archetypes to Hamilton and Jefferson, compared Federalist vs. Democratic-Republican beliefs, and found images that represented each party’s values. This final layer helped students see patterns, make connections, and process the big picture in a creative, visual way.
Class Companion: Writing on the Election of 1796
To wrap it all up, students used Class Companion to answer: How did disagreements between Hamilton and Jefferson lead to both the creation of political parties AND an unusual outcome in the election of 1796?
Class Companion provided real-time feedback, pushing students to refine their writing. The AI-driven scoring gave them a clear sense of what worked—and what needed improvement. Since they had multiple attempts, students were motivated to revise and improve their responses in real time. Some students got competitive, trying to perfect their answers on their third attempt. Seeing them actually excited about revising their writing was a huge win.
Why This Works
Map and Tell gives students a visual connection to political divisions.
Annotate and Tell helps students organize party beliefs clearly.
Quote Sort turns ideological differences into an interactive challenge.
Thick Slides encourage students to synthesize information creatively.
Class Companion makes writing engaging, immediate, and iterative.
Students analyzed, compared, discussed, and created. This layered approach made early political parties meaningful, memorable, and real.
Tuesday: John Adams
I’ve been using the textbook, but I’m running out of time. The reality of trying to fit everything into the unit assessment timeline has me teaching to a test instead of focusing on deep learning and real understanding. This is not education. I feel like a robot, checking boxes rather than tailoring lessons to what my students actually need. But, despite the constraints, I found ways to layer in engagement and critical thinking while still covering the required content.
Quick Notes: Laying the Foundation
I started class with quick notes to introduce:
Background on John Adams—his role in the revolution, his Federalist views, and his leadership style.
Foreign policy challenges—especially rising tensions with France.
The XYZ Affair—what happened and how it impacted U.S.-French relations.
The Alien and Sedition Acts—why Adams passed them and how they divided the nation.
These notes set the stage, ensuring students had context before diving into deeper analysis.
Fast and Curious Gimkit: Reinforcing Key Ideas
Next, we ran a Gimkit Fast and Curious with questions on John Adams and political parties. Students played for three minutes, I provided instant feedback, and we played again. This quick retrieval practice helped reinforce key concepts, ensuring they recognized important terms and events before moving forward.
Archetype Four Square: Understanding John Adams
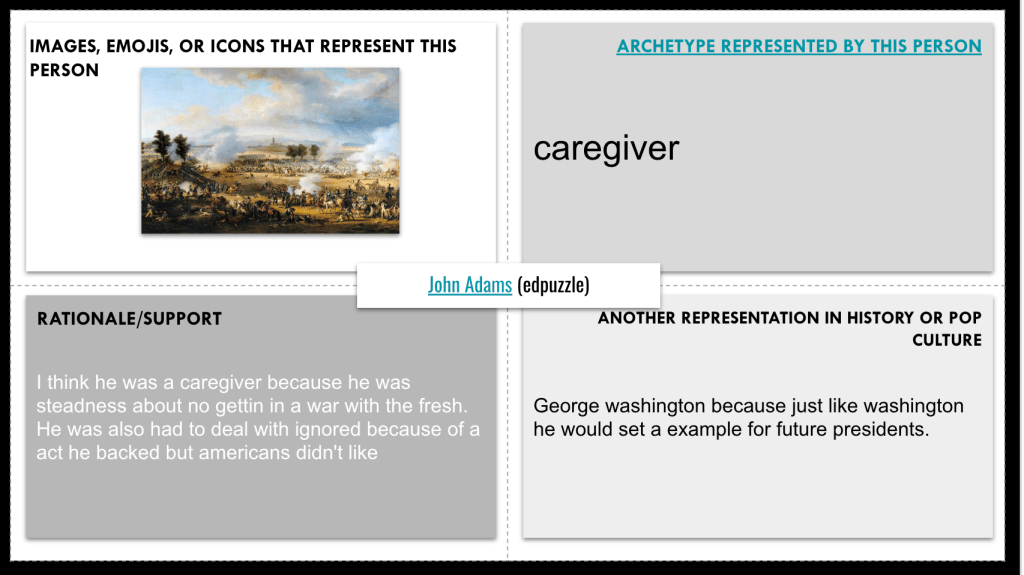
To push students toward higher-order thinking, we used an Archetype Four Square activity.
Students watched an EdPuzzle on John Adams while thinking about which archetype best fit him. Was he:
A Protector, trying to defend the country from French interference?
A Ruler, who prioritized law and order with the Alien and Sedition Acts?
A Visionary, thinking ahead for what was best for the country long-term?
They had to choose an archetype, justify their reasoning, and discuss with a partner. This helped them see Adams as more than just another name in the textbook—they began analyzing his motivations and leadership style.
Sketch and Tell Connect: Breaking Down the Issues
We then moved into a Sketch and Tell Connect, where students answered four guided questions pulled from the textbook’s guided reading section. The goal was for them to process and organize what they had learned.
To push them further, I used a Somebody Wanted But So Then (SWBST) structure for the sketches:
Somebody (John Adams or France)
Wanted (to protect the U.S., avoid war, maintain Federalist power, etc.)
But (tensions with France, backlash to Alien and Sedition Acts, etc.)
So (the government took action)
Then (the impact on the country and his presidency)
This was challenging for them. Synthesizing content like this is a higher-order skill, and many struggled to condense complex events into simple cause-and-effect relationships. But that’s the whole point—we’ll keep practicing.
Class Companion: Writing on Adams’ Presidency
To wrap up, students used Class Companion to summarize the major problems Adams faced as president. They had to explain the XYZ Affair, the Alien and Sedition Acts, his dealings with France, and the Federalist Party split.
The AI-powered feedback helped students clarify their writing, refine their ideas, and strengthen their arguments. Some improved their responses after multiple attempts, realizing where they needed stronger evidence and explanations. Seeing students revise and rethink their work in real time was a win.
Why This Works
Fast and Curious Gimkit reinforced content through repetition and quick retrieval.
Archetype Four Square encouraged critical thinking about Adams’ leadership style.
Sketch and Tell Connect with SWBST pushed students to synthesize information visually and see the cause-and-effect relationships in history.
Class Companion writing gave students instant feedback, helping them improve their ability to explain and analyze historical events.
Even though I felt trapped by the textbook and assessment timeline, I made sure students weren’t just memorizing—they were thinking, discussing, and applying. That’s what makes learning stick.
Wednesday: Marbury v. Madison
One of the essay questions on the textbook unit assessment asks students to write about Marbury v. Madison. So, as I continue teaching to a test (insert sarcasm), I put together a lesson solely focused on the case. What’s funny is that the pre-assessment for the unit didn’t include a single question on Marbury v. Madison, yet somehow, students are expected to write an essay about it at the end of the unit. The textbook dedicates two paragraphs to explaining the case—two paragraphs—and assumes that’s enough for middle schoolers to write an in-depth response.
Luckily, I already had a lesson from last year that actually helps students understand this case in a meaningful way. It’s structured, layered, and built for comprehension rather than memorization.
Quick Notes: The Supreme Court Before Marbury v. Madison
We started with quick notes on the weaknesses of the Supreme Court before this landmark case. The Court was not seen as a powerful branch, and many people questioned its authority. Marbury v. Madison changed that by firmly establishing the Court’s power of judicial review—the ability to declare laws unconstitutional.
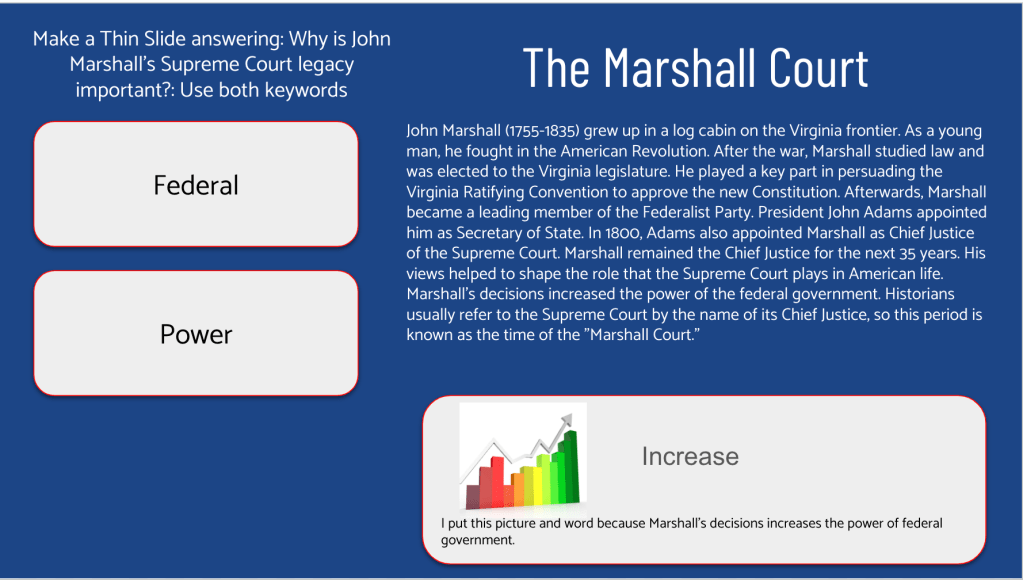
Thin Slide: John Marshall’s Supreme Court Legacy
To introduce John Marshall, students completed a Thin Slide answering: Why is John Marshall’s Supreme Court legacy important?
Students added one word and one picture to represent his impact and responded to the question. This quick, low-stakes activity gave them an opportunity to process key ideas visually before we dove deeper.
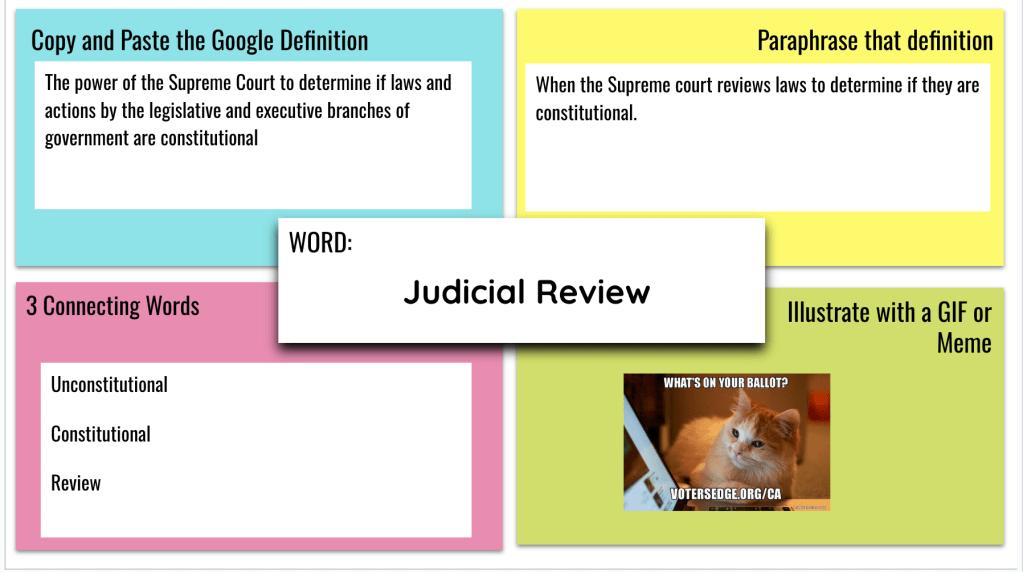
Frayer Models: Breaking Down Key Concepts
Next, students built background knowledge using two Frayer models—one for judicial review and one for writ of mandamus.
For each concept, they:
Defined it in their own words.
Paraphrased a Google definition (to compare with their explanation).
Came up with three connecting words to reinforce meaning.
Illustrated the concept using a GIF or meme.
This structured approach helped students grasp difficult legal terms and connect them to real-world applications.
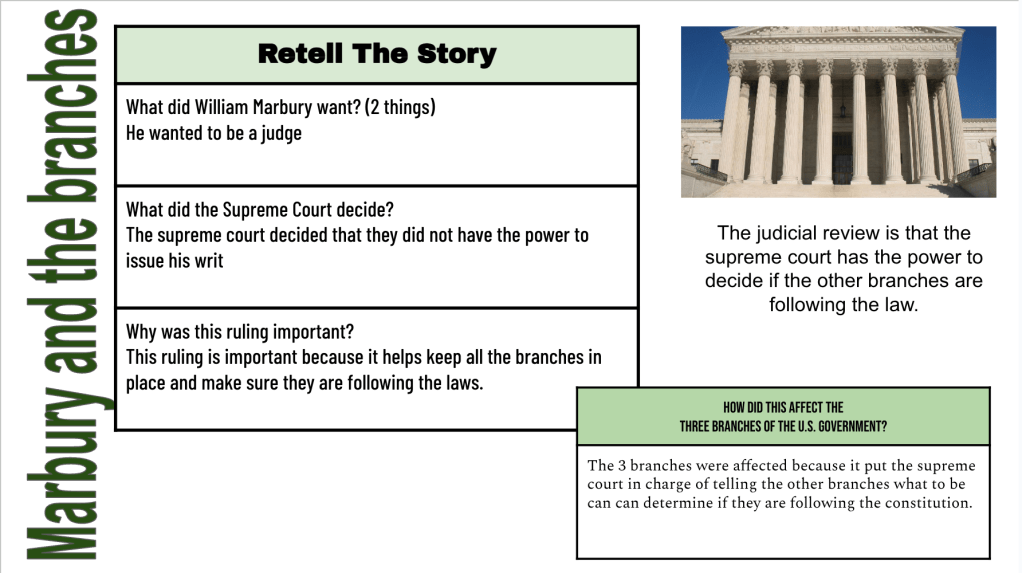
Reading the Case: Making It 8th-Grade Friendly
The textbook’s two-paragraph explanation wasn’t enough, so I adapted an iCivics reading to simplify the language while maintaining accuracy.
Students read about:
What William Marbury wanted (his commission as a judge).
What the Supreme Court decided (they couldn’t force Madison to deliver the commission).
Why the ruling was important (it established judicial review).
Students completed a Thick Slide to organize their learning, breaking the case into cause, decision, and impact—a direct alignment with the essay question they’ll face on the unit test.
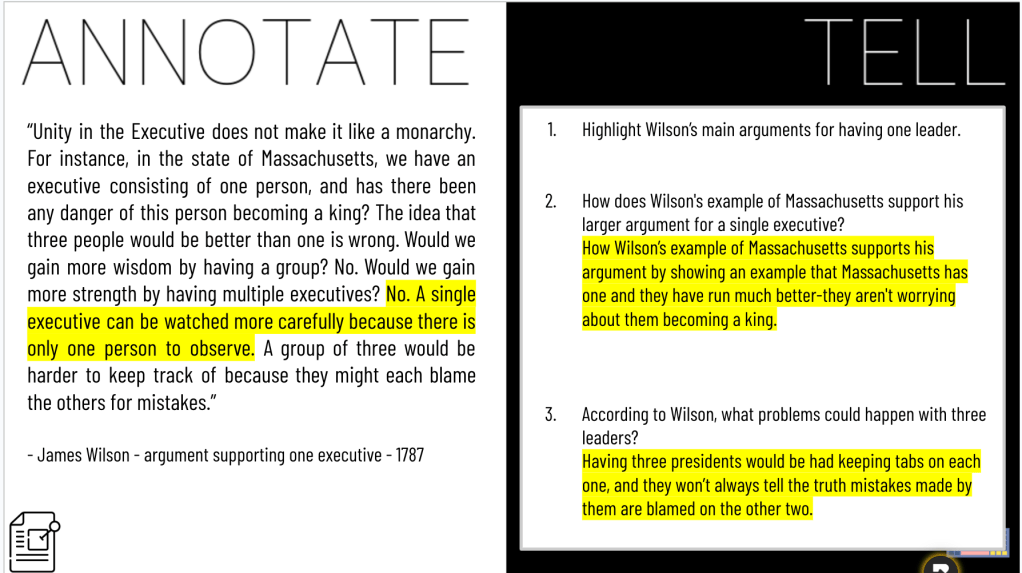
Annotate and Tell: Marshall’s Ruling
We then moved to primary source analysis. Students read excerpts from John Marshall’s ruling and used Annotate and Tell to highlight key ideas.
As they read, they:
Highlighted Marshall’s views on who should have the final say in interpreting the Constitution.
Answered: What does Marshall say is the Supreme Court’s job and responsibility? Why is this important to his argument?
This activity reinforced the central argument of judicial review—that the Supreme Court’s job is to interpret the Constitution and override laws that contradict it.
Gimkit Fast and Curious: Wrapping It Up
To cement understanding, we ended class with a Gimkit Fast and Curious on Marbury v. Madison. After one round, I gave feedback, and we played again. By the second round, students were improving their recall and accuracy, showing that the layered approach to this lesson worked.
Why This Works
Thin Slides helped students preview the key figure (John Marshall) in a quick, engaging way.
Frayer Models broke down complex legal concepts into manageable, student-friendly chunks.
A carefully adapted reading ensured that all students could access the information—not just the ones who can decipher legal jargon.
Thick Slides allowed students to process the case visually and organize their learning for the upcoming essay.
Annotate and Tell built close reading skills and helped students engage with Marshall’s ruling in a meaningful way.
Gimkit Fast and Curious reinforced content through repetition and retrieval practice, strengthening student recall.
I made sure students actually understood Marbury v. Madison instead of just skimming two textbook paragraphs and hoping for the best. That’s why this approach works.
Thursday: The Louisiana Purchase
The textbook’s approach to the Louisiana Purchase makes zero sense. It spends an entire chapter on Napoleon, French colonies, and the lead-up to the purchase, yet barely covers what the purchase meant for the U.S. Then, it dedicates multiple pages to Lewis and Clark, even though there isn’t a single question about them on the unit assessment. Meanwhile, Marbury v. Madison gets two textbook paragraphs, but the test expects students to write a full essay on it. Make it make sense.
Instead of wasting time on unnecessary details, I cut straight to the heart of the matter—why the Louisiana Purchase mattered, why Jefferson took the risk, and why Federalists hated it.
Map and Tell: Predicting Motives
We started class with a Map and Tell prediction slide with the following setup:
“The Democratic-Republican President, Thomas Jefferson, had a bold vision for American expansion that led him to create the Louisiana Purchase of 1803, which doubled the size of the United States for just 3 to 4 cents per acre—arguably the greatest real estate deal in history.”
Students then made predictions:
Why do you think France was willing to sell such a huge territory to the United States?
Why do you think the Federalists hated this purchase of Louisiana?
This activity got them thinking before diving into the details. It also highlighted misconceptions early so we could clear them up as we went.
EdPuzzle: Understanding Jefferson’s Vision
Next, students watched an EdPuzzle on Thomas Jefferson to ground them in his mindset—his strict interpretation of the Constitution, his agrarian ideals, and his vision for westward expansion.
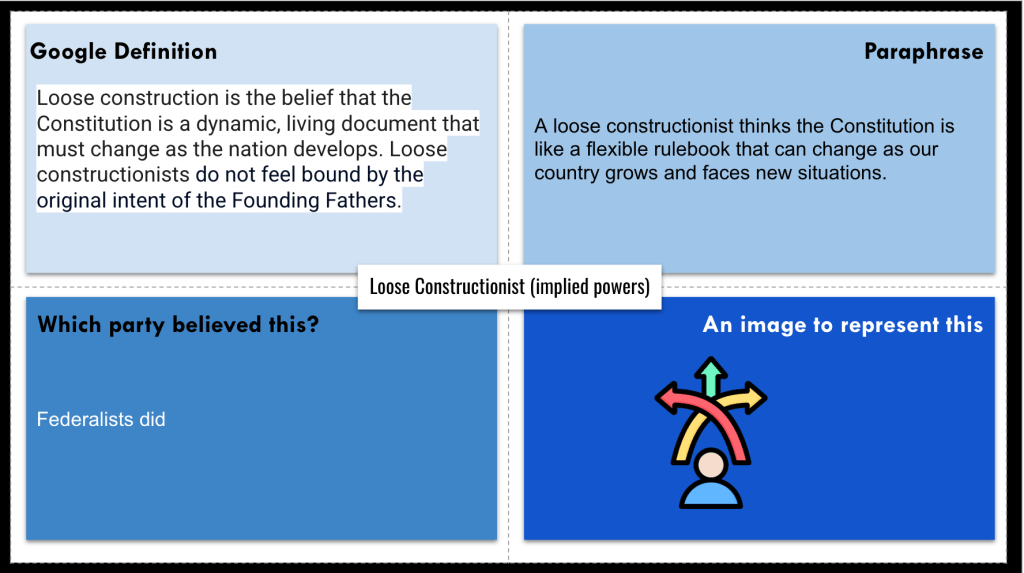
Frayer Models: Strict vs. Loose Constructionists
Since one of the biggest issues with the purchase was that Jefferson had to go against his own beliefs, students completed two Frayer models:
Strict Constructionist (following the Constitution exactly as written)
Loose Constructionist (interpreting the Constitution more broadly)
This set up the big debate—how Jefferson, a strict constructionist, justified loosening his interpretation to make the purchase happen.
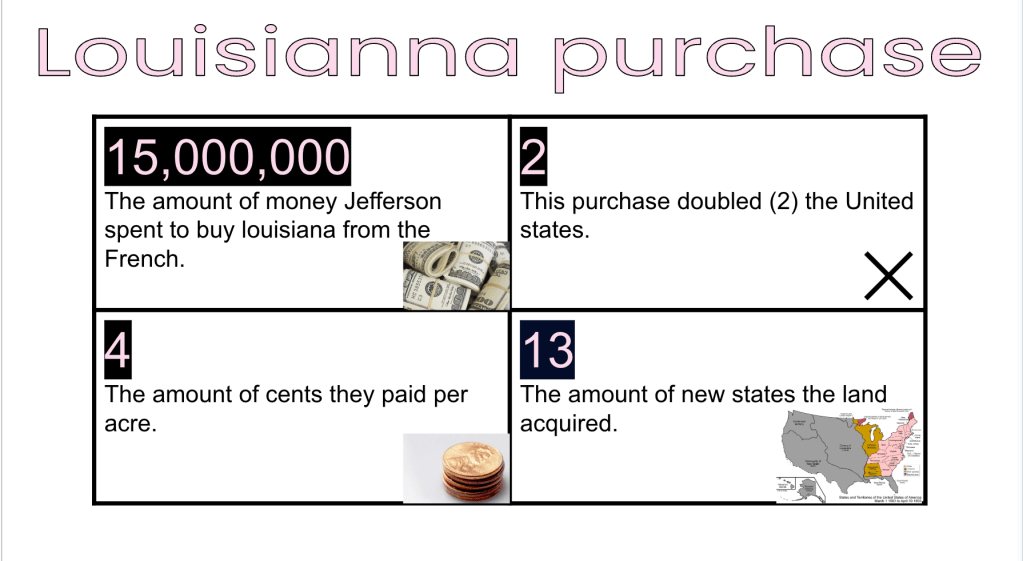
Number Mania: Proving a Statement with Data
Next, we read about the Louisiana Purchase and completed a Number Mania.
For this activity, I gave students a statement they had to prove true using numerical evidence from the text:
“Expanding the country west was a key goal for Jefferson. So even though it went against some of his usual policies, Jefferson made the daring choice to buy all of Louisiana from France.”
Students had to find and highlight numbers that supported this idea, such as:
The price of the purchase ($15 million, about 3-4 cents per acre)
The Senate approval vote (26-6 in favor)
How the purchase doubled the size of the U.S.
Instead of just listing facts, they had to find numbers that connected directly to the bigger argument, reinforcing why the purchase was such a big deal.
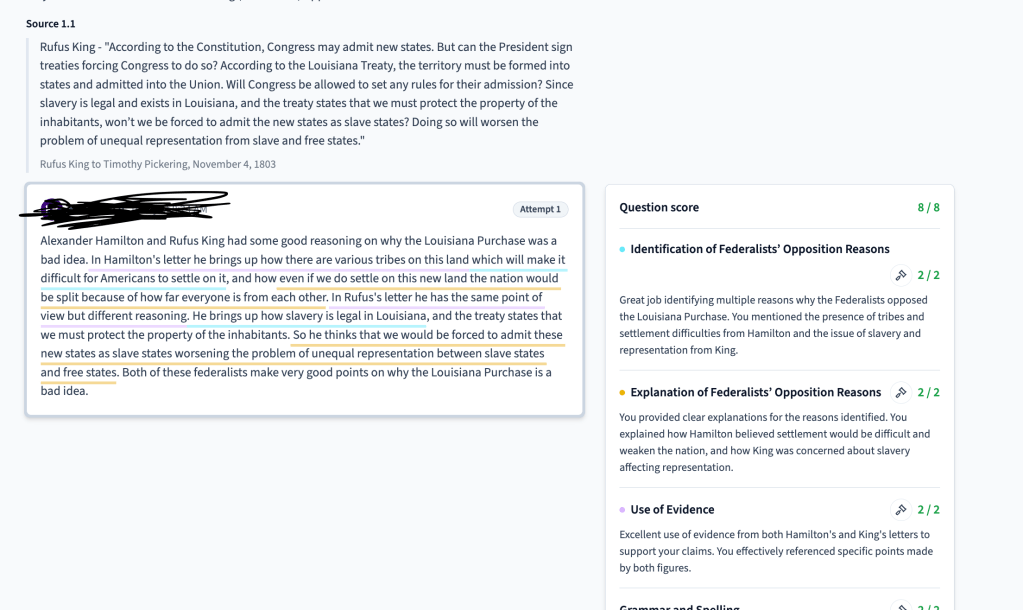
Class Companion: Federalist Opposition to the Purchase
To wrap it up, students went to Class Companion, where they read letters from Alexander Hamilton and Rufus King criticizing the Louisiana Purchase.
Using what they learned from the lesson, they had to write a response explaining why Federalists opposed the purchase. This final step connected everything—Jefferson’s decision, the constitutional debate, the numbers proving its significance, and the political pushback from Federalists.
Why This Works
Map and Tell made students predict historical motives, encouraging critical thinking before reading.
EdPuzzle gave students context on Jefferson’s philosophy, making the purchase easier to understand.
Frayer Models clarified the strict vs. loose interpretation debate, the core constitutional issue of the purchase.
Number Mania forced students to use evidence-based reasoning, proving why the purchase was so monumental.
Class Companion writing allowed students to engage with primary sources and articulate historical perspectives.
Even though the textbook wasted pages on unnecessary details, this lesson cut straight to the point, ensuring students understood the key issue—the Louisiana Purchase doubled the U.S., forced Jefferson to change his beliefs, and created major political controversy. That’s what actually matters.
Friday: The War of 1812
Friday began with an experiment—a frustrating but eye-opening one. I took questions directly from the unit test and gave them to 1st and 2nd bell as written. The class averages? 32% and 38%.
Then, I took those same questions, rewrote them in more appropriate vocabulary, and gave them to 5th and 6th bell. The class averages? 70% and 77%.
The results speak for themselves. The kids know the content, but when questions are loaded with unnecessary wording, they struggle—not because they don’t understand history, but because they’re being asked to decode convoluted language.
They are 8th graders, not college students. Why do we keep equating big words with rigor? When I saw 32% and 38%, I felt like a lousy teacher, but I know these kids understand the material. It’s not a comprehension issue—it’s a wording issue.
After that eye-opener, we moved into the War of 1812 with a series of layered activities to connect causes, events, and outcomes.
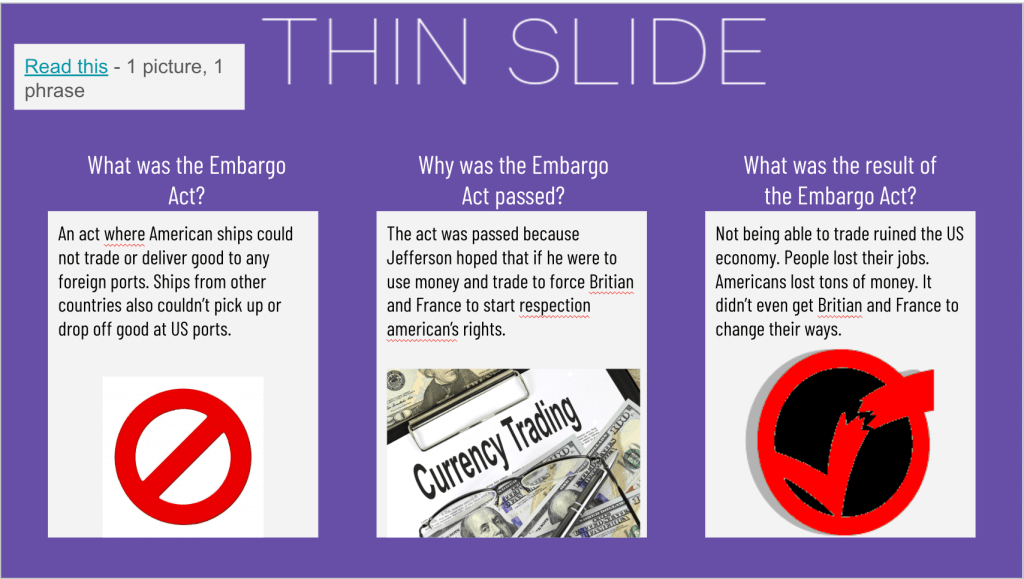
Quick Notes: The Web of War
We started with quick notes outlining the complex web of decisions that led to the War of 1812.
The Embargo Act weakened the economy but failed to stop British and French interference.
Impressment angered Americans as British ships kidnapped U.S. sailors and forced them into service.
War Hawks in Congress pushed for military action, believing Britain was disrespecting American sovereignty.
Madison’s Presidency—he inherited the diplomatic failures of Jefferson and ultimately led the country into war.
This framing helped students see the cause-and-effect relationships instead of treating each event as an isolated fact.
Thin Slide: The Embargo Act
Next, students completed a Thin Slide focusing on the Embargo Act. They read a short description and chose:
One word that represents the act’s impact.
One image that visually represents the act.
A quick response to explain their choices.
This forced students to synthesize their thinking quickly and connect the Embargo Act’s impact to the bigger picture.
Archetype Four Square: James Madison’s Leadership
With the Archetype Four Square, students examined James Madison’s leadership and determined which archetype best fit him in the context of the war.
Was he a Peacemaker, trying to avoid war as long as possible?
Was he a Reluctant Warrior, forced into action despite hesitations?
Was he a Commander, embracing war as necessary?
Students had to justify their choices and discuss them with a partner, leading to great conversations about how presidents make wartime decisions.
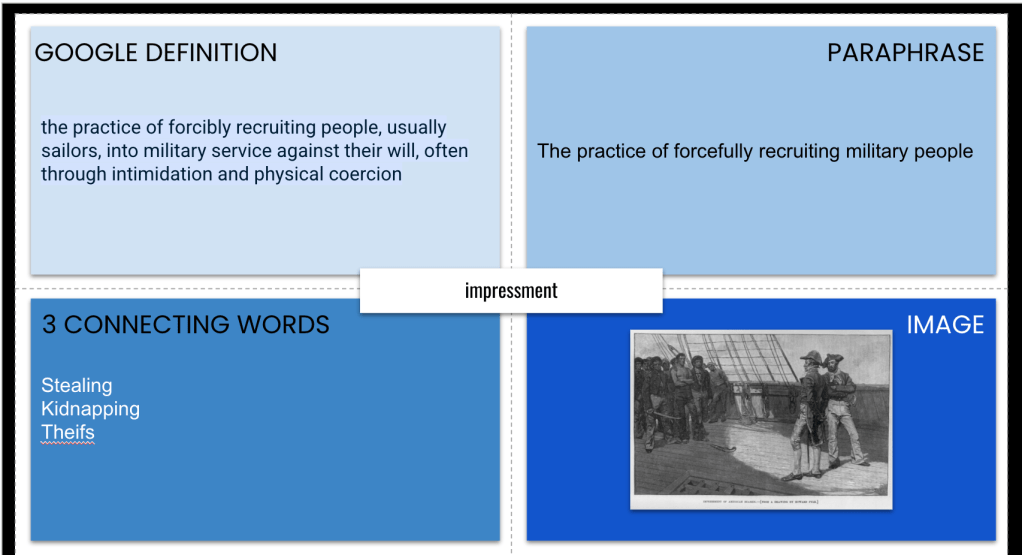
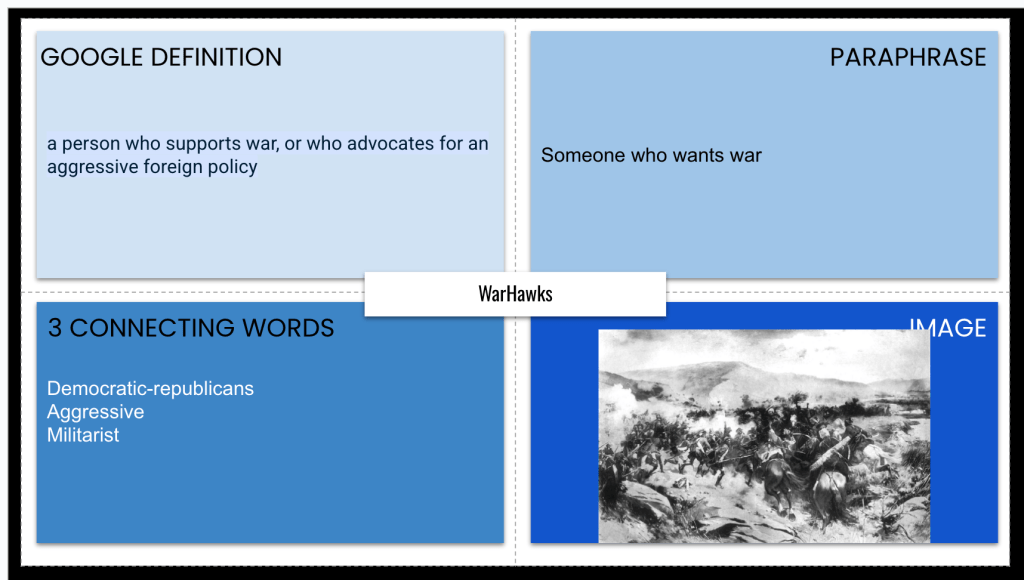
Frayer Models: Impressment and War Hawks
To reinforce key terms, we completed two Frayer Models—one for impressment and one for War Hawks.
For each, students:
Defined the term in their own words.
Identified a real-world connection or comparison.
Illustrated the term with an image, symbol, or icon.
Listed key facts from the reading to support their understanding.
This helped break down two critical causes of the war into student-friendly explanations.
Progressive Sketch and Tell: The Story of the War
For the main event, we did a Progressive Sketch and Tell to break down the War of 1812 into digestible chunks.
I took the textbook section and had AI split it into five parts.
Each student received one part at a time.
They created a sketch and tell comic strip for their section.
After three minutes, they shared with a partner to explain their visual representation.
Then, they received the next section and repeated the process.
This step-by-step visual storytelling made a complex war easy to understand. It also helped students see connections between different events rather than treating them as random battles.
Why This Works
Quick notes created a clear cause-and-effect web instead of just listing events.
Thin Slides encouraged quick synthesis of key concepts.
Archetype Four Square made students think critically about Madison’s leadership.
Frayer Models reinforced essential vocabulary through multiple connections.
Progressive Sketch and Tell broke the war into digestible chunks, making it memorable and interactive.
Instead of just reading about the War of 1812, students analyzed, created, discussed, and applied what they learned. And that’s what makes the learning stick.
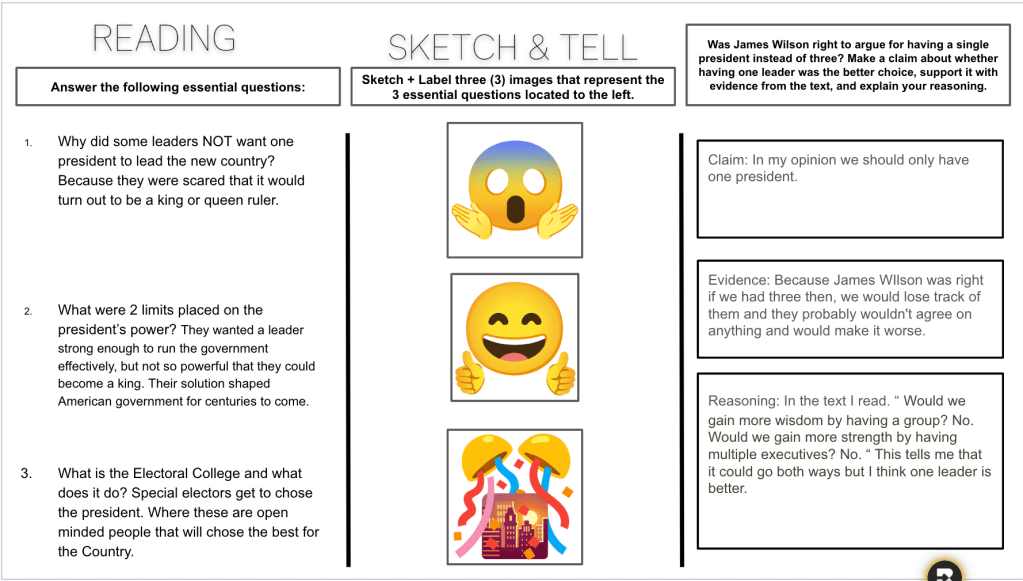
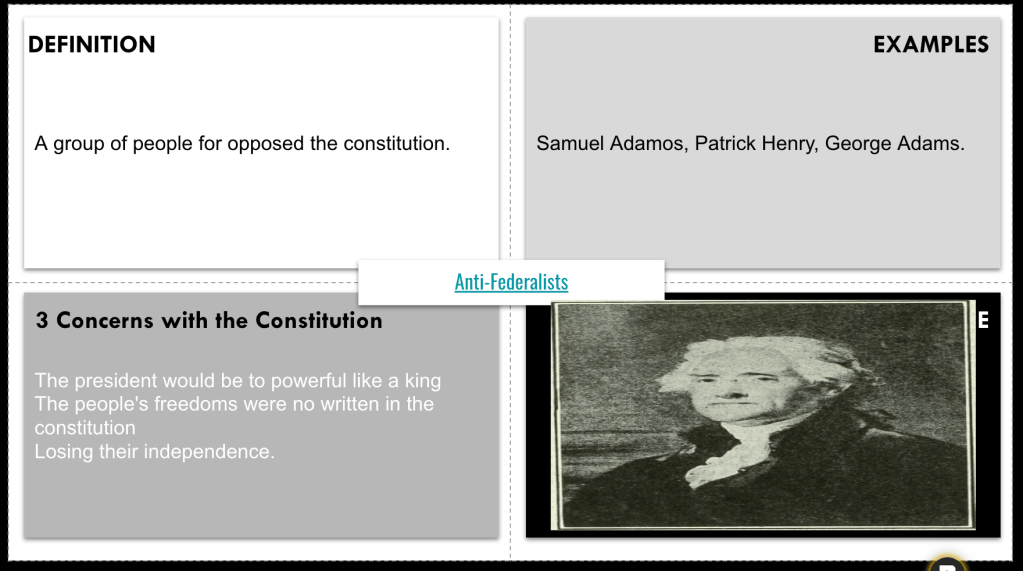
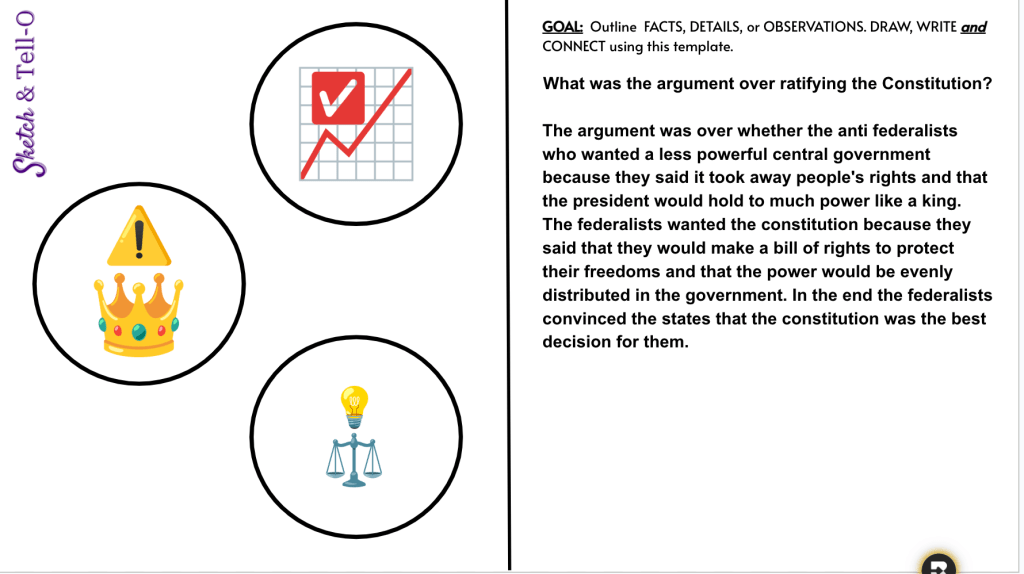
This week in 8th-grade social studies, we dove deep into the Constitutional Convention and the ratification debates, using a variety of EduProtocols to engage students and build understanding. From Frayer Models to define key terms and concepts, to Sketch and Tell-O and 8Parts Sourcing for visual analysis and critical thinking, each day offered a structured and interactive way for students to connect with history.
Activities like Gimkit, Quizizz Mastery Peak, and Emoji Kitchen kept the energy high and provided opportunities for review, creativity, and synthesis. Through consistent protocols and thoughtful lessons, students explored the compromises, debates, and decisions that shaped the U.S. Constitution.
Even though I was out sick, I wanted to ensure my students had meaningful, engaging lessons to kick off our exploration of the Constitutional Convention. With EduProtocols and structured activities, I aimed to keep students on track while fostering curiosity and understanding.
Starting with the Purpose
Every lesson on the Constitutional Convention begins with the question: “What was the purpose of the Constitutional Convention?” To set the stage, I assigned an EdPuzzle that introduced the basics of the event. EdPuzzle is always a reliable tool when I’m out—it keeps students engaged with videos while offering questions to ensure they’re following along.
Building Vocabulary with Gimkit
Next, I created a Gimkit with key terms students would encounter throughout the week, including federalist, anti-federalist, compromise, republic, and constitution. Vocabulary is critical for understanding the bigger picture, and Gimkit’s game-like format keeps students motivated while helping them retain these foundational terms.
Deep Dive with a Frayer Model
To dive deeper into the Constitutional Convention, students completed a Frayer model. They defined the convention, identified three key figures who attended, listed three important facts, and added an image to tie it all together. This activity helped them organize their initial understanding while highlighting the significant people and ideas of the event.
Sketch and Tell-O: Synthesizing Purpose
Students then read about the purpose of the Constitutional Convention and created a Sketch and Tell-O. They sketched out three important facts from the reading and wrote a summary answering the essential question: Why was the Constitutional Convention necessary? This activity combined visual and written processing, encouraging them to connect details to the broader purpose of the event.
Tuesday
Still out on Tuesday, I kept the focus consistent and structured, guiding students through the key compromises made at the Constitutional Convention. With a mix of graphic organizers, interactive mapping, and creative synthesis, students had the opportunity to deepen their understanding of the Great Compromise and the Three-Fifths Compromise.
Starting with Vocabulary
We began with a Gimkit review of the vocabulary introduced on Monday. Terms like federalist, anti-federalist, compromise, republic, and constitution are foundational, and revisiting them daily helps reinforce understanding while building fluency.
Graphic Organizers: Breaking Down the Compromises
To tackle the Great Compromise and the Three-Fifths Compromise, I created two graphic organizers.
The Great Compromise Organizer
Students read a brief article about the Great Compromise, identifying:
The issue at stake
The two opposing sides
The compromise itself
This activity helped them see how differing viewpoints shaped the structure of Congress and highlighted the balance of interests between large and small states.
The Three-Fifths Compromise Organizer
After reading a second article, students completed the same organizer for the Three-Fifths Compromise, focusing on:
The issue of representation and slavery
The opposing perspectives of Northern and Southern states
The resulting compromise
By structuring the readings and graphic organizers this way, students were able to make direct comparisons between the compromises while seeing how both contributed to strengthening the national government.
Map and Tell: Connecting Compromises to Modern Context
To reinforce their understanding of the Great Compromise, students engaged in a Map and Tell activity. Using a map showing the current number of representatives for each state, students answered the following questions:
Which state currently has the most people?
Identify a state with the fewest people.
In 2019, Ohio had 16 representatives in the House. Why do you think they only have 15 now? (Hint: It’s not because they died!)
Every state has 2 senators. How many senators are in the U.S. Senate?
These questions required students to apply what they learned about representation and the legislative structure created by the Great Compromise. The activity added relevance and encouraged them to connect historical decisions to the modern-day functioning of government.
Sketch and Tell-O: Synthesis
Students ended the day with a Sketch and Tell-O activity addressing this essential question:
“How did the leaders at the Constitutional Convention compromise to strengthen the central (national) government?”
Their responses needed to include the terms great compromise, representation, and three-fifths compromise. By combining visual representation with written explanation, students synthesized their learning while reinforcing the central role of compromise in the Convention.
Wednesday
For the third day in a row, I was out, but the focus on the Constitutional Convention’s compromises remained strong. Wednesday’s lesson tackled the debate over the executive branch—whether the nation should have one president or three, and how that leader should be chosen. The structure and consistency of the lessons helped students stay engaged and build on their understanding of the compromises that shaped the U.S. government.
Starting with Vocabulary
As always, the day began with a Gimkit review of the key vocabulary terms from earlier in the week. Repetition is key to reinforcing these foundational terms, and Gimkit’s interactive format ensures students stay motivated and focused.
Frayer Model: Defining the Executive Branch
Next, students created a Frayer model for the term executive branch. They:
Defined the term.
Provided examples (e.g., the president, the cabinet).
This activity helped students clarify the role and function of the executive branch, setting the stage for the deeper analysis to follow.
Graphic Organizer: Breaking Down the Debate
Students then read about the debate over the executive branch, focusing on the key issues:
Should the country have one president or three?
How should the president be chosen?
Using the same organizer from the previous days, they identified:
The issue at hand.
The two opposing sides of the debate.
The compromise that resolved the conflict.
This consistent structure helped students compare this debate with the previous ones, reinforcing the importance of compromise in shaping the Constitution.
Annotate and Tell: Analyzing James Wilson’s Argument
To deepen their understanding, students analyzed a primary source excerpt from James Wilson, who argued for having one president. Through an Annotate and Tell activity, they highlighted key points and answered these questions:
What are Wilson’s main arguments for having one leader?
How does Wilson’s example of Massachusetts support his argument for a single executive?
According to Wilson, what problems could arise with three leaders?
This activity encouraged critical thinking and connected historical perspectives to the broader debate over the executive branch.
Wrapping Up with Synthesis
To conclude, students worked on three tasks:
Answering Essential Questions: Students reflected on the executive branch’s role and how the Constitutional Convention resolved its structure.
Sketch and Tell-O: They illustrated their understanding of the debate, including key issues, arguments, and the compromise reached.
CER Writing: Students crafted a Claim-Evidence-Reasoning paragraph responding to the question: Should we have one president or three?
Thursday
It’s rare for me to miss three days in a row, so when I returned to class today, I faced the challenge of pulling together three days’ worth of content—some completed on Chromebooks, some on paper. The goal for the day was simple: consolidate the material, assess understanding, and help students connect the dots.
Starting with Quizizz
I kicked off the lesson with a 10-question Quizizz that covered key points from the past three days. Quizizz’s format, where each question is asked once, allowed me to see how students performed on a broad range of topics. Unfortunately, the results revealed significant gaps, with class averages at 45%, 47%, 54%, and 59%. The data didn’t point to one specific area of struggle; it was clear the students needed a comprehensive review to piece everything together.
Curipod to the Rescue
To address the gaps, I turned to Curipod—a tool that continues to impress me with its versatility and ability to engage students. I uploaded a premade presentation summarizing the key points of the Constitutional Convention, and Curipod enhanced it with interactive features that brought the content to life.
Guided Notes: Students worked on guided notes as we moved through the presentation, grounding them in the essentials of the Great Compromise, the Three-Fifths Compromise, and the executive branch debate.
Interactive Features:
Students submitted open-response questions, such as one where they could “ask James Madison a question.”
Curipod provided AI feedback for their responses, making the review process more engaging and personalized.
The AI whiteboard feature asked students to draw how the Founding Fathers balanced representation between big and small states with the Great Compromise. AI analyzed their drawings and offered feedback.
Voting on Responses: Students anonymously voted on open-response answers, with the top three being displayed at the end. I love this feature because it minimizes bias and encourages thoughtful participation.
Curipod’s interactive elements made the material engaging and accessible, and the guided notes ensured students had something tangible to refer back to as we reviewed.
Wrapping Up with Quizizz
We ended class by retaking the same Quizizz from the beginning of class. The results spoke volumes:
47% jumped to 76%.
45% increased to 80%.
54% rose to 77%.
59% climbed to 80%.
The improvement showed that the combination of Curipod, guided notes, and interactive features helped students consolidate their understanding and apply it effectively.
Friday
By Friday, we were back on track and moving forward with the next big question in our unit: “What were the arguments over ratifying the Constitution?” This lesson delved into the emergence of Federalists and Anti-Federalists, emphasizing how the newly proposed Constitution required states to not only understand but also buy into the vision for a federal government.
Starting with Mastery Peak
We began with the Mastery Peak feature in Quizizz, using the same questions from Thursday to refine understanding. The growth in scores was impressive:
77% → 100%
70% → 93%
77% → 96%
67% → 96%
This demonstrated that students were solidifying their grasp of the material as we continued to revisit and apply it.
Introducing Ratification with Gimkit
Next, I ran a quick 2-minute Gimkit with six questions about the ratification of the Constitution. This short review prepared students for the day’s focus and introduced key terms like Federalists, Anti-Federalists, and ratification.
I framed the lesson with the question: “What were the arguments over ratifying the Constitution?” This served as a springboard to discuss how Federalists and Anti-Federalists debated the need for state approval and public buy-in to legitimize the new government.
Sourcing with 8Parts: The Federal Pillars
We began our exploration with the Federal Pillars image, using the 8Parts Sourcing Protocol to analyze it. Students:
Identified nouns, verbs, adjectives, and prepositions in the image.
Summarized the artist’s message about the ratification process.
This visual analysis helped students interpret how the artwork symbolized the growing support for ratification while emphasizing the states’ critical role in the process.
Frayer Models: Federalists vs. Anti-Federalists
Next, students completed two Frayer models, one for Federalists and one for Anti-Federalists. They defined each group, listed key characteristics, included examples of prominent figures, and noted non-examples. This activity helped clarify the contrasting perspectives on the Constitution:
Federalists advocating for a strong central government.
Anti-Federalists emphasizing states’ rights and the need for a Bill of Rights.
To wrap up, students used Emoji Kitchen to visually represent three arguments over ratification. They selected emojis to symbolize each argument and wrote a summary answering our essential question: “What were the arguments over ratifying the Constitution?” This activity added a creative and personal element to the lesson, encouraging students to connect with the material in a unique way.
Ending with Gimkit
We finished class with the same Gimkit as earlier, reinforcing the key concepts about ratification. This repetition helped solidify understanding while ending the day on an engaging note.
This week was all about leveraging EduProtocols to simplify learning, foster creativity, and reinforce key concepts. From using Thin Slides and Cybersandwich to explore complex topics like Bacon’s Rebellion and race-based slavery, to engaging students with retrieval-based activities like Graph and Tell and Thick Slides, the focus was on making learning more accessible and engaging. Whether students were interacting with AI chatbots or diving into historical data, these protocols helped break down challenging content into manageable, meaningful tasks. Here’s a breakdown of how we used EduProtocols to keep the momentum going this week:
On Monday, I decided to try out something new and set up a free trial with Magic School. In the past, it seemed like a promising one-stop shop for classroom tools, though my previous experiences were inconsistent. But with a new school email, I created a fresh account and set up a chatbot for the 13 colonies.
My vision was to have a chatbot that would take on the persona of one of the founders of the 13 colonies. All students had to do was type, “Who founded <enter colony name>?” A few people have already asked how I set up the chatbot, so here’s how I did it: Instead of app smashing, I was AI smashing. I went to Claude AI and asked for a set of instructions for a chatbot that would take on the persona of one of the founders of the 13 colonies—geared for 8th graders. It even provided a knowledge base for each founder!
For this lesson, I didn’t think it was important for students to memorize every detail about every colony. Instead, I wanted them to understand the colony’s region, its geography, and its economy.
Starting with Gimkit: Colonial Regions Review We kicked off with a quick Gimkit on colonial regions, a review of Friday’s lesson. The class averages ranged from 82% to 90%—pretty solid, especially for a Monday.
Frayer Model Activity Next, I handed out paper Frayer models where students wrote a colony name in the middle and added information about its government, geography, economy, and religion. Looking back, I should’ve just aligned it with the PEGS acronym we used on Friday, but live and learn.
Introducing Magic School I showed students how to use Magic School, where I had set up a classroom that allowed me to add AI tools. I added both the chatbot and an image generator, then shared the Magic School link with the students—super easy!
I loved this activity because it got kids asking good questions, which is such an important life skill. They could ask the chatbot about their colony and get personalized answers. For example, they could ask the founder to use simpler language or even to relate the colony’s geography to basketball! It was cool, and the students were hooked—many didn’t know AI could do this kind of stuff.
Students wrote down notes from the chatbot on their Frayer models.
Airbnb Advertisement Activity The next step was to use those notes to create an Airbnb advertisement for their colony. I got this idea from Ditch That Textbook, and it was super easy to adapt. However, the students struggled a bit with this task. Getting them to think creatively and step outside the box is still a work in progress, but I see improvement.
Takeaway The chatbot was a win—it allowed students to engage in inquiry-based learning and step away from the textbook. The creative thinking piece is still a challenge, but I’m confident that with practice, we’ll get there. The biggest takeaway? Learning how to ask good questions and use AI to personalize that learning was a game changer for my students.
Tuesday, I needed a bit of an easy day, but still wanted to create a meaningful learning experience. We started the lesson by emphasizing the importance of using person-first language when discussing slavery. Instead of using terms like “slave,” we replaced them with “enslaved person,” and “master” or “owner” with “enslaver.” It’s a small shift but a crucial one, and I’ve learned it requires explicit teaching for students to fully grasp its significance.
Station Rotation Activity: The Triangular Trade and Middle Passage The core of today’s lesson was a station rotation activity centered on the essential question: “How did Europeans exploring North America for trade, religious reasons, and competition with each other affect the history of the continent and the people who lived there?” This question has been guiding our exploration of European colonization’s impact on North America.
Students rotated through four stations, each engaging with a different aspect of the Triangular Trade and the Middle Passage:
Station 1: EdPuzzle Video We kicked off with a 5-minute EdPuzzle video—a Ted-Ed lesson on the Middle Passage. The video was followed by questions to ensure comprehension and introduce students to the topic. The video laid the foundation for the rest of the activity.
Station 2: SlaveVoyages.org Interactive Map At this station, students used the SlaveVoyages.org database, an incredible resource featuring a timelapse map of ships departing West Africa for the New World. The interactive map allowed students to explore individual ships, their cargo, and survival rates. It was a powerful, visual way to understand the horrific journeys endured by enslaved people. The database, built through collaborative efforts, was an invaluable resource for our class.
Station 3: Slavery Statistics In this station, we focused on statistics related to slavery. Tying back to our previous Number Mania lesson, students saw how statistics have real historical context. They used data from the Slave Voyages database and connected it to the numbers we’ve been exploring.
Station 4: Slavery in the Northern and Southern Colonies At the final station, students read about slavery’s presence in both the Northern and Southern colonies and how enslaved people managed to build their own culture despite their circumstances. A map illustrating the Triangular Trade routes accompanied the reading, helping students visualize the geographic connections.
Students worked in pairs at each station, discussing and answering questions. The stations ended up taking longer than expected, but seeing the students engaged and actively learning was more important than sticking to a rigid timeline.
Thick Slide Assessment To wrap up the lesson, I posted a Thick Slide task. Students condensed the information from their station rotations into essential facts, answering the question, “How did the triangular trade and the Middle Passage transform North America?” They also used the Slave Voyages database to find a ship that traveled to North America and gather relevant statistics. As a final touch, they included a quote from Olaudah Equiano and an image with a caption.
Takeaway This was a more laid-back day, but it was packed with meaningful content and reflection. The stations allowed for deep engagement, and the students rose to the challenge of condensing complex ideas into manageable pieces of information. Even though we didn’t stick to the exact schedule, the engagement and learning made it all worth it.
On Wednesday, I wanted to introduce how race-based slavery came to be in North America. I started with a picture of Anthony Johnson on the board. Johnson was a Black man and former indentured servant in Jamestown who earned his freedom, owned land, and even enslaved people to work on his tobacco farm. This example illustrated that slavery wasn’t originally race-based in the colonies. But then came Bacon’s Rebellion, and things began to shift.
Graph and Tell: Analyzing Slavery Census Data We began with a Graph and Tell activity where students analyzed census data about slavery. They made inferences based on the data, which served as a review of the colonial regions and their economies. This exercise helped students make connections between the regions and how slavery impacted their development.
Introducing Bacon’s Rebellion Next, I introduced Bacon’s Rebellion. The textbook mentioned that the rebellion showed how the Virginia government couldn’t ignore its citizens, but I thought, “Bacon’s Rebellion goes way beyond that!” To help students understand, I used a Somebody, Wanted, But, So, Then activity, giving them more practice with sequencing and comprehension. This scaffolded their understanding of the rebellion’s role in the shift toward race-based slavery.
Cybersandwich: The Start of Race-Based Slavery After introducing Bacon’s Rebellion, we read about how race-based slavery began in Virginia as a consequence of the rebellion. I had students work through a Cybersandwich activity for this reading. They wrote down five important facts, condensed their notes, and then compared and discussed with a partner. This paired learning helped students process the material more deeply.
Struggling with Summary Writing To wrap up, I wanted students to write a quick summary of what they had learned about the shift to race-based slavery. Oh boy—the summary writing was a struggle. I’m not sure if it was the content itself or just the act of writing, but many students found it challenging to condense their thoughts into a clear, concise summary.
Takeaway Wednesday’s lesson introduced some complex ideas, and while the Cybersandwich activity helped students grasp the content, the summary writing showed me that we still have some work to do. I’ll need to continue working on breaking down writing skills and building confidence in expressing complex ideas in shorter formats.
Thursday was a special reward day for the students since it was the end of the quarter. With limited time and a more relaxed atmosphere, I decided to do something simple but beneficial: a Retrieval Practice Grid activity that doubled as an opportunity for extra credit.
The Retrieval Practice Grid I created a grid of questions that covered topics from 7th grade, Unit 1, Unit 2, and our current unit. Each question on the grid was worth a different amount of points based on its difficulty. Students could work through the questions, and depending on how many points they earned, they could unlock different levels of extra credit.
To ensure this was true retrieval practice, I didn’t allow Chromebooks—it was all about what they could recall from memory. The goal was to reward students for what they’ve learned over time, and it was a great way to wrap up the quarter while still reinforcing key content.
Takeaway This activity worked perfectly for the day’s time constraints while still keeping students engaged and focused. It also showed me how much they’ve retained from not just this year, but even last year’s content. A win for both students and teacher!
As the week comes to a close, I’m impressed with how the EduProtocols have streamlined our lessons while keeping students engaged and thinking critically. The combination of Thin Slides, Cybersandwich, and Graph and Tell not only made complex topics like race-based slavery more approachable, but also fostered deeper understanding and retention. The students are gradually getting more comfortable with creative tasks, and I can see their confidence growing as they interact with both the content and each other. Moving forward, I’m excited to keep building on this momentum with even more dynamic and student-centered activities.