The Week That Was In 234

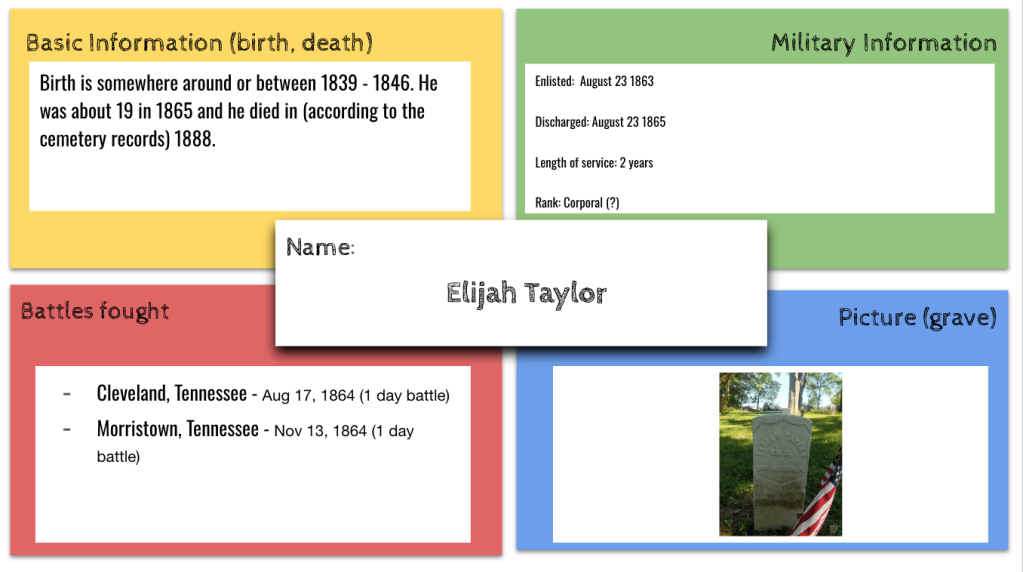
This week, I took a hard look at my teaching approach and realized I had been falling into a pattern of overloading my lessons with too much traditional content. After reflecting and talking with Jon Corippo, I refocused my energy on using student-centered protocols that would both engage my 8th graders and keep the content academically rich yet accessible. We used a variety of strategies—starting with Fast and Curious to boost content retention, Graffiti Walls for movement and exploration, and Thick Slides for quick, meaningful summaries. By Friday, I brought everything together with a headline-driven lesson on Jamestown that sparked curiosity and used a mix of Google Maps, Wicked Hydra, and Wordwall. The result? A week that was fast-paced and engaging.

Monday

Lesson Link

Coming into class on Monday, I was tired, and I knew I needed to pull out a creative, high-engagement lesson to get both myself and my students through the day. I decided to lean into interactive strategies that would keep everyone on their toes.

Starting with Gimkit: Fast and Curious

I started the day with a Fast and Curious session on Gimkit, which is an effective way to review material and build momentum. If you’re not familiar, Fast and Curious is a quick, repeated review activity that leverages competition. I uploaded questions about Spanish explorers that we had already covered, making it a review while subtly gauging where students stood on key facts and concepts. The class average ranged from 65% to 77%, but the real value wasn’t just in the scores—it was the immediate feedback and the students’ drive to improve. For anyone trying to build retrieval practice into lessons, Gimkit makes it fun and competitive, and you can track student progress instantly.

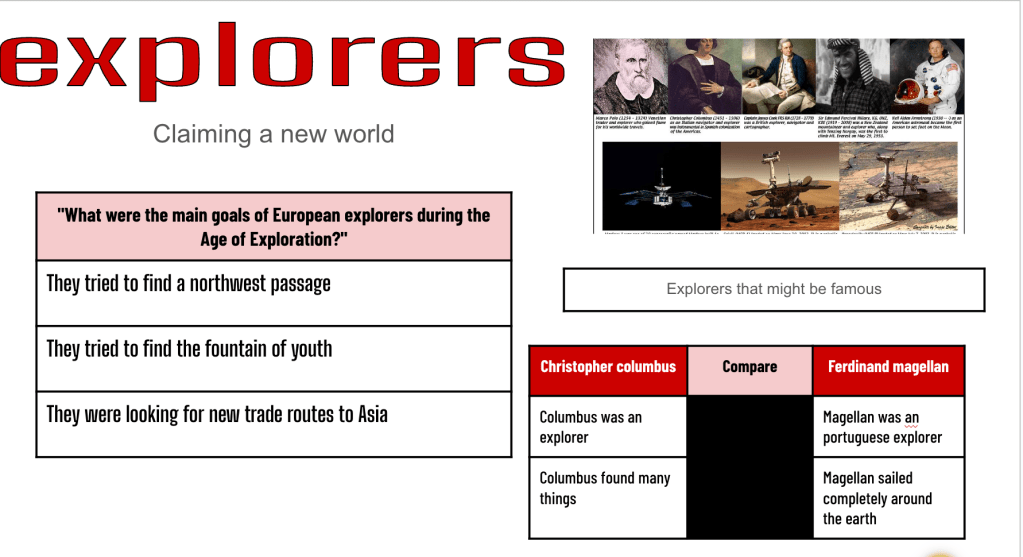
Explorer Scavenger Hunt: Moving Around the Room

Next, I had the students participate in an explorer scavenger hunt. This wasn’t just a passive worksheet activity—students were up, moving around the room, searching for answers about different explorers posted at stations. I tweaked the scavenger hunt by dividing the questions into Part A and Part B. I assigned each student to an explorer marked with either an A or B next to their name. This meant that students weren’t overwhelmed with all the questions at once; they could focus on smaller chunks of information, which worked well for those needing more structured guidance.

For setup, I stapled the explorer profiles and questions together and posted them around the room. Each station had information about a different explorer, like Christopher Columbus, Vasco da Gama, Ferdinand Magellan, and more. This tactile, physical movement not only keeps students engaged, but it also serves as a way to differentiate the activity. I find that students who struggle with longer reading passages or sitting still benefit from the opportunity to physically move around while learning.

A Layered Learning Approach

This lesson wasn’t just a one-off on explorers. It was part review and part preview. Monday’s scavenger hunt focused primarily on explorers that we had already covered, like the Spanish explorers, but I also introduced a few new explorers they would be learning about in more depth in Tuesday’s lesson. This gave the students some curiosity and set the stage for the rest of the week’s lessons.

By layering content this way, I’m not just throwing new information at them; instead, students have a chance to review and master familiar material while also preparing their minds for what’s coming next. This approach helps scaffold learning and ensures students are more comfortable when we dive deeper into the new material later on.

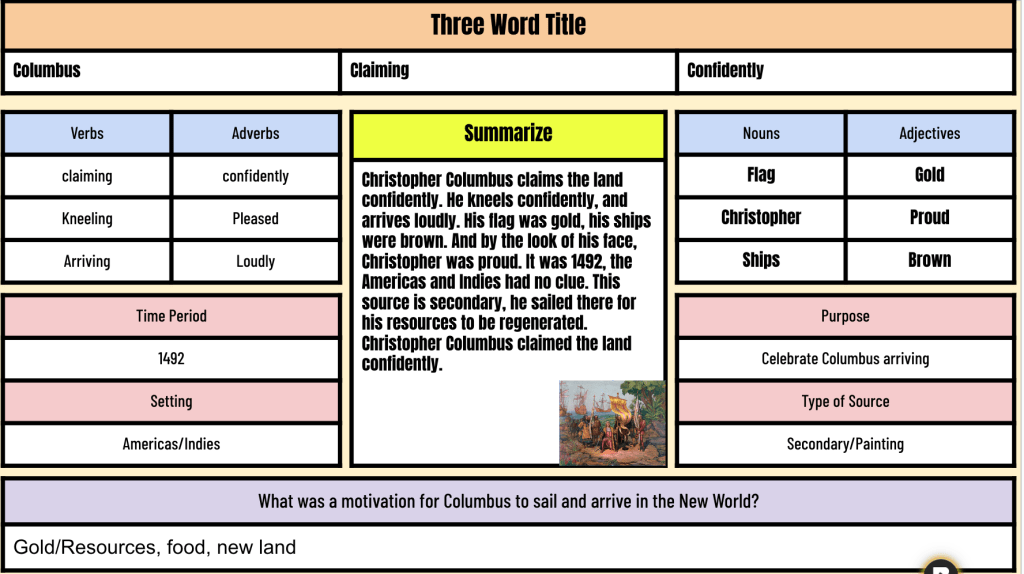
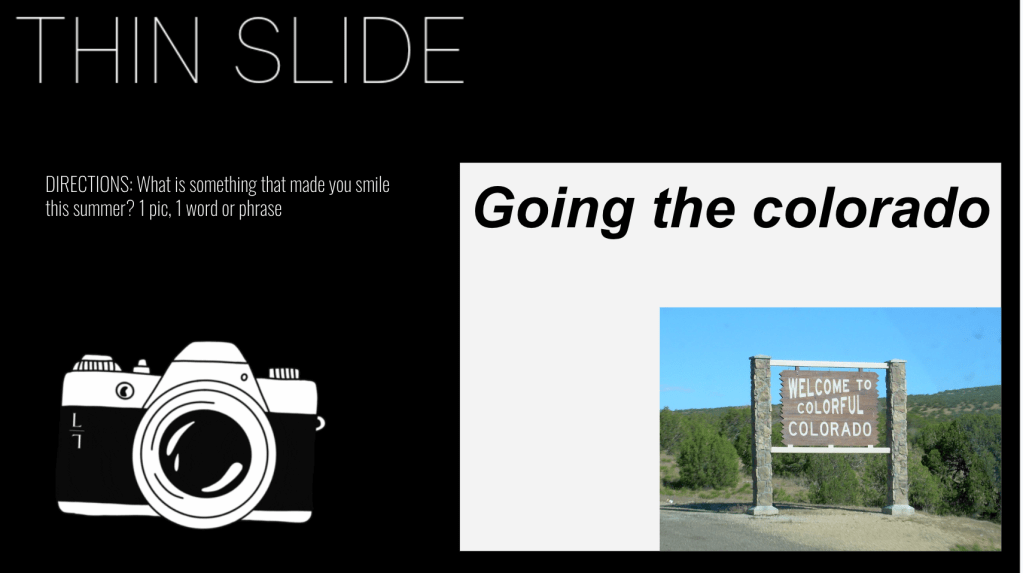
Wrapping it Up with Thick Slides

We ended the lesson with a Thick Slide activity. For those unfamiliar, this is a powerful summarization tool that asks students to process their learning on one slide. Here’s what I had them do:

  • Share three or four important facts they learned during the scavenger hunt.
  • Compare two explorers they read about (e.g., Cabot vs. De Leon).
  • Add a picture related to exploration.

This structure hits several skills at once: content recall, comparison and contrast, and creative expression through visuals. The slides serve as a formative assessment, letting me see what they’ve internalized. It’s a great visual tool for students too because they synthesize what they’ve learned into something concise but meaningful.

Tuesday

Lesson Link

After a successful Monday, I kicked off Tuesday with a map activity that set the tone for another full day of exploration. The goal was to help students understand the colonies in the New World set up by Spain, Portugal, France, and the Netherlands, and how these countries played a role in shaping early America.

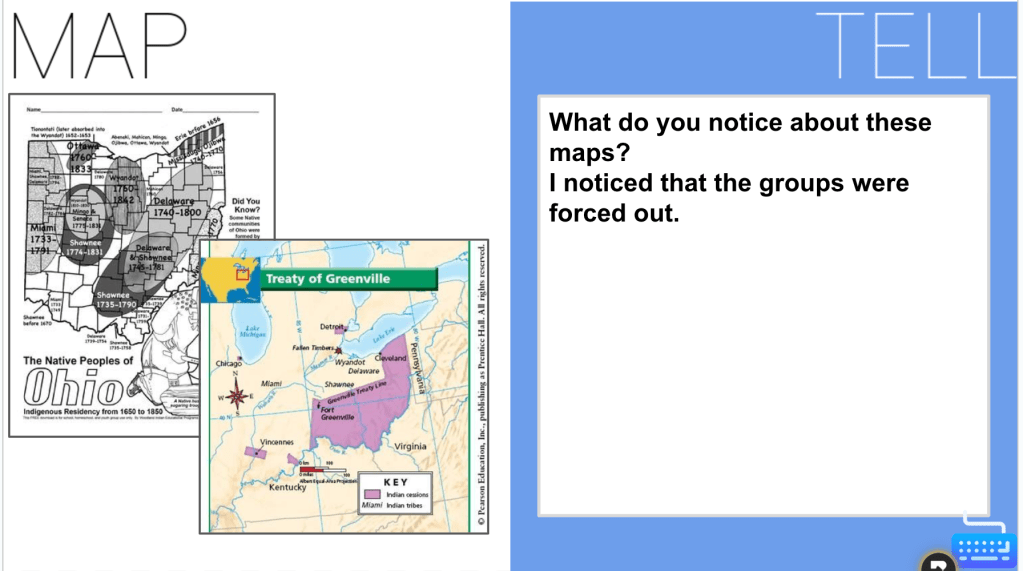
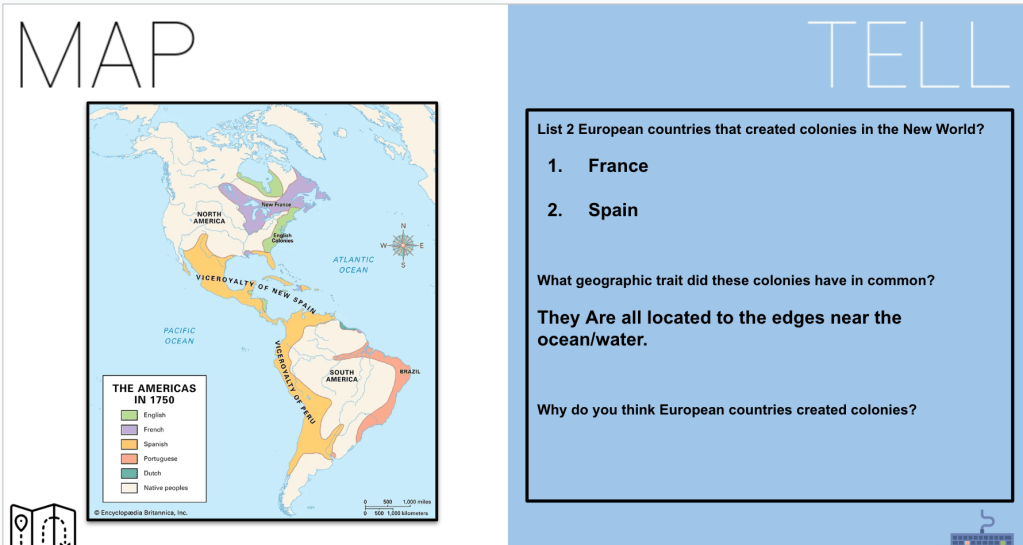
Map and Tell: Analyzing the New World Colonies

We began the lesson with a Map and Tell activity focused on the colonies created by Spain, Portugal, France, and the Netherlands. The students worked in pairs to analyze a map that outlined where these European powers had established their territories. Here are the questions they worked through:

  1. Which two European countries created colonies in the New World?
  2. What geographic trait did these colonies have in common?
  3. Why do you think European countries created colonies?

This analysis helped students build context and draw connections between geography and colonization strategies. The discussions around why these countries set up colonies set the stage for the next part of the lesson: Mercantilism.

Frayer Model: Understanding Mercantilism

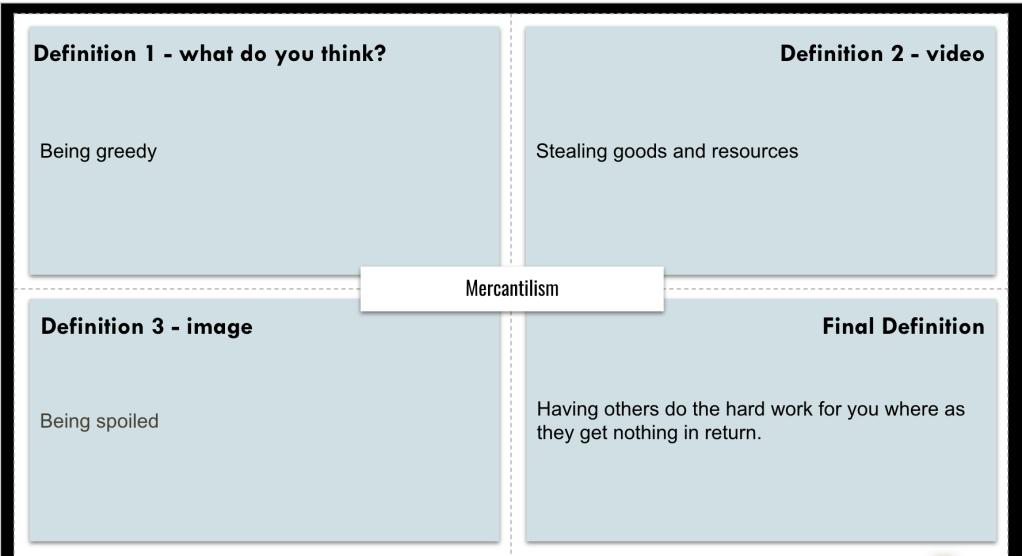
We then transitioned to a Frayer Model on Mercantilism, a concept that was new to most of my students. I asked them to first write down what they thought mercantilism meant—just their best guess. Once they were done, I had them angle their Chromebook screens.

Next, I showed a short video from Disney’s Pocahontas called “Mine, Mine, Mine.” It’s a 4-minute video that captures the essence of European greed and exploitation during colonization, which ties perfectly into mercantilism. After the video, I asked the students to revisit their definitions of mercantilism. Some students added new insights, while others completely redefined their initial thoughts, which was exactly what I was hoping for.

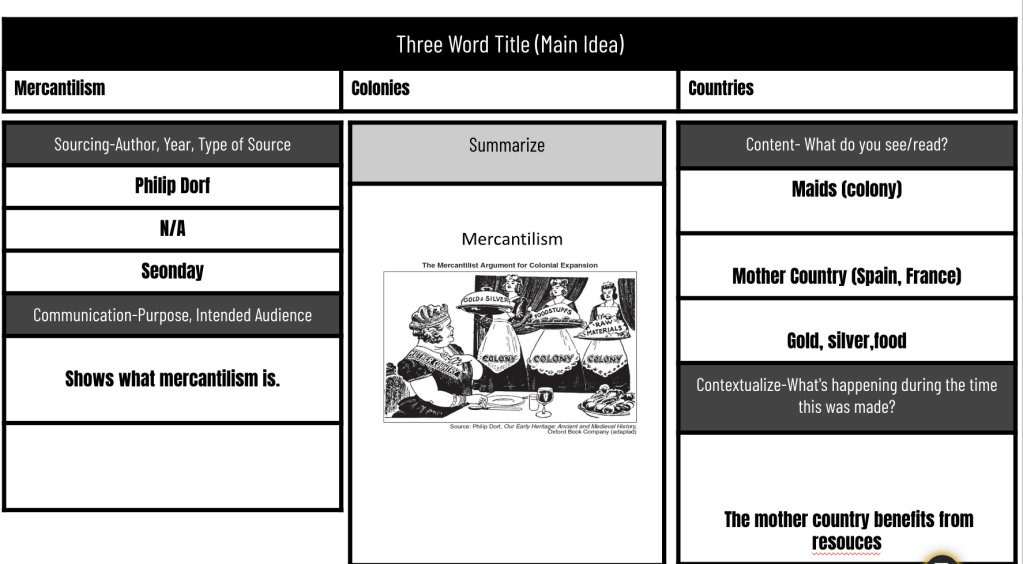
Sourcing Parts: Breaking Down Mercantilism Through a Cartoon

With a better understanding of mercantilism, we moved on to analyze the classic mercantilism cartoon. Using the Sourcing Parts EduProtocol, we broke the cartoon down by focusing on the following:

  • Sourcing: Who created this cartoon? When and why was it made? What type of source is this?
  • Summarize: What do you see or read in the cartoon?
  • Contextualize: What was happening during the time this cartoon was created?
  • Communicate: What is the purpose of this cartoon, and who was its intended audience?

The students dove deep into analyzing how the cartoon depicted European countries’ relentless pursuit of wealth through colonies and trade. It was great to see them apply their critical thinking skills to a visual source, reinforcing the concept of mercantilism and its connection to colonization.

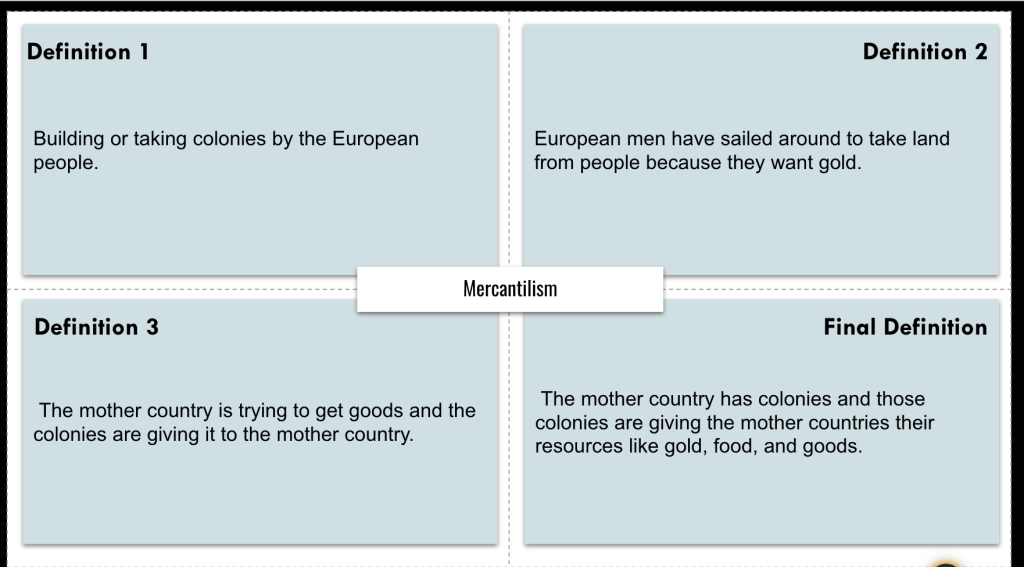
Frayer Model Revisited

After the cartoon analysis, we returned to our Frayer Models to once again refine and add to our definitions of mercantilism. At this point, students had developed a far more comprehensive understanding, and their definitions were rich with historical context. The progression from initial guesses to a more nuanced definition was evident.

Socrative: Putting It All Together

To wrap it all up, I had the students share their final definitions of mercantilism on Socrative. This was a quick way for me to check for understanding and see who was still struggling with the concept. Overall, most students showed a strong grasp of how mercantilism shaped European colonization strategies in the New World.

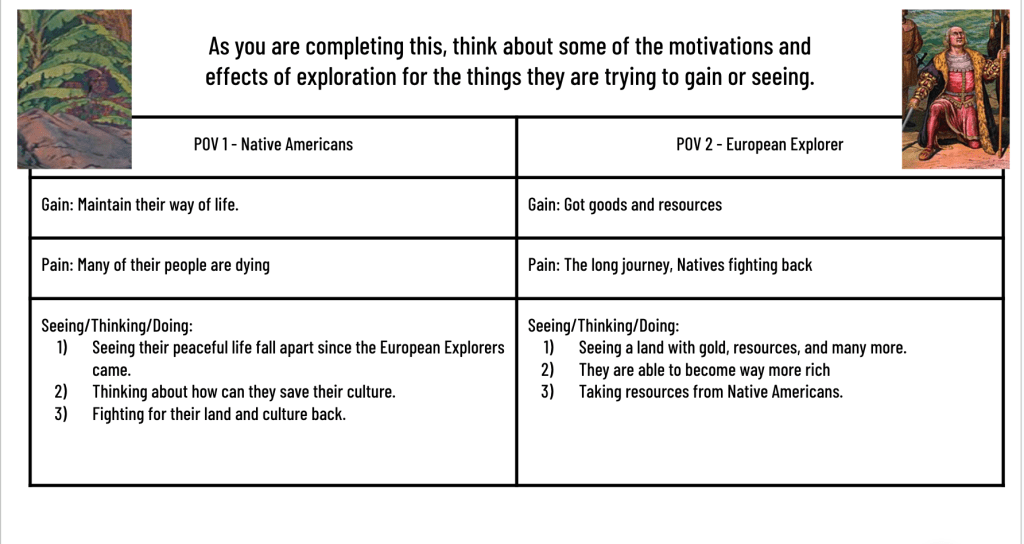
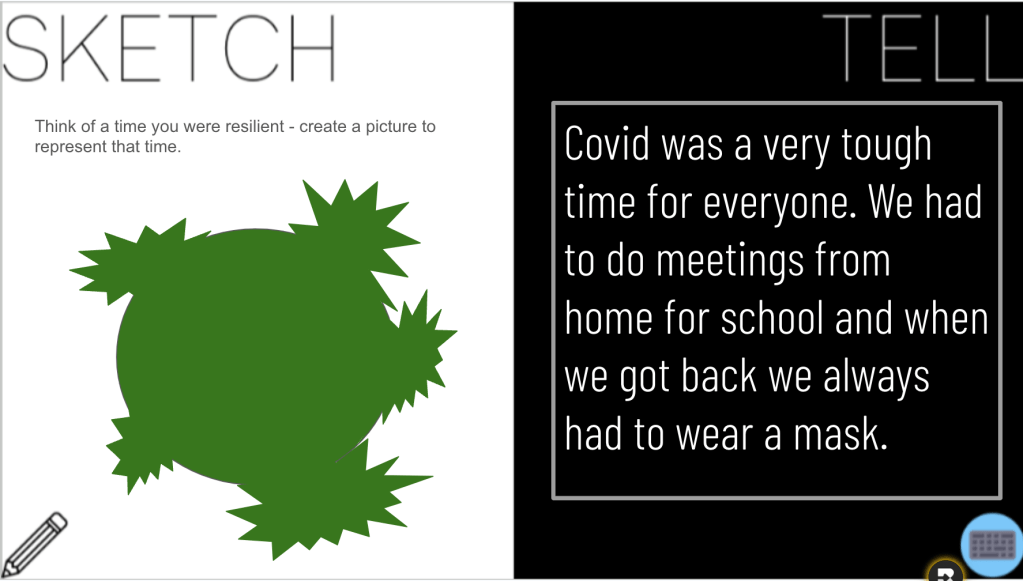
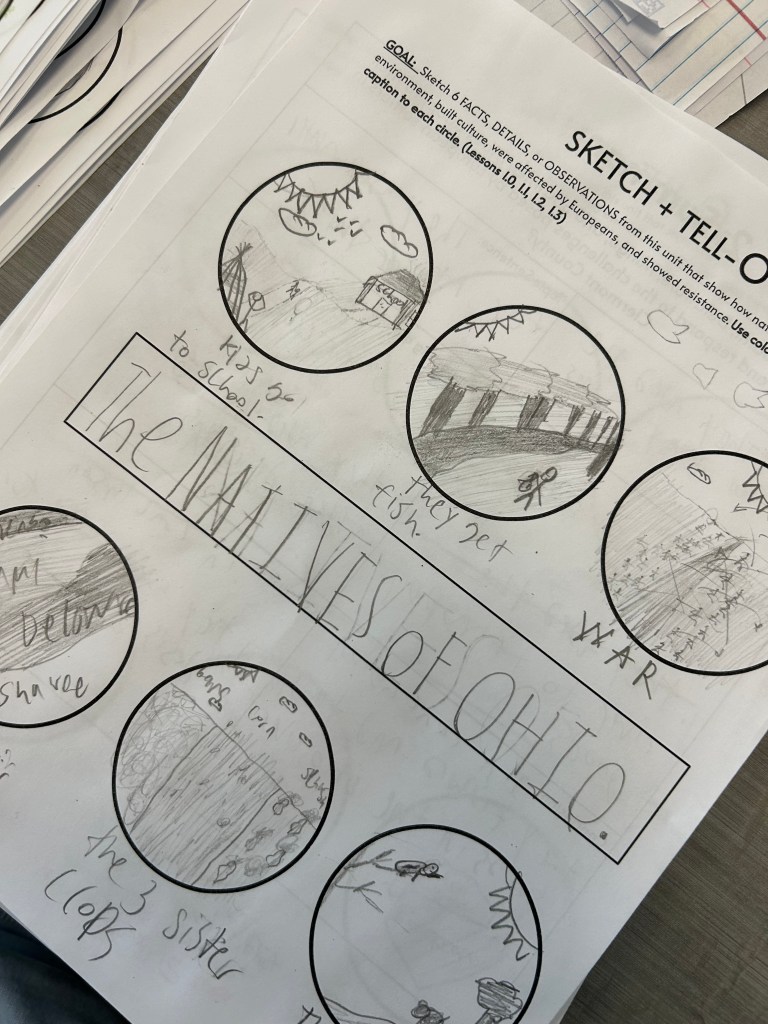
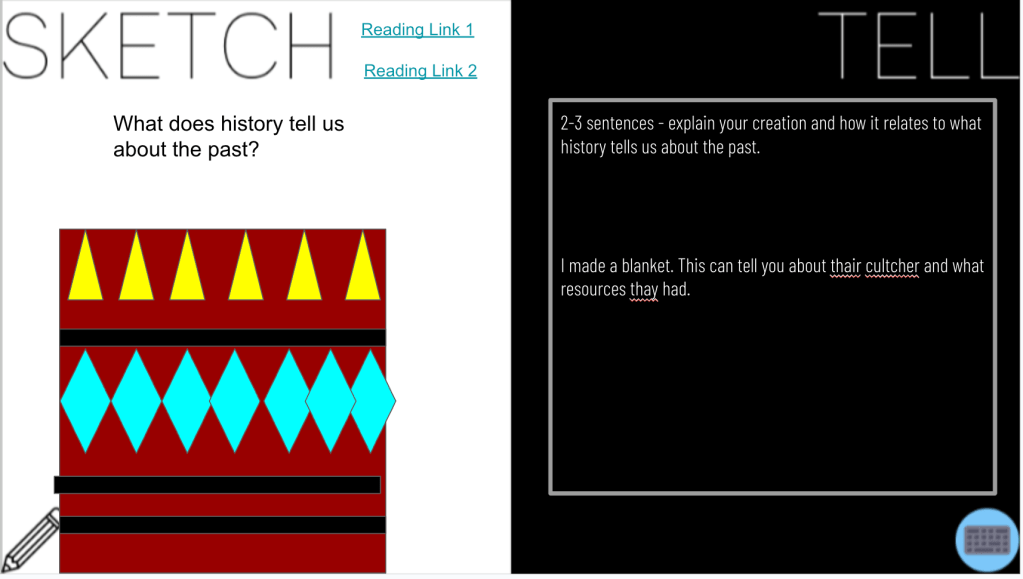
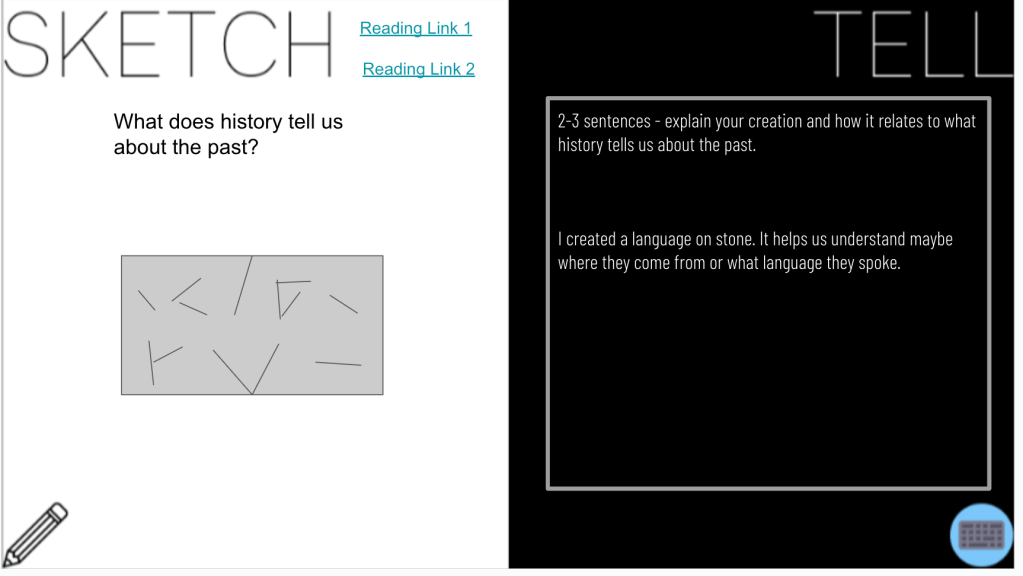
Sketch and Tell: Essential Questions

We finished the day with a Sketch and Tell activity. The students were tasked with answering the following essential questions:

  1. How does mercantilism relate to European colonization of the Americas?
  2. Why did the French explore and colonize the Americas?
  3. Why did the Dutch explore and colonize the Americas?

For each question, the students created a sketch to visually represent their answer and added a short caption. This activity gave them a creative outlet while reinforcing their learning. It also allowed me to gauge their understanding in a more visual and reflective way.

Looking back, I had originally planned to include a CER (Claim, Evidence, Reasoning) activity as the final part of the lesson, but I quickly realized it was a bit too ambitious for the time we had. The students were already processing a lot of new information, and adding a CER would have pushed us over the edge. Instead, we focused on sketching and summarizing, which worked out well for the time we had.


Wednesday

Lesson Link, Gimkit

Wednesday was all about assessing what my students had learned throughout our unit on European exploration, but I wanted to ensure that they could see the purpose behind each activity we had done leading up to this point. The assessment was split into two parts: a Gimkit challenge and an annotated map, both designed to help students make connections between last week’s lessons and the material we had covered this week.

Part 1: Gimkit Challenge

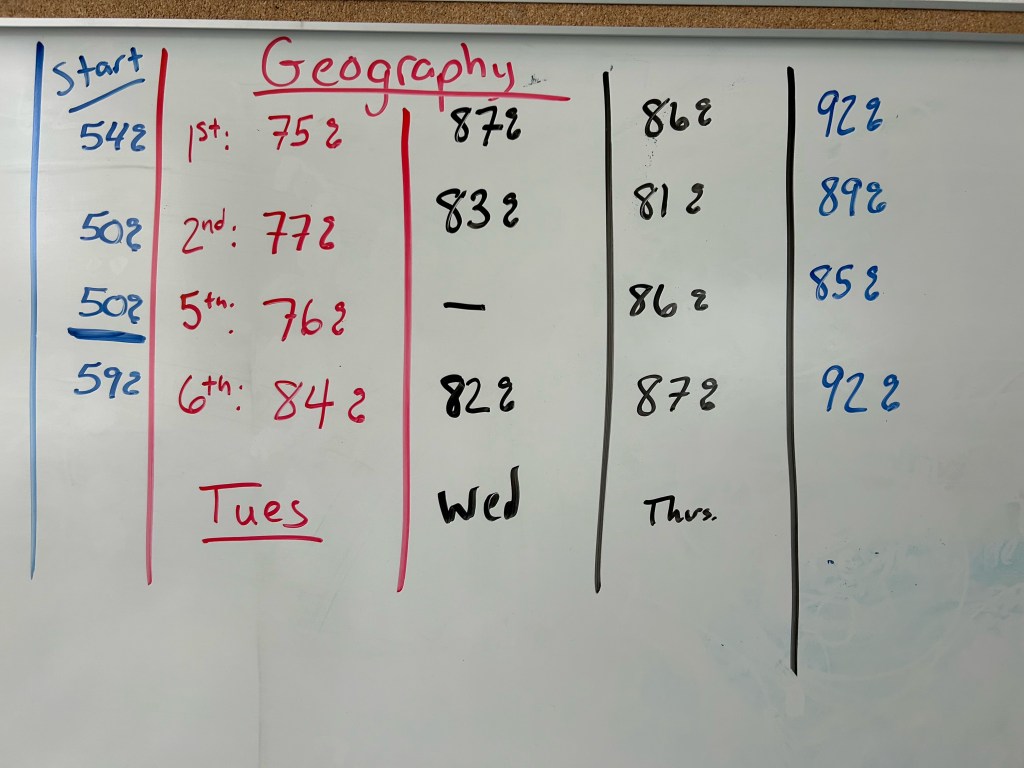
We started the day with a Gimkit challenge, where I encouraged the students to push themselves to raise the class averages to 90% or higher. When we first began using this Gimkit last week, the class averages were sitting at 52%, 54%, 62%, and 58%. After practicing with it throughout the unit, the students were determined to hit the target.

By the end of Wednesday’s class, the final averages were 87%, 90%, 92%, and 89%. The improvement was incredible and showed how much they had retained through consistent practice and spaced repetition. More importantly, the students could see the direct results of their hard work, which motivated them to push even further.

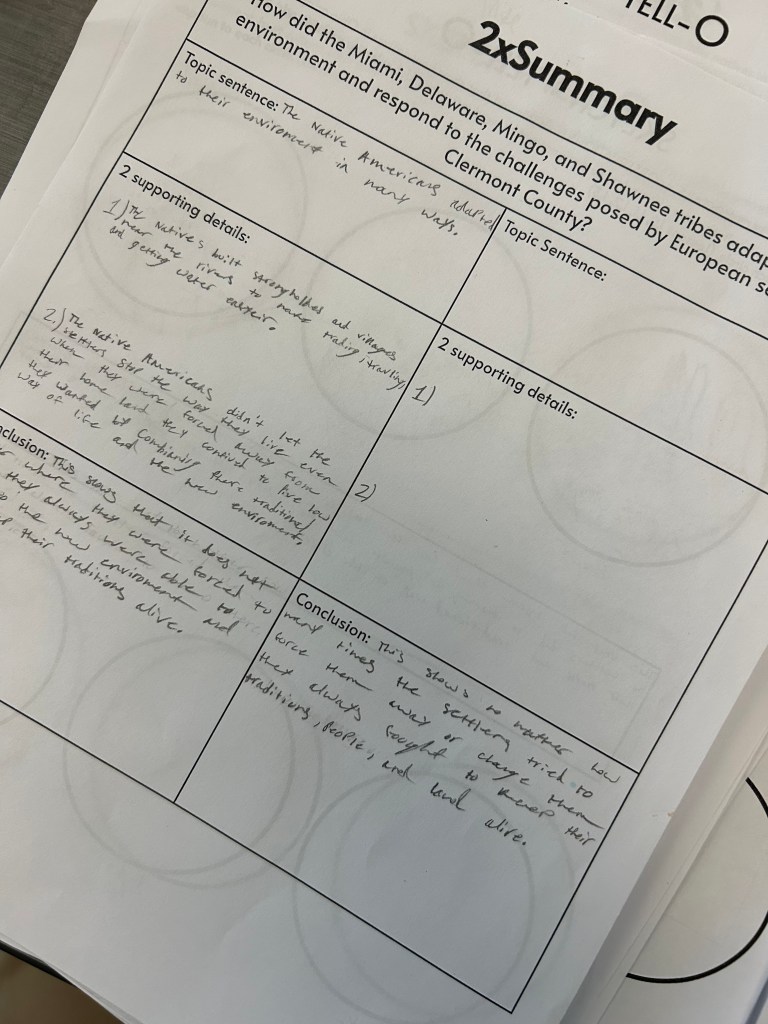
Part 2: Annotated Map Assessment

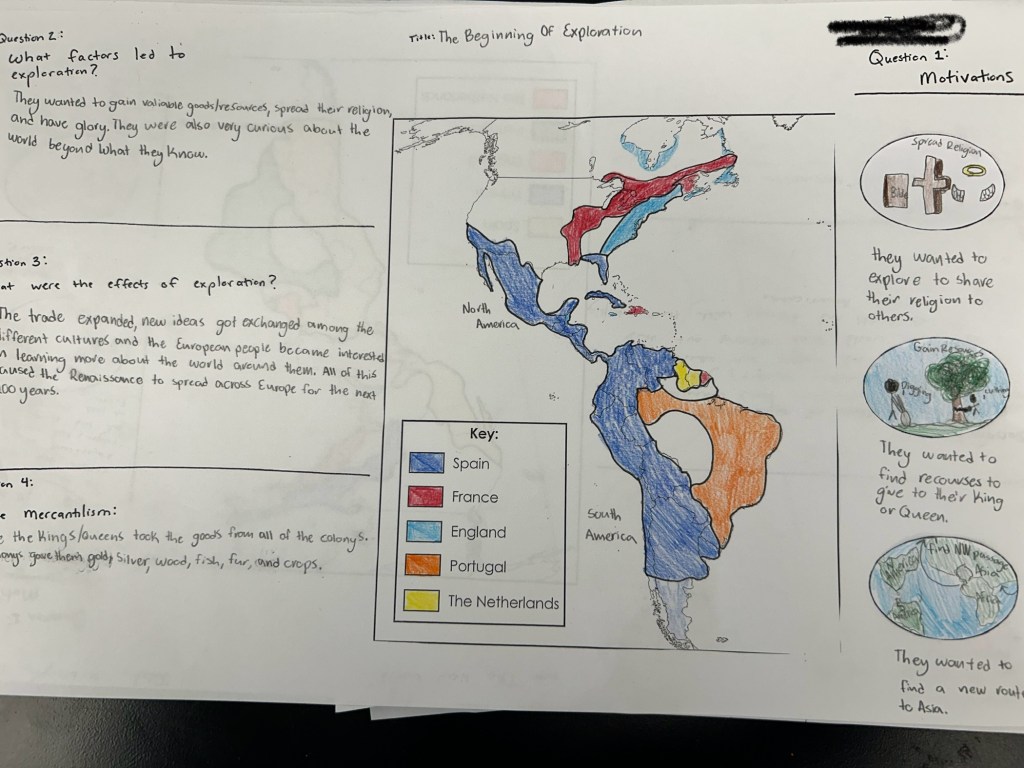
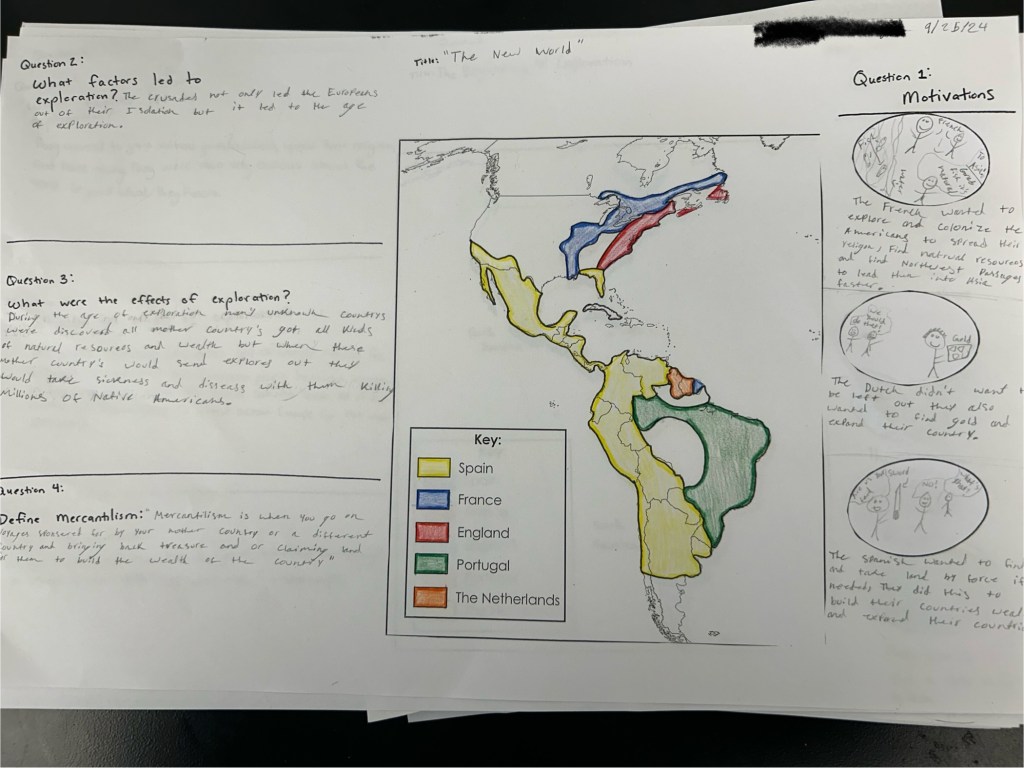
For the second part of the assessment, I had the students work on an annotated map that pulled together everything we had studied. Each student received a large 11×17 piece of paper with a blank map of North and South America in the center. The map required them to apply their knowledge of European exploration and colonization by completing a set of detailed tasks.

Here were the instructions they followed:

  1. Label and color the map for the territories claimed by different European countries using five different colors. They labeled both North America and South America.
  2. Add a title to the top of the map.
  3. Answer the following questions, referencing lessons from last week and this week:
    • Question 1: What motivated Spain and France to explore and colonize the Americas? For this question, students cut out and glued three Sketch and Tell-o circles from Tuesday’s lesson. This connected the current task to earlier work, helping them see the purpose behind the activities we do.
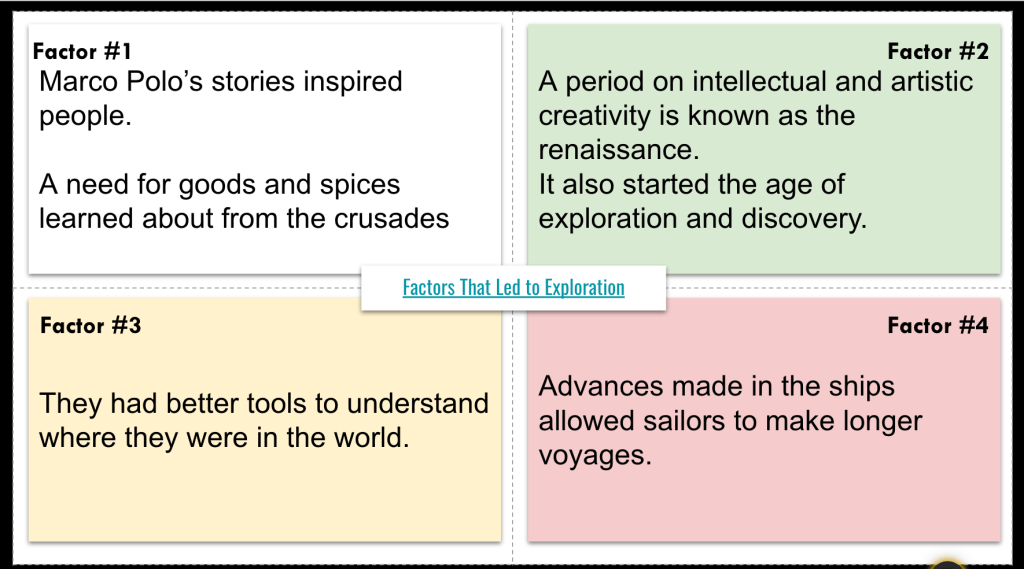
    • Question 2: What factors led to exploration? They identified and listed two factors, referring back to lessons from the previous week.
    • Question 3: What were the effects of exploration and colonization? They had to identify and describe three examples, using information gathered from multiple lessons.
    • Question 4: Define mercantilism. This was a concept they had explored thoroughly on Tuesday, so they returned to their Frayer models to inform their responses.

Using the Sketch and Tell-o circles from Tuesday was particularly important because it helped the students see continuity and purpose in the activities we’ve been doing. It wasn’t just a random task—it all tied together to help them form a bigger picture of the Age of Exploration.

The annotated map provided an opportunity for students to synthesize all of the information they had learned, while also allowing for creative expression. I was especially pleased with how the students used their previous lessons as a reference, connecting the dots between Spain and France’s motivations, the factors behind exploration, and the broader effects of colonization.

By having them revisit earlier lessons, they could clearly see the purpose behind the different activities we did throughout the unit. It helped them understand that each task—whether it was a Gimkit challenge, a Sketch and Tell-o, or a map activity—contributed to a deeper understanding of exploration and colonization. The process of going back to those lessons also gave them a sense of how much they’ve grown academically since the start of the unit.

Thursday

On Thursday, we dove into a brand-new unit on The English Colonies, and I knew I had to find a way to engage the students from the start. To get them moving and thinking about the topic, I started with a Graffiti Wall activity that had just the right mix of physical movement and competition.

Graffiti Wall: Gamifying Exploration of Textbooks

I placed textbooks on their desks, and right away, the students weren’t too excited. It’s a common reaction, but I was ready for it. I told them to look through pages 64-94 and find important words that could help them understand English colonization. Once they found a word, they had to raise their hand, and I called on them to come up to the whiteboard and write the word.

Here’s the catch: once a word was written on the board, it couldn’t be used again. This kept them on their toes, trying to find words that hadn’t already been claimed. The energy in the room picked up as they scrambled through the pages. And I had a “secret” word that added an extra layer of excitement. The secret word was Jamestown, and whoever wrote it down earned PBIS points. It was fun to watch as they eagerly searched for words that might give them an edge.

After about 10 minutes, the board was covered with key terms like charter, Plymouth, and middle colonies. I took a moment to give a brief summary of the upcoming unit, tying in all the words they had written on the board to help them see how these terms would fit into the bigger picture of English colonization.

The Great American Race: Teamwork and Discovery

Next, we shifted gears into a Great American Race activity, which was another chance for them to apply what they were starting to learn. I created 20 cards, each with a secret word like Jamestown, Plymouth, charter, or middle colonies. I handed out a card to each student, and their task was to create a Google Slide with four clues and one picture related to their word.

As they worked on their slides, I compiled them into a complete slide deck in order, giving feedback along the way. This allowed me to see how well they were connecting with the material and to guide them if they needed clarification on their clues or picture choices.

Once the slides were ready, I collected the cards and shared the completed slide deck with the class. The students then partnered up for the final part of the activity. Using their prior knowledge, the Graffiti Wall as a word bank, and some quick Googling, they worked together to figure out the answers to each slide. It was harder than they expected—many of the clues were tricky, and they had to really dig into their critical thinking skills to figure them out. But that was the point: this activity pushed them to apply what they had learned while collaborating and problem-solving.

It was a great day of active learning. The Graffiti Wall got them up and moving while building curiosity around the key terms for the unit. Gamifying it by making certain words off-limits and adding a secret word kept the energy high. The Great American Race followed that up by challenging their research and teamwork skills, while still keeping the fun element of discovery and competition.

The connection between the two activities—using the Graffiti Wall as a word bank for the race—reinforced the idea that everything we do in class has a purpose and that knowledge builds on itself. By the end of class, they had a strong foundation to start digging deeper into the history of the English colonies.

Friday

Lesson Link

Friday was a day of reflection and adjustment for me. Being at a new school, I’ve been feeling like I’ve fallen into a bit of a rut—relying too much on traditional methods and dry content that just wasn’t resonating with my 8th graders. After talking with Jon Corippo, I realized I had been trying to do too much, often using material that lacked the punch needed to grab the attention of middle school students. I needed something quicker, more engaging, and with just enough academic rigor to feel worthwhile but still fun. And that’s when I came across an article that completely changed my approach to Jamestown.

Hooking Them with a Shocking Headline

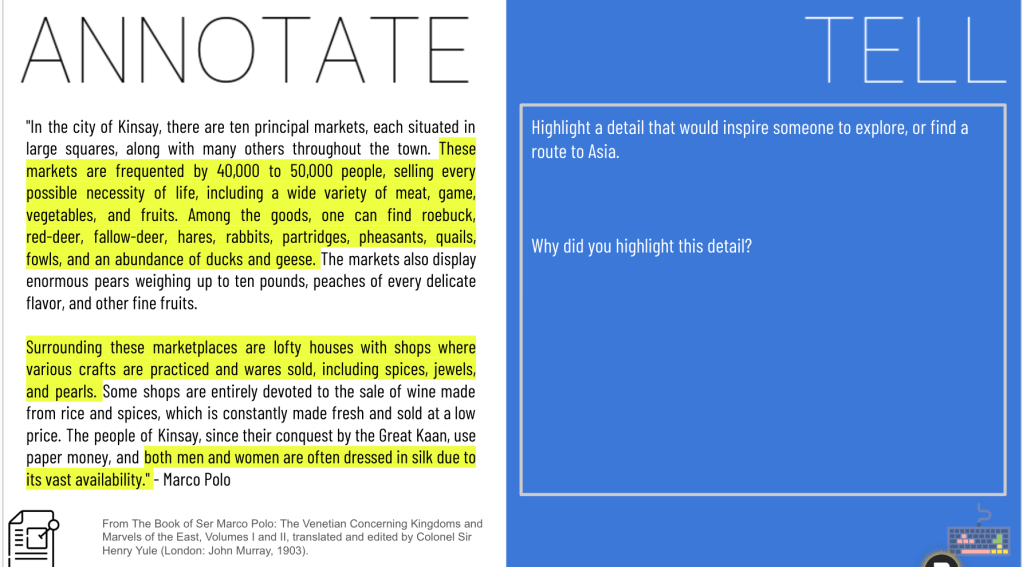
The headline I found was: “Jamestown Settlers Ate 14-Year-Old Girl.” I knew this would instantly grab their attention. When they walked into class, that headline was already on the board. I also had it printed on 11×17 paper at their desks, ready to go. You could feel the curiosity and the slight shock as they sat down and read it.

We began with a Wicked Hydra activity—an approach my students were already familiar with, where they had the chance to ask as many questions as they wanted about the headline. It sparked a lot of discussion right from the start, and students were eager to dive deeper. This was exactly the kind of engagement I had been missing.

Walking Through Jamestown with Google Maps

After the Wicked Hydra, we moved on to Google Maps. I had the students use Street View to explore the Jamestown site as if they were walking through it themselves. This added a layer of real-world connection to what they were reading, helping them visualize the setting where these historical events took place. They were completely absorbed in their virtual walk around Jamestown, and it set the tone for the rest of the lesson.

Exploring the Dark Side of Jamestown: Quick and Punchy Reading

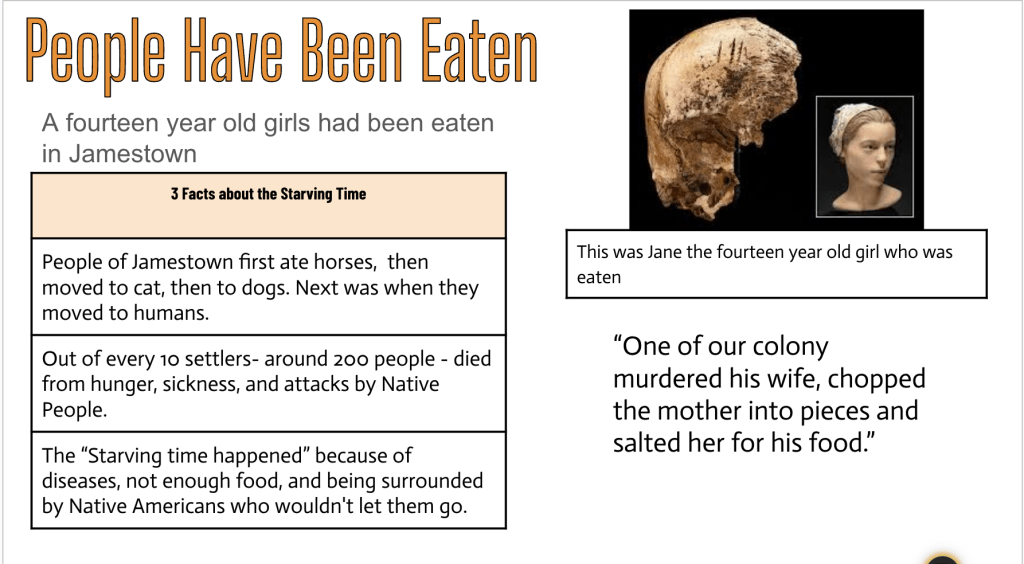
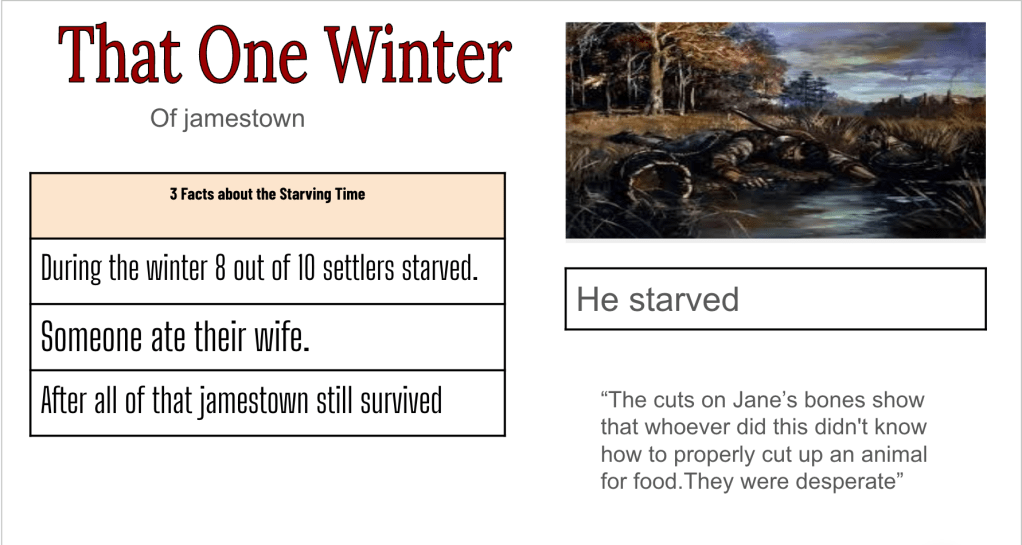
Next, we dove into the one-page newspaper article that accompanied the headline. This reading was quick—just one page—but packed with bizarre details about Jamestown’s Starving Time and the unsettling choices the settlers had to make. The students were tasked with highlighting three weird facts and one crazy quote from the article. The headline had already captured their attention, and now they were digging into the details with enthusiasm.

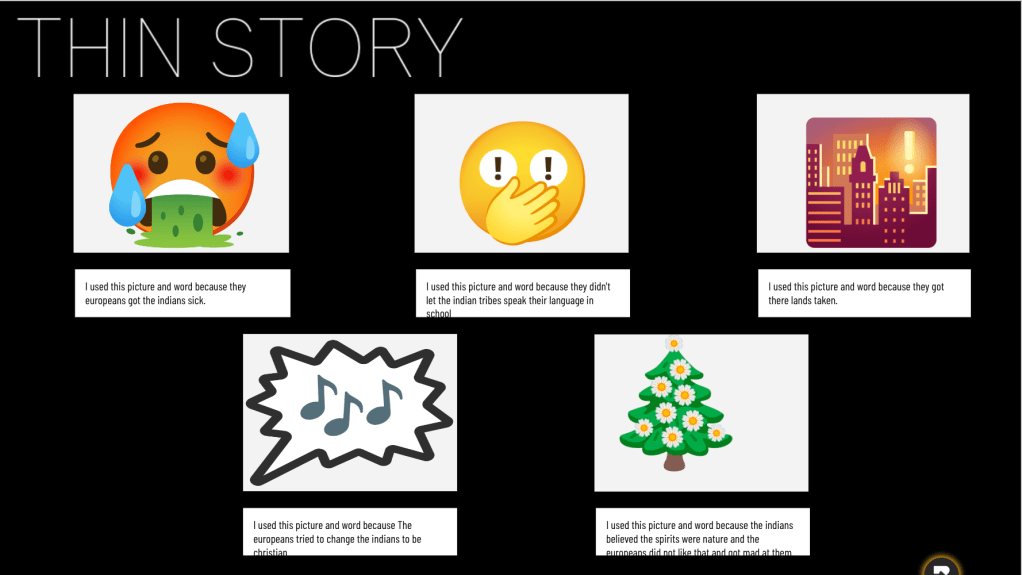
Thick Slide: Summarizing the Starving Time

After reading, we shifted gears to a Thick Slide activity. In just 10 minutes, students had to create a summary slide that included:

  • Three important facts about the Starving Time
  • One surprising quote
  • A relevant image

This quick-paced summary helped them process what they had just learned while keeping the focus on critical information. The format gave them enough structure to succeed while leaving room for creativity in how they presented their findings.

Wrapping Up with Wordwall and Gimkit

To finish off the class, we switched to Wordwall, where students did a drag-and-drop activity with the 13 colonies. I timed this for 8 minutes, and the students raced against the clock to correctly place the colonies in their respective spots. It was a fun, fast-paced way to reinforce geography while still keeping the focus on the day’s theme of colonization.

If we had any time left, we reviewed vocabulary on Gimkit to round out the lesson. This gave students one last chance to test their knowledge in a competitive, interactive format, keeping the energy high right up until the end of class.

Friday’s lesson was a turning point for me. The shocking headline, quick reading, virtual exploration, and fast-paced activities all combined to create a lesson that felt engaging and easy to complete while still being academically rigorous. The Jamestown article worked wonders in sparking interest, and using Google Maps and the Thick Slide brought the lesson full circle, helping students understand the reality of life in the early colonies. By simplifying my approach and focusing on keeping things interactive and relevant, I finally felt like I was hitting the mark with my 8th graders.

The Week That Was In 234

I’ve been slammed lately with so much going on—coaching tennis, adjusting to a new school, juggling presentations, and life in general. Honestly, I’ve been feeling like a first-year teacher again! Between managing the chaos of lesson planning, keeping up with my students, and coaching, it’s been a whirlwind. With everything happening, I decided to take my weekly activities, add a quick description, and let AI handle the blog writing. It’s been a huge time saver, especially since it allowed me to focus more on the classroom and less on the stress of documenting every detail.

Throughout the week, we’ve been using a mix of Thin Slides, Thick Slides, and even Sketch and Tell-o activities to keep things engaging and varied. These methods helped students break down complex historical concepts into simple, creative outputs. Whether they were creating Thin Slides with a single word and image or developing more in-depth Thick Slides, I saw them make great progress in expressing their understanding. The Sketch and Tell-o added a fun, visual element, allowing them to sketch key ideas and present them to the class.

Also, if you’re interested in how AI can be used effectively in education, check out an article I contributed to in EdWeek: Can AI Be Used Effectively in Class?. It’s been exciting to see how tools like this can support both students and teachers in new ways!

Tuesday – Factors of Exploration

Wednesday – Motivations for Exploration

Thursday – Columbus

Friday – Effects of Exploration

Tuesday: Factors Leading to European Exploration

In Tuesday’s class, we dedicated time to various engaging activities that built up to a comprehensive understanding of the factors leading to European exploration. Here’s a detailed breakdown:

Thin Slide (3 minutes): We started with a quick Thin Slide activity where students selected a word and an image to represent a factor that motivated European exploration. The speed of this activity pushed students to think quickly and make instinctive connections between visual elements and key ideas, such as “spices” or “trade routes.” This set the tone for deeper exploration of the topic.

Frayer Model and Reading (20 minutes): After the Thin Slide, we shifted into a Frayer Model combined with a reading session. Students read about the key historical factors behind the exploration era—like Marco Polo’s influence, advancements in navigation, and the rise of trade. As they read, they filled out their Frayer Models, identifying four main factors (such as the Renaissance, the desire for wealth, better ships, and the spice trade). This process helped them structure their knowledge and highlight the key points in a logical manner. The Frayer Model worked especially well for students to internalize the information and make it more manageable.

Annotate and Tell (8 minutes): The next phase involved an Annotate and Tell activity, focusing on a passage from Marco Polo’s writings. Students spent time annotating the text, underlining or highlighting key sections that illustrated how Polo’s stories inspired European curiosity and exploration. They then shared these annotations with the class, fostering discussion about how historical narratives shaped exploration. This part helped students connect primary source analysis to the broader motivations for European exploration, further deepening their historical thinking skills.

8Parts (12 minutes): We then moved on to an 8Parts activity where students analyzed a historical map. This exercise required them to break down the map by identifying key nouns, adjectives, and verbs. They discovered how geography—land and sea routes—was integral to understanding exploration. This helped students think critically about the relationship between European nations and the wider world. By dissecting the map in a structured way, they learned how to interpret visual resources as historical evidence.

Thick Slide (Remaining class time): The final part of the class was dedicated to the Thick Slide activity. Here, students were asked to create a detailed slide that combined the insights they had gathered throughout the lesson. They selected a key factor from their earlier work—whether it was technology, trade, or influence of explorers—and developed a visual and textual presentation around it. Additionally, they wrote a strong topic sentence that summarized the main idea of the lesson, drawing together everything they had learned. This required students to synthesize the various elements they had explored, from their initial Thin Slide idea to the more detailed knowledge gained through reading, annotating, and map analysis.

The Thick Slide provided a perfect opportunity for students to creatively showcase their understanding and articulate the big picture of why exploration was such a significant period in European history. This extended time allowed for in-depth thinking, while also reinforcing writing skills through the construction of clear, concise topic sentences that encapsulated the lesson’s core ideas.

Wednesday: Refining Work and Exploring Motivations

In Wednesday’s class, we started with an innovative approach to refine the students’ work from the previous day. I gave students 15 minutes to finish their Thick Slide, focusing on crafting strong topic sentences that summarized the main idea of European exploration. To enhance their writing, we utilized AI feedback through Claude Artifact, allowing students to receive targeted suggestions on how to improve their topic sentences. This provided an interactive and reflective start to the lesson, encouraging students to refine their thinking and writing.

After this, we transitioned into a Sketch and Tell-o activity, where students read about the motivations for Spanish and Portuguese exploration. Using the information from the reading, students sketched six key details, each accompanied by a caption explaining the motivation behind it. For example, students captured aspects like Portugal’s quest for new trade routes and Spain’s competition with Portugal, visually representing each with simple but meaningful drawings. This activity helped reinforce the motivations behind exploration in a creative and engaging way, encouraging students to visualize what they had learned about the explorers’ economic, religious, and competitive motivations.

We wrapped up the class with a Random Emoji Paragraph activity, where I introduced random emojis as part of a “mystery bag” concept to encourage creative thinking. For instance, when a bouquet of flowers appeared, I suggested students think about how the flowers could represent something “bunched together.” One student cleverly made a connection, saying, “The Spanish and Portuguese explorers wanted to claim a bunch of land,” showing how the emojis could inspire creative associations with historical content. This activity added a fun and imaginative twist to the lesson, pushing students to think outside the box while still connecting back to the day’s theme.

Overall, the class blended technology, creativity, and critical thinking to help students deepen their understanding of exploration. The use of AI feedback, visual storytelling through sketches, and creative connections with emojis made for a dynamic and engaging lesson.

Thursday: Christopher Columbus

In Thursday’s class, we explored the question: “Should Christopher Columbus be considered a hero or a villain?” This sparked an in-depth analysis of various perspectives on Columbus’s legacy.

We started by watching an 8-minute EdPuzzle video that provided background on Columbus and the Taino people. The video helped set the stage for understanding the complexities of Columbus’s actions and provided a foundation for the primary source activity.

After the video, I introduced six primary sources that had been simplified using AI, maintaining a primary source tone with added sourcing and context information. These sources included journal entries from Columbus, accounts by Bartolome de las Casas, and perspectives from modern historians. Each source offered a unique take on Columbus, allowing students to engage with both positive and negative portrayals.

Students then used a graphic organizer to analyze the sources, answering premade questions to determine if each source presented Columbus in a positive or negative light. This helped students gather evidence for the claim they would later make about Columbus’s legacy.

To wrap up, students completed a 1xCER activity, where they wrote a claim about whether Columbus should be considered a hero or villain, supporting their claim with evidence from two different sources and providing reasoning. Many students struggled with the reasoning portion, so I had AI generate a reasoning example, which I shared with the class. This example helped clarify how to link evidence to the claim more effectively.

Looking ahead to next year, I plan to revise the question to “Should Columbus be celebrated?” This approach feels more appropriate and encourages a more nuanced discussion about Columbus’s legacy, moving beyond the simplistic hero-villain framework.

Friday: Effects of Exploration

In Friday’s class, we started with an 8Parts activity using a painting depicting Columbus’s arrival in the Americas. Students are improving in their ability to break down images, and this activity took about 10 minutes. The goal was to tie the visual representation of Columbus’s arrival to Thursday’s lesson, where we analyzed whether Columbus should be considered a hero or villain. The 8Parts activity helped students focus on key aspects of the image, such as nouns, verbs, and adjectives that related to exploration, discovery, and interaction with indigenous peoples.

Next, we moved on to a Thin Story activity where students read about the effects of exploration from the text. They were asked to select one picture and one word to represent a key effect of exploration and explain their choices. I pushed them to use more specific details from the reading rather than general statements, encouraging them to dig into the information they learned. This exercise emphasized the consequences of exploration for both Native Americans and Europeans, helping students engage with the more detailed aspects of how exploration shaped history.

Afterward, students completed a 2xPOV activity, where they considered the perspectives of both Native Americans and European explorers. I incorporated elements from an empathy map, asking students to think about what these groups might be feeling, seeing, doing, and gaining or losing. This helped students develop a more empathetic understanding of how exploration impacted both groups, while also drawing connections to the motivations and consequences discussed in the previous activities.

We finished class with a Fast and Curious Gimkit activity, which provided a fun and interactive way for students to review key concepts from the week. The rapid-fire questions helped reinforce their understanding of the effects of exploration while keeping the energy up as we wrapped up the lesson.

By the end of class, students had a stronger grasp of how the arrival of Columbus and subsequent exploration impacted different groups, and the activities throughout the week helped them think critically about these historical events.

The Week That Was In 234

Introduction

This week in the classroom was packed with diverse activities and learning experiences. Here’s a quick overview of what we covered:

  • Concluded our unit on Native Americans in Ohio
  • Held a commemorative lesson on 9/11
  • Began a new unit on European exploration
  • Utilized various EduProtocols and tech tools including Gimkit, Blooket, and Storyfile

Each day brought its own set of challenges and opportunities as we worked through these topics and experimented with different teaching methods. The following daily breakdowns detail our activities, student responses, and the ongoing process of adapting lessons to meet learning objectives.

Monday – Resistance and Resilience, Stories

Tuesday – Assessment

Wednesday – Storyfile

Thursday – Blooket – Exploration Vocab

Friday – Before 1492 Exploration, Gimkit Countries/Continents

Monday

On Monday, we continued our unit on Native Americans within Clermont County and around Ohio. I started off with a Gimkit Fast and Furious as a review of the content from last week. I ran the Gimkit for about 5 minutes, challenging the students to achieve a higher class average than we did on Friday. Most classes were at or slightly below where we finished on Friday, which is normal.

Next, we finished the Thin Story from Friday’s lesson. The Gimkit served as a review before completing the Thin Story on the effects of colonization on Native Americans within Ohio. I simply wanted the students to include one picture, one word, and explain why they chose that picture and word to represent how natives were affected by Europeans. It was a quick and easy wrap-up of that lesson.

With marginalized groups, I think one thing that often gets overlooked is the resistance and resilience these groups displayed against their oppressors. So, I always try to focus on resistance and resilience when I can. For this lesson, I put together some Justin Unruh templates. I began with a Sketch and Tell as a preview activity, asking the students, “Think of a time you were resilient – create a picture to represent that time.” I wanted the kids to connect resilience from their lives to what we were studying.

To prepare for the lesson, I had ChatGPT create 14 different stories of Native American resilience and resistance, pulled from a 38-page document on Native Americans of Ohio. I had ChatGPT adjust the stories to a 7th-grade level and provide context for each one. I then numbered the stories one through seven, cut them up, and placed them in envelopes around my classroom.

Students walked around the classroom, finding four different stories of resilience and resistance. They filled out a Frayer Model where they had to list three to four details from each story. At the conclusion of this activity, students completed an empathy map with details from their stories, putting themselves in the shoes of the Native Americans to understand what was causing them pain, what they were trying to gain, and what they were seeing, thinking, and feeling. Overall, I liked how this lesson shaped up, especially with the empathy map at the end.

Tuesday

On Tuesday, we reached the final portion of our unit on Native Americans from Ohio. So far this school year, I’ve been dealing with many student absences and trying to figure out how to work around that. It’s challenging when I’m still teaching students how to use some of the EduProtocols and they miss days.

I needed to create an assessment that would allow all students to demonstrate what they learned, whether they were present in school or not. I settled on doing a Sketch and Tell where students would share six images and captions of anything they learned in this unit. In the middle of the paper, I wanted them to list out the main idea of the entire unit as well.

To make the assessment more comprehensive, I added a 2xSummary on the back of the Sketch and Tell. This graphic organizer had students think about a topic sentence that addressed our compelling question for the unit. Then, they had to include two details to support their topic sentence and write a concluding sentence twice.

Part of this assessment also included doing the Gimkit Fast and Curious that we had been doing since last week. I offered a deal to all my classes: if everyone answered 18 or more questions individually and the class average rose above 90%, I would give everyone a 100%. Out of my four Social Studies classes, two classes were able to meet that expectation.

Wednesday

On Wednesday, we needed 15 minutes to finish up the assessment from Tuesday, which was the Sketch and Tell and the 2xSummary. Considering this day was 9/11, I had a 9/11 lesson planned using Storyfile.

To begin my lesson on 9/11, I showed a news clip about a survivor from that day. I prefaced it by asking students to think about the survivor and consider what questions they could ask if they had the chance. The news clip was about 2 minutes long.

Following the news clip, we did a Wicked Hydra activity. I had the students pair up in groups of three to four people and write “9/11 Survivor” in the middle of a big piece of paper. From there, I wanted the students to start writing questions they would ask a survivor from 9/11. I gave them 8 minutes to come up with questions as a group, then had them pass the papers around the room to new groups who added more questions after 3 minutes. This process was repeated once more before the papers returned to the original group.

Next, I gave them a Frayer Model and asked them to choose the four best questions from their paper. Each quadrant of the Frayer Model contained one chosen question. Then, I had the students access Storyfile, a website where historical figures, famous people, and everyday individuals can be recorded giving responses to different questions. It’s a way to preserve history and create an interactive experience with historical figures.

In this case, Storyfile featured a 9/11 survivor, and the students could now ask their questions, to which the survivor may or may not respond. I explained to the students that an important life skill is being able to ask good questions, and if the survivor wasn’t responding to their question, it might not have been a good one.

At first, the students were a little freaked out because it seemed like the person was live on video. However, I explained that it’s just a collection of recorded videos spliced together, using AI to identify keywords from their questions and determine whether to answer or not. This was an engaging lesson and a way for students to understand the impact of 9/11 on those who lived through it.

Thursday

On Thursday, I started a new unit on exploration. I’m approaching it differently this year, focusing solely on Spain, France, the Netherlands, and Portugal, and how these countries explored around the world and eventually into the Americas. There’s also an emphasis on the things students learned in 7th grade and how they impacted European exploration, such as the Renaissance, the Crusades, Muslim explorers, and Rome.

I began the unit with vocabulary words such as Renaissance, caravel, astrolabe, colony, and mercantilism. I wanted to focus on students using context clues to create definitions for these words. To achieve this, I had ChatGPT use every vocabulary word in a sentence so students could use context clues to create their own definitions.

I printed all of these sentences, numbered them, and put them in envelopes around my room. Students worked together to fill out an organizer where they wrote down the word, read the sentence, came up with their own definition, and drew a symbol for the definition and word. When they finished each word, they would bring it to me for feedback. If it was good, they rolled a 20-sided die to determine how much that envelope was worth. At the end of the lesson, the group with the highest point total got to pick from my unimpressive prize box.

Following this game, we played two rounds of Fast and Curious on Blooket. This activity completed the class, and I really enjoyed the idea of students using context clues to create their own definitions.

Friday

On Friday, we did one quick round of Fast and Curious on Blooket with our vocabulary words from the previous day. We immediately followed this up with Gimkit, where I had 10 questions on continents and countries related to all the continents and countries we would be discussing with exploration. We did a quick 4-minute round on Gimkit, I gave some quick feedback, and then we did a quick 3-minute round just to become familiar with our continents and countries. The Gimkit included topics like Europe, Asia, Africa, North America, South America, France, Spain, the Netherlands, the United Kingdom, and Portugal.

Following this, I put together some Justin Unruh templates, and we started off with a Frayer Model with the term “CE” or Common Era. Students wrote a definition, used examples, non-examples, and used Common Era within a sentence. I started this lesson by building geographical knowledge of continents and countries, and I included CE because these concepts were used heavily in the reading we would be using for the Iron Chef activity.

Next, we did a Map and Tell where I had a map of the Crusades. We talked about sourcing the map, and I had a few questions such as “How do the routes on the map differ?” and “Here is a statement: ‘The Crusades stimulated European exploration.’ How does the map prove this statement true?” I also wanted the students to move stars to label Spain, France, and the United Kingdom as they looked at the map on a more global scale.

Next, I handed out the reading from our textbook. I’ve been doing a lot of reading aloud to the students because that’s what’s necessary right now in my classroom. It’s been a lot of hand-holding and walking them through it, but I’ve got to do what’s necessary at this point. The reading focused on Rome trading with China, Muslim explorers, and the Crusades.

For the reading on the Iron Chef, I asked the question, “What are some ways the world was connected before 1492?” As I read, I had the students think about highlighting four ways the world was connected. At the conclusion of the reading, they had to transfer their information to the Iron Chef template. They also had to change the title to fit the main idea (as we’re still focused on that skill), add a picture, and include two emojis to show things that were traded in the world at this time.

Here’s the twist: I rolled dice to determine how many words they had to use when transferring and typing their highlighted information. One particular class had to choose the most important information because the dice roll came up as two. Another class had a dice roll of three, so they had to choose important words. I love this because they have to determine what’s important and paraphrase.

As they were building their Iron Chef slides, which took 10 minutes, I copied and pasted their slides into one slide deck. What’s nice about Google Slides is that I can link the copied slide back to their original slide, and it updates on mine in real time. At the conclusion of 10 minutes, I put the new slide deck of their Iron Chef slides on the classroom screen. I had them close their Chromebooks, and right from their desks, they had four seconds to present one thing that connected the world that they learned about. I use the word “share” because it’s less threatening than “presentation,” and these kids did awesome. That’s how we ended class today – it was a great day!

The Week That Was In 234

Introduction

As a social studies teacher, I’m always looking for ways to make history relevant and engaging for my 8th-grade students. Recently, I leveraged AI to design a comprehensive lesson about Native Americans in Clermont County, Ohio. While our textbook covers Native Americans in North America broadly, I wanted to create a unit that would help students understand how their local area played a significant role in American history.

I began this process by uploading Ohio state standards and relevant textbook chapters to ChatGPT. After analyzing the standards related to Native Americans (or American Indians, as they’re sometimes referred to), ChatGPT helped determine what 8th-grade students should know about this topic. It then created and aligned questions for a 5 to 6-day unit, including a compelling question and supporting questions. This approach ensured that our lessons would meet state requirements while providing a localized, meaningful context for our students.

To maintain consistency with our existing curriculum, I had ChatGPT analyze the style and tone of the textbook readings. I then sourced local Native American history documents and had ChatGPT align them with the supporting questions, matching the textbook’s style. This step was crucial in creating a seamless integration between our standard materials and the new, localized content. ChatGPT also created a list of unit vocabulary words, ensuring we covered all necessary terminology.

With this solid framework in place, I selected EduProtocols based on data I had collected on my students’ needs and the specific literacy skills we needed to work on as a class. These protocols, developed by educators for educators, provide engaging, repeatable instructional strategies that can be used across various subjects and grade levels.

Finally, I used ChatGPT to create Gimkit multiple-choice questions aligned with the readings and standards. Gimkit, a gamified learning platform, would serve as both a formative assessment tool and an engaging way for students to interact with the material.

Throughout this process, I utilized EduProtocol templates created by Justin Unruh to plug into my unit framework. I tried to use EduProtocols we have been using to build in reps. I also tried to build in literacy skills my class needs to work on – identifying main idea, summarizing, and understanding perspectives.

Tuesday – EduProtocol Rack and Stack (Iron Chef, Frayer, Map and Tell), Gimkit Link

Wednesday – EduProtocols Rack and Stack (Frayer, CyberSandwich)

Thursday and Friday – EduProtocols Rack and Stack (Map and Tell, Iron Chef, Thin Story)

Tuesday

We kicked off the unit with our compelling question: “How did the Miami, Delaware, Mingo, and Shawnee tribes adapt to their environment and respond to the challenges posed by European settlers in Clermont County?” This overarching question would guide our exploration throughout the week. Our supporting question for Tuesday was more specific: “How did the Miami, Delaware, Mingo, and Shawnee tribes use their environment to meet their basic needs?”

I began class with a simple yet revealing question: “Who can name a Native American group that inhabited Clermont County?” Surprisingly, only three students across all my classes could name one – the Miami. This highlighted the importance of our upcoming lessons in building local historical knowledge.

We then moved to Gimkit, using the questions I had prepared. Initial class averages ranged between 59% and 68%, which was lower than I’d hoped. I quickly realized that students were often choosing the longest answers, assuming they were correct. This led me to refine the questions, ensuring all options were of similar length – a valuable lesson in question design!

Transitioning to our main activity, we engaged in a Map and Tell exercise exploring prehistoric migration to the Americas. We examined maps showing ancient land routes from Asia to North America, which sparked lively discussions. Students debated factors like climate change, food availability, and population pressures that might have influenced these epic journeys.

To connect this broader history to our local area, we located Ohio on the continental map and then zoomed in on a detailed, illustrated map of Clermont County. Students played detective, hypothesizing about Native American settlement locations based on geographical features like rivers, forests, and natural resources.

Following this, I implemented the Iron Chef EduProtocol, a strategy designed to help students engage deeply with content while practicing essential skills. Students created individual slides with a title (representing the main idea) and five facts about how specific Native American groups adapted to their environment. They had 15 minutes for this task, encouraging focused work.

Next, students reviewed each other’s slides, listing four key facts for each group in a Frayer model. This peer review process not only reinforced learning but also exposed students to multiple perspectives on the same information.

We concluded with the Emoji Kitchen concept, where students combined emojis to represent how Native Americans adapted to Ohio’s environment. This creative element allowed students to synthesize their learning visually, appealing to different learning styles and encouraging out-of-the-box thinking.

Wednesday

We continued our exploration of Native American tribes in Clermont County, shifting our focus to the supporting question: “How did the culture of the Miami, Delaware, Mingo, and Shawnee tribes shape their daily lives and help them thrive?”

The class began with a rolling recap using a 20-sided die, a strategy that combines retrieval practice with an element of chance. I posed questions about the previous day’s material, and students had to craft responses using the exact number of words as their die roll. This exercise not only reviewed key concepts but also challenged students to be concise and precise in their communication – valuable skills for any subject.

Next, we delved into defining culture using a Frayer model. This visual organizer helped students break down the complex concept of culture into its definition, characteristics, examples, and non-examples. It was particularly effective in helping students understand the multifaceted nature of Native American cultures.

Building on this foundation, we transitioned into a CyberSandwich activity. This structured approach, another EduProtocol strategy, allowed students to engage deeply with the content while developing their writing skills. The activity consisted of three parts:

  1. A 10-minute reading and note-taking session, where students gathered information about how the tribes’ culture influenced their daily lives.
  2. A 5-minute discussion period, allowing students to share insights and clarify understanding with their peers.
  3. A 10-minute writing exercise, where students crafted a paragraph with a clear topic sentence, two supporting details, and a concluding sentence.

This writing sample gave me valuable insight into their comprehension and writing abilities, allowing me to identify areas for further instruction.

To round off the class, we revisited our Gimkit questions. I was pleased to see improvement, with class averages rising to 70-75%. This progress indicated that students were solidifying their understanding of the material and becoming more comfortable with the content.

Thursday

I began Thursday’s lesson by leveraging AI to enhance our writing process. I created a Claude AI artifact designed to provide feedback on students’ CyberSandwich paragraphs from the previous day. The artifact was primed with the article we had read and a custom rubric featuring potential topic sentences, supporting details, and concluding sentence keywords.

While the results were still somewhat variable, it was a noticeable improvement from the previous week’s thick slide link submissions. Students seemed to appreciate the AI-generated feedback and made substantial revisions based on the suggestions. They submitted their revised paragraphs through a Google Form for further assessment.

We then transitioned to our lesson on how European settlers disrupted the culture and way of life of Native American tribes in Ohio. I introduced an Iron Chef activity, challenging students to identify five ways Native Americans were affected by European arrival. To model effective main idea identification, I read an article aloud, deliberately connecting it to our previous lessons on Native American culture.

Students then had 10 minutes to create their Iron Chef slides, which included:

  1. A title representing the main idea
  2. A relevant picture
  3. Five key facts about European impact on Native Americans
  4. A “secret ingredient” section with an Emoji Kitchen creation to visually represent a perspective

Next, we engaged in a Map and Tell exercise, comparing two maps: one showing Native American territories throughout Ohio, and another illustrating the effects of the Treaty of Greenville. This visual comparison helped students grasp the dramatic shift in Native American land holdings and the profound impact of settlement.

We concluded the class with another round of Gimkit. I was pleased to see a significant improvement in performance, with class averages rising from 75% to 90%. This progress indicated that students were consolidating their understanding of the complex relationships between Native Americans and European settlers in Ohio.

Friday

On our final day of the unit, we began with an engaging activity called “Doubling Details.” The initial prompt was “How were natives in Ohio affected by Europeans?” Students had to respond in exactly 8 words, encouraging concise, focused thinking. Next, they paired up to combine their ideas into a 16-word response. Finally, groups of four created a 32-word summary. Each round lasted 3 minutes, keeping the energy high and ideas flowing.

To prepare for our deep dive into the Treaty of Greenville, I introduced key vocabulary through a Blooket game. We played two quick rounds with words like “boundary,” “hindrance,” and “cede” to ensure students were prepared for the treaty excerpts.

For the main activity, I employed an EMC2Learning content compactor to explore sections of the Treaty of Greenville. Here’s an example of one excerpt we examined:

“The general boundary line between the lands of the United States and the lands of the said Indian tribes, shall begin at the mouth of Cayahoga river… thence southwesterly in a direct line to the Ohio River….”

I modeled the process of analyzing these excerpts using an “I do, we do, you do” approach. We summarized each excerpt, distilled it to a single word, and then added a picture for dual coding. However, when it came time for independent work, many students struggled. I allowed this struggle to continue until it verged on chaos, as I’m committed to building their confidence and resilience. While progress feels slow, I’m confident we’ll get there.

We concluded the lesson with a Thin Story activity. Students created a single image and word to represent how Native Americans were affected by Europeans, synthesizing all we had learned throughout the week.

Reflection

Throughout the week, these lessons combined various skills including vocabulary building, historical analysis, summarization, and visual representation. By using a variety of EduProtocols and technology-enhanced strategies, we were able to engage students in deep, meaningful learning about a complex historical topic.

The use of AI in lesson planning and feedback proved to be a valuable tool, allowing for more personalized and efficient instruction. However, it’s clear that the human element – the ability to adapt in real-time, to push students just the right amount, and to create a supportive classroom environment – remains crucial.

As we move forward, I’m excited to continue refining these strategies, always with the goal of making history come alive for my students and helping them see their place in the ongoing story of our community and nation.

The Week That Was In 234

As educators, we are always seeking new ways to make learning meaningful and engaging for our students. This week, my social studies class embarked on a journey to explore the power of stories hidden within artifacts and primary sources. From deciphering the tales behind everyday objects to connecting local history with broader historical themes, our activities aimed to deepen students’ understanding and appreciation of the past. Through a combination of hands-on lessons, creative exercises, and critical thinking challenges, we explored how seemingly simple items can reveal complex narratives about our lives and the world around us. This blog post chronicles our week of discovery, highlighting the strategies, successes, and lessons learned along the way.

Monday – Sources

Tuesday – Sourcing Thick Slide Lesson

Wednesday – 5 Themes of Geography Thin Slide

Thursday – Resource Rumble

Friday – Thick Slide Assessment

Monday

This week, we continued our lesson from Dan Lewer on making sense of artifacts and primary sources, focusing on the stories these sources might tell us. It seemed like the perfect opportunity to begin class with the Town Dump Lesson. I asked the kids, “Does everything have a story?” Initially, they looked puzzled, unsure how to answer. To help them understand, I shared some examples of random objects that might seem meaningless to them but hold stories for me. For instance, I have a globe in my room. When I ask, “Why do I have this globe?” they typically respond, “Because you teach social studies.” While this is true, I explain that the story they don’t know is that it belonged to a colleague of mine who passed away during the middle of the school year. It reminds me of her, which is why I kept it. I then pointed to the student notes on my wall, explaining, “I have these notes because each one tells a story of an impact or time I had with those students.”

Next, I read the story The Town Dump and highlighted how objects in the dump tell the story of the town and its people, much like the artifacts from Dan Lewer’s primary source lesson tell a story about teenage life in 2024. I asked the students to think of an object or artifact they possess that tells a story about them, something they have held onto because it has meaning. After spending 15–20 minutes on this exercise, we finished the lesson on primary sources. I had the students use their descriptions, inferences, and questions to create two claims about teenage life in 2024. I included a 2xCER template on the paper I gave them because they were familiar with the format from the previous week. This was also an effort to incorporate general writing practice into my class. We concluded the class with a Gimkit about the states, where each question featured a picture of a state, and the students had to choose the correct answer. I noticed that our class average was stagnating at 65–70%, so I knew we needed to try something new.

Tuesday

On Tuesday, we started class with the same Gimkit from the previous day. This time, however, I gave the students a blank map of the United States. If they got a state wrong, I had them pause, locate the state on the map, and label it. I also mentioned that I expected a 90% class average by the end of the week, and I would be taking it for a score. Following the Gimkit, I introduced the concept of sourcing to the students. We began with a Frayer model for the word “sourcing.” I’ve been trying to incorporate the use of context clues to help create definitions for words, but the students are really struggling with this skill. I also included “two questions you would ask when sourcing” and examples of “good sources” and “bad sources.”

I took a screenshot of my Frayer, uploaded it to ChatGPT, and had it create a quick, one-paragraph reading to help the students fill in the Frayer boxes. I linked the reading to the Frayer. Afterward, I created an Annotate and Tell activity with some quick newspaper advertisement snippets and related questions. However, I soon realized that I was overwhelming the students with too much information. I wanted the focus to be on reading a secondary source newspaper article about the history of their community, Batavia, Ohio. So, during the second half of the day, I replaced the Annotate and Tell with an 8pArts sourcing template.

The main part of the lesson involved reading an article about the Batavia Bicentennial and creating a thick slide. I used the 8pArts template to guide students in practicing sourcing and breaking down a document. The template included a three-word title, content, contextualizing, sourcing, and communication (author’s purpose). I provided the Batavia Bicentennial article to the students and asked them to scan the article’s title and headings to predict its content by creating a three-word title. We then sourced the article, discussing who the author was and when it was written. We also contemplated why it was written—to celebrate the bicentennial of Batavia.

Once we completed these steps, it was time to read the article. I asked the students how long they thought it should take to read it. Answers varied from 10 minutes to as little as 2 to 3 minutes. I informed them that it should take about 3 minutes, which surprised some and relieved others. Many students tend to overestimate reading time and shut down before they even start. After reading, the students listed three interesting facts under the content/details section. Finally, we contextualized the information and determined it was about Batavia’s Bicentennial. I explained the term bicentennial, breaking down the word into “bi,” meaning two, and “centennial,” meaning 100, to help them understand.

In the middle of the 8Parts template was a space to summarize, but I instructed them to create a Thick Slide as their summary. On the Thick Slide, students included three interesting facts from the 8pArts template, a picture with a caption, and a title. We also reviewed the concept of continuity, a word we studied last week. I asked them to find and list an example of continuity from Batavia, and some identified that Batavia has been the county seat since 1824—great stuff! I also had them list two events that took place in Batavia in 1828 and 1877 and find two other events that occurred in the United States during the same years. Finally, they wrote a topic sentence that captured the main idea of their slide, reinforcing our focus on understanding the main idea.

Wednesday

On Wednesday, we focused on the Five Themes of Geography using a Thin Slide activity. Instead of reading about the Five Themes, I decided to use a simple Thin Slide format. Initially, I attempted this on Google Slides, but halfway through the day, I switched to Padlet. I originally created a five-slide deck for each student, but I wanted to switch to Padlet so they could see each other’s ideas.

On Padlet, I set up five columns, one for each theme of geography: location, movement, place, region, and human interaction. I had the students relate these themes to Cincinnati. For example, they shared a city or state near Cincinnati and explained its relative location. Another example was how people in Cincinnati have interacted with and adapted to the Ohio River. Students shared one picture and one word or phrase for each theme, with a time limit of three minutes per theme. After completing the Thin Slides, the students created a personalized geography page where they added their favorite climate, a country they always wanted to visit, their favorite geographical feature, and more. We wrapped up the class with another round of Gimkit on the states, and this time, we achieved over 80% in each class, showing marked improvement.

Thursday

We began Thursday’s class with students finishing their personalized geography pages from the previous day, using the first 15 minutes of class to do so. Next, we did a Resource Rumble, where I asked questions related to historical thinking skills (primary and secondary sources, sourcing, continuity, and the Five Themes of Geography). Students went to the envelopes I had taped around the walls, answered the questions, and had me check their answers. After receiving feedback, they could roll dice and collect Jenga blocks. The team with the tallest tower won a prize from the unimpressive prize box. I had the students keep their answer sheets because they would need them for tomorrow’s assessment. This activity was part of my effort to show students that everything we do serves a purpose. I want them to take ownership of their learning and place importance on every activity. We ended the class with another round of Gimkit for practice before our final attempt on Friday.

Friday

On Friday, we started with a final round of the Gimkit about the states. I reviewed the class averages from the beginning of the week—54%, 50%, 50%, and 59%. I set the Gimkit timer for eight minutes and made a deal with them: if everyone answered 32 or more questions and the class average was 90% or higher, everyone would receive a score of 100%. The results were promising—first bell met the challenge with a 92% average, second bell achieved 89%, fifth bell reached 86%, and sixth bell finished strong with 92%. I’ve always struggled to get other classes above 80%, but looking back, giving the students a blank map to label when they missed a state question made a significant difference.

The next part of our assessment was using a Thick Slide to demonstrate their historical thinking skills. On the Thick Slide, students created a title that encapsulated the main idea of the topic, listed two reasons why it’s important to study the history of Batavia, OH, found a historical image of Batavia and used the caption to source it (by asking questions about it), compared primary and secondary sources, and listed an example of continuity. The students could use their Resource Rumble paper from Thursday’s lesson to help them complete the slide. I gave the students 25 minutes to complete this assessment.

During this assessment, I incorporated a new feature I learned from Jake Carr about using Claude to create artifacts, such as multiple-choice quizzes, short answers, or essays, and to provide feedback. Jake showed me how Claude could generate a code to create an artifact that could be shared with others. This led me to wonder, “Can I create an artifact where students can paste a link to their Thick Slide, and Claude analyzes it and gives instant feedback?” I worked on and reworked a prompt to set this up.

Here is the prompt I created:

“Create an artifact that provides consistent, quality feedback for 7th-grade students’ Thick Slide submissions on historical thinking skills. The feedback should focus on the following areas:

  1. Reasons for Studying History:
    • Understanding the past to inform the future.
    • Learning from past mistakes and successes.
    • Building cultural awareness and empathy.
    • Developing critical thinking and analytical skills.
    • Preserving collective memory and identity.
  2. Sourcing Questions:
    • Who created this source?
    • When was it created?
    • Why was it created?
    • What is the creator’s perspective or bias?
    • Who is the intended audience?
  3. Definitions of Primary and Secondary Sources:
    • Analyze how accurately students define and differentiate between primary and secondary sources.

Rubric Development:

  • Design a rubric that includes criteria for evaluating each of the three focus areas (reasons for studying history, sourcing questions, and definitions of primary/secondary sources).
  • Ensure the rubric provides clear, 7th-grade-level descriptions for each criterion, allowing for objective and consistent grading.

Artifact Creation:

  • Use the rubric to generate an artifact (such as a feedback template) where students can copy and paste their Google Slide link.
  • The artifact should automatically provide quality, constructive feedback based on the rubric’s criteria.
  • Feedback should be designed to guide students in improving their understanding of historical thinking skills while being accessible at a 7th-grade reading level.

Consistency and Quality Control:

  • Implement measures within the artifact to ensure that feedback remains consistent across different student submissions.
  • Ensure that the artifact is free from errors and provides accurate, relevant feedback tailored to the student’s work.”

After the artifact was created, I shared the link with the students. It was easy to access and use, and while some students found it helpful, others noted that it inaccurately told them they hadn’t completed certain tasks that they actually had. The feedback was varied, and the Claude feedback was inconsistent, but it’s still a work in progress. There’s a lot of potential here for some cool developments.

The Week That Was In 234

Introduction

So far this school year is flying by. I’m really enjoying my new schedule. My day begins with teaching two 65-minute social studies periods, followed by a plan period, co-teaching a reading workshop with an ELA teacher, and ending the day with two more 65-minute social studies classes. It makes for a nice day, allowing for in-depth lessons and sufficient time to transition between subjects.

At the beginning of the year, the name of the game is teaching the process and procedures of EduProtocols. I like to begin the year smart by starting with the following EduProtocols: Wicked Hydra, Frayers, 3xCER, 8Parts, Thin Slides, and Sketch and Tell. These are pretty basic, and I use them throughout the entire school year. They provide a solid foundation for critical thinking and engagement. I will introduce more in-depth protocols as the year progresses, such as CyberSandwich and Thick Slides, which build upon these basic skills.

Monday – Resource Rumble

Tuesday – Fast and Curious on Gimkit

Wednesday – Practice, Sketch and Tell-o

Thursday – Why We Study History

Friday – Sources, Gimkit

Monday

We began the day with no Chromebooks, so I needed a new plan. I had to introduce the syllabus. Last year, I used an escape room, but without Chromebooks, I needed something different. Enter the Resource Rumble from EMC2Learning. I used AI to create some puzzles and questions based on my syllabus related to the rules and procedures. I took the questions created by AI and placed them in 8 “treasure chests” around the room. The students had 25 minutes to complete all the treasure chests and have me check their work. This activity not only introduced the syllabus content but also encouraged teamwork and problem-solving.

A true Resource Rumble involves Jenga blocks, but mine were on the Amazon truck. I switched to a new plan and used dice instead. I have several different styles of dice, including one that has numbers one through twelve. After each group brought up their answer, I had them roll the dice to determine how many points the chest was worth. At the end, I had them add up their points. The winning group got to choose from my Unimpressive Prize Box, which contains small, quirky items that surprisingly delight the students.

Following this activity, we did a quick overview of the syllabus, ensuring everyone understood the key points. We then moved on to some Frayer a Friend, to make more connections. By the end of the day, the students finally received their Chromebooks, setting us up for more tech-integrated lessons in the coming days.

Tuesday

Now that we had Chromebooks, it was great to finally introduce the Fast and Curious. I was surprised at the number of students who had never played Gimkit. Since so many students were unfamiliar with it, I found a 4th-grade trivia Gimkit to introduce the game. I set the time limit for 8 minutes to let them explore, but I didn’t tell them anything – I wanted them to figure it out on their own.

Next, I ran another 4th grade trivia Gimkit round with less time, but challenged them to answer more questions and raise the class average. Following this, we did another round where I introduced the states – 50 questions, 50 states. My goal is to have the students know their states with 90% accuracy. It’s a work in progress, but Gimkit’s game-like structure makes this typically dry subject more engaging.

For another round of Gimkit, I had half the class close their Chromebooks and partner up to work together to answer questions. This variation promotes collaboration and peer teaching. If we had any time left, I had students complete another Frayer a Friend continuing to make more connections and learn the process of using a Frayer model.

Wednesday

We began class with a Dominic Helmstetter special – a great Smart Start for the Sketch and Tell-o with gold medals. I had students choose an Olympic event they would gold medal in and one non-Olympic event they would gold medal in. They had to draw a symbol and provide an explanation for why they would win a gold medal. This took about 20-25 minutes and served as a fun warm-up activity that also encouraged creativity and self-reflection. It also agve me a chance to understand the interests of the students.

We followed this up with another Gimkit on states, continuing to build their geography knowledge. I was ready to move into content and the question of “Why do we study history?” However, I realized I had a problem: we hadn’t really practiced much on Chromebooks. We had done Sketch and Tell and Thin Slides on paper, but not much with Chromebooks. This needed to change to ensure students were comfortable with the digital tools we’d be using throughout the year.

I stopped the lesson and created some practice slides using Justin Unruh templates. I put together a Thin Slide utilizing Google Slides, a Thin Slide utilizing Padlet, and two Sketch and Tells. I wanted to show how Padlet could be utilized for the “I can’t draw” feature, as it uses AI to generate images that can be used for Thin Slides. This introduction to various digital tools will prove valuable as we incorporate more tech-based activities.

For the Smart Start question, I asked, “What is a food no one should eat?” I gave students 3 minutes to create their responses. They put their name as the “subject” and wrote their one word or phrase in the body of the post. After 3 minutes, I selected “freeze Padlet” and then hit the play button, which turned it into a slide presentation. By using Padlet, students can’t mess with each other’s slides, ensuring a smooth presentation process.

Following our Thin Slides, we used a regular Sketch and Tell. The prompt was, “What is a food you can eat every day for the rest of your life?” It became apparent that I had to show them where Google Shapes was located on the toolbar and how to change colors and duplicate shapes. We clearly have some Google tech learning that needs to be done! I chose these specific EduProtocols because I would be using them in the near future, and this practice session helped identify areas where students needed more support.

Thursday

I began class with a Literacy Skills Entry exam from our McGraw Hill book. I noticed two exams – Historical Thinking Skills and a Literacy Skills exam. I decided the Literacy Skills entry exam was what I was going to use. I have every student with an IEP this year, and I wanted an idea of our ability to understand main ideas, inferences, context clues, and perspectives. This baseline assessment will help me tailor future lessons to meet the specific needs of this year’s class.

The original exam was 20 questions, which seemed like overkill. I had AI analyze the entire exam and every question for the skills being assessed. From there, I reduced the 20 questions to 8. This exam took 20 minutes. At the end of the day, I had AI create a rubric for the exam, and then I took all the students’ responses and correlated them with the rubric. The data I received provided good baseline information that will inform my teaching strategies moving forward.

For my original lesson on “Why do we study history?” I had a CyberSandwich ready to go. However, after some thought and knowing the students I had in front of me, I realized a new protocol would be too much. Instead, I put together a Thin Slide with the prompt, “What is an event that families would try to record and retell?” I gave them 3 minutes and stuck to my timer. This activity helped students connect historical thinking to their personal experiences.

Next, I included a Frayer with the word “continuity.” Under the “define” heading, I had AI create a sentence that could be used to help students use context clues to create a definition. The sentence was: “The movie series kept the same main character and story from one film to the next, providing continuity that helped viewers follow along easily.” For the other boxes, students had to find examples, non-examples, and a picture. I was hoping the Frayer would take 5 minutes, but it took about 8 to 10 minutes. This extra time was well-spent as students grappled with this important historical concept.

Following the Frayer, I had two Sketch and Tells ready to go. I linked the section from the textbook and asked, “Why do we study history?” The goal was to create a sketch with Google Shapes based on the reading and explain it with 2 to 3 sentences. Students had 10 minutes to complete both Sketch and Tells. That was a bit of a struggle, but I still had them turn it in. I’m learning I have my work cut out for me this year – I’m trying to help the students own their learning through protocols and timers. This process of productive struggle is essential for developing their historical thinking skills.

Friday

On Friday, I continued our historical thinking skills unit. This new book has a lot to it. It’s overwhelming and, like most textbooks, restricting, but I’m trying to analyze the teacher edition and think about which skills they’re trying to get the students to use. This helps direct my use of EduProtocols and ensures that I’m meeting curriculum standards while using engaging teaching methods.

The new topic today was, “How do historians use primary and secondary sources?” I felt like I had overwhelmed the students yesterday with too much, so I decided to simplify it and stick to a Frayer about primary and secondary sources. I provided a sentence created by AI to help them use context clues to create a definition. This approach allowed us to focus deeply on these fundamental concepts in historical research.

We began class with a Gimkit of 10 questions related to why we study history and primary and secondary sources. The class averages were between 72% and 79%, showing a decent grasp of the concepts but room for improvement. We followed this up with a Frayer on primary and secondary sources, reinforcing the ideas through a different learning modality.

Instead of using the textbook section on historians using various sources, I used a Dan Lewer “History for Humans” lesson. It provides a scenario set in the year 3240, where students are historians looking back on the lives of teenagers from 2024. I provided students with a graphic organizer, and they had to select artifacts or sources from their backpacks, write down observations, make inferences, and ask questions. Students used Chromebooks, phones, Stanley water bottles, pencils, and books as their artifacts. They did an excellent job with this activity, really getting into the role of future historians and understanding how everyday objects can become historical sources.

I also reminded them that they had started thinking like historians last week with a Wicked Hydra, asking questions about pictures related to me. They had also begun this process with the 8Parts activity, analyzing a historical photo. We didn’t finish this historical thinking activity and will continue on Monday, allowing for a deeper exploration of these skills.

We finished class with a Gimkit challenge: get above a 90% class average, and everyone receives 3 PBIS points. The class averages ranged from 82% to 92% – every class raised their average. This friendly competition helped reinforce the concepts we’d been learning all week while adding an element of fun to end the week.

Closing

As I reflect on this week, I’m pleased with the progress we’ve made in introducing various EduProtocols and historical thinking skills. The students are gradually adapting to the new technologies and methodologies, even if there’s still a learning curve. It’s clear that flexibility is key – whether it’s dealing with unexpected Chromebook delays or adjusting lesson plans on the fly. I’m particularly encouraged by the students’ engagement with activities like the Resource Rumble, Gimkit challenges, and the futuristic historian exercise. These activities not only make learning more interactive but also help develop critical thinking skills essential for studying history.

Looking ahead, I plan to continue refining my approach, balancing between introducing new concepts and reinforcing the basics. The baseline data from our literacy skills assessment will be invaluable in tailoring future lessons. As we delve deeper into our curriculum, I’m excited to see how the students will grow in their ability to analyze sources, make connections, and think like historians. It’s been a challenging but rewarding start to the year, and I’m looking forward to what the coming weeks will bring. Onward to another week of discovery in 8th grade social studies!

The Week That Was In 234

This week marked the start of a new chapter in my teaching career. I’ve transitioned to Batavia Middle School, where I’m now teaching 8th grade social studies in room 234. While the subject remains the same, I’m facing new procedures, new students, and a new textbook.

Thursday and Friday – Frayers, 3xCER

Adapting to Change

At my previous school, we used TCI History Alive, but now I’m working with McGraw Hill’s Voices of the Past. This change has presented some challenges. Previously, I could easily transfer TCI sections to a Google Doc and link it to activities (like EduProtocol), or directly link TCI sections to activities. However, with McGraw Hill, I can’t transfer content to Google Docs or create links in the same way.

This limitation is particularly frustrating because I prefer using Google Docs for its accessibility. It allows students to quickly access sources with a simple click, which streamlines the class and maintains a good tempo. I’m currently brainstorming ways to work around this issue.

Another adjustment I’m facing is the longer class periods. We now have 65-minute classes, compared to the 47-minute periods I was accustomed to. While this extended time offers more opportunities for activities (as they say in Step Brothers, “There’s so much room for activities”), it’s challenging from a timing perspective. On the bright side, I now only have four periods of Social Studies and co-teach one period of reading workshop with an ELA teacher.

Despite these changes, the first two days flew by.

Thursday: Building Connections

Thursday marked the first day back for everyone. As always, I began by emphasizing the core values of our classroom: respect, value, support, connection, challenge, and empowerment for everyone in room 234.

Although the students won’t receive their Chromebooks until next week, it wasn’t a problem. EduProtocols are versatile and can easily transfer to paper. To foster a sense of value, respect, and connection among the students, we started with a “Frayer a Friend” activity. This exercise included various prompts such as:

  • Their name and birthday
  • Four things they like
  • Four things they dislike
  • Three items they’d want on a deserted island
  • A sketch of their dream vacation

I initially set a six-minute timer for the first round, but many students couldn’t finish in time. That’s perfectly fine – it’s all part of the learning process. On the back of the Frayer, I incorporated an idea from Ariana Hernandez: Sketch, Tell, and Connect. Students sketched something they noticed during their interview, wrote a quick sentence about it, and then explained how it might connect to them personally.

We followed this with another round of Frayer a Friend, this time reducing the time to five minutes. Impressively, 90% of the class finished this round. I used this as an opportunity to reinforce our class goal: improvement with each repetition, doing a bit more each time.

Next, we moved on to a REPP (Random Emoji Power Paragraph) activity with their partners. This is always a hit, bringing great energy and laughter to the classroom. It’s one of my favorite EduProtocols.

To wrap up the day, since we didn’t have Chromebooks, I introduced the Marker Game. Students found a new partner, and each pair received a dry erase marker to stand up between them. I read True/False statements about the syllabus and my class. If they thought the statement was true, they grabbed the marker; if false, they left it alone. This game was a blast and a great way to review important class information.

Overall, it was a successful first day, though I’m eagerly anticipating the arrival of the Chromebooks.

Friday: Deepening Connections and Introducing Myself

On Friday, I wanted to maintain the momentum we’d built. We started with another Frayer a Friend activity, this time partnering students with someone from a different table. I set a four-minute timer, and everyone successfully completed the task.

Next, I introduced the Wicked Hydra activity. I had prepared five images related to me and my life, taping them to poster paper or whiteboards around the room. These images included:

  1. A picture of my family
  2. Me receiving the OCSS MS Social Studies Teacher of the Year award
  3. A photo from my NKU tennis days
  4. A Zach Bryan concert where Bruce Springsteen made a surprise appearance
  5. A picture of Dominic Helmstetter and me presenting at NCSS (interestingly, two classes thought Dominic was Ronaldo and were impressed that I had “met” him!)

The goal of this activity was to introduce myself through questioning strategies while simultaneously developing students’ historical thinking skills of observation and questioning. I rotated all groups through all pictures in 15 minutes.

Following this, I combined a 3xCER (Claim, Evidence, Reasoning) with the Wicked Hydra activity. I emphasized that everything we do in room 234 serves a purpose. In this case, their observations and questions would help them create claims about me. After explaining claims, evidence, and reasoning, I gave the students 10 minutes to come up with claims about me based on the images they had observed.

We concluded the activity by having students share their claims. I answered their questions and shared more about myself, creating a wonderful opportunity for connection and engagement.

This class period was a resounding success, and I’m definitely planning to use this activity again in the future.

In conclusion, despite the challenges of adapting to a new school environment, these first two days have been incredibly rewarding. I’m excited to continue building connections with my students and helping them develop crucial skills through engaging, purposeful activities.

The Week That Was In 505

This is the last The Week That Was In 505. It will be changing to The Week That Was in 234 as I have changed schools and classrooms.

The New Richmond community has been a part of my life since 2nd grade. It is my alma mater. I’m in their athletic hall of fame for tennis. My parents still live in the community. It is where I have taught the last 12 years. But, it was time for a change. I’m moving onto Batavia Middle School and teaching 8th grade social studies.

What does this mean for all the template links on this site? I don’t know….it depends on how long they keep my account open. I have too many template links, and a messy drive, and it’s next to impossible for me to track down all these links. We will just start fresh with the new school year.

Every year I write a note on my board and walk out. Here is my last note:

Monday – Escape Room, Google Form

Monday

Monday was really the only day of teaching this week. Knowing how middler schoolers can be, I needed something engaging. I used my good buddy Claude AI to help me design an escape room. Claude came up with a series of puzzles and games to help students figure out a clue to unlock the Google Form.

The escape room we designed was related to the content students learned all year – causes of the American Revolution, the Constitution, Westward Expansion, and causes of the Civil War.

Claude did an excellent job coming up with some basic puzzles. For example:

  1. Students had to put westward expansion events in chronological order for a number lock.
  2. There was a series of multiple choice questions where the correct answers spelled out the cause of the Civil War that students had to unscramble.
  3. The Cryptogram was fun, but it wasn’t perfect. Some of the words and letter clues were off.
  4. One of the clues specific letters from the answers were unscrambl;es and spelled out FEDERALISM.

Overall, Claude did an excellent job coming up with ideas. I put this escape room together in 30 minutes. Claude also helped me come up with rhymes to help students find the next puzzle thgat I hid somehwere ion my classroom.

Ultimately, the escape room built up to a 3 digit lock box where the students had to do some math:

Clue 1: Start with the total number of representatives in the U.S. House of Representatives.
Clue 2: Subtract the total number of senators in the U.S. Senate.
Clue 3: Subtract the number of the amendments that abolished slavery and involuntary servitude, except as punishment for a crime.
Clue 4: Subtract the number of the amendment that granted citizenship rights and equal protection under the law to all persons born or naturalized in the United States.
Clue 5: Subtract the number of the amendment that reserves powers not delegated to the federal government to the states or the people.

It was an engaging, and awesome, last Monday of school.

I don’t often share any notes I get, but I keep everything in a basket, and I thought I would share some…

The Week That Was In 505

Monday through Friday:

  1. Civil War Veteran EduProtocols
  2. Success Criteria

This week, my students embarked on a fascinating research project to uncover the stories of Civil War veterans buried in Watkins Hill Cemetery, located right behind our school. By combining a series of EduProtocols, the students were able to organize their findings and piece together the contributions these brave soldiers made to the Union victory.

To kick off the project, students utilized the Fold3 database, a rich resource for military records, as well as information from the cemetery itself and the American Battlefield Trust website. Armed with these tools, they took on the role of historical detectives, digging deep to unearth details about each veteran’s life and service.

The EduProtocols provided a structured framework for the students to present their discoveries. They began by creating a Frayer model to capture basic information about their chosen veteran, such as their birth and enlistment details, regiment, and company. Next, they constructed a timeline to place the veteran’s service within the broader context of the Civil War, marking key milestones like enlistment, discharge, and the battles they fought in.

One of the most engaging aspects of the project was the “Thick Slide,” where students delved into a specific battle their veteran participated in. They researched the date, location, and significant events of the battle, bringing the veteran’s experience to life. By watching videos about the daily life of Civil War soldiers and the food they ate, the students gained a more intimate understanding of the challenges these men faced.

As a culminating activity, the students wove together all the threads of their research to craft a compelling biography of their veteran. They reflected on how each individual contributed to the Union’s ultimate victory, whether through bravery on the battlefield or vital support roles behind the lines.

I asked students what they learned from this project. Here was an interesting comment from a student on the reflection form…”That even though we mainly focus on the big events in history, all the people involved are very important to the overall event.”

Watching my students engage so deeply with local history was truly rewarding. They not only honed their research and critical thinking skills but also developed a profound appreciation for the sacrifices made by these long-ago soldiers. By connecting with the past on such a personal level, they gained a new perspective on the impact of the Civil War on our community and the nation as a whole.

Projects like this one remind us of the power of place-based learning and the importance of preserving local history. I’m incredibly proud of my students’ dedication and the insights they uncovered, and I look forward to exploring more ways to bring the past to life in our classroom.

The Week That Was In 505

As educators, it is our responsibility to make history come alive for our students. By employing a variety of teaching strategies and resources, we can help them develop a deep understanding and appreciation for the past. In this blog post, I will share my experience teaching the Civil War to my students, highlighting the activities and projects that proved most effective in engaging them and fostering their learning.

Monday – Assessment (I can’t share the EMC2Learning templates – sorry)

Tuesday – Start of the Civil War

Monday

To assess my students’ understanding of the Civil War and the events leading up to it, I provided them with three assessment options on Monday: a Story Dice template, a Video Game template, and a Sketch and Tell-o Connect activity. These diverse assessment methods allowed students to demonstrate their knowledge in creative and engaging ways, catering to different learning styles and preferences.

The Story Dice template required students to select nine images that represented or symbolized the events and factors contributing to the growing tensions over slavery. They then wrote a paragraph explaining how these events and factors led to the Civil War, incorporating the selected images.

The Video Game template challenged students to create a game proposal that included at least four of the events or factors studied. They had to explain how each event or factor was represented in the game and discuss the educational value of their proposed game.

Lastly, the Sketch and Tell-o Connect activity asked students to create six sketches representing the events leading up to the Civil War. They then made connections by creating a claim, evidence, and reasoning for the question, “What series of disagreements and deals made between the Northern and Southern states finally caused the Civil War?”

Tuesday

Following the summative assessment, I utilized a combination of resources and activities to introduce the Civil War. On Tuesday, I had my students complete a Frayer Model activity, where they collected information about the Union and Confederate armies, including the states involved, colors worn, and other characteristics. This activity helped them organize their knowledge and understand the opposing forces.

I also had my students watch an EdPuzzle video on the start of the Civil War. The video provided a concise yet informative overview of the key events, battles, and leaders, allowing students to visualize the important aspects of the war. The EdPuzzle platform enabled me to embed questions throughout the video, ensuring active engagement and comprehension.

Thursday

On Thursday, I embarked on an exciting project that connected our classroom learning with local history. Near our school grounds lies the Watkins Hill Cemetery, which houses the graves of several Civil War veterans. I instructed my students to research and document the names of these veterans, along with the companies and regiments in which they served.

To make the most of this opportunity, I took my students on a field trip to the cemetery. They had the chance to explore, locate the graves, and gain firsthand knowledge about the individuals who played a significant role in our nation’s history. This hands-on experience brought history to life and fostered a deep connection with the past.

Building upon this experience, I introduced my students to Fold3, a comprehensive military veteran database. Using a Google Slidedeck containing EduProtocols, students organized their research findings and delved deeper into the stories of the Civil War veterans. They analyzed numerical data points, researched specific battles, and pieced together the historical context in which their chosen veterans lived.

Conclusion

By employing a multifaceted approach to teaching the Civil War, I was able to engage my students and help them develop a profound understanding of this pivotal moment in history. The combination of creative summative assessments, introductory activities, and hands-on exploration of local history created a comprehensive and meaningful learning experience.

I encourage fellow educators to explore opportunities within their communities to connect history with local landmarks. By immersing students in the stories of the past, we can ignite their curiosity, foster a love for learning, and help them appreciate the sacrifices made by those who came before us.