The past few weeks have been challenging—probably some of the toughest I’ve faced as a teacher. Being sick on and off for nearly a month has left me drained, both physically and mentally. Adjusting to a new school setting, new students, and trying to figure out what works has added to the weight. This year has forced me to stray from some of my core teaching philosophies. I’ve had to rely on strategies like extra credit, guided notes, and even the textbook more than I’d like.
I’m not relying on the textbook entirely, but it’s jam-packed with far too much information for 8th graders to process effectively. Pair that with vocabulary that feels overwhelming—words like negotiate, stimulate trade, inland, and emerged—and it’s clear the textbook isn’t a practical tool for building understanding. The challenge of teaching Tier 1 and Tier 2 vocabulary alongside complex historical concepts often feels insurmountable. When a student recently asked me, “What’s a stencil?” (I’m serious), I realized just how wide the gap can be.
The workload is also a challenge. There’s so much material to cover, and balancing meaningful activities with manageable workloads has been a constant juggling act. It’s hard not to feel like everything is just too much—for my students and for me.
I love writing in this blog; it’s a space to reflect and process. But lately, it’s felt like one more thing I can’t always keep up with. From here on, I’ll write when I can and focus on sharing what feels meaningful.
This week, though, I had three big wins. These are moments where my students were engaged, excited, and learning—and that’s what keeps me going.
What It Is: Gimanji is a competitive review activity created by Alexis Turnbull that combines Gimkit, Blooket, Quizizz, Kahoot, or any mix of platforms. It’s a hit with students because it’s fast-paced, fun, and team-based.
How to Run It:
Start with a Gimkit
Create a short, themed quiz. For example, I made a holiday-themed Gimkit with 12 questions about winter holidays.
Run the game for about 5 minutes and let the top 4 or 5 finishers choose their teams.
Switch to a Blooket
Pick a mode that keeps the energy high. For our holiday version, I chose Santa’s Workshop, which is based on speed and luck.
Award points to the top 5 finishers—5 points each worked well for us.
Add a Kahoot
Create a Kahoot quiz based on a fun theme. Ours was holiday songs represented by emojis. Students earn points based on accuracy and speed.
Keep it short—5 to 8 minutes is perfect.
End with Quizizz
Finish with another short quiz. We did a round on holiday cookies.
Again, the top 5 finishers earned points for their team.
Why It Worked: The variety of platforms kept students engaged, and the team-based competition added an extra layer of excitement. By rotating through different tools, you can cater to a range of learning styles and keep the activity fresh. Gimanji is flexible—you can adapt it to any subject or theme.
2. WeWillWrite: Gamified Writing
What It Is: WeWillWrite is a platform that turns writing into a gamified activity. Students respond to creative prompts in secret teams, assess their peers’ writing, and compete for points.
How to Run It:
Sign Up and Create a Session
Log in to WeWillWrite and create a session. The platform has premade prompts for all grade levels.
Introduce the Activity
Students join with a code, similar to Gimkit or Blooket.
The platform automatically places them into secret teams.
Write and Assess
Display the first prompt (e.g., “Convince your grandma her cringe gift is perfect”).
Students write for 3 minutes—there’s no submit button, so they’re encouraged to write the entire time.
After writing, students self-assess and read the work of their teammates.
Vote and Award Points
Teams vote on the best, funniest, or most thoughtful piece.
Winning entries are displayed, and AI highlights literary elements like metaphors, adjectives, and personification.
Repeat for Additional Rounds
Continue with new prompts, tracking team scores along the way.
Why It Worked: The prompts were fun and accessible, encouraging even reluctant writers to participate. The anonymity of secret teams removed the fear of judgment, and the AI feedback added a layer of validation and learning. It was exciting to see students so invested in writing, and the self-assessment piece encouraged reflection on their work.
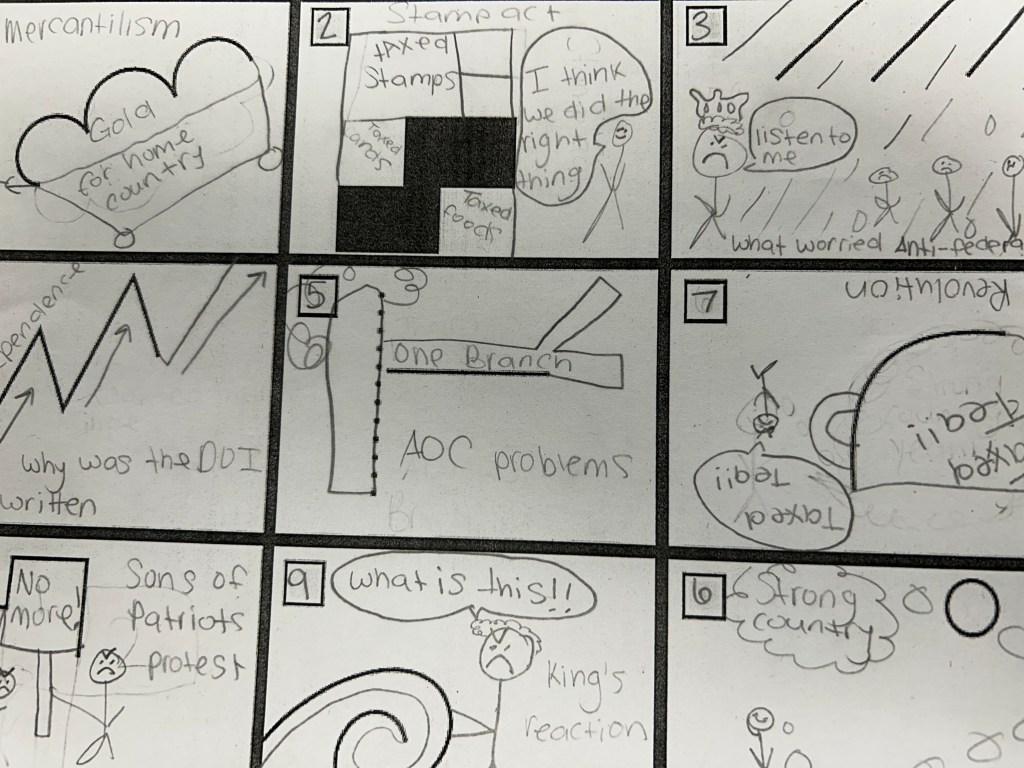
3. Finish the Drawing
What It Is: This activity, inspired by Howson History, combines creativity with content. Students complete partially drawn images based on prompts tied to your curriculum.
How to Run It:
Prepare the Drawings
Create a sheet with 9 unfinished drawings—simple shapes or partial designs that students can build upon.
Provide space under each box for labels.
Randomize and Assign Prompts
Have students randomly number the boxes on their sheet.
Call out prompts one at a time. For example:
“How would King George react to the Declaration of Independence?”
“Illustrate mercantilism in action.”
“What worried Anti-Federalists about the Constitution?”
Drawing and Labeling
Give students 3 minutes to complete their drawing and label it with key terms or ideas.
Repeat and Discuss
Continue with new prompts, encouraging students to share and explain their drawings as time allows.
Why It Worked: This activity made abstract concepts more tangible. Students who might struggle with writing or vocabulary could still demonstrate understanding through visuals. It sparked great discussions and could easily transition into a Sketch and Tell or Sketch and Tell-O.
Final Thoughts
This week reminded me why I love teaching, even during tough seasons. These activities—Gimanji, WeWillWrite, and Finish the Drawing—brought energy and engagement back into my classroom. They provided ways to work around vocabulary gaps while keeping students focused and excited.
If you’re looking for ways to shake up your lessons and get your students excited, I highly recommend trying these strategies. They’re flexible, fun, and effective—proving that a little creativity can make a big difference!
This week in 8th-grade social studies, we dove deep into the Constitutional Convention and the ratification debates, using a variety of EduProtocols to engage students and build understanding. From Frayer Models to define key terms and concepts, to Sketch and Tell-O and 8Parts Sourcing for visual analysis and critical thinking, each day offered a structured and interactive way for students to connect with history.
Activities like Gimkit, Quizizz Mastery Peak, and Emoji Kitchen kept the energy high and provided opportunities for review, creativity, and synthesis. Through consistent protocols and thoughtful lessons, students explored the compromises, debates, and decisions that shaped the U.S. Constitution.
Even though I was out sick, I wanted to ensure my students had meaningful, engaging lessons to kick off our exploration of the Constitutional Convention. With EduProtocols and structured activities, I aimed to keep students on track while fostering curiosity and understanding.
Starting with the Purpose
Every lesson on the Constitutional Convention begins with the question: “What was the purpose of the Constitutional Convention?” To set the stage, I assigned an EdPuzzle that introduced the basics of the event. EdPuzzle is always a reliable tool when I’m out—it keeps students engaged with videos while offering questions to ensure they’re following along.
Building Vocabulary with Gimkit
Next, I created a Gimkit with key terms students would encounter throughout the week, including federalist, anti-federalist, compromise, republic, and constitution. Vocabulary is critical for understanding the bigger picture, and Gimkit’s game-like format keeps students motivated while helping them retain these foundational terms.
Deep Dive with a Frayer Model
To dive deeper into the Constitutional Convention, students completed a Frayer model. They defined the convention, identified three key figures who attended, listed three important facts, and added an image to tie it all together. This activity helped them organize their initial understanding while highlighting the significant people and ideas of the event.
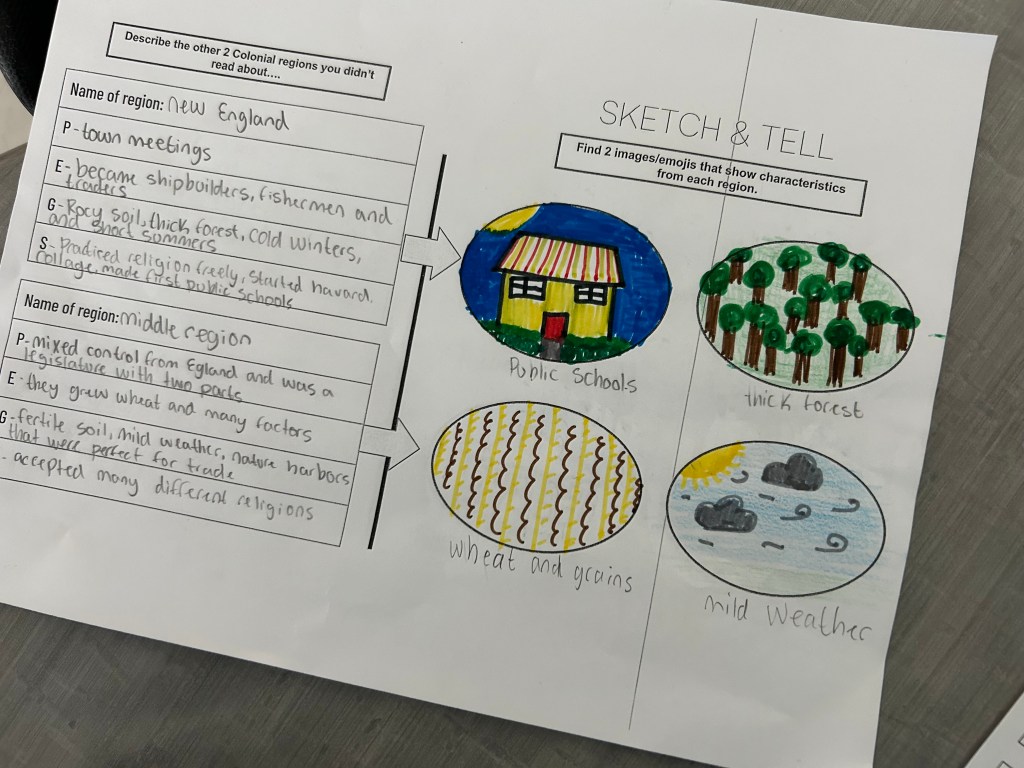
Sketch and Tell-O: Synthesizing Purpose
Students then read about the purpose of the Constitutional Convention and created a Sketch and Tell-O. They sketched out three important facts from the reading and wrote a summary answering the essential question: Why was the Constitutional Convention necessary? This activity combined visual and written processing, encouraging them to connect details to the broader purpose of the event.
Tuesday
Still out on Tuesday, I kept the focus consistent and structured, guiding students through the key compromises made at the Constitutional Convention. With a mix of graphic organizers, interactive mapping, and creative synthesis, students had the opportunity to deepen their understanding of the Great Compromise and the Three-Fifths Compromise.
Starting with Vocabulary
We began with a Gimkit review of the vocabulary introduced on Monday. Terms like federalist, anti-federalist, compromise, republic, and constitution are foundational, and revisiting them daily helps reinforce understanding while building fluency.
Graphic Organizers: Breaking Down the Compromises
To tackle the Great Compromise and the Three-Fifths Compromise, I created two graphic organizers.
The Great Compromise Organizer
Students read a brief article about the Great Compromise, identifying:
The issue at stake
The two opposing sides
The compromise itself
This activity helped them see how differing viewpoints shaped the structure of Congress and highlighted the balance of interests between large and small states.
The Three-Fifths Compromise Organizer
After reading a second article, students completed the same organizer for the Three-Fifths Compromise, focusing on:
The issue of representation and slavery
The opposing perspectives of Northern and Southern states
The resulting compromise
By structuring the readings and graphic organizers this way, students were able to make direct comparisons between the compromises while seeing how both contributed to strengthening the national government.
Map and Tell: Connecting Compromises to Modern Context
To reinforce their understanding of the Great Compromise, students engaged in a Map and Tell activity. Using a map showing the current number of representatives for each state, students answered the following questions:
Which state currently has the most people?
Identify a state with the fewest people.
In 2019, Ohio had 16 representatives in the House. Why do you think they only have 15 now? (Hint: It’s not because they died!)
Every state has 2 senators. How many senators are in the U.S. Senate?
These questions required students to apply what they learned about representation and the legislative structure created by the Great Compromise. The activity added relevance and encouraged them to connect historical decisions to the modern-day functioning of government.
Sketch and Tell-O: Synthesis
Students ended the day with a Sketch and Tell-O activity addressing this essential question:
“How did the leaders at the Constitutional Convention compromise to strengthen the central (national) government?”
Their responses needed to include the terms great compromise, representation, and three-fifths compromise. By combining visual representation with written explanation, students synthesized their learning while reinforcing the central role of compromise in the Convention.
Wednesday
For the third day in a row, I was out, but the focus on the Constitutional Convention’s compromises remained strong. Wednesday’s lesson tackled the debate over the executive branch—whether the nation should have one president or three, and how that leader should be chosen. The structure and consistency of the lessons helped students stay engaged and build on their understanding of the compromises that shaped the U.S. government.
Starting with Vocabulary
As always, the day began with a Gimkit review of the key vocabulary terms from earlier in the week. Repetition is key to reinforcing these foundational terms, and Gimkit’s interactive format ensures students stay motivated and focused.
Frayer Model: Defining the Executive Branch
Next, students created a Frayer model for the term executive branch. They:
Defined the term.
Provided examples (e.g., the president, the cabinet).
This activity helped students clarify the role and function of the executive branch, setting the stage for the deeper analysis to follow.
Graphic Organizer: Breaking Down the Debate
Students then read about the debate over the executive branch, focusing on the key issues:
Should the country have one president or three?
How should the president be chosen?
Using the same organizer from the previous days, they identified:
The issue at hand.
The two opposing sides of the debate.
The compromise that resolved the conflict.
This consistent structure helped students compare this debate with the previous ones, reinforcing the importance of compromise in shaping the Constitution.
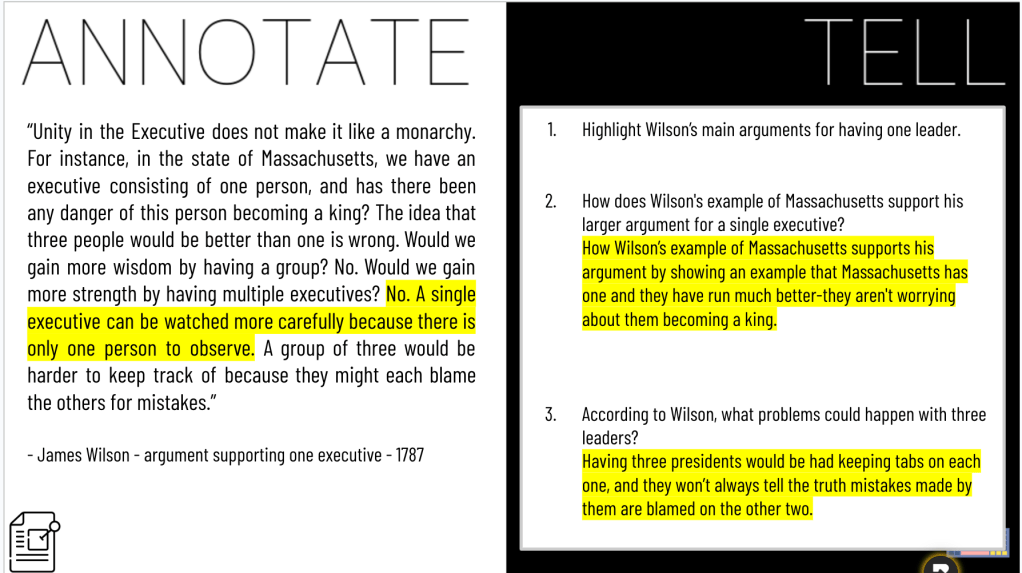
Annotate and Tell: Analyzing James Wilson’s Argument
To deepen their understanding, students analyzed a primary source excerpt from James Wilson, who argued for having one president. Through an Annotate and Tell activity, they highlighted key points and answered these questions:
What are Wilson’s main arguments for having one leader?
How does Wilson’s example of Massachusetts support his argument for a single executive?
According to Wilson, what problems could arise with three leaders?
This activity encouraged critical thinking and connected historical perspectives to the broader debate over the executive branch.
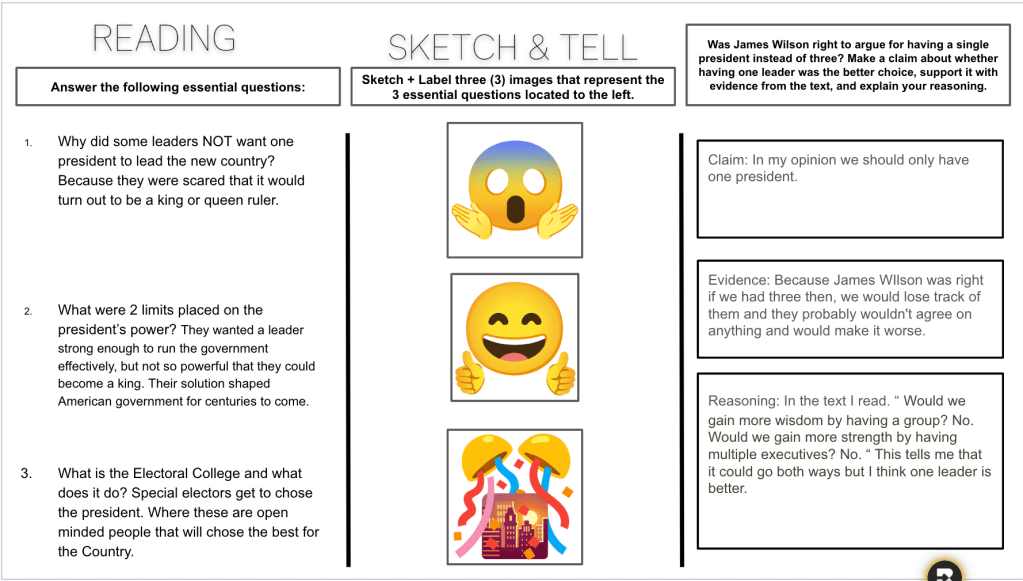
Wrapping Up with Synthesis
To conclude, students worked on three tasks:
Answering Essential Questions: Students reflected on the executive branch’s role and how the Constitutional Convention resolved its structure.
Sketch and Tell-O: They illustrated their understanding of the debate, including key issues, arguments, and the compromise reached.
CER Writing: Students crafted a Claim-Evidence-Reasoning paragraph responding to the question: Should we have one president or three?
Thursday
It’s rare for me to miss three days in a row, so when I returned to class today, I faced the challenge of pulling together three days’ worth of content—some completed on Chromebooks, some on paper. The goal for the day was simple: consolidate the material, assess understanding, and help students connect the dots.
Starting with Quizizz
I kicked off the lesson with a 10-question Quizizz that covered key points from the past three days. Quizizz’s format, where each question is asked once, allowed me to see how students performed on a broad range of topics. Unfortunately, the results revealed significant gaps, with class averages at 45%, 47%, 54%, and 59%. The data didn’t point to one specific area of struggle; it was clear the students needed a comprehensive review to piece everything together.
Curipod to the Rescue
To address the gaps, I turned to Curipod—a tool that continues to impress me with its versatility and ability to engage students. I uploaded a premade presentation summarizing the key points of the Constitutional Convention, and Curipod enhanced it with interactive features that brought the content to life.
Guided Notes: Students worked on guided notes as we moved through the presentation, grounding them in the essentials of the Great Compromise, the Three-Fifths Compromise, and the executive branch debate.
Interactive Features:
Students submitted open-response questions, such as one where they could “ask James Madison a question.”
Curipod provided AI feedback for their responses, making the review process more engaging and personalized.
The AI whiteboard feature asked students to draw how the Founding Fathers balanced representation between big and small states with the Great Compromise. AI analyzed their drawings and offered feedback.
Voting on Responses: Students anonymously voted on open-response answers, with the top three being displayed at the end. I love this feature because it minimizes bias and encourages thoughtful participation.
Curipod’s interactive elements made the material engaging and accessible, and the guided notes ensured students had something tangible to refer back to as we reviewed.
Wrapping Up with Quizizz
We ended class by retaking the same Quizizz from the beginning of class. The results spoke volumes:
47% jumped to 76%.
45% increased to 80%.
54% rose to 77%.
59% climbed to 80%.
The improvement showed that the combination of Curipod, guided notes, and interactive features helped students consolidate their understanding and apply it effectively.
Friday
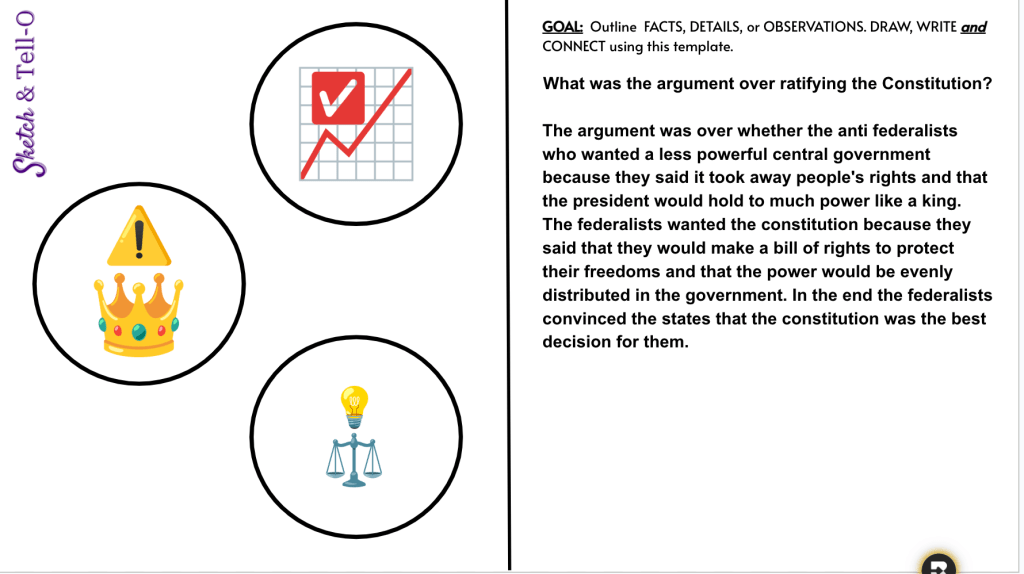
By Friday, we were back on track and moving forward with the next big question in our unit: “What were the arguments over ratifying the Constitution?” This lesson delved into the emergence of Federalists and Anti-Federalists, emphasizing how the newly proposed Constitution required states to not only understand but also buy into the vision for a federal government.
Starting with Mastery Peak
We began with the Mastery Peak feature in Quizizz, using the same questions from Thursday to refine understanding. The growth in scores was impressive:
77% → 100%
70% → 93%
77% → 96%
67% → 96%
This demonstrated that students were solidifying their grasp of the material as we continued to revisit and apply it.
Introducing Ratification with Gimkit
Next, I ran a quick 2-minute Gimkit with six questions about the ratification of the Constitution. This short review prepared students for the day’s focus and introduced key terms like Federalists, Anti-Federalists, and ratification.
I framed the lesson with the question: “What were the arguments over ratifying the Constitution?” This served as a springboard to discuss how Federalists and Anti-Federalists debated the need for state approval and public buy-in to legitimize the new government.
Sourcing with 8Parts: The Federal Pillars
We began our exploration with the Federal Pillars image, using the 8Parts Sourcing Protocol to analyze it. Students:
Identified nouns, verbs, adjectives, and prepositions in the image.
Summarized the artist’s message about the ratification process.
This visual analysis helped students interpret how the artwork symbolized the growing support for ratification while emphasizing the states’ critical role in the process.
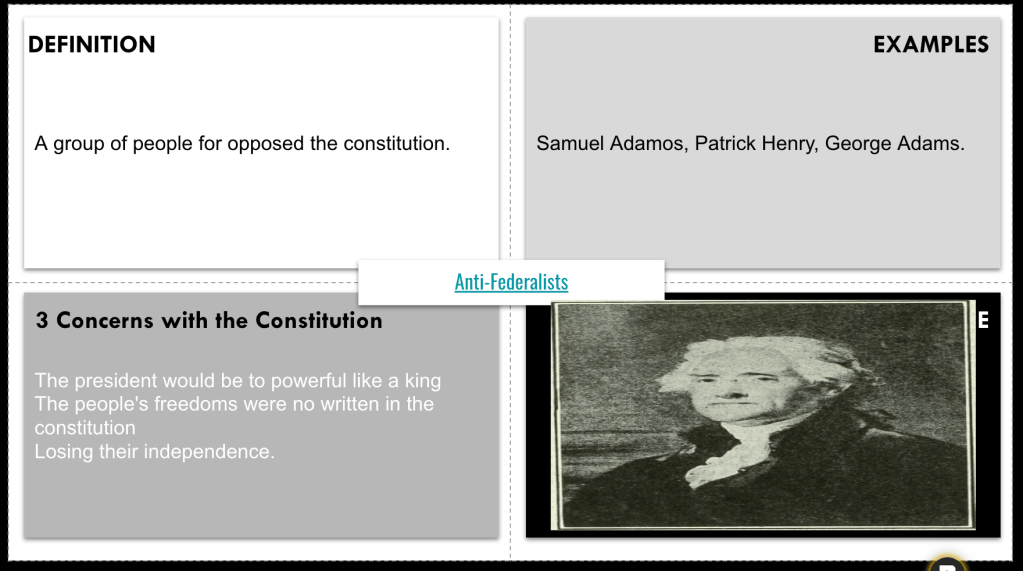
Frayer Models: Federalists vs. Anti-Federalists
Next, students completed two Frayer models, one for Federalists and one for Anti-Federalists. They defined each group, listed key characteristics, included examples of prominent figures, and noted non-examples. This activity helped clarify the contrasting perspectives on the Constitution:
Federalists advocating for a strong central government.
Anti-Federalists emphasizing states’ rights and the need for a Bill of Rights.
To wrap up, students used Emoji Kitchen to visually represent three arguments over ratification. They selected emojis to symbolize each argument and wrote a summary answering our essential question: “What were the arguments over ratifying the Constitution?” This activity added a creative and personal element to the lesson, encouraging students to connect with the material in a unique way.
Ending with Gimkit
We finished class with the same Gimkit as earlier, reinforcing the key concepts about ratification. This repetition helped solidify understanding while ending the day on an engaging note.
This week, we dug into the foundations of the United States government and explored how early laws shaped the country’s growth. EduProtocols were front and center as we kept students engaged and active in their learning:
EduProtocols made this week dynamic and interactive, helping students dive deeper into complex topics while keeping them engaged and excited to learn!
Monday
Today, we began our new unit on the Constitutional Convention, which will cover topics like the Articles of Confederation, Shays’ Rebellion, the Northwest Ordinance, key compromises, and Federalists vs. Anti-Federalists. To set the stage, I introduced the concept of different government systems—some familiar, some new—and used a mix of EduProtocols to keep students engaged and thinking critically.
Starting with Gimkit: Activating Prior Knowledge
We started class with a quick 2-minute Gimkit on types of governments, focusing on basic terms and concepts. After the first round, I gave immediate feedback, clarifying any misunderstandings, and then we jumped into a second round. Repetition and feedback in short bursts like this are a great way to activate prior knowledge and boost confidence, especially as we dive into new material.
Introducing the Tier List: A Fun New Protocol
Next, I introduced a new EduProtocol: The Tier List (created by Eric Curts). Many students were already familiar with it, which made for a seamless introduction. We began by ranking fast food chains using the S-F ranking system. Students had three minutes to place their rankings, with the flexibility to leave tiers blank or include multiple restaurants in the same tier.
The real value of the Tier List came in the next steps:
Partner Discussions: Students paired up to compare rankings and explain their reasoning, fostering meaningful discussions about personal preferences and decision-making.
Live Class Results: As students submitted their rankings through a Google Form, the live results appeared on the board. This led to a fun, interactive class discussion about trends and outliers in the rankings.
This warm-up not only got students talking but also built their familiarity with the Tier List format, which we’ll use again for academic topics later in the unit.
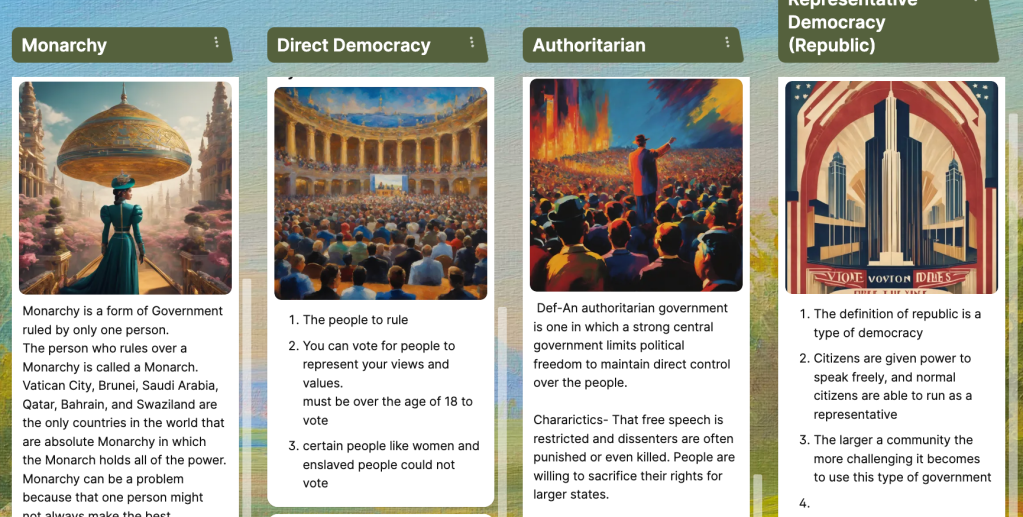
Diving into Government Systems with Iron Chef
For the main activity, we used an Iron Chef format paired with Padlet to explore six government systems: direct democracy, monarchy, republic, authoritarian, anarchy, and confederation (I left out theocracy this time). Here’s how it went:
Distributing Readings: Students received a half-page reading about their assigned government system.
Padlet Contributions: Each group shared:
A definition of their government system
Two characteristics of that system
Potential problems or limitations
An AI-generated symbolic image to represent it
This collaborative activity gave students ownership over their topic and ensured a wide range of perspectives for the class to learn from.
Sketch and Tell-O: Processing and Synthesizing
To reinforce what they learned, students moved into a Sketch and Tell-O Notes activity. As they reviewed each Padlet post, they sketched a quick picture, wrote a definition, and jotted down key facts for each government style. This protocol helps students process information visually and create a set of notes they can reference throughout the unit.
Wrapping Up with Gimkit
We ran out of time, but I squeezed in a final 3-minute Gimkit to reinforce what we’d covered. Quick reviews like this are an excellent way to close a packed lesson and leave students feeling confident in their understanding.
Reflection
Today’s mix of protocols and activities was all about building foundational knowledge in an engaging and interactive way. The Tier List added a fun twist to class discussions, while Iron Chef and Sketch and Tell-O helped students dive deeper into the nuances of different government systems. Although we ran out of time, the energy and focus in the room made for a strong start to this new unit.
Today, I realized we needed to shake things up. After starting class with a Gimkit on government systems, I noticed the results were still stagnant—students weren’t making the progress I’d hoped for. If they were struggling with basic questions, how could they effectively rank and discuss the systems on a Tier List? Time to try something different.
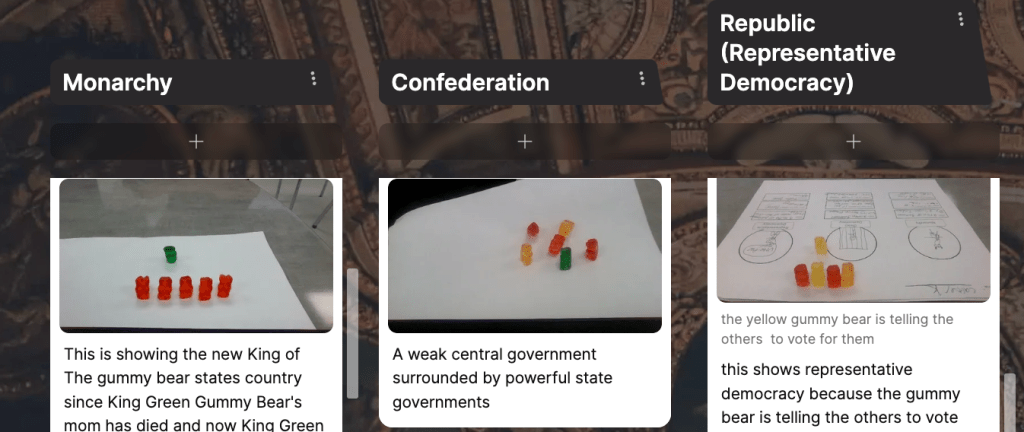
Gummy Bear Representations
Enter the gummy bears. I handed each student a pack of individually wrapped Haribo gummy bears and set up a Padlet. Their task: review monarchy, confederation, and republic styles of government by creating gummy bear representations of each system.
Students got creative:
For monarchy, some built a single gummy bear “king” surrounded by loyal “subjects.”
For confederation, students grouped bears into loose alliances, showing independence but some cooperation.
For republic, gummy bears voted or worked together as equals.
They took pictures of their creations, uploaded them to Padlet, and explained how their setups represented each government style. The energy in the room was fantastic, and students were highly engaged. This hands-on approach turned what could’ve been a dry review into something fun and memorable.
Revisiting Gimkit
After 20 minutes of gummy bear creations, we revisited the Gimkit. The results were much better this time—students had a clearer grasp of the government systems and were able to apply what they’d just reviewed in a meaningful way.
Ranking Governments with the Tier List
Next, we transitioned into the Tier List EduProtocol. This time, students ranked the styles of government we’ve studied so far. After completing their Tier List rankings, they paired up to discuss their choices and submitted their final results through a Google Form.
Wrapping Up with Class Discussion
We ended with a class discussion based on the live Google Form results, comparing trends and outliers. Students defended their rankings, debated the merits of each system, and reflected on what makes some systems more effective than others.
Reflection
Today’s gummy bear activity was a game-changer. It transformed abstract concepts into something tangible, making it easier for students to connect with and understand the material. The improved Gimkit scores showed that this hands-on, creative approach worked, and the Tier List discussion added depth to their understanding. Sometimes, all you need to reinvigorate learning is a little creativity—and a pack of gummy bears. 🍬
Wednesday
While I wasn’t in class today, I left a structured, engaging set of activities to introduce the Articles of Confederation and its connection to Shays’ Rebellion. The plan aimed to build foundational knowledge through vocabulary, visuals, and synthesis tasks, though I anticipated needing Thursday to review and reinforce some of the concepts.
Vocabulary Practice with Gimkit
The lesson began with a Gimkit focused on vocabulary terms related to the Articles of Confederation. This provided a quick, interactive way for students to familiarize themselves with key terms they’d encounter in the reading and activities.
Edpuzzle: Visual and Audio Support
Next, students watched a six-minute Edpuzzle video on the Articles of Confederation. The video served as a concise visual and auditory primer, helping students understand the context and purpose of the Articles while highlighting its strengths and weaknesses.
Frayer Model: Breaking Down the Articles
Students then completed a Frayer model on the Articles of Confederation, paired with a reading. The prompts encouraged them to:
Define the Articles of Confederation.
Explain one reason why the government was intentionally made weak.
List three powers Congress had under the Articles.
Identify four weaknesses of the government.
This activity pushed students to engage with the text critically and organize their understanding in a structured way.
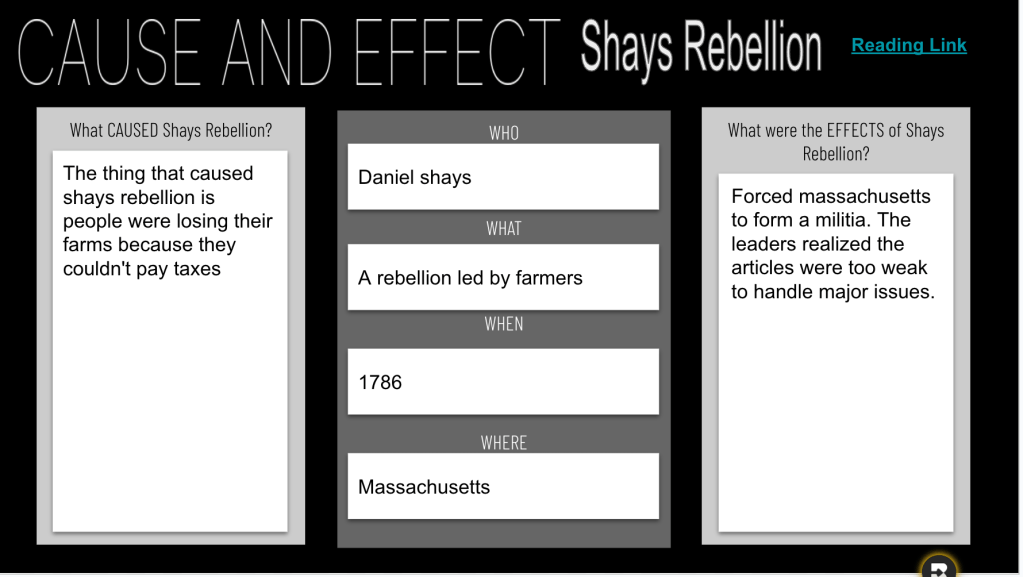
Exploring Shays’ Rebellion
To connect the Articles to its historical impact, I included a Justin Unruh template focused on Shays’ Rebellion. Students identified:
The cause of the rebellion.
The who, what, when, and where of the event.
The effect Shays’ Rebellion had on the call for a stronger federal government.
This task linked abstract governmental weaknesses to a real-world crisis, helping students see how the Articles’ limitations played out in history.
Sketch and Tell Comic: Synthesis
The final activity was a Sketch and Tell comic. Students were tasked with synthesizing the day’s learning by illustrating:
What the Articles of Confederation were.
Two weaknesses of the Articles.
Shays’ Rebellion.
One success under the Articles.
This activity combined creativity and critical thinking, but as expected, many students didn’t finish this part. We’ll use Thursday to revisit and complete it.
Reflection
Today’s plan blended a variety of tools—Gimkit, Edpuzzle, Frayer models, and a Sketch and Tell comic—to help students engage with foundational ideas about early American government. While I wasn’t there to guide them, the scaffolding allowed for independent exploration. Still, Thursday will be key for addressing gaps and ensuring everyone synthesizes these concepts fully. Sometimes, lessons like these are reminders of the importance of follow-up, especially when tackling big, interconnected topics like these.
Thursday
Today was all about getting everyone on the same page with the Articles of Confederation and Shays’ Rebellion. After Wednesday’s independent work, I decided that a more guided and interactive approach was needed to fill gaps and ensure everyone had a clear understanding. Enter Curipod, an AI-powered tool similar to Pear Deck and Nearpod, which helped make today’s lesson engaging and collaborative.
Using Curipod to Guide the Lesson
If you haven’t tried Curipod, let me just say—it’s a game changer! I asked Curipod to generate a lesson for 8th graders about the Articles of Confederation and Shays’ Rebellion. It created a structured lesson with key topics like:
Successes and Weaknesses of the Articles
The Structure of Government
Cause and Effect
Shays’ Rebellion
What makes Curipod especially great are the interactive pieces. For example, it included prompts like:
“Why do you think the founding fathers didn’t create an executive branch with a president?”
“Why do you think they created a central government that couldn’t levy taxes?”
Students had three minutes to respond, thanks to the built-in timer (adjustable if needed). Once time was up, students could read and vote on the most relevant responses—anonymously! This feature is a huge win because it encourages honest, thoughtful answers without turning into a popularity contest.
Curipod also lets you add, edit, or delete information on the slides, making it highly adaptable to fit your classroom needs. The free version alone is incredibly robust, and I loved how it seamlessly tied into today’s goals.
Revisiting and Fixing Frayers and Comics
To start, students opened the Frayer models they had worked on Wednesday. Using the Curipod lesson as a guide, they reviewed and updated their definitions, weaknesses, successes, and other key details about the Articles of Confederation. This ensured they had accurate, complete information while reinforcing what we’d already covered.
Next, we transitioned to their Sketch and Tell comic slides, where students synthesized:
The Articles of Confederation
Two weaknesses of the Articles
Shays’ Rebellion
One success under the Articles
With time to refine their work, the students made meaningful improvements to their comics, bringing together everything they’d learned so far.
Wrapping Up with Gimkit
We ended class with a quick round of Gimkit to reinforce the key terms and ideas. By now, students’ scores were improving steadily, showing their growing confidence with the material.
Reflection
Curipod was the perfect tool for today’s lesson—it brought clarity, engagement, and interactivity to topics that could otherwise feel dry or overwhelming. The anonymous response feature encouraged thoughtful participation, while the guided format helped students fix any misunderstandings from Wednesday’s lesson. Tying everything together with the Frayers, comics, and Gimkit made for a well-rounded day of learning and reflection. If you haven’t tried Curipod yet, I highly recommend it—it’s an absolute game changer for collaborative lessons!
Today’s focus was on two key pieces of legislation: the Land Ordinance of 1785 and the Northwest Ordinance of 1787. These laws laid the groundwork for organizing and settling the Northwest Territory, so our lesson emphasized understanding how land was divided and states were established.
Starting with Gimkit
We kicked off with a 10-question Gimkit that combined review from Thursday’s lesson with new questions about today’s content. This mix kept students on their toes while reinforcing prior learning and previewing key ideas.
Reading and Proving a Statement
Next, we read an article on the Land Ordinance and Northwest Ordinance. I explained how townships were set up, breaking down the system of squares, sections, and their purposes. To apply their learning, I gave students the statement:
“The United States created an organized system to divide land and establish new states in the Northwest Territory.”
Their task was to prove the statement true using four numbers from the readings. This Number Mania activity helped them connect specific details to a broader understanding, encouraging them to think critically and organize evidence to support a claim.
Wrapping Up Early
I originally planned to include more activities, but by the time we finished the Number Mania and ran a second round of Gimkit, I decided that was enough for the day. It’s Friday, Thanksgiving break is around the corner, and the students had been working hard all week. Sometimes, it’s just as important to recognize when they need a break as it is to keep pushing forward.
Reflection
Today’s lesson was a perfect balance of review, new content, and synthesis. The Number Mania helped students focus on key details, while the Gimkit kept them engaged and reinforced their learning. Wrapping up a bit early felt like the right call—it gave students a breather after a week of hard work and set a positive tone heading into the weekend. Sometimes less really is more.
This week, we wrapped up the Revolutionary War and began transitioning into the formation of a new nation. From major battles to the Treaty of Paris, and the contributions of marginalized groups to the local impact of Revolutionary War veterans, the focus was on tying big ideas to personal connections.
EduProtocols were front and center, with Sketch and Tell-O taking the lead as students visualized key concepts across the unit. We also used Wicked Hydra to spark curiosity, Number Mania to connect history to local stories, and Brain, Book, Buddy, Boss to strengthen review and collaboration. It’s been a week of reflection, practice, and making history come alive through active, creative engagement.
Today, we focused on Revolutionary War battles, diving into the “big five” that shaped the war’s outcome: Lexington and Concord, Bunker Hill, Trenton, Saratoga, and Yorktown. While battles aren’t my favorite part of this unit (and I’m ready to wrap it up by the week’s end), I aimed to make the lesson purposeful and engaging for my students while also pushing their thinking beyond surface-level details.
Starting with Curiosity and Context
To kick off, I posed a simple but thought-provoking question: How many battles do you think were fought during the Revolutionary War? As expected, the responses ranged from “10” to “1 million” (middle schoolers never disappoint). I shared the surprising fact that there were over 1,000 battles and skirmishes, but we’d focus on five key battles. This helped set the stage for students to see the broader context before zooming in on the most impactful moments.
Building Knowledge with Gimkit and Padlet
We started with a 3-minute Gimkit to review core terms and concepts from the Revolutionary War. This quick burst of activity keeps engagement high and helps solidify foundational knowledge. Next, I had students dive deeper by becoming “battle experts.” Each student researched one battle, focusing on:
When it happened
Where it happened
Two major events
Why it was important to the war’s outcome
To share their findings, I set up a Padlet divided into five sections—one for each battle. I provided directions, maps, and a prompt to guide their work. Students also used the “I Can’t Draw” AI tool to create images representing their battle, adding a creative touch. Once the Padlet was complete, students read through the shared information and mapped out each battle location along with three key facts per battle.
Pushing into Evaluation and Synthesis
After gathering information, I challenged students to evaluate: Of the five battles, which three were the most important? They struggled with this—evaluating and ranking require a shift to DOK 2 thinking, and it’s an area we’re still building. Students sketched a quick image for each of their top three battles, which helped them synthesize their ideas visually.
To extend their thinking further, we moved into a CER (Claim, Evidence, Reasoning) exercise: Which battle was the most important overall? Writing a strong claim with evidence and reasoning remains a work in progress for many of my students, but these moments of struggle are necessary steps in their growth. While the CERs weren’t perfect, they showed effort and emerging skills, and I see improvement as we continue practicing.
Wrapping Up with Retrieval
To close, we circled back to a 3-minute Gimkit, reinforcing what we’d learned and giving students a sense of progress by ending with something familiar and fast-paced.
Reflection: A Mix of Wins and Areas for Growth
My students excelled at the DOK 1 tasks—reviewing, gathering information, and sharing details—but evaluating and ranking battles (DOK 2) proved more challenging. CER writing continues to be a struggle, as expected, but it’s something we’ll keep practicing. The process of grappling with these higher-order tasks is just as important as the end result. Overall, the day offered a mix of engagement, content-building, and opportunities for growth, which is exactly what I want as we head toward the end of the unit.
Tuesday: Treaty of Paris of 1783
Today was all about the Treaty of Paris of 1783, and we explored its impact through visuals, questioning, and perspective-taking. This pivotal moment in history not only marked the end of the Revolutionary War but also set the stage for a newly independent United States. My goal was to hook students with curiosity, guide them through the key agreements, and challenge them to think critically about the treaty’s outcomes.
Starting with Wicked Hydra: Hooking Curiosity
We began with Benjamin West’s famous unfinished painting of American diplomats at the Treaty of Paris. Using the Wicked Hydra protocol, students generated questions about the painting. Predictably, many asked whether Benjamin Franklin was in the painting and why parts of it were blank or cloudy. Wicked Hydra is one of my favorite ways to start a lesson because it taps into students’ natural curiosity and frames their questions as an integral part of the learning process. I deliberately designed the lesson to answer many of their questions, creating a sense of anticipation and connection as the day progressed.
Treaty Reading, Sketch and Tell-O, and Summarizing
Next, students read a one-page summary of the Treaty of Paris. I used a concise reading to make the content manageable, focusing on three key agreements of the treaty. To reinforce comprehension, students sketched out each agreement using a Sketch and Tell-O, pairing visuals with concise explanations. Sketch and Tell-O not only keeps students engaged but also helps them process information in a way that sticks. After sketching, students wrote a brief summary, which encouraged them to synthesize what they’d learned and translate it into their own words.
Mapping Boundaries: Visualizing the Treaty’s Impact
To make the treaty’s outcomes more concrete, we turned to a map showing the boundaries established by the agreement. Students read three short descriptions outlining the boundaries for Spain, the United States, and Britain, then colored the map accordingly. This activity was an eye-opener—it highlighted just how challenging spatial reasoning and interpreting written directions can be for middle schoolers. Even with labeled sections on the map, many struggled. While it wasn’t smooth sailing, it was excellent practice for connecting textual information with geographic visuals, a skill they’ll continue to develop.
Ending with Perspective: A 2xPOV Activity
To wrap up, we revisited the painting and engaged in a 2xPOV protocol. Students wrote from the perspective of the American diplomats in the painting, reflecting on the significance of the treaty and their feelings about independence. Then, they switched to the perspective of the absent British negotiators, imagining their thoughts on the loss of the war and the new boundaries. This exercise pushed students to consider the treaty from multiple viewpoints, fostering empathy and critical thinking about the complexities of peace negotiations.
Reflection: A Mix of Wins and Growth Opportunities
The Wicked Hydra and Sketch and Tell-O were clear wins—their questions and sketches showed curiosity and a solid grasp of the treaty’s major points. The mapping activity, while a struggle, was valuable practice in connecting abstract agreements to tangible visuals. The 2xPOV activity challenged students to think beyond surface-level facts and put themselves in the shoes of the historical figures involved, a skill that’s key to understanding history as more than just events and dates.
Wednesday: The Contributions and Paradox of Marginalized Groups in the Revolutionary War
Today’s lesson was about bringing the voices of marginalized groups into the narrative of the Revolutionary War, a story that often centers on the contributions of white men while sidelining others who played critical roles. Ohio’s standards emphasize the importance of teaching how different groups—enslaved people, women, and Native Americans—contributed to the war’s outcome. However, our textbook provides only a brief mention of women and an even smaller nod to enslaved people, leaving an enormous gap to fill.
Introducing the Paradox: Fighting for Freedom
As I prepared for this lesson, I wanted students to grapple with a critical paradox: How did these marginalized groups help secure freedom during the Revolutionary War, only to be denied that freedom in the new nation they helped create? It’s a difficult, uncomfortable truth, but it’s also an opportunity to make history more inclusive and meaningful. My goal was to push students to think about this contradiction and see history as more than just dates and events—it’s a collection of human stories, struggles, and injustices.
Building Context with a Frayer Model: Defining “Marginalized”
We began by unpacking the term marginalized using a Frayer model. Defining the word gave students the vocabulary to frame the lesson and helped anchor their understanding of how these groups were treated during and after the war. Adding examples and characteristics brought the abstract concept to life, setting the stage for our deeper exploration.
Sketch and Tell-O: Contributions and Denial of Freedom
Next, students read a passage I created by combining textbook excerpts and additional information generated with AI. I asked AI to fill in the gaps, highlighting both the contributions of marginalized groups and the freedoms they were denied after the war. The students then completed a Sketch and Tell-O, choosing one group to illustrate both their contributions to the war and an example of the freedoms they were denied afterward. This activity gave students a way to process the information visually and reflect on the paradox of fighting for freedom while being excluded from it.
Engaging Perspectives: Interviewing Historical Figures with AI
To take things further, I introduced a Frayer model activity where students “interviewed” a historical figure. Using Claude AI and Magic School Chatbot, I created personas for James Lafayette, Abigail Adams, Deborah Sampson, and members of the Oneida. While I’m cautious about using AI for marginalized perspectives due to potential bias, I carefully tailored the instructions to avoid harmful stereotypes and ensure the responses were appropriate for 8th graders.
Students chose a figure, conducted interviews, and completed the Frayer model, answering questions about the figure’s contributions to the war, their treatment during and after the war, and their legacy. This interactive component allowed students to step into the shoes of these individuals and gain a deeper understanding of their experiences.
Closing with Reflection: Living the Paradox
To conclude, I asked students to reflect on what it might have been like to fight for freedom yet be denied it in the new nation they helped create. We discussed examples such as being forced back into slavery, having one’s land taken away, or being excluded from voting. This reflection aimed to connect students emotionally to the historical content, fostering empathy and critical thinking about the inequities that shaped early America.
Reflection: Teaching Beyond the Textbook
Today’s lesson was a powerful reminder of the importance of teaching history as a collection of diverse stories. While the textbook offers a narrow view, using AI and creative protocols like Sketch and Tell-O and historical interviews allowed me to broaden the narrative and engage students in meaningful ways. Grappling with the paradox of marginalized groups is challenging, but it’s a necessary step in helping students understand history’s complexities and injustices. I’m hopeful that today’s lesson planted seeds for deeper thinking and more inclusive perspectives in our classroom conversations.
Here’s the updated blog post for Thursday:
Thursday: Reviewing with Brain, Book, Buddy, Boss
Today was a review day, and we used one of my favorite protocols: Brain, Book, Buddy, Boss. This time, we approached it through multiple-choice questions to reinforce key content from the Revolutionary War unit while encouraging collaboration, self-reflection, and deeper understanding.
Setting Up the Process: Brain, Book, Buddy
Students began by dividing their paper into three columns. I provided 16 multiple-choice questions, covering everything from Revolutionary War battles to the Treaty of Paris. Here’s how the protocol unfolded:
Brain: In the first column, students answered the questions independently without any help. This initial attempt was purely from memory, and I asked them to highlight or star any questions they were unsure of as they worked through the set.
Book: Next, students used their notes, sketches, and completed EduProtocols to review the questions they’d flagged. In column two, they wrote down the updated answers they found using these resources. This step not only reinforced their retrieval skills but also encouraged them to connect back to the activities and materials we’ve worked on throughout the unit.
Buddy: Finally, students compared their answers with a partner, writing their final answers in column three. Any discrepancies between their answers sparked a discussion, requiring students to explain their reasoning and come to an agreement. These discussions were phenomenal—students were engaged, asking each other questions, and even revisiting their notes to back up their arguments. The teamwork was inspiring and exactly what I hoped to see.
Grading and Analyzing Progress
At the end of the activity, I revealed the correct answers and had students grade themselves for each column. The goal was to reflect on what they knew independently (Brain), how much they improved with resources (Book), and whether collaborating helped them refine their understanding (Buddy). For most students, the progression showed clear improvement, but there were a few surprises—some students actually scored lower as the columns progressed! I chalk it up to the unpredictability of middle school thinking; sometimes overthinking or misunderstanding during the Buddy phase can derail what they initially got right.
Wrapping Up with Gimkit
To close the day, we played a Gimkit to reinforce the content we’d reviewed. The class averages—83%, 86%, 86%, and 90%—showed strong growth and confidence. Gimkit remains a favorite because it blends competition and repetition, making review both effective and fun.
Reflection: Balancing Independence and Collaboration
Today highlighted the balance between independent thinking and collaborative learning. Students showed strong effort in the Brain and Book phases, and the Buddy discussions pushed them to explain their reasoning and build consensus. Even when some students scored lower after collaborating, the discussions were valuable in fostering deeper thinking and reinforcing the importance of justifying answers.
The self-grading piece was especially powerful, giving students immediate insight into their progress and areas for improvement. Middle school is a mix of surprising growth and moments of “What just happened?” but that’s what makes it such a rewarding process. Overall, today was a win for reflection, review, and meaningful teamwork.
Friday: Assessment and Connecting the Revolutionary War to Local History
Today was a mix of assessment and transition, as we wrapped up the Revolutionary War unit and began looking ahead to the creation of a new country. With ties to local history, the lesson aimed to connect the broader narrative of the war to something more personal and tangible for my students.
Assessment: Gimkit and Short Answer
We started the day with a dual-format assessment. I set up a Gimkit assignment with 17 questions that stopped automatically when students completed it, giving them a focused goal. Alongside the Gimkit, I included two short-answer questions on paper, asking students to synthesize key ideas from the Revolutionary War unit. They had 20 minutes to finish both tasks, balancing their time between the two formats. After collecting their papers and recording scores, we transitioned to the second part of the day.
Number Mania: Local Connections to Revolutionary Veterans
For our next activity, we explored a transitional topic: Revolutionary War veterans settling in Ohio. I found a fantastic article from the Clermont Sun newspaper detailing how land in Clermont County and surrounding areas, including Hamilton and Brown counties, was granted to veterans as payment for their service. This topic is personal for me because my family has farmed Revolutionary War land in Clermont County since it was granted to my ancestors. Sharing this personal connection brought a human element to the lesson and helped students see how national history ties directly to their local area.
Like all Number Mania activities, I began with a statement for students to prove: “Clermont County became a significant settlement area for Revolutionary War veterans, who were paid in various ways for their service.”
We read the article together, and students highlighted four numbers and corresponding facts that supported the statement. Using these numbers, they designed slides that visualized the information in a clear and compelling way. This task combined reading comprehension, critical thinking, and design skills, making it a great way to bridge content areas.
Wrapping Up with Insights
With five minutes left, I revealed eight possible numbers that could have supported the statement, giving students a chance to compare their choices with other possibilities. This final step sparked discussion about what makes evidence strong and how different pieces of information can support the same claim.
Reflection: Bringing History Home
Today’s activities were a meaningful way to connect national history to local significance. The assessment gave students a chance to show what they’ve learned, while the Number Mania tied the Revolutionary War to their own community’s roots. The personal connection—especially sharing my family’s Revolutionary War land story—added a layer of authenticity and relevance that helped students see how history shapes the places we live today. As we move forward into the new country’s formation, I hope this connection inspires them to think critically about how the past continues to impact the present.
This week focused on building a strong base for our Revolutionary War unit through EduProtocols and engaging activities. We used Gimkit rounds to reinforce key vocabulary, Thick Slides to explore foundational ideas like government’s role, and Brain-Book-Buddy-Boss for structured retrieval practice. Midweek, students independently analyzed the Declaration of Independence, paraphrasing and summarizing key passages.
By Friday, we launched into the war itself, pairing Sketch and Tell-O with a Choose Your Own Adventure as Continental soldiers and a creative Funko Pop project. These varied protocols helped make complex history accessible and memorable, laying the groundwork for deeper exploration of the Revolutionary era.
This week, we continued our journey into the Declaration of Independence, working to break down complex ideas and bring clarity to an iconic but challenging text. The goal was to keep the Declaration manageable, balancing cognitive load with targeted analysis. I aimed to help students connect with the key concepts through consistency, vocabulary focus, and engaging paraphrasing work. Here’s a look at how it unfolded.
Breaking Down the Declaration
We picked up with the Declaration, focusing on why it was created, who was involved, and what it outlined for the future of governance. Knowing the text can be overwhelming, I broke it down into digestible sections—five key excerpts, starting with its description of government’s role. This approach allowed students to work with smaller, manageable parts and helped me pace the class to keep focus high.
We kicked off with a Gimkit review of core vocabulary from the Declaration—terms like political bands, unalienable, endowed, self-evident, usurpations, and tyranny. Running Gimkit in short rounds gave students a fast-paced vocabulary review; after three minutes, I provided quick feedback and immediately launched another round to reinforce retention.
Parafly: Paraphrasing with Scaffolding
Moving into the Parafly activity, I used Socrative to facilitate the paraphrasing practice. To get students warmed up, we started with random trivia and fun animal facts, adding some lighthearted engagement before diving into the Declaration’s text. I then introduced the five excerpts, inviting students to either paraphrase the original or work from a simpler translation if needed—an approach inspired by my special education background to support all learners. I pointed out the relevant vocab terms as we went along, helping to connect meaning and context in real time.
The Parafly took a bit longer than expected, with students getting involved in the layers of meaning within each excerpt. Although I aimed for a fast pace, I found it rewarding to see their focus as they grappled with language and intent.
Wrapping Up with Vocabulary Reinforcement
With time running out, we returned to Gimkit for a third and final round. It reinforced our vocabulary in a quick and dynamic way, although we didn’t quite make it to the Thick Slide summary I’d planned to close with. Still, seeing their engagement and progress with the Declaration was a win.
The week’s start has been a balance of repetition and exploration, and the students are beginning to see the Declaration not just as words but as ideas that shaped history. EduProtocols like Gimkit and Parafly have helped make the content accessible, and I’m looking forward to building on this foundation in the days ahead.
Tuesday
While I presented at an AI conference, my students worked independently on two key areas: wrapping up our exploration of the Declaration of Independence and diving into a basic introduction to the Electoral College for Election Day. With both activities, my focus was on reinforcing their understanding of purpose and process in government while also beginning the slow shift away from traditional worksheets.
Thick Slide: Synthesis and Locke’s Influence
For the Declaration, I left a Thick Slide assignment designed to help students synthesize what they’ve learned. They were tasked with listing three facts about the Declaration, explaining why it was written, and defining the purpose of government. To add a layer of historical analysis, I had them find a quote reflecting John Locke’s influence and select an image that could show King George’s reaction to the Declaration. It was an opportunity for them to connect the ideas we’ve been exploring and to bring a bit of creativity into the mix.
Election Day Connection: Electoral College Intro
Given the significance of Election Day, I added a brief lesson on the Electoral College. I provided a simple reading, a set of questions, and an Edpuzzle video to introduce the basics. While I’m gradually moving away from basic worksheets, I recognize that some students are accustomed to this format and often gravitate toward it. The goal is to phase out these simpler resources without overwhelming them—a gradual balance of cognitive load and new skills.
Most students completed the Electoral College worksheet, but the Thick Slide remained unfinished for many. I’d hoped they’d prioritize the slide, but I understand that their inclination toward worksheets is simply a comfort zone I’m working to expand. Since the Thick Slide is key to consolidating their learning on the Declaration, we’ll wrap it up together on Wednesday.
The day was a reminder that gradual shifts in learning habits take time. As we move forward, I’ll keep guiding students toward deeper reflection and away from surface-level tasks. It’s a process, but it’s encouraging to see their growing confidence with more complex activities like the Thick Slide.
With the end of our unit in sight, Wednesday was dedicated to solidifying knowledge and preparing for what’s next. We began with a Gimkit review covering British taxes, colonial protests, and the Declaration of Independence—an all-in-one refresher to activate students’ memory of the unit’s main ideas. Following that, students completed the Thick Slide they’d started on Tuesday, giving them 12 focused minutes to synthesize their understanding before moving into our big review activity: Brain-Book-Buddy-Boss.
Brain-Book-Buddy-Boss: A Layered Approach to Review
This review approach remains one of my favorites because it gives students multiple ways to retrieve information, collaborate, and clarify. Each part of the protocol has a unique focus:
Brain: Students started with 10 minutes of solo retrieval, jotting down everything they could remember from the unit. It’s a powerful way to see what truly “stuck” from the lessons.
Book: Using the EduProtocols we completed, students had 12-15 minutes to revisit their notes and review resources. This stage encourages them to reflect on what we covered together and reinforces their recall with structured material.
Buddy: Partnering up, students spent 8-10 minutes discussing and cross-checking their answers. This peer support helps bridge gaps in understanding and often leads to those “Aha!” moments.
Boss: Finally, students could ask me questions for eight minutes. I set a timer and told them that when the timer was up, so was the Q&A—creating a sense of urgency and encouraging focused, meaningful questions.
Reflections on Class Differences
It’s always intriguing to see how each class performs during Brain-Book-Buddy-Boss. Some groups had extensive recall during the Brain phase, while others needed more time with their notes. These variations make me think critically about my own teaching—was something presented differently, or did attendance play a role? Each class brings its own dynamic, and this reflection helps me adapt and refine my approach for next time.
Overall, today’s review reminded me of the power of structured retrieval and peer collaboration. By giving students a framework to recall, reflect, and refine, I saw their confidence grow as they connected the dots across the unit. It’s a gratifying way to close a chapter and prepare for what’s ahead.
Today, I was out of the classroom, but I set up a dual assessment to gauge students’ understanding of our unit on colonial unrest and independence. Knowing that my students were well-prepared after multiple reviews and practice with the material, I felt confident leaving them with activities that encouraged both quick recall and deeper analysis.
Self-Paced Gimkit Review
I kicked off their assessment with a Gimkit assignment set to complete when students answered 20 questions correctly. I like this self-paced approach because it adapts to students’ mastery levels—those who know the content can finish quickly, while others get more repetitions to reinforce their learning. The class averages came in at 83%, 80%, 74%, and 86%. The 74% average in one class stood out to me, given the number of review sessions we’ve done. It’s something I’ll need to revisit to ensure we’re addressing any lingering gaps.
Thick Slide: Independent Analysis
For the second part of the assessment, I left a Thick Slide assignment designed to capture various levels of understanding (DOK 1, DOK 2, and DOK 3). On the Thick Slide, students had to:
Create a title and subtitle.
Find an image illustrating the colonists’ desire for independence and explain it in a caption.
Compare Loyalists to the Sons of Liberty.
Identify and describe two British taxes.
Select a quote from the Declaration of Independence that reflects Enlightenment influence.
This mix of tasks allowed them to showcase both foundational knowledge and analytical skills. Despite my absence, 83% of students were able to complete the Thick Slide, which was encouraging. It’s rewarding to see them synthesize information independently and apply key concepts we’ve covered.
Today’s self-paced setup allowed for some great insight into both their grasp of the material and areas where we might need to focus more in future lessons. The combination of Gimkit for quick recall and the Thick Slide for deeper analysis created a balanced assessment that catered to different learning strengths.
Today marked the beginning of our Revolutionary War unit, and I used a blend of strategies to introduce core vocabulary, guide focused reading, and foster creative engagement with historical content. From targeted vocabulary practice to a Choose Your Own Adventure activity, each step was designed to give students multiple entry points into understanding the complexities of the Continental and British armies.
Gimkit Vocabulary Practice and Strategic Reading
We started with a Gimkit focused on essential terms like minutemen, Continental Army, and Redcoats—words they’ll see repeatedly as we dive deeper into this period. After running through the questions, I reviewed the most commonly missed terms, helping to solidify their understanding. I then had students skim the reading to locate these terms in context, connecting vocabulary to real content.
For the reading, I handed out a streamlined, one-page document that highlighted the strengths and weaknesses of both armies. (Our textbook dedicated three pages to this, but I find that a more concise approach keeps students focused and reduces cognitive load.) I prompted them with, “How long should it take to read this?” Responses varied from 5 to 10 minutes, so I set a 4-minute timer to add a sense of urgency and purpose. Their goal: highlight one strength and one weakness under each heading, keeping their focus clear and purposeful. By giving them a structured task with a set time frame, I aimed to improve both their reading efficiency and comprehension.
Sketch and Tell-O: Visualizing Key Points
With their highlights in hand, students moved on to a Sketch and Tell-O, where they created four quick sketches representing the key points they’d just highlighted—one for each strength and weakness. Importantly, they did this without looking back at the reading, challenging them to recall and process the information in a new way. After sketching, they discussed their drawings with a partner, building verbal communication skills and reinforcing the content through peer-to-peer explanation. This was followed by a summary writing task, helping them consolidate their understanding in their own words.
Immersive Learning with Choose Your Own Adventure & Funko Pop Creation
To cap off the day, we turned to an engaging, interactive Choose Your Own Adventure experience inspired by Mike Meehan (@MrMeehanHistory). Students stepped into the shoes of a Continental or minuteman soldier, making choices to navigate the realities and hardships of Revolutionary War life. This approach gave students a more personal connection to the material, encouraging empathy and a deeper grasp of the soldiers’ experiences.
As a creative wrap-up, students crafted their own Funko Pop soldier. They incorporated the strengths, weaknesses, and lifestyle aspects they’d learned throughout the lesson, transforming the facts into a personalized, imaginative artifact. This final activity allowed them to express their understanding in a tangible, visual way and capped off the lesson with a memorable project.
Each part of the lesson was carefully structured to balance cognitive load and engagement. The use of concise readings, strategic highlights, timed tasks, peer discussion, and hands-on creativity gave students multiple modes to interact with the content, making the start of our Revolutionary War unit both educational and memorable.
This week was all about keeping engagement high and adapting to student needs with a strong lineup of EduProtocols. We started by wrapping up our government voice inquiry with a Thick Slidesummary and fast Gimkit reviews, then dived into Sketch and Tell-o on Loyalist perspectives and Enlightenment ideas with Parafly paraphrasing exercises. Thursday’s Halloween twist saw students using Number Mania for the Declaration of Independence, while Friday’s low attendance turned into a lively Gimkit Draw session and creative Retell in Rhyme exercise on Disney movies and daily topics. EduProtocols once again carried the week!
After missing Friday, I came back on Monday to discover that my inquiry lesson on the importance of having a voice in government hadn’t gone as planned. I had used AI to simplify the primary sources into 7th-grade-friendly readings, hoping this would keep students engaged and make the sources more accessible. But when I checked Google Classroom, only a handful of students had completed the work. The inquiry went deeper than expected, and without support, the substitute likely couldn’t guide students through the challenge.
Regrouping with Purpose
Rather than diving into low scores or assigning blame, I chose a reset. I’m not one to pass off low marks without offering students a real chance to understand. So, we tackled the primary sources together, discussing the background and importance of each source and connecting them back to our essential question: Why is it important to have a voice in government? We used this discussion to explore representation, power, and fairness—all critical ideas that lay the groundwork for the events leading to the American Revolution.
Thick Slides to Synthesize Learning
For our wrap-up, I had students create a Thick Slide summary on what they’d learned. Thick Slides have proven incredibly effective in helping students distill complex concepts into concise, visual representations, and the students did a fantastic job as usual. The content breakdown clearly helped, and it was rewarding to see them engage with and articulate these foundational concepts in such a clear way.
Reinforcing with Gimkit
We wrapped up with a Gimkit Fast and Curious to reinforce everything we’ve covered, from British taxes to the French and Indian War and the growing tensions with Britain. Class averages hit between 80% and 90%, showing that sometimes all we need is a little extra time to reset and regroup. It was a solid reminder of the power of building understanding, even when things don’t go as planned.
With classes reduced to around 45 minutes, I knew our lesson had to be both quick and effective. This made the Loyalist primary source lesson from the Digital Inquiry group a perfect choice. I adapted the sources with AI, preserving the primary source feel but bringing the language down to a level that worked for 8th graders. My goal was to shift focus and challenge students to consider an often-overlooked question: Why would some colonists choose to stay loyal to Britain, despite rising revolutionary sentiments?
Setting the Scene with Inquiry and Quick Retrieval
We started with an inquiry warm-up: “We’ve been discussing how the Sons of Liberty protested British rule. What do you think might cause someone to stay loyal to King George instead?” After sharing some predictions, we moved into a Gimkit for a brief but focused review of vocabulary like Loyalist, Patriot, and other terms they’d encounter in the readings. I wanted to ensure they had the basics down before diving deeper.
Document Analysis in Action
Students then moved to Document 1, where they filled out an organizer, closely reading the text, sourcing the information, and contextualizing it in terms of its historical moment. We repeated the process with Document 2, helping students see the range of reasons people might remain loyal. Finally, we had them corroborate the two sources to find connections, patterns, and any differences in Loyalist reasoning. This built their analytical skills and brought out critical thinking as they explored motivations and biases.
Wrapping It Up with Sketch and Tell-o
For our final task, students engaged in a Sketch and Tell-o activity, visualizing three reasons for Loyalist loyalty and summarizing each one. This combination of analysis and creativity is really where their understanding shines—they don’t just read; they actively process and illustrate their learning.
We ended with a quick Gimkit for further retrieval, although the class averages varied, thanks to the adjusted schedule and excitement of a different day. The students really took to this shift in perspective and showed curiosity about how Loyalists made their choices. Even in a shorter time, they walked away with a new layer of insight into the diversity of colonial perspectives.
With a return to our usual schedule, we jumped right into two big topics: The Enlightenment and the Declaration of Independence. These foundational ideas helped shape American ideals, and I wanted to make them accessible and memorable for the students using some targeted EduProtocols.
Starting Strong with Fast and Curious
We started class with a Gimkit Fast and Curious, tackling key Enlightenment terms and early concepts from the Declaration of Independence. I kept this session short—just three minutes—and then gave feedback to help clarify terms. It was a quick but effective primer, setting the stage for the day’s deeper dive.
Frayer Fun: Enlightenment and John Locke
Then, we turned to the Frayer Model for the term “Enlightenment.” Students rewrote a definition in their own words, listed characteristics, and found a symbolic image. This helped break down the big concept, and I could tell from their summaries that they were getting it.
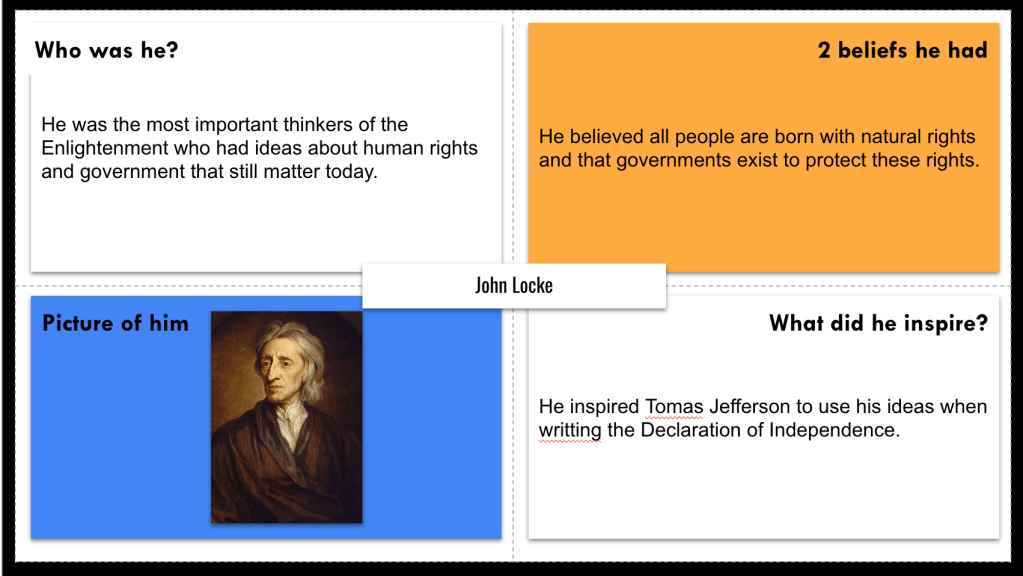
Next, we moved into a Frayer on John Locke. While I usually would bring in the Archetypes protocol to help link Locke’s ideas with Enlightenment ideals, I decided to keep it simple this time. Instead, students listed his beliefs, noted his influence, and added an image to represent him. This exercise anchored Locke as a key influencer on American revolutionary thought.
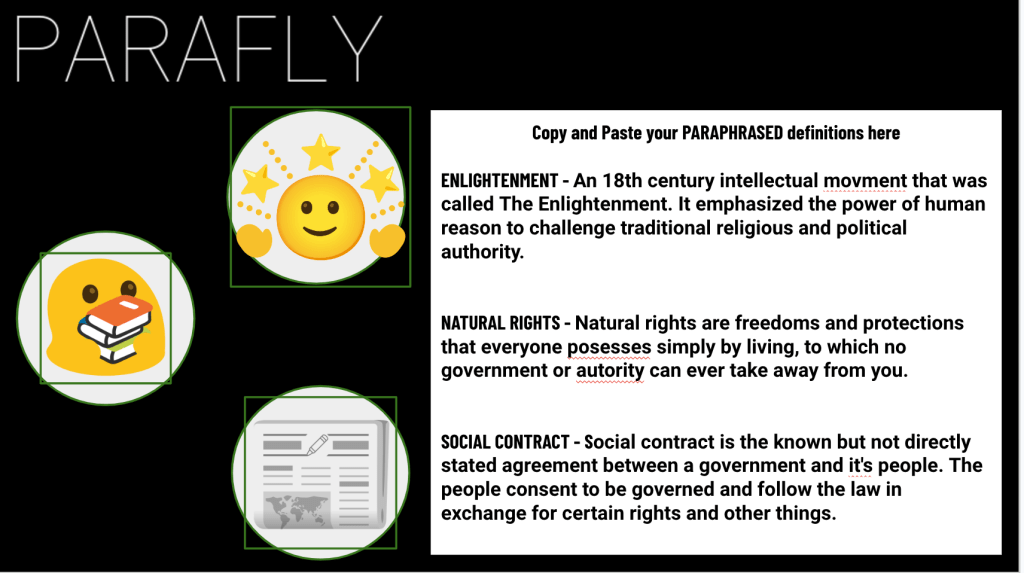
Parafly Protocol: Making Paraphrasing Fun
Then came Parafly, an EduProtocol that introduces students to paraphrasing in a super engaging way. I used Socrative to share fun sentences about topics like Halloween, quirky facts, and even SpongeBob, to warm them up to the idea. After reviewing strategies like using synonyms, simplifying, and rearranging sentences, I gave them two minutes to submit their paraphrases. Then, we voted on each round, and I provided feedback. The excitement and engagement levels were high. At one point, a student even said, “This is fun. Can we keep doing this?” They were totally absorbed—in paraphrasing, of all things!
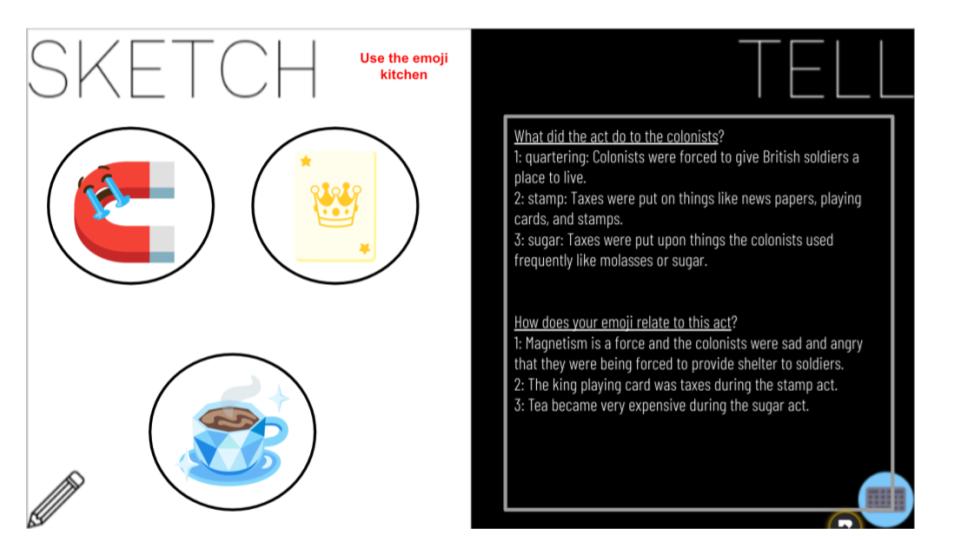
We wrapped up Parafly by shifting focus to key terms like “Enlightenment,” “Natural Rights,” and “Social Contract.” Students paraphrased each term and then brought in some creative flair by using Emoji Kitchen to design custom emojis representing their ideas on a Sketch and Tell slide.
Wrapping with Another Fast and Curious
To end the day, we circled back to the Gimkit Fast and Curious from earlier, this time to see growth after our review of the terms. Seeing their scores rise was the perfect way to close out the lesson, with students clearly connecting to these revolutionary ideas.
This mix of creative, structured, and interactive protocols turned some abstract concepts into tangible understandings, with Parafly paraphrasing emerging as the highlight of the day.
Halloween and an observation on the same day? No problem—EduProtocols to the rescue! Two weeks back, I’d casually agreed to a Thursday observation without realizing it fell on Halloween. Despite potential holiday distractions, I knew the structured and interactive protocols would keep us on track and meet the standards for my evaluation.
Kicking Off with a Fast and Curious on Independence
We began with a Gimkit Fast and Curious on the Declaration of Independence. This activity set the stage, refreshing students on key terms and events as we eased into the historical focus of the day. With classes in good spirits, I projected a Google Maps Street View image of Independence Hall to add some context. Seeing the actual site where the Declaration was signed gave everyone a sense of place, grounding our conversation in the moment of 1776 and shifting attention from Halloween to history.
Halloween Twist: A “Declaration Signer” Meme
Keeping things festive, I introduced an activity that blended Halloween fun with historical context. Students created a Halloween costume meme (EMC2Learning) for a “Declaration signer.” We talked through some “accessories” these costumes might need—powdered wigs, quills, maybe even parchment or lanterns. This meme-building activity was a hit! It allowed students to engage with historical figures through a lighthearted lens and provided a creative outlet that still tied back to the Declaration. The students brought some great ideas, and our meme creations lasted about 15 minutes.
Main Event: Number Mania on the Declaration of Independence
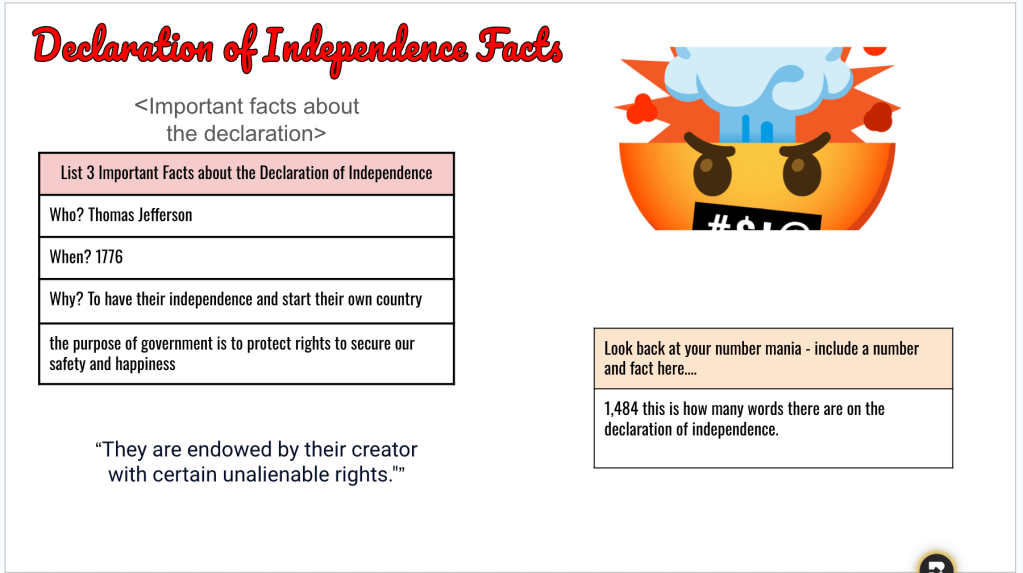
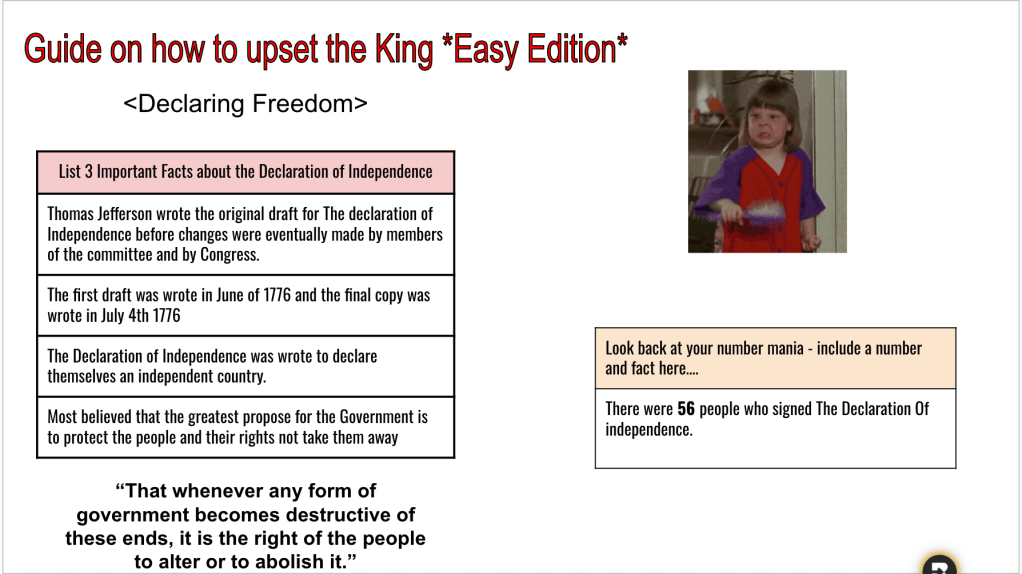
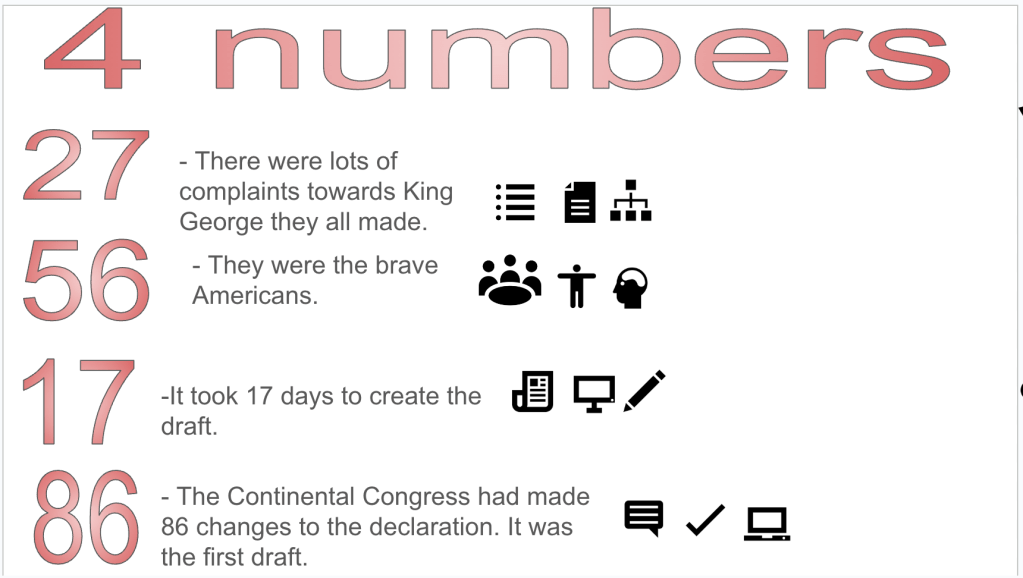
With focus re-centered, we dove into our main EduProtocol for the day: Number Mania. I started by sharing the quote: “The Declaration of Independence showed how the American colonists were willing to risk everything to create a new government that protected people’s rights. They carefully planned a way to explain why they wanted to be free and what they believed about human rights.”
Students read through our text, highlighting four specific numbers or statistics that supported the ideas within the quote. They then designed a visual infographic. Having practiced Number Mania with the Boston Tea Party, students were ready to go and applied themselves well—this time the numbers came together even faster.
Wrapping Up with Fast and Curious
Finally, we circled back to another Gimkit Fast and Curious for a quick review. Students’ Gimkit averages were up across the board—our rounds in the morning paid off with solid comprehension by day’s end. Between Gimkit, our “costume” meme, and Number Mania, EduProtocols helped guide the class from start to finish and make my observation a success. Nothing like a combination of creativity and rigor to wrap up Halloween with history and high engagement!
Friday
With attendance looking rough the day after Halloween, I knew diving deep into the Declaration of Independence wouldn’t hit the mark, so I pivoted to something lighter and more interactive. The goal was to keep students engaged without overwhelming them—sometimes you just have to read the room and adapt.
Gimkit Draw Mode: American Revolution Edition
We kicked things off with a crowd-pleaser—Gimkit Draw mode. This random-student-draws, classmates-guess format brought the energy up immediately. To keep it connected to our content, I had AI generate a list of simple, Revolution-related terms for students to draw, like “stamp,” “tax,” and “musket.” The guessing was quick, and even the less artistic students loved the challenge. This activity was perfect for the post-Halloween lull and reminded everyone that history doesn’t always have to be a quiet read-through.
Rhyming Games with Disney and Rhyme Scheme
Next, we switched gears to a quick exercise on rhyme schemes with a Disney twist. Using rhyming couplets about Disney movie plots (thanks again, AI!), we turned it into a guessing game. This light activity led to a discussion about rhyme schemes and couplets, and everyone had fun trying to guess the movie based on the rhyme.
Retell in Rhyme: The Challenge of Writing in Pairs
Inspired by our Disney activity, I introduced Retell in Rhyme. Students chose a favorite Disney movie and worked in pairs to craft a summary in rhyme with six couplets. Some classes took to it and got really creative; other classes found the rhyming tougher than expected, and I could feel the energy dip. For those groups, I pivoted: instead of summarizing a movie, I had them write couplets about everyday topics like “morning routine,” “making a sandwich,” or “rainy days.” This tweak gave students a familiar foundation and helped them find their flow again.
This week in Room 234 was packed with a mix of EduProtocols, hands-on activities, and a focus on understanding colonial tensions. From Sketch and Tell-O for visualizing British taxes on Monday to analyzing historic protests with 8 Parts and Cyber Sandwich later in the week, each day brought something new. We tackled the Boston Tea Party with Number Mania to dig into key details and wrapped up with an inquiry lesson on “having a voice in government.” I even worked in guided notes—a rare move for me—to support their understanding of the British Acts. Each protocol helped keep the energy high while pushing students to think critically about the events leading up to the American Revolution.
Monday didn’t start out the way I’d planned. I wasn’t feeling well, but I managed to make it to school—until that weird feeling just took over and I had to head home. I can’t believe I’m saying this, but I ended up leaving…guided notes. 😳 Yep, the thing I swear I’m anti- guided notes. But sometimes, you’ve got to roll with what works for the kids you have this year, even if it’s not your ideal plan.
Guided Notes
I’m working with a student population that’s still getting used to taking ownership of their learning. So, while guided notes aren’t my go-to strategy (and honestly, something I’d like to phase out), they’re a starting point. I figured that leaving the notes would help the students review what we’ve already learned about British acts and taxes while introducing some new information like the Townshend Acts, Tea Act, and Intolerable Acts. I could’ve covered all the British acts and taxes at once, but knowing the group I have this year, I wanted to avoid overload. Small doses, steady progress—that’s the plan.
Sketch and Tell-o: Emoji Kitchen Edition
To follow up the guided notes, I left a Sketch and Tell-o activity. I had the students use the Emoji Kitchen to create visual representations of the British acts. The goal was for them to combine two emojis into one new emoji that represented each act, like using a tea cup and an angry face to illustrate the Tea Act. It’s a fun and creative way to get them thinking beyond the text, and I was hoping it would engage their imaginations a bit more than traditional worksheets.
Gimkit
I set up a Gimkit as an assignment and left it for them to complete. It was meant to reinforce the acts we covered, testing their recall and giving them that competitive, game-based edge they enjoy. I figured it was the perfect way to end the lesson independently—keeping it interactive even while I was out.
The Results: Progress, but We’ve Got Work to Do
Here’s what happened:
About 80% of students completed the guided notes, which isn’t bad considering it’s what they’re used to.
50% made it through the Sketch and Tell-o, which shows me they’re still warming up to that format.
Only 30% completed the Gimkit—but of that 30%, the overall average score was 82%, so they’re retaining the info, which is a positive takeaway.
Not the most productive day, but it’s progress. The plan is to ease them out of guided notes and into more interactive and student-led learning activities as the year goes on. We’re building stamina and confidence, one small step at a time. This class is growing—slowly but surely—and I’m adapting my approach to meet them where they’re at while pushing them forward. It’s all part of the journey.
Tuesday, I was back in action and ready to keep building on the momentum (even after a rough Monday). To really drive home the idea of British acts and taxes, I used a classic Mr. Roughton lesson called “Of Parents and Children.” It’s a gem that uses a humorous, relatable approach to connect the build-up of the American Revolutionary War with the students’ own experiences.
“Of Parents and Children”: Bringing the Revolution Home
In this lesson, the premise is simple but effective—compare historical events to everyday situations that students can relate to. I read scenarios that mimicked the British acts and taxes but presented them as if they were happening between parents and children. For example, one scenario had the “parents” making their child pay the family Netflix bill (which, of course, got a lot of groans and eye rolls). The students wrote down how they would feel if that happened to them—most of the responses ranged from “unfair” to “totally unreasonable.”
After each scenario, we flipped the script and connected it to the actual historical event, like the Stamp Act or Townshend Acts. The students then made connections between the two, understanding how colonists might have felt and why they were so angry. It’s always great to see the lightbulbs go off when they realize how similar these feelings of unfairness are to the colonists’ experiences.
Taking Longer Than Expected
The activity ended up taking longer than I anticipated—students were really into it, and we had some great discussions about fairness and control. We didn’t have time for all the follow-up activities I had planned, but the engagement and dialogue made it worth it. It was one of those moments when slowing down felt right, even if it meant changing the pace of the day.
Fast and Curious Wrap-Up
To wrap things up, we did a quick Gimkit Fast and Curious. It was a great way to reinforce what we’d discussed in a fun and interactive format. The class averages ranged from 90% to 76%, showing that even with a more hands-on, discussion-based approach, they were retaining the key information.
It was a solid day of learning that tied the content to something personal and familiar for the students, making the history feel less distant and more relevant. Onward to the next lesson! 💥🔥
Wednesday, I could tell the energy in the room was running low after all the talk about British acts and taxes. It was time to pivot and move on. I decided to shift the focus to how the colonists protested these taxes and why they chose to take action. And, to really hook them, I wanted to start with something dramatic—violence.
Kicking Off with a Hook: “The Bostonians Paying the Excise-Man”
To grab their attention right off the bat, I used the famous cartoon, The Bostonians Paying the Excise-Man. This picture tells a pretty wild story—perfect for keeping 8th graders interested while diving into the deeper meaning of protest and rebellion. I knew the image’s intensity would catch their eye and drive home the point that sometimes people resort to violence when they feel unheard.
I started the lesson with a quote on the board: “He picked off his charred skin, kept it in a box, and showed it to King George III to prove his loyalty.”
It was just the hook I needed. Eyes went wide, and hands shot up. The curiosity was sparked, and we were off to a solid start. This lesson was done entirely on paper because I’ve noticed that my students engage more with physical materials than with digital ones—so we’re rolling with what works.
8Parts: Analyzing the Cartoon
We kicked off with an 8Parts activity. The goal? Analyze the cartoon with no background information—just raw observation. I asked them to list nouns, verbs, adjectives, and adverbs they saw. This helped them start thinking critically without immediately jumping to conclusions. After they’d had some time to work through their observations, I filled them in on the historical context behind the cartoon and had them consider: Why would someone create this?
To wrap up the 8Parts, they crafted a summary using all the parts they had identified. It was cool to see them start piecing together how protest could turn violent and why.
Frayer Models: Sons of Liberty & First Continental Congress
Next up, we switched gears and worked on two Frayer Models—one for the Sons of Liberty and one for the First Continental Congress. I provided the Google definition for each term, but I wanted them to make it their own. They had to create their own definitions, jot down two examples of people they might have heard of who were part of each group, and sketch a picture to represent each one. It was a solid way to build context and give them some hands-on work that helped reinforce the key players in these protests.
CyberSandwich: The Story of John Malcolm
For the main event, we dove into a CyberSandwich about the cartoon The Bostonians Paying the Excise-Man. The story focused on John Malcolm, who was tarred and feathered by the Sons of Liberty. This narrative always grabs attention—it’s intense and dramatic, exactly the kind of thing that gets 8th graders engaged. They took notes using the who, what, when, where, why structure. They were all in, and you could see the gears turning as they made connections between the story and the broader context of colonial protests.
To wrap up the CyberSandwich, I tried something different. I had AI create a really bad summary paragraph for the students to fix. They nailed it—picking it apart, rephrasing, and turning it into something meaningful. It was awesome to see them take ownership of their corrections and really focus on improving the content.
The last task was to write a caption for the cartoon, but from the perspective of a British loyalist. This was a challenge for them. They struggled to switch perspectives, and it was clear that empathy mapping is still something we need to work on. But it’s all part of the process, and I’m confident that with more practice, they’ll get there.
Reflection
Wednesday was an active day that pushed the students to connect personally with history while developing key skills like analysis, summarization, and empathy. The energy in the room was definitely better, and I felt like the shift in focus was just what we needed to keep the momentum going. On to the next! 💥🔥
Thursday was all about continuing the theme of protest, shifting from violent and intimidation protests to destructive protests when people felt their voices weren’t being heard. Our focus? The Boston Tea Party—a classic example of colonists taking drastic measures to make their point.
Intro to Number Mania
I love using Number Mania for events like the Boston Tea Party, but I realized I hadn’t introduced this activity to my students yet. So, before diving into the history, I set up a practice round to get them comfortable with the concept.
To start, I had each student create a slide with 3 numbers that were significant to them. It could be anything—like their birthday, favorite sports jersey number, or the number of pets they have. Then, I taught them how to use Word Art, change colors and fonts, and add drop shadows to make everything pop on their slides. This creation time took about 12-15 minutes, but it was worth it. They got into the groove of designing and making their numbers stand out.
This step was crucial; it got them familiar with the process and built confidence so when we moved into the actual content, they’d feel ready.
The Real Deal: Boston Tea Party By the Numbers
With the practice under their belts, it was time for the real Number Mania experience. I had Claude (AI) create a “Boston Tea Party By The Numbers” reading. Of course, I fact-checked everything before handing it over to the students—got to keep things accurate!
To set the stage, I gave them a quote: “The Boston Tea Party was a massive and well-organized protest that required careful planning, involved many people, and had huge consequences.”
Their goal? Find 4 numbers and facts in the text that supported this quote. We read the text together, and they highlighted the numbers that stood out. Then, they created a slide with their findings, just like we practiced.
Success with Number Mania
Thanks to the practice run, they nailed it. I was hearing a lot of “This is easy!” as they worked, which is exactly what I want—confidence and engagement. They connected the numbers back to the larger idea of the Boston Tea Party being a well-planned protest, and it was great to see them make those connections independently.
This approach worked wonders. It wasn’t just about understanding the history; it was about reinforcing the process, building confidence, and making it feel achievable. We’re definitely keeping Number Mania in the rotation!
Onward to the next chapter in our revolutionary journey! 💥🔥
Friday was a day off for me, so I set up an inquiry lesson for my students—a deep dive into the question, “Why is it important to have a voice in government?” This inquiry question felt like the perfect way to wrap up everything we’d covered throughout the week about colonial protests, representation, and rebellion.
Tackling Inquiry with a Little Help from AI
Now, I actually like some of the inquiry lessons from the textbook, but the problem is they’re often a bit much. These lessons can be overly complicated, and many of the primary sources aren’t exactly written at an 8th-grade-friendly level. Sure, I want students to stretch their thinking and be challenged, but there’s a fine line. Most students don’t have the stamina for hours of “critical thinking” with material that feels too complex or abstract.
So, I decided to give this inquiry lesson a boost to make it more accessible. Here’s what I did:
Streamlining the Primary Sources: The lesson had five primary sources, so I took screenshots and ran each one through Claude AI. I asked it to rewrite the sources at a 7th-grade reading level, but still maintain the original tone and style. This way, the students could understand the essence without getting bogged down by archaic language.
Adding Context & Guiding Questions: For each source, I had the AI add context to set the stage—who wrote it, why, and how it fits into our big question. I also had it extract any guiding questions from the textbook and even create one additional question for each source to push the students’ thinking just a bit further.
Final Synthesis Question: The ultimate goal was for students to answer the question, “Why is it important to have a voice in government?” After they’d worked through the sources and guiding questions, they were meant to summarize their findings on a Thick Slide.
The Real-Life Results
Did most students finish the work on paper? Honestly, I’m not sure. I saw that about 30 out of 90 students got to the Thick Slide summary. My guess is that the majority were working through the sources at their own pace, which is totally fine. The focus was less on “getting to the end” and more on engaging with each source meaningfully.
This setup was a bit of an experiment, but I’d say it was worth it. Having simplified sources and targeted questions helped make the inquiry more manageable. Even if they didn’t all finish, I’m hopeful that they took away some understanding of why representation matters—a key theme we’ll keep building on as we move forward in our revolutionary timeline.
Sometimes, the demands of teaching and life outside the classroom can be overwhelming. This week, I felt the weight of it all. Trying to balance lesson planning, teaching, and taking care of my own well-being hasn’t been easy, but I’m doing my best to carve out moments for myself to stay sane. Still, Tuesday’s lesson reminded me that, despite all the challenges, we’re making progress—one step at a time.
Our focus for the day was colonial government, diving into how the colonies were left to create their own systems under England’s “salutary neglect.” It was a great opportunity to make connections between historical events and the structures the colonies built, giving students a look at the roots of American government.
We kicked things off with a Gimkit review to get the students’ minds engaged. The scores were rough—class averages came in at 49%, 60%, 65%, and 68%. Not exactly the strong start I was hoping for, but it set the tone for what we needed to work on. It’s all about growth, and sometimes seeing those lower numbers is the push we need to make improvements.
Map and Tell: Visualizing Space and Context
Next, we did a Map and Tell activity. I wanted students to make the observation that England was far away from the colonies. This helped us place the lesson in the context of distance and the impact of England’s hands-off approach, leading to salutary neglect. It’s one thing to tell them the colonies were left to manage themselves; it’s another to show them the physical distance on a map and let them connect the dots themselves.
Pyramid of Power: Visualizing Colonial Structure
To reinforce the concepts, we filled out a pyramid showing the power structure in England versus the colonies. The top half of the pyramid was England, with the king and Parliament. The bottom half showed the 13 colonies with their elected assemblies and town meetings. This was my attempt to help them visualize how the government was structured differently on either side of the Atlantic. We also tied this back to mercantilism, which we covered last week, emphasizing how England’s focus on economic gain allowed the colonies to develop their own political systems.
Thin Slides: Chunking Colonial Government
After the pyramid, I had the students use a Justin Unruh Thin Slide to work through chunked readings about the different foundations of colonial government, like the Magna Carta, Mayflower Compact, House of Burgesses, English Bill of Rights, and Fundamental Orders. The goal was to have them engage with keywords and summarize these concepts visually.
But this is where things got tricky. The kids seemed overwhelmed by the task. I chunked the material into five slides, thinking it would make the information manageable, but even this proved daunting for them. I timed each slide at 5-6 minutes, but it felt like I was pushing a boulder uphill—students were struggling to keep up, and engagement was low. I tried to step in, reading the content aloud and shifting to an “I do, we do, you do” model, hoping to guide them through it.
By the time I got to the second half of the day, I realized I needed to adjust. I switched the Thin Slide activity to paper. It was a simple move, but it made a huge difference. With the material in front of them and fewer distractions, the kids seemed more settled, and the pace was smoother. It’s a reminder that sometimes we have to adjust and find what works best for our students, even if it means veering from the plan.
Wrapping Up: Finishing with Gimkit
To close out the lesson, we went back to Gimkit for a final review. This time, the class averages were better—70%, 80%, 74%, and 72%. It wasn’t a dramatic jump, but it showed progress, and that’s what I’ll take away from this day.
Reflections: Learning and Adjusting
It wasn’t the most productive day, and that’s okay. Some lessons flow smoothly, and others remind us that teaching is a constant process of trial, error, and adjustment. Switching from digital to paper was the right call, and it’s something I’ll keep in mind moving forward. If a strategy isn’t working, I have to be flexible enough to try something new in the moment.
It’s all about finding the balance—both for my students and for myself. Whether it’s adjusting lessons on the fly or taking a deep breath to center myself before the next class, I’ll keep moving forward. Sometimes, it’s about embracing the small wins—like those incremental Gimkit score improvements—and using them as building blocks for the next day.
Here’s to figuring it all out, one lesson (and one adjustment) at a time.
We started the lesson with the “Brain” phase—classic retrieval practice. Students closed their Chromebooks and used their memories to answer a series of questions about the English Colonies. I set the timer for 10 minutes and challenged them to pull as much as they could from their own knowledge. The purpose was to emphasize thinking without relying on tech. As they worked, I could see some were really digging deep, and the effort was there. It was a great warm-up and laid the groundwork for the rest of the lesson.
Next, I had students highlight the questions they couldn’t fully answer, and that’s when we moved into the “Book” phase. Chromebooks came back out, but I was strict—no Googling! Instead, they had to rely on their notes and materials from previous lessons. I made sure to walk around, keeping everyone focused on using their resources the right way. This was all about reinforcing the importance of their own notes as tools and encouraging them to build solid study habits. The class was quiet but engaged, as students dove into their resources.
Once they had gathered their answers, it was time for “Buddy.” Students paired up and compared their responses, filling in any gaps or clarifying details they missed. This was the most interactive part of the lesson, and it was great to see them teach and learn from each other. I could tell that some students found confidence in what they knew, while others appreciated the chance to ask questions and catch up.
Finally, we wrapped up with “Boss” mode—that’s where I stepped in. Students brought their remaining questions or uncertainties to me. I loved this part because it gave me insight into areas where they needed more support and gave them the opportunity to check their understanding. I made it a point to answer their questions directly, clearing up any misconceptions they had about the material. It was a great way to wrap up the review while ensuring that everyone walked away with a clearer understanding.
The Results: A Big Improvement
I didn’t reveal the Brain-Book-Buddy-Boss framework upfront—I introduced each step as we went along, keeping the students curious and engaged. By the time we got through all four phases, they were fully on board and energized. We ended the lesson with another Gimkit assessment. This time, the class averages jumped significantly: 92%, 88%, 87%, and 86%. It was a major improvement from the 60%-70% range we had last week.
And the best part? I had them put away their notes and Chromebooks for the Gimkit—just their brains, again. The progress showed me that the strategy worked, reinforcing not only content knowledge but the value of retrieving information from memory.
Final Takeaway: Why I’ll Be Using This Again
The Brain-Book-Buddy-Boss approach hits all the right notes for an effective review session. It builds on retrieval practice, collaboration, and direct feedback—all while keeping students actively engaged. The step-by-step method allows them to build confidence, reflect on what they know, and fill in gaps—all in one lesson.
I’ll definitely be using this strategy again. It’s a win for the students and a win for the teacher, and it’s exactly the kind of structure we need to keep moving forward in our learning journey.
Thursday was a turning point in the classroom as we launched into a new unit: the Causes of the American Revolution. The focus was all about understanding the shifting relationship between the colonists and England, and how things went from cooperation under Salutary Neglect to conflict. I knew I needed a hook that would be engaging, relevant, and just disruptive enough to get their attention—so I turned to PBIS.
Hooking Them with the PBIS Bathroom Trick
Let’s be honest—classic hooks like pretending to tax pencils or papers just don’t cut it anymore. Kids see right through it. So, I pulled out a move that was a little more realistic. I went into our PBIS rewards system and created a store item—a bathroom pass—for a steep price: 150 PBIS points. When I announced this to the class, they were outraged, and that’s exactly what I was going for.
We launched into a discussion about why they were so mad. The students had a lot to say, calling out the fairness of it all and pointing out that I had never cared about bathroom usage before—so why was I making it a big deal now? That’s when I pulled out my “Aha!” moment. I explained that this frustration they felt was exactly what the colonists experienced. England had ignored them for years under Salutary Neglect, and then suddenly, it started enforcing policies and making them pay their “fair share.” The students connected instantly—it wasn’t just a random history lesson; it was a situation they could feel.
This hook worked because it was something they genuinely cared about, and it was believable. It’s way better than the cheesy, outdated “tax” tricks. When you tap into something realistic like PBIS rewards, they buy in because it’s their world.
Retrieval Practice and Review: WordWall and Gimkit
After we had our discussion, I wanted to keep the momentum going with some retrieval practice. I’ve been making a conscious effort to build retrieval practice into the routine so it becomes second nature. We started with a WordWall activity where I posted a 13 Colonies map and had students, from memory, drag and drop to match the colonies. They got one shot to do it. Most students nailed 13 to 14 colonies correctly, which was awesome to see—proof that the practice is starting to pay off.
Next, we switched gears to a Gimkit focused on the French and Indian War. I prompted them with the question: “Think about what changed the relationship between the colonists and England?” This helped frame the conversation about how England’s policies started shifting after the war, leading to the tensions we’d see later.
Thin Slides and Sourcing Parts: Making Connections
To dig a little deeper, we did a quick Thin Slide on Padlet. I asked the students to find the European country that controlled Clermont County, Ohio, in 1754. Their task was simple: one word (the country) and one picture (a map) to support their answer. It took about 5 minutes, which was longer than I usually like for Thin Slides, but they needed that time to explore and find the info. I’m okay with a little extra time if it means they’re engaging with the material.
We moved on to Sourcing Parts using the famous Join or Die cartoon. The goal was to pick apart the cartoon and write a summary of its message. This activity took about 10 minutes, but I was impressed. The students noticed details like the letters and abbreviations representing the colonies, which was exactly why I had started with the WordWall retrieval practice earlier. It set the foundation for them to make the connection to the colonies depicted in the cartoon.
Experiment Time: Guided Notes vs. Sketch and Tell-o
Here’s where the day got interesting. I tried an experiment with my classes: for the first three, I used guided notes while I talked about the French and Indian War. For the last class, I switched it up and used a Sketch and Tell-o, letting them read about the French and Indian War on their own and create their own notes. I wanted to see if one approach would yield better engagement or retention.
We ended with another round of Gimkit. The scores were all over the place:
First class: 45% to 69%
Second class: 39% to 76%
Third class: 31% to 66%
Fourth class: 43% to 74%
So, what did I learn? Well, honestly, it’s hard to draw any clear conclusions. There were so many variables at play—behaviors, levels of engagement, and just plain old classroom dynamics. In the last bell, where I tried the Sketch and Tell-o, I had a couple of my usual top scorers out of the room during the second Gimkit round. They usually rank in the top 5, so there’s no doubt their absence impacted the final percentage. That 74% could’ve easily pushed up closer to 80% if they’d been there.
Final Thoughts
Was it the guided notes or the Sketch and Tell-o that made the difference? I don’t have a definitive answer yet. What I do know is that mixing things up and testing out different methods helps me see where my students are at and what they respond to. Sometimes, it’s not about the perfect strategy; it’s about being willing to pivot and try new things, even if the results aren’t crystal clear. At the end of the day, any progress—whether it’s small jumps in Gimkit scores or students making connections to content—means we’re moving in the right direction.
The PBIS bathroom hook will definitely make a return in future lessons—it’s the kind of realistic hook that gets them thinking and feeling like they’re in the colonists’ shoes. And I’ll keep experimenting with different approaches to see what sticks and what doesn’t. It’s all part of the process, and every day, we’re building something better.
I kicked off the class with a quick overview of why we have taxes in the first place—what they pay for and why they’re necessary. This laid the groundwork for our discussion about taxation without representation, so the students could start seeing things from the colonists’ perspective. I used a map to show the distance between England and the colonies, highlighting how disconnected the colonists felt from the laws being imposed on them.
I didn’t want to overwhelm the kids with too much information at once, so I decided to focus on just three key acts: the Stamp Act, the Sugar Act, and the Quartering Act. Breaking it down into manageable chunks felt like the right move, especially for a Friday when everyone’s attention span is hanging by a thread!
Iron Chef on Padlet: Act by Act
Once I set the stage, I gave each student a half-page of reading about one of the acts. They had 10 minutes to read and then jump into an Iron Chef activity on Padlet. The goal was to share key facts from their reading and use Padlet’s “I Can’t Draw” feature to create an AI-generated image that visually represented the act they were assigned. It was fun watching them explore the AI tool, and it definitely kept the energy up in the room.
Sketch and Tell with Emoji Kitchen
After we built out the Padlet, students reviewed each other’s work. Their task was to choose an act they didn’t study initially and create a Sketch and Tell using the Emoji Kitchen. They had 10 minutes to pair an emoji with a visual representation of the act and explain its significance. This approach was all about helping them synthesize information from their peers and think critically about how to represent historical concepts visually. The Emoji Kitchen adds a playful twist that keeps them engaged—some of the creations were spot-on and hilarious!
Wrapping Up with a Thick Slide
To pull everything together, we moved into a Thick Slide activity. I asked the students to create a slide that included the following:
A title and subtitle for context
Four key facts about the acts they learned
A comparison between the Stamp Act and the Sugar Act
An image that tied their points together
The Thick Slide gave them a chance to consolidate their knowledge and show what they’d absorbed in a structured way. It also allowed me to assess their understanding at a glance. I love how Thick Slides force students to think critically about what they’ve learned and distill it into a concise, visual summary.
Ending Strong with Gimkit
We wrapped up class with a Gimkit session to reinforce what we covered. The students always get competitive with Gimkit, and it’s the perfect way to review and end the week on a high note. I could see that focusing on just three acts kept things clear and manageable for them, and the structured activities made it easier for them to retain and recall information.
Final Thoughts
Friday felt like a win. By focusing on a few key acts and using a variety of EduProtocols like Iron Chef, Sketch and Tell, and Thick Slides, the lesson flowed smoothly. The balance of reading, visual work, and interactive review hit all the right notes. It’s all about finding ways to keep the students engaged while ensuring they walk away with a solid grasp of the content.
I’m looking forward to building on this foundation next week as we dive into more of the acts and continue exploring the buildup to the Revolution. The goal is to keep it fresh and interactive so that the students stay invested in the story of how these events shaped America.
This week was all about leveraging EduProtocols to simplify learning, foster creativity, and reinforce key concepts. From using Thin Slides and Cybersandwich to explore complex topics like Bacon’s Rebellion and race-based slavery, to engaging students with retrieval-based activities like Graph and Tell and Thick Slides, the focus was on making learning more accessible and engaging. Whether students were interacting with AI chatbots or diving into historical data, these protocols helped break down challenging content into manageable, meaningful tasks. Here’s a breakdown of how we used EduProtocols to keep the momentum going this week:
On Monday, I decided to try out something new and set up a free trial with Magic School. In the past, it seemed like a promising one-stop shop for classroom tools, though my previous experiences were inconsistent. But with a new school email, I created a fresh account and set up a chatbot for the 13 colonies.
My vision was to have a chatbot that would take on the persona of one of the founders of the 13 colonies. All students had to do was type, “Who founded <enter colony name>?” A few people have already asked how I set up the chatbot, so here’s how I did it: Instead of app smashing, I was AI smashing. I went to Claude AI and asked for a set of instructions for a chatbot that would take on the persona of one of the founders of the 13 colonies—geared for 8th graders. It even provided a knowledge base for each founder!
For this lesson, I didn’t think it was important for students to memorize every detail about every colony. Instead, I wanted them to understand the colony’s region, its geography, and its economy.
Starting with Gimkit: Colonial Regions Review We kicked off with a quick Gimkit on colonial regions, a review of Friday’s lesson. The class averages ranged from 82% to 90%—pretty solid, especially for a Monday.
Frayer Model Activity Next, I handed out paper Frayer models where students wrote a colony name in the middle and added information about its government, geography, economy, and religion. Looking back, I should’ve just aligned it with the PEGS acronym we used on Friday, but live and learn.
Introducing Magic School I showed students how to use Magic School, where I had set up a classroom that allowed me to add AI tools. I added both the chatbot and an image generator, then shared the Magic School link with the students—super easy!
I loved this activity because it got kids asking good questions, which is such an important life skill. They could ask the chatbot about their colony and get personalized answers. For example, they could ask the founder to use simpler language or even to relate the colony’s geography to basketball! It was cool, and the students were hooked—many didn’t know AI could do this kind of stuff.
Students wrote down notes from the chatbot on their Frayer models.
Airbnb Advertisement Activity The next step was to use those notes to create an Airbnb advertisement for their colony. I got this idea from Ditch That Textbook, and it was super easy to adapt. However, the students struggled a bit with this task. Getting them to think creatively and step outside the box is still a work in progress, but I see improvement.
Takeaway The chatbot was a win—it allowed students to engage in inquiry-based learning and step away from the textbook. The creative thinking piece is still a challenge, but I’m confident that with practice, we’ll get there. The biggest takeaway? Learning how to ask good questions and use AI to personalize that learning was a game changer for my students.
Tuesday, I needed a bit of an easy day, but still wanted to create a meaningful learning experience. We started the lesson by emphasizing the importance of using person-first language when discussing slavery. Instead of using terms like “slave,” we replaced them with “enslaved person,” and “master” or “owner” with “enslaver.” It’s a small shift but a crucial one, and I’ve learned it requires explicit teaching for students to fully grasp its significance.
Station Rotation Activity: The Triangular Trade and Middle Passage The core of today’s lesson was a station rotation activity centered on the essential question: “How did Europeans exploring North America for trade, religious reasons, and competition with each other affect the history of the continent and the people who lived there?” This question has been guiding our exploration of European colonization’s impact on North America.
Students rotated through four stations, each engaging with a different aspect of the Triangular Trade and the Middle Passage:
Station 1: EdPuzzle Video We kicked off with a 5-minute EdPuzzle video—a Ted-Ed lesson on the Middle Passage. The video was followed by questions to ensure comprehension and introduce students to the topic. The video laid the foundation for the rest of the activity.
Station 2: SlaveVoyages.org Interactive Map At this station, students used the SlaveVoyages.org database, an incredible resource featuring a timelapse map of ships departing West Africa for the New World. The interactive map allowed students to explore individual ships, their cargo, and survival rates. It was a powerful, visual way to understand the horrific journeys endured by enslaved people. The database, built through collaborative efforts, was an invaluable resource for our class.
Station 3: Slavery Statistics In this station, we focused on statistics related to slavery. Tying back to our previous Number Mania lesson, students saw how statistics have real historical context. They used data from the Slave Voyages database and connected it to the numbers we’ve been exploring.
Station 4: Slavery in the Northern and Southern Colonies At the final station, students read about slavery’s presence in both the Northern and Southern colonies and how enslaved people managed to build their own culture despite their circumstances. A map illustrating the Triangular Trade routes accompanied the reading, helping students visualize the geographic connections.
Students worked in pairs at each station, discussing and answering questions. The stations ended up taking longer than expected, but seeing the students engaged and actively learning was more important than sticking to a rigid timeline.
Thick Slide Assessment To wrap up the lesson, I posted a Thick Slide task. Students condensed the information from their station rotations into essential facts, answering the question, “How did the triangular trade and the Middle Passage transform North America?” They also used the Slave Voyages database to find a ship that traveled to North America and gather relevant statistics. As a final touch, they included a quote from Olaudah Equiano and an image with a caption.
Takeaway This was a more laid-back day, but it was packed with meaningful content and reflection. The stations allowed for deep engagement, and the students rose to the challenge of condensing complex ideas into manageable pieces of information. Even though we didn’t stick to the exact schedule, the engagement and learning made it all worth it.
On Wednesday, I wanted to introduce how race-based slavery came to be in North America. I started with a picture of Anthony Johnson on the board. Johnson was a Black man and former indentured servant in Jamestown who earned his freedom, owned land, and even enslaved people to work on his tobacco farm. This example illustrated that slavery wasn’t originally race-based in the colonies. But then came Bacon’s Rebellion, and things began to shift.
Graph and Tell: Analyzing Slavery Census Data We began with a Graph and Tell activity where students analyzed census data about slavery. They made inferences based on the data, which served as a review of the colonial regions and their economies. This exercise helped students make connections between the regions and how slavery impacted their development.
Introducing Bacon’s Rebellion Next, I introduced Bacon’s Rebellion. The textbook mentioned that the rebellion showed how the Virginia government couldn’t ignore its citizens, but I thought, “Bacon’s Rebellion goes way beyond that!” To help students understand, I used a Somebody, Wanted, But, So, Then activity, giving them more practice with sequencing and comprehension. This scaffolded their understanding of the rebellion’s role in the shift toward race-based slavery.
Cybersandwich: The Start of Race-Based Slavery After introducing Bacon’s Rebellion, we read about how race-based slavery began in Virginia as a consequence of the rebellion. I had students work through a Cybersandwich activity for this reading. They wrote down five important facts, condensed their notes, and then compared and discussed with a partner. This paired learning helped students process the material more deeply.
Struggling with Summary Writing To wrap up, I wanted students to write a quick summary of what they had learned about the shift to race-based slavery. Oh boy—the summary writing was a struggle. I’m not sure if it was the content itself or just the act of writing, but many students found it challenging to condense their thoughts into a clear, concise summary.
Takeaway Wednesday’s lesson introduced some complex ideas, and while the Cybersandwich activity helped students grasp the content, the summary writing showed me that we still have some work to do. I’ll need to continue working on breaking down writing skills and building confidence in expressing complex ideas in shorter formats.
Thursday was a special reward day for the students since it was the end of the quarter. With limited time and a more relaxed atmosphere, I decided to do something simple but beneficial: a Retrieval Practice Grid activity that doubled as an opportunity for extra credit.
The Retrieval Practice Grid I created a grid of questions that covered topics from 7th grade, Unit 1, Unit 2, and our current unit. Each question on the grid was worth a different amount of points based on its difficulty. Students could work through the questions, and depending on how many points they earned, they could unlock different levels of extra credit.
To ensure this was true retrieval practice, I didn’t allow Chromebooks—it was all about what they could recall from memory. The goal was to reward students for what they’ve learned over time, and it was a great way to wrap up the quarter while still reinforcing key content.
Takeaway This activity worked perfectly for the day’s time constraints while still keeping students engaged and focused. It also showed me how much they’ve retained from not just this year, but even last year’s content. A win for both students and teacher!
As the week comes to a close, I’m impressed with how the EduProtocols have streamlined our lessons while keeping students engaged and thinking critically. The combination of Thin Slides, Cybersandwich, and Graph and Tell not only made complex topics like race-based slavery more approachable, but also fostered deeper understanding and retention. The students are gradually getting more comfortable with creative tasks, and I can see their confidence growing as they interact with both the content and each other. Moving forward, I’m excited to keep building on this momentum with even more dynamic and student-centered activities.
This week, my focus was all about scaling back and simplifying. I realized I’ve been expecting too much from my students in a short amount of time. Instead of overwhelming them, I shifted to teaching them how to work efficiently, meet deadlines, and build confidence with every task. EduProtocols like Thin Slides, Iron Chef, and Sketch and Tell-O became the foundation for helping students succeed. The goal wasn’t just to cover content, but to teach them how to learn and apply skills independently. Small wins are adding up, and I’m already seeing the results in their engagement and confidence.
I came into class on Monday knowing I needed to simplify and keep things engaging. I leaned into some tried-and-true strategies to break down the lesson, making it easier for students to digest.
Starting with Gimkit: Fast and Curious We began the day with a quick 4-minute Gimkit focusing on 8 questions about Jamestown. This activity—Fast and Curious—is all about rapid retrieval and feedback. The class averages ranged between 57% and 70%, but more importantly, it set the tone for the lesson. Fast and Curious is an excellent way to boost content retention while adding a layer of competition. It was a simple but effective way to kick things off.
Breaking It Down with Thin Slides Next, we used Justin Unruh’s Thin Slide template to chunk the reading. Jamestown can be dry, and our textbook doesn’t do it any favors. I used AI to extract the key parts of the reading and then chunked it into manageable sections. Each Thin Slide had one word and one picture, and I modeled how to provide an explanation using the keywords provided. Each slide took about 5 minutes, which kept the class moving while giving students time to process the content.
Somebody, Wanted, But, So, Then Sketch and Tell After completing the Thin Slides, I had the students combine their work into a Somebody, Wanted, But, So, Then Sketch and Tell comic. This is basic reading comprehension but framed in a way that’s simple enough for everyone to grasp. The students created a visual summary of Jamestown, which reinforced the lesson’s main points while keeping it creative and interactive.
Breaking the “Right Answer” Mindset A lot of students were still raising their hands, hoping for the “right” answer, but I’m working hard to break them out of the mindset that social studies is just about filling in blanks. I want them to engage with the content and think critically—there are no simple answers here!
Wrapping Up with Gimkit To close out the class, we ran the same Gimkit again, and the improvement was clear. Class averages shot up to 85%-94%. This repeated retrieval practice solidified their learning, and the jump in scores showed they were starting to internalize the material.
By keeping things simple and focusing on strategies that chunked the content, I was able to make this lesson engaging and accessible. The results? The students worked through the material effectively, and I didn’t feel like I was overwhelming them. It’s a win-win.
Tuesday’s lesson followed the same structure as Monday, and the results continued to impress. Keeping it simple, consistent, and achievable is key to building student confidence and engagement.
Starting with Gimkit: Fast and Curious on Plymouth We kicked off the day with a custom Wordle. I made the Wordle “Religion” and asked the kids to figure it out because the word related to Plym outh. Next we did a Fast and Curious Gimkit, this time focusing solely on Plymouth. The quiz was 9 questions, and the class averages ranged from 52% to 65%. It was a great way to gauge what the students already knew and give immediate feedback.
Thin Slide: Chunking the Reading Just like Monday, we used the Thin Slide template. The readings were chunked into smaller sections, with each slide featuring a keyword and a picture. The students had 5 minutes per slide to process the information and build their slides, using the provided keywords as a guide. The familiarity of the Thin Slide made it an achievable task for the students. There was no need to introduce new techniques or overwhelm them with too much at once.
Somebody, Wanted, But, So, Then Sketch and Tell Once the Thin Slides were complete, we wrapped up the reading with another Somebody, Wanted, But, So, Then Sketch and Tell comic. This is such a simple yet effective way to summarize content. It allows the students to visually capture the key points of the lesson in a creative format, reinforcing comprehension in a way that feels both achievable and rewarding.
Ending with Gimkit: Building Confidence We ended the class with the same Gimkit as the beginning. This time, the class averages soared to 86%-94%. The consistency in approach, combined with the immediate feedback and the opportunity to retry, boosted the students’ confidence. And despite the repetition of Monday’s format, there were no complaints. In fact, 90% of the students finished the task, which is a win in itself.
Why I’m Sticking with Thin Slides The Thin Slide strategy is becoming a staple in my classroom for a reason: it’s simple, familiar, and helps students feel like they can finish something. Pairing that with Gimkit, which builds their confidence through repeated practice, is setting the foundation for a stronger work ethic. These small wins will add up over time, and I’m seeing the early signs of engagement taking root.
On Wednesday, we switched gears and used paper for an inquiry-based lesson straight from the textbook. The lesson focused on the hardships and survival stories of colonists in Jamestown and Plymouth, but let’s be real—the textbook readings were way too much. The language was jargon-filled, dry, and not exactly something an 8th grader doesn’t give a damn about.
Simplifying Primary Sources with AI My goal was to simplify the lesson while still helping students build confidence and learn. To do that, I took the primary sources straight out of the textbook and ran them through Claude AI with a simple prompt: “Keep the primary sourceness of these documents but make them so 8th graders can understand them.” I also had Claude add author names and context since the textbook didn’t bother to provide that crucial information.
The revised documents were a mix of Jamestown and Plymouth hardships and survival stories. With the language made accessible, the students were much more engaged. They worked in pairs, reading the sources and answering questions. This took about 35 minutes and gave them a deeper understanding without the confusion of outdated jargon.
Funko Pop Character Creation For the final part of the lesson, I wanted to tap into their creativity, so I had them create a Funko Pop character who had journeyed to either Jamestown or Plymouth. The biography for the Funko Pop had to include why their character went to the colony (reviewing the content from Monday and Tuesday), the hardships they faced, and whether they survived—or not. This activity took 25 minutes, and it allowed the students to synthesize what they had learned in a fun, engaging way.
Combining Jamestown and Plymouth in Gimkit We ended the day with a combined Jamestown and Plymouth Gimkit. This was a great way to reinforce everything from the week so far. The class averages ranged from 86% to 92%, showing solid retention of the material.
Takeaway The key here was breaking down the overwhelming textbook content, making it relatable, and allowing students to demonstrate their understanding through a creative, personalized project. By the end of the day, they had a solid grasp on both the hardships of colonial life and the survival strategies of early settlers.
Thursday
Thursday was all about pivoting and simplifying—sometimes less is more. I had originally planned to pack the lesson with multiple activities, but it quickly became clear that was overambitious.
Finishing the Funko Pop Characters We kicked off class by wrapping up the Funko Pop characters from Wednesday. The students had 15 minutes to finalize their creations, adding in the last details about their colonial hardships and survival stories. Once that was done, we shifted focus to something new.
Colonial Regions Mapping The natural next step was to move into the colonial regions. This is where I initially tried to cram in too much. My original plan was an Iron Chef, followed by a Sketch and Tell, followed by a mapping activity—but it became obvious after the first bell that this was a disaster in the making. I scrapped the Iron Chef and Sketch and Tell, deciding to focus solely on the map and some Wordwall practice.
Using a Mnemonic Device The map we used came from Howson History, and it featured a helpful mnemonic device for remembering the colonial regions. I explained what a mnemonic device was using examples like ROY G. BIV and DeSSert means strawberry shortcake (never miss that double ‘S’ in dessert!). After that, the students created their own mnemonic device for the colonial regions.
Mapping the Colonies Once the mnemonic was sorted, we got down to the mapping activity. The students looked up the colonies and labeled them on the map. It was simple but effective, reinforcing both geography and historical knowledge.
Wordwall Practice and Rolling Recap To reinforce the mapping, I had the students practice using a drag-and-drop map on Wordwall. It gave them some hands-on repetition, which helps with retention. After finishing the Wordwall, we still had some time left, so I pulled out a Rolling Recap. This is a fun retrieval practice where I roll a 20-sided dice and give the kids a prompt. They have to respond to the prompt in exactly the number of words rolled. The questions focused on Jamestown and Plymouth, and it was a creative way to review key content while keeping things engaging.
Takeaway Thursday reminded me that sometimes, simplicity wins. The mapping activity and mnemonic device were more than enough to carry the lesson. And, as always, building in some creative retrieval like Rolling Recap kept the students engaged while reinforcing their learning.
On Friday, we continued working on our colonial regions, focusing on reinforcing knowledge and boosting confidence. Here’s how the day went.
Starting with Gimkit: Colonial Regions We began with a quick 4-minute Gimkit on the colonial regions, which featured 12 questions. The class averages were 68% to 73%. After running the game, I gave feedback, and we quickly moved on to the next activity.
Colonial Regions Iron Chef on Padlet For the main part of the lesson, we did an Iron Chef on Padlet. Each student received a half-page of reading about a different colonial region. They logged onto Padlet and shared four facts related to their region using the PEGS format—political, economic, geography, and social. Once their notes were posted, they used the “I can’t draw” feature on Padlet to create a picture representing their region. This visual aspect gave them a creative outlet to express their understanding.
Experimenting with Thick Slide vs. Sketch and Tell-O After the Iron Chef, I decided to try an experiment. In two classes, I had students create a Thick Slide using the shared information from Padlet. In the other two classes, I used a Sketch and Tell-O activity instead. The results were interesting—classes that made Thick Slides had second Gimkit scores of 85% and 87%, while the Sketch and Tell-O classes scored slightly higher at 88% and 89%. While the difference wasn’t huge, it was enough to show me that both methods can be effective, depending on the class dynamic.
Finishing with Wordwall We wrapped up with the same Wordwall practice from Thursday, this time with a twist. I challenged the students to complete the activity without any map help. Many of them surprised themselves by getting 100% on their own! It was great to see that kind of confidence and self-assurance building as we closed out the week.
Takeaway Friday showed me that the methods we’ve been using—whether it’s Padlet, Gimkit, Thick Slides, or Sketch and Tell-O—are all helping to build both knowledge and confidence. The slight variation in results also confirmed that students respond differently to various activities, but the key is keeping things engaging and accessible.
Experimental Idea
I created a Colony Founder GPT. This GPT is designed to let students immerse themselves in history by interviewing the founders of the original 13 American colonies. Instead of reading static facts, students can interact with historical figures like William Penn, John Winthrop, or Roger Williams and ask them questions directly. It’s an engaging way to explore the personal motivations behind each colony’s founding, the challenges they faced, and their unique perspectives. Whether you’re learning about religious freedom in Rhode Island or the tobacco economy in Virginia, this tool offers a conversational approach to make research more dynamic and memorable.